 Wartime GPW Head exchange!
Finally, after so many delays it just got to be silly, the Jeep is back up and driving again! In this extra-long update, I go through the entire process of changing out my CJ2 engine head to a wartime GPW head! That includes adding the correct studs, bolts, a GPW thermostat, and a copper gasket. It’s been a multi-week project! I also continue replacing bolts with correct recessed head bolts and replace one of the top bow brackets with a GPW one. Plus several other things!

For the last two and a half weeks, the Jeep has pretty much looked like this in the garage. Tools all over, a big bulk of the engine missing, and bags covering the exposed engine from dust and debris. If you’ve been following along the last two weeks, it’s been mostly a waiting game for parts. The new few photos are a full recap.

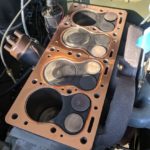
In my ever going quest to get my GPW more and more a true GPW, I procured an original GPW wartime head from Roger Smith a few weeks ago and drove quite the distance to pick it up. When I got the Jeep, it had a really tip top shape CJ2 post-war engine. The compression tests came back at ‘like new engine’ readings, so I have no real desire to spend thousands for a GPW engine. That being said, it’s simple enough to replace the head of the engine, so I decided to get this as a ‘birthday present’ for the Jeep celebrating her 76th DOD birthday. Here’s a look at the F stamp on the wartime engine head.
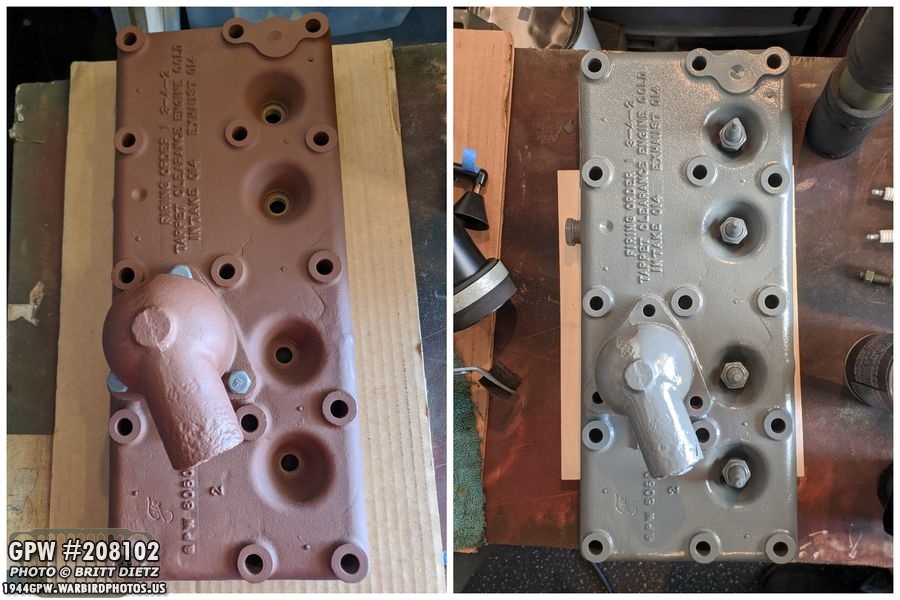
The head was hot tanked, resurfaced to a straight edge, and primed when I got it. After some light sanding of the primer, I hit it with VHT Ford Engine Gray (using my ‘paint spark plugs’).
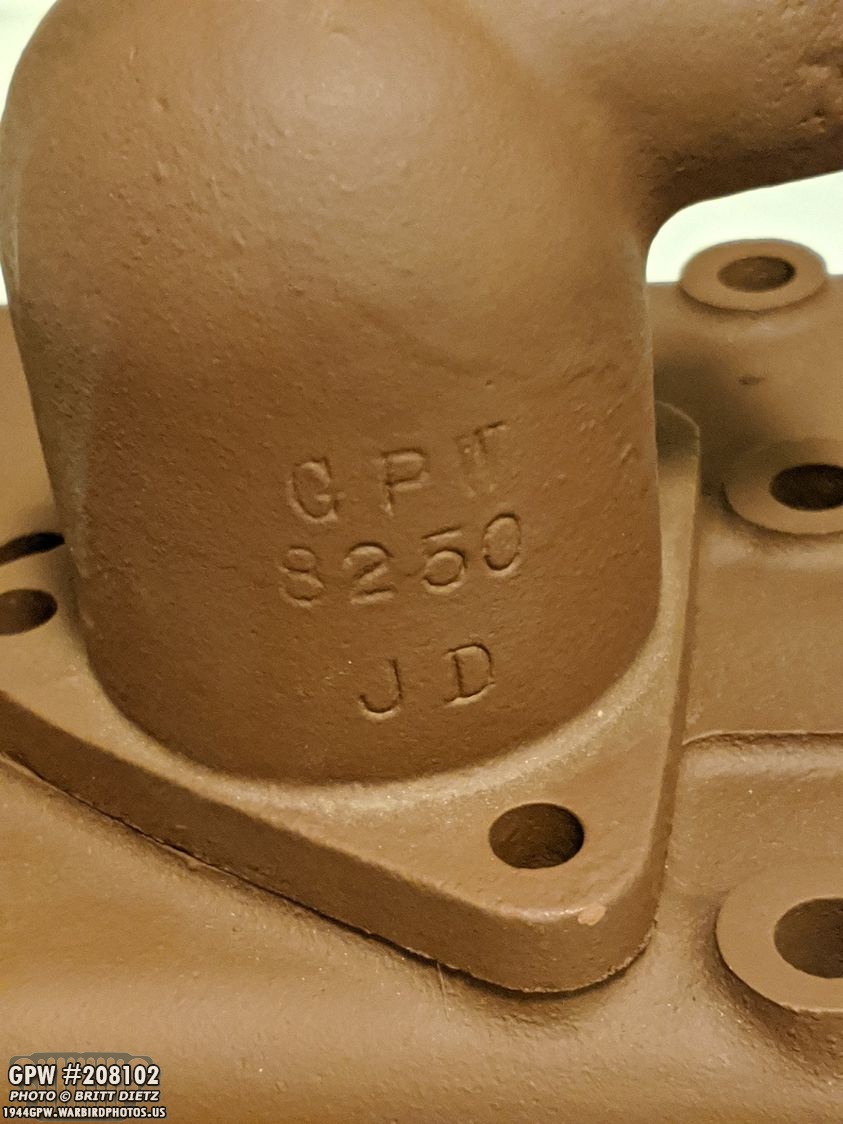
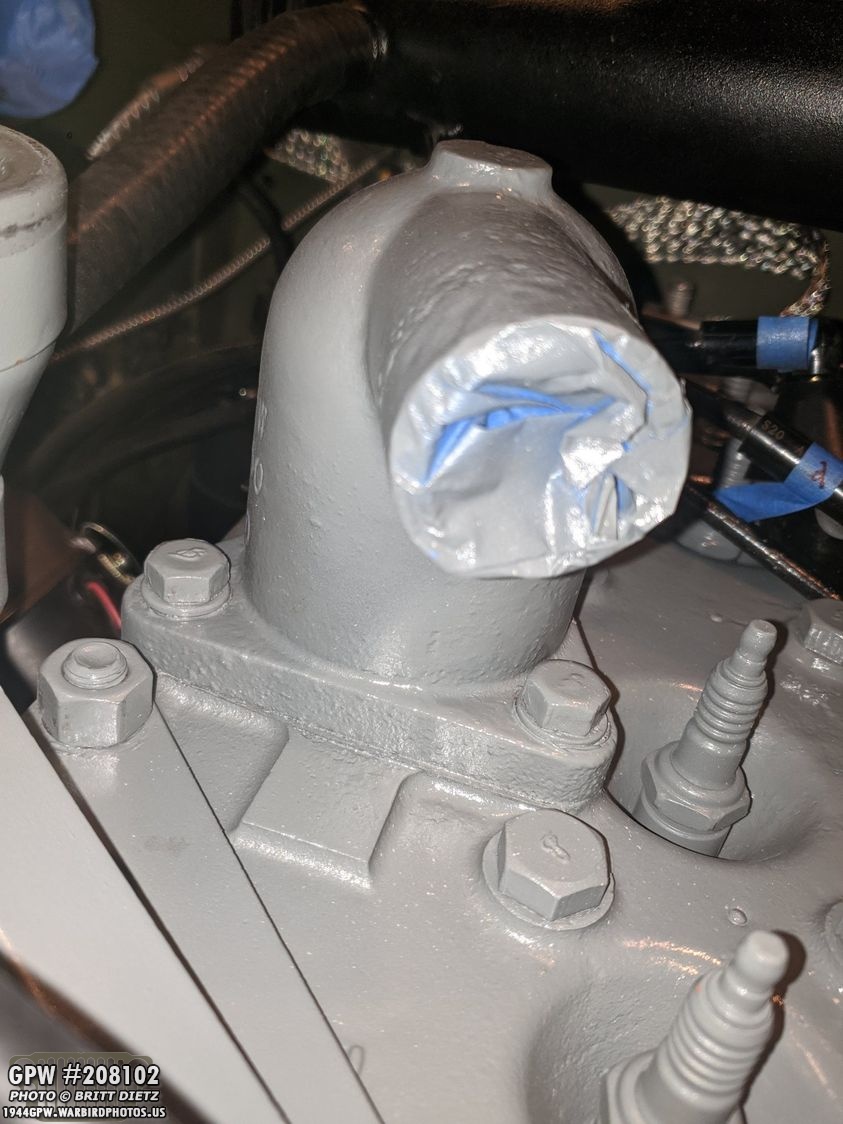
As a wonderful bonus, I also got a GPW thermostat elbow with the head. It’s a John Deere contracted GPW elbow. They don’t have an F stamp and instead have JD on them.

Once I procured the head, I removed the CJ head (comparison in the next photo), and I super cleaned the top surface of the block as best as I could.

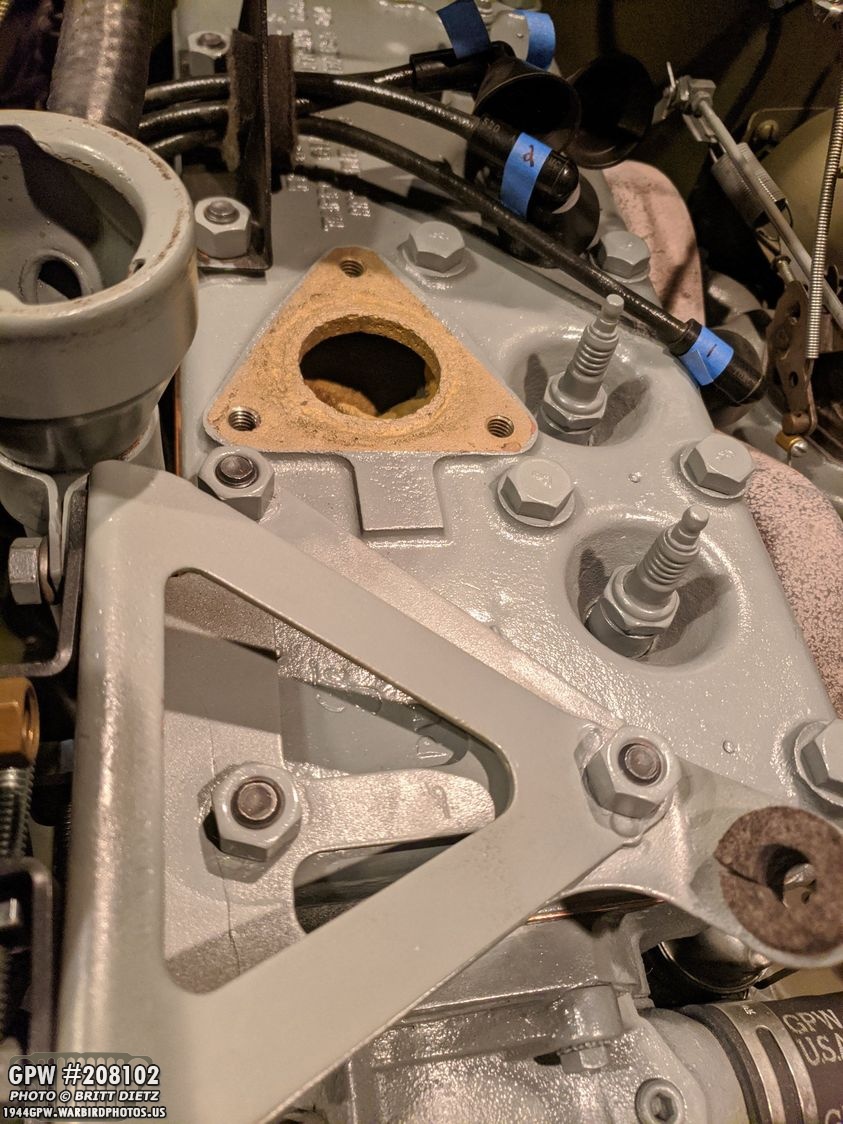
Here’s a look at the post-war CJ2 head (which had an MB thermostat elbow!) on top, and the wartime GPW with GPW thermostat elbow below. The main difference, that I’ve been able to see, is the addition of ribs on the post-war head that allowed for extra strength and prevent cracking between holes.

Here’s the thermostat elbow all painted up with Ford Engine Gray and the thermostat itself with the retainer that I took out of my MB thermostat elbow. (and yes, it does have a hole drilled on the flange to help trapped air)
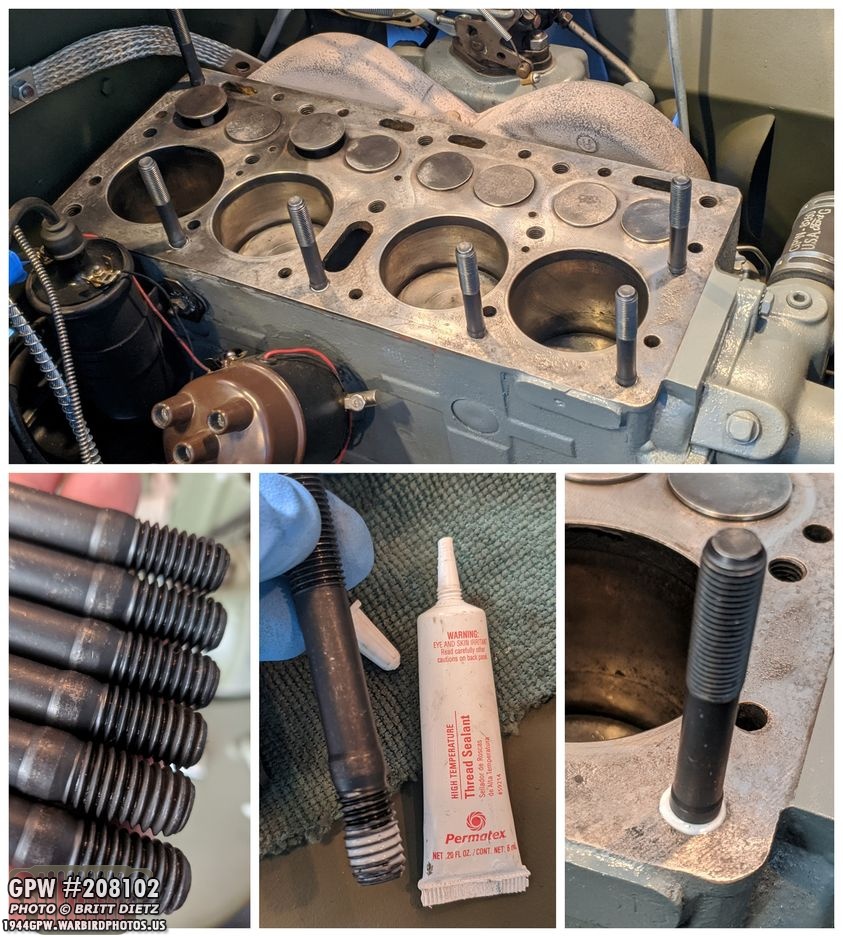
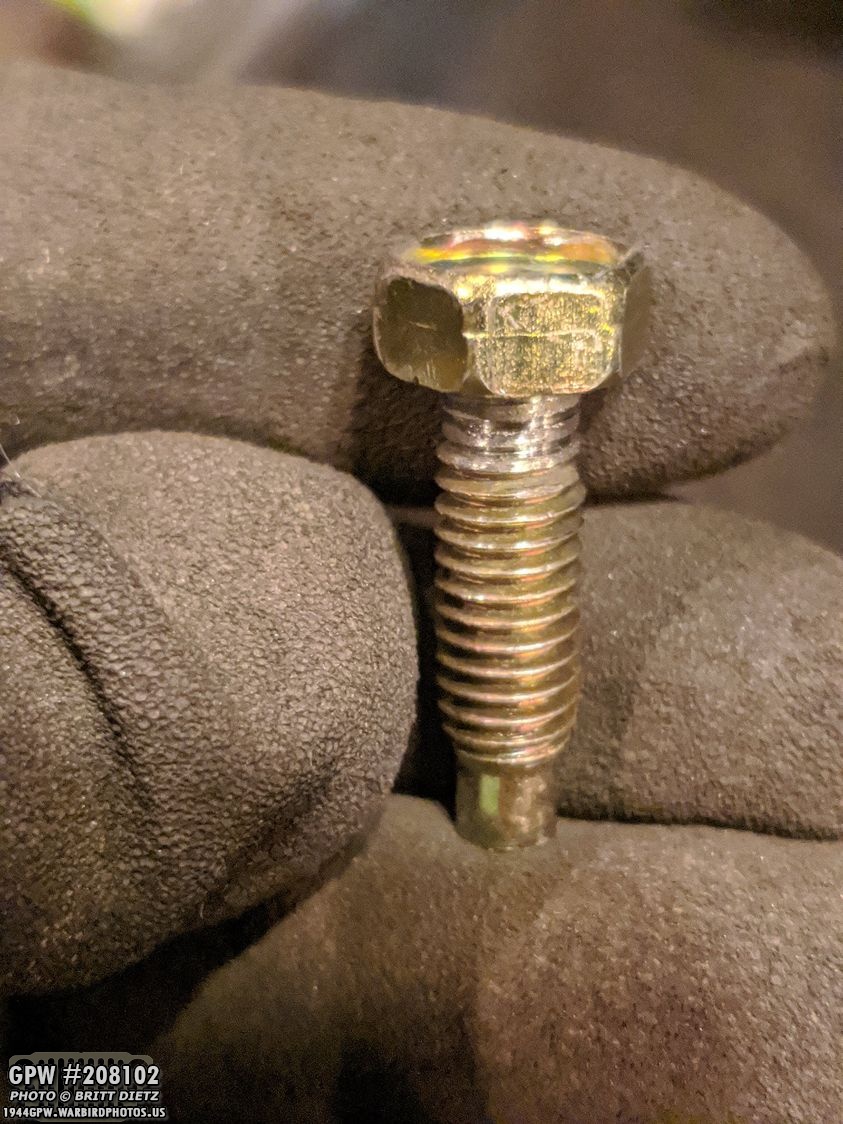
In last week’s update, I was hoping I’d have this entire process finished, but that did not end up happening. Last week I chronicled installing the 6 studs into the engine. The wartime GPW engine around my Jeep’s June 1944 had a mix of 6 short studs, 1 long stud, and 8 F marked bolts. The studs I got have small shoulders (bulges by the bottom threads) to help prevent cracking and leaking since the studs go into the coolant system. I used Permatex thread sealant on each stud then wipe away the excess that oozed out.
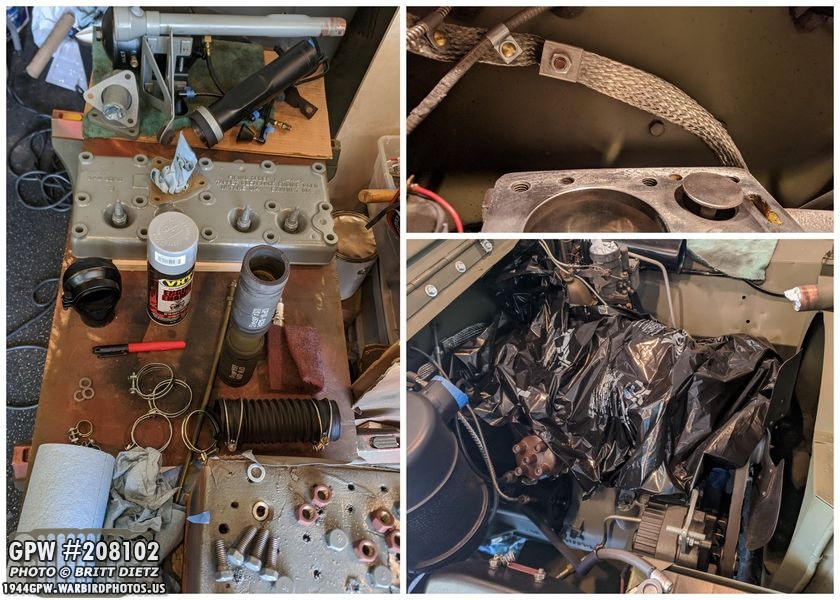
And there is where I had to stop a week and a half ago. Parts all over the workbench, engine covered with a trash bag to keep out debris. Why? Well… all because of that top right image (which was shot before I installed the studs). See that silver strap? That’s supposed to go on the center single long stud. Everyone, and I mean just about everyone, was out of that stud. I finally found somewhere the had it in stock, but they took a while to ship it and ended up shipping it slower than I paid for. Not happy with that vendor. So it didn’t arrive in time for the last update.

Finally, the long stud arrived a few days later. And now we start where I left off! Here’s a look at the longer stud, with the same shoulder (bulge) at the bottom threads.

Like the other studs, I applied the thread sealant to the very end of the threads.

Here it is installed, you can see how much taller it is than the regular studs. As with the other studs, you only want to do slightly tighter than hand tight on the studs or you have have issues. You do NOT torque the studs. I also have the bond strap on there as a test to make sure the hole is to size. Now it’s time for the gasket, we’re making progress! Or so I thought…
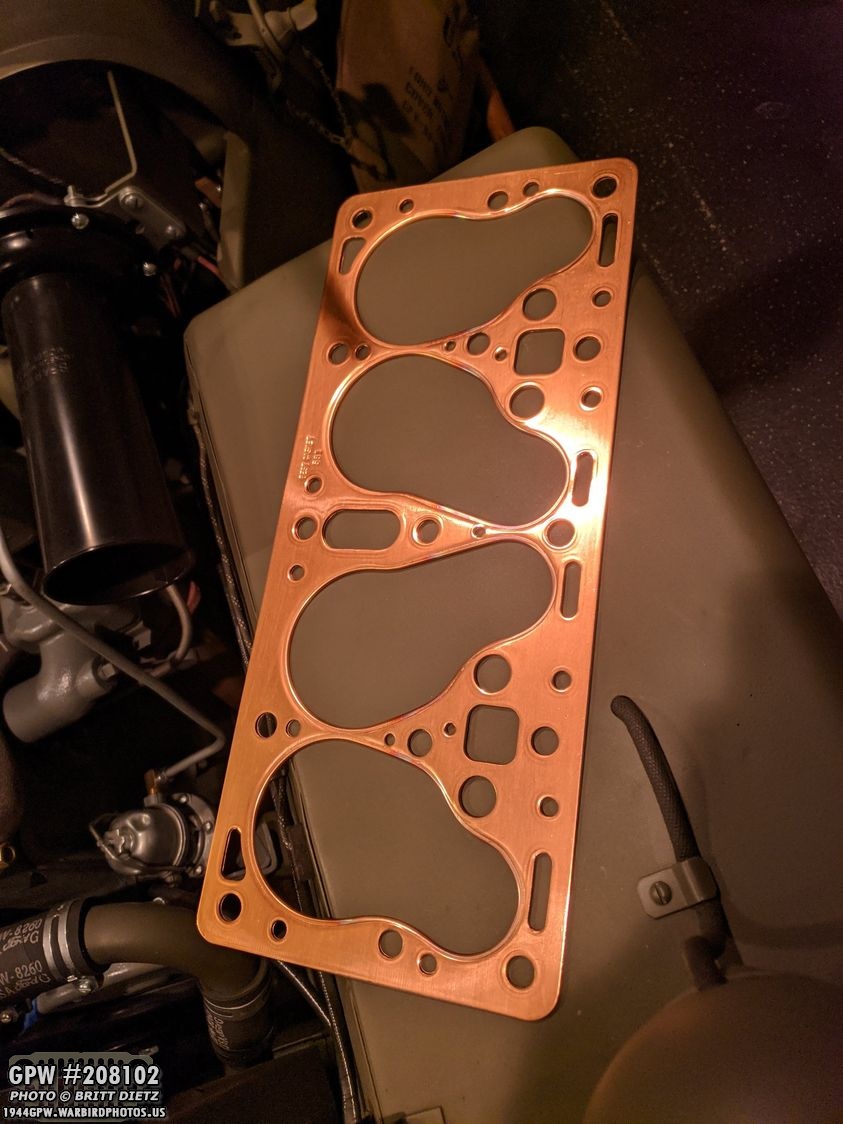
If you know your Jeep engines, you’ll immediately look at this and say, that’s the wrong gasket! And yup, you’d be right. This was the second delay in things, I ordered the wrong copper gasket from &Ron Fitzpatrick Jeep Parts. Totally my fault, I searched for ‘copper gasket,’ it was the first one to come up, and I just ordered it without thinking. Didn’t even realize till I started to put it on the engine and saw that some of the valves would be covered. Didn’t cross my mind that I could have ordered the wrong one. It’s an F134 engine gasket, not L134. Sigh… so I would then have to wait a few days for the correct Gasket to get here from Ron.

As I waited for the correct gasket to arrive, Roger Smith told me about a little trick he does to the engine head just to help prevent any seepage from the coolant system. He takes some of the Permatex Copper and lightly (meaning the thinnest possible smear) puts it around each of the coolant holes. He says that he’s not had a leaky head gasket since. I figured, works for him, It’ll work for me. So I went out and got this.
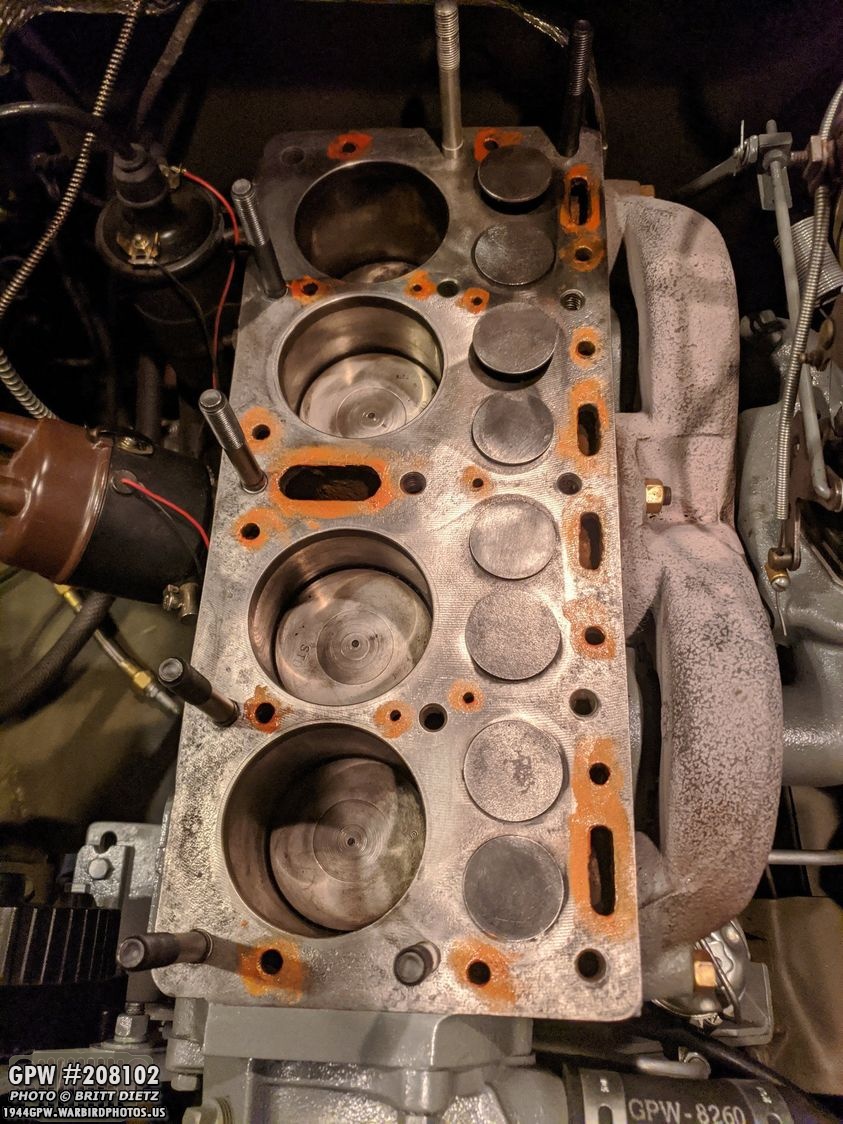
With the correct gasket in hand finally, I went to work prepping the block with the Permatex Copper. It dries rather fast, so I enlisted my girlfriend’s help dividing the holes in half with us each smearing it on. It worked well.
In my anxiousness to get the gasket on then get the head so the weight helps to adhere the gasket to the Permatex Copper smears, I forgot to take a photo. But here’s a photo from earlier this year when I had to replace the head gasket when I went to stop some leaks that had been happening with the gasket that was on the Jeep when I got it (a FelPro gasket). The I got also gasket looks just like this. I opted both times for the more expensive copper gasket as I feel it’s worth the money for the adhesion it has. Sadly, anytime you remove the engine head, you should replace the gasket, so it can be expensive if you need to it more than once.

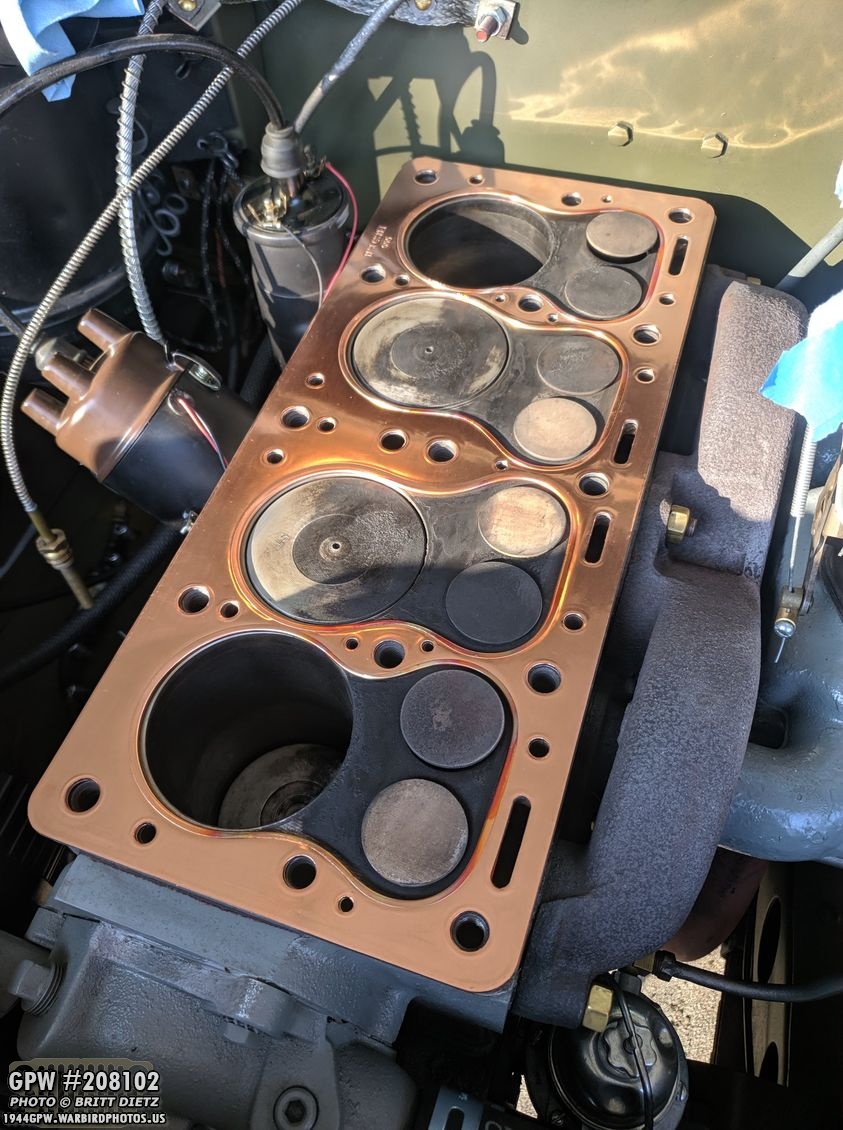
With the gasket and the head on the block (and the head slipped on the studs without any issues! Success!) it was time to install the bolts. I did the same as the studs and put some Permatex thread sealer on the ends.

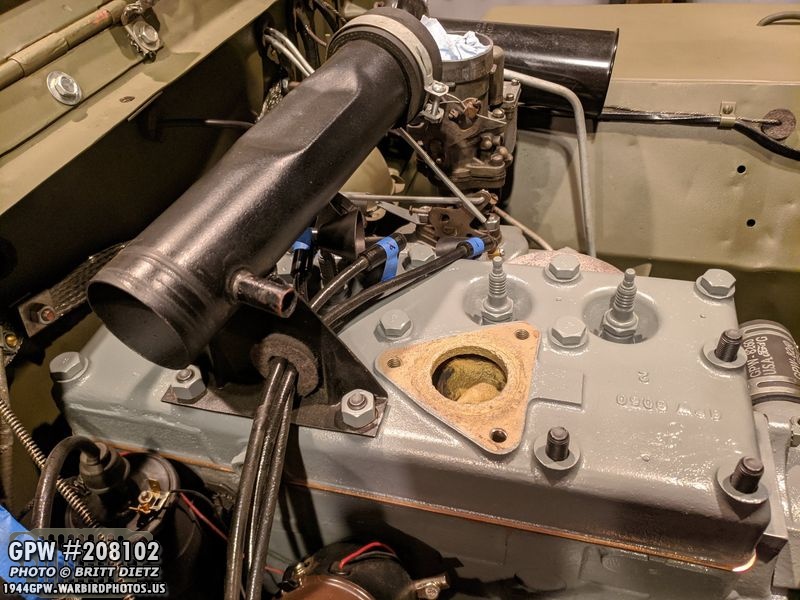
I only lightly tightened them by hand, as I still needed to put the nuts on the studs. Here’s a look at the layout of studs vs F stamped bolts for the 1944 GPW. You can see the copper gasket sticking out a little. I’ll hand paint that with the VHT Ford Engine Gray to match (and help seal any possible extra seepage that could happen, though unlikely).
When putting the nuts on the studs, I also just hand tightened them for the time being. Two of the studs hold down the air cleaner cross over tube, so you have to install that. It’s too bad, as it would be so much easier to clean up the bolt/nut paint jobs that are messed up from the torquing if it wasn’t on there.

All the nuts have been added! Starting to look like a Jeep engine again. Time to start torquing! Note the blue painters tape, I marked where the spark plug wires go on both sides.
A close up of all the bolts (with F stamps) and nuts. There’s a small crack on the oil filter bracket which will need to be fixed (it’s an original F stamped oil filter bracket), but that’s a job for another day. The crack hasn’t moved in almost 150 miles of driving the Jeep nor has it broken through to the other side. It’s on my list of things to repair.

Time to torque… my least favorite part of this process. But, I got a little something to help me out that I discovered at the hardware store… this Quinn torque device. It connects to your standard 1/2 rachet and any 1/2 sockets. It’s digital, so you plug in the torque you want, and start turning. It beeps slowly, then faster as you get closer to that value. When you hit it, it has a solid beep and tells you the exact torque you did. Saves me a ton of time vs having to reset a standard torque rachet, and I can use smaller rachets! Well worth the purchase! There’s a specific way to Torque a Jeep engine…

Using the instructions from a WW2 Jeep TM manual, this is the sequence you need to torque the engine. It’s a bit all over the place, but it’s that way for a reason to apply even torque throughout the engine head. You also need to do the torquing in increments. You want them to about 65 foot pounds, but you don’t do that right away. I started with 30 (remember they were only hand tight) using the pictured order. Then 40, then 50, 60, and finally 65.

Here’s the Quinn torque device as I was on the last torquing sequence (this is spot #1). The socket is a 11/16 socket, and I used a mix a deep socket, just the normal socket, and the normal socket with a long extender to get it well above the cross over tube.

After a lot of sweating in the hot garage (Southern California was about 98 degrees that day), all the bolts and nuts were torqued!

Next up, the thermostat! First thing, I wanted to make sure I get the orientation of the gasket correct. There is a right and wrong way for that gasket, and it can be a bit tough to figure out, so putting it on as a test fit first helps. I ended up putting a dot with a black sharpie so I knew what way was top and forward.

To put the thermostat on, you need the Permatex thread sealant and Permatex water pump/thermostat gasket maker.

You can’t see it here (again, me being anxious and forgetting to take a shot), but you take that Permatex Water Pump/Thermostat gasket maker and cover BOTH SIDES with it. I opted to do one side at a time. Make sure the entire gasket is covered (not super thick, but a good coat) and stick it on. That helps keep it in place.

I then put another layer on the top side of the gasket and once I finished, I put the thermostat elbow (which has the thermostat and retainer shown earlier inside) down. The will stick the elbow on there. Since I have a few seconds before the Permatex starts to harden, I put the three bolts in screwing them only enough to grab a few threads (not pictured). This helps line up the thermostat with the threaded holes on the head in case I slightly messed up.

I then take each bolt out one at a time, coat it with the Permatex thread sealer, make sure it has a lock washer, then screw it in all the way till it’s almost but not quite hand tight.
Once all three bolts are in (all 3 have F stamps! They are original bolts), it’s time to Torque. They should be torqued to 20-25 foot-pounds. I did them in two increments, 10 foot-pounds first, then 22 foot-pounds each.

With that finished, it’s time to start putting the engine back together! As you can see, I had some of the items closed with painters tape to keep clean during the whole downtime. Here I’ve put the spark plug wires back on the distributor. Those were labeled where each wire went, so made for easy reinstall. I’ve put the dipstick back in the tube as well.

I added the air cleaner flexible accordion tube and clips along with the air cleaner cross over tube to dipstick tube clips on. You can really see the copper gasket between the head and the block here.

I had forgotten to purchase another 7/16-20 (fine thread) nut for the long stud to hold on the bond strap, so I found one at Home Depot. It’s a smaller height than the other nuts, which is perfect. I used a star washer on both sides of the bond strap as well.
Before I could finish the project, I wanted to do a final flush of the radiator to get any particles or leftover cleaner out. In my previous updates from multiple weeks recently, I’ve been doing an ongoing flush of the coolant system using various methods. At this point the block and radiator are as clean as I could get them, but I had been meaning to do that final flush, so I took out the radiator.

I also took the time to clean both the radiator to water pump and radiator to thermostat elbow tubes since they had some residual items trapped in them from the cleanings. When cleaning out the radiator, I flushed it from every which angle… upright, upside-down, sideways, etc. I shook it gently to loosen up any crud (which did some out). After about a half hour of this, the radiator is as clean as it’s probably been in some time. I also took the time (after this photo) to touch up the OD Green on some areas.
After the paint was dry, I reinstalled the radiator. I’ve been asked before to take some photos of how the radiator is attached. It goes large star washer, plain washer, nut, bond strap, plain washer, then the final nut. The bond straps are connected on the other side to the cross-member on the frame with welded in studs. For you Jeep purists, this is one of the few areas of the Jeep I didn’t mind some over-spray.

Now that the crossover tubes were all cleaned, it was time for reinstall. One thing I wanted to do, since they were off, is replace the screws on the clamp straps. They had come with terrible cheap screws that were stripping when I’d tighten the straps (which you really need to do tight in order to make sure there’s no leaks). So I ordered several of the same size slotted head screws from boltdepot.com of a higher grade. While not exactly the same head design-wise, they are MUCH stronger and withstand the tightening without a hitch.
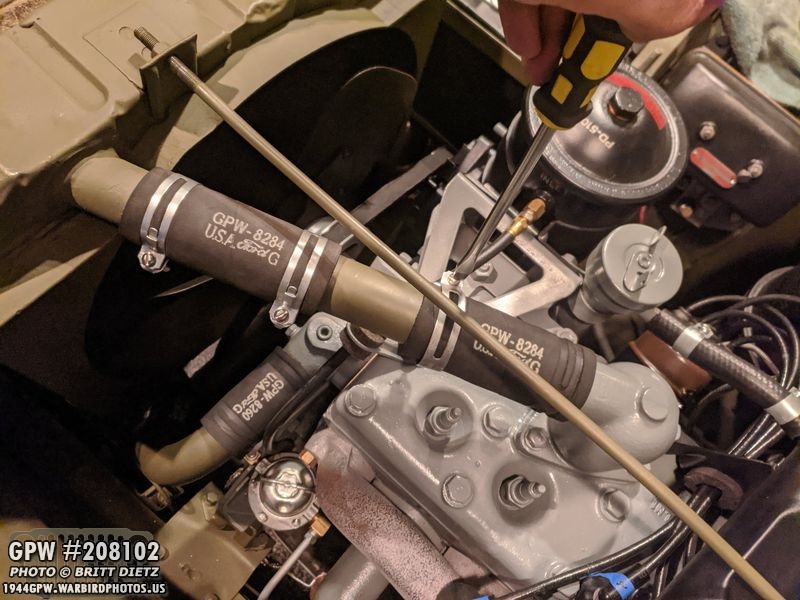
Working on the upper cross over tube adding the straps. Love the GPW Ford stamping. One of those extra details I love having on the Jeep.

And here’s all 8 straps on the two cross over tubes. That lower tube that goes from the radiator to the water pump is a pain-in-the-you-know-what to install. Took me several attempts and contorting to get it to slip on the water pump. But, as most things on the Jeep I’ve struggled with, I eventually got it.

Next up, the spark plugs and their wires! Super easy.

Everything is installed and the radiator guard rod installed! The Jeep is almost ready to go!

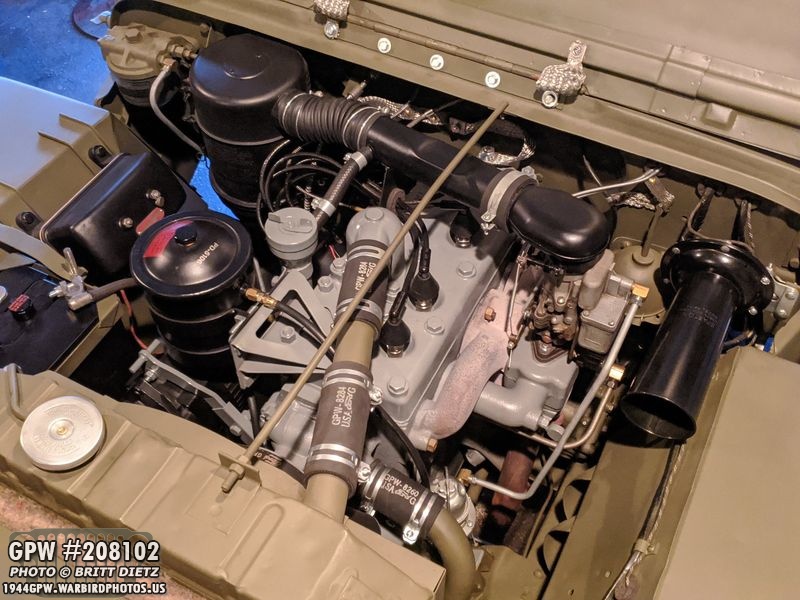
I had to stop and take a look. After being down for two and a half weeks, it was so nice to have a complete engine again. And the GPW head looks so nice.

Sadly, the only way you can really see the F stamp and GPW markings are between the gaps of the oil filter bracket. But, if someone does look through there, they’ll see it! And without the extra ribs and ‘WILLYS JEEP’ markings, my engine will appear original. You will need to look hard at the bottom of the engine to see the block is still a CJ2.
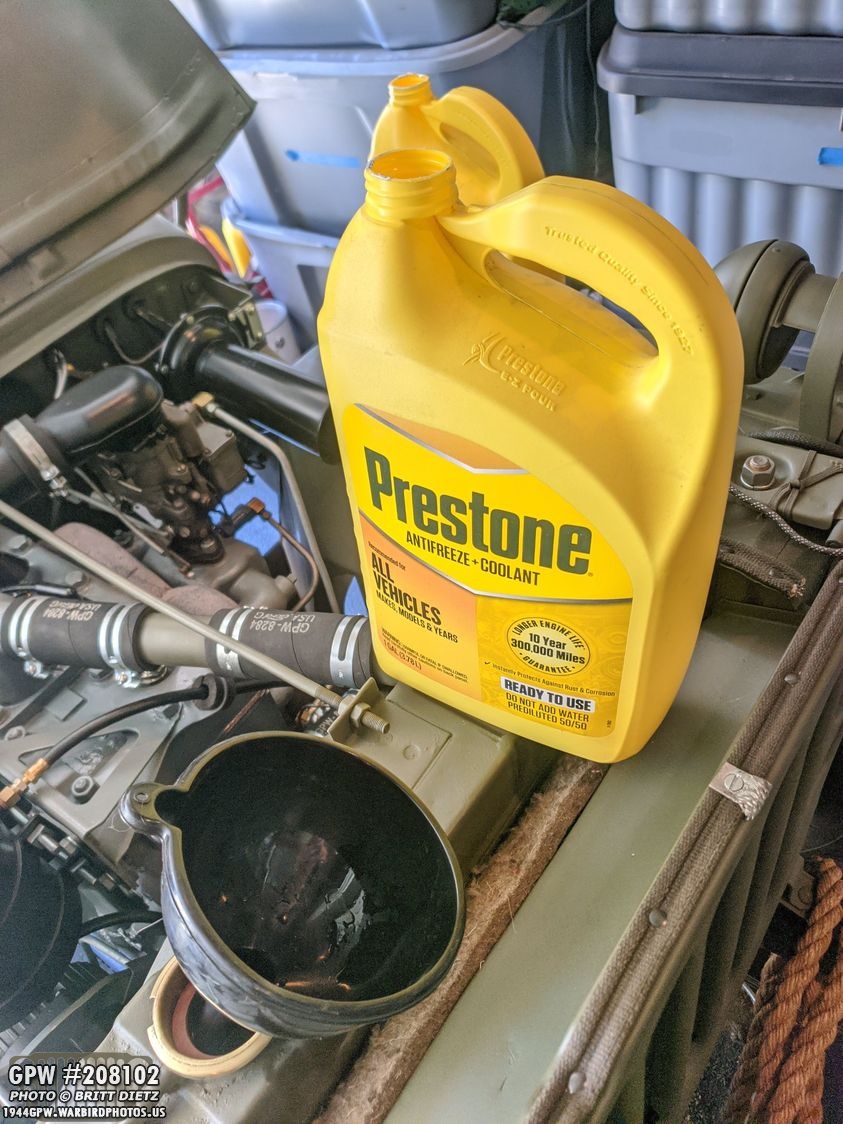
Before I can drive it, I need to fill the coolant system which has had everything BUT antifreeze coolant in it the last few weeks. It takes about 11 quarts to fill the Jeep, but for me it took about 2.2ish gallons.

What you want to do is fill it to where you can just see the greenish coolant on the left side (if you’re standing in front of the bumper looking down at the radiator) where the drop of the ledge is. I can just see it and it hasn’t reached the top of the ledge, so that’s where you stop.

With coolant in the system and a final check of the entire engine for anything I missed, it was time to fire her up for the first time in 2.5 weeks! I ran the engine for a little bit before pulling her out of the driveway. I then took her around the neighborhoods in the area for about 3 miles worth of driving. I figured that would show me any leaks. The engine diff get pretty hot at times, but it was also almost 100 degrees out and the area around me has a lot of hills.
Once back into the garage to cool off, I did an inspection.- No leaks from the radiator cap: CHECK!- No leaks from the thermostat elbow: CHECK!- No leaks from the freeze plugs on the block: CHECK! – No leaks from the cross over tubes: CHECK! – No drips from the radiator overflow tube: CHECK! And most important:- No leaks from the head gasket: CHECK!
So the engine is tip top! I’ll continue to closely monitor everything over the next week as I drive it a bit as many days as I can for any leaks, but so far, so good! Great to have the Jeep driving again and looking great with the GPW head and Thermostat elbow! I did check the radiator cap once things cooled down to see how my coolant flushes did, and I was happy to see it was pure coolant! No discoloration nor crud! I think my multiple weeks of hard work paid off. WHEW! Now, let’s move on to other things.
Last two weeks, I’ve been replacing flat head hex bolts inside the Jeep with correct recessed head bolts. I’ve chronicled those replacements in the last updates, so look at them for more on that. I did the transmission cover (recessed head with flange), the master cylinder inspection cover (recessed head with flange), and the gas tank shield (recessed head with flange) which were all 1/4-20 size. The driver and passenger seats have recessed head bolts as well, but without the flange and 5/16-18 in size. I’ve been experimenting with different recessed head bolts trying to find the best ones for everything. Boltdepot.com had the best recessed head with flange for the 1/4 sizes, but I the 5/16 ones just didn’t seem right. I even thought about getting 5/16 recessed head with flange bolts and removing the flange, but the head turned out to be way too tall.

What I ended up finding was Ford (ironic) 5/16-20 bolt bolts with attached washer from Ace Hardware. They even have the tapered end. I would have to remove the washer, however, and tap the threads all the way to the head.
That took a bit of time to remove the washer with a dremel and re-tap the threads (which made them a little less deep).

I then hit them with primer.

Here’s the driver’s seat right side attached! Looks really nice with the star washer underneath. Fits perfectly in the capture nuts.
Here’s a comparison with the 1/4-20 recessed head bolts with the flange on the transmission cover.

And here’s the driver’s seat left side. I had to sand the foot a bit, so I re-primed it before giving it a 33070 final coat. Looks good!

And here’s a look at both of the driver’s seat recessed head bolts! I still need to do the passenger side, which will be a project for this week.

After all my constant searching for recessed head bolts, and turns out Harbor Freight Tools has an entire set of recessed head bolts (even though they appear to have markings on the head, they don’t!) in the sizes needed for a GPW… 1/4-20 (3/4 short ones and 1-1/4 long ones) and 5/16-20 in two sizes. Doh! So if you’re looking to get them in one go, this is an option. Flip to the next shot for a photo of them.

Here’s a look at the two 1/4-20 sizes. ‘But wait, I thought the recessed head bolts for the transmission cover & etc had flanges?’ Yes, that’s true. And there’s a way to use these bolts to mimic it. (next photo)

If you get a #12 washer, it fits perfectly on the head to make it appear like a recessed head with flange once it’s all painted. Put a star washer under it, add the plain washer, and it looks the part. (I added the nut in this shot just to put it all together).

Moving on! When I ordered the correct copper gasket from &Ron Fitzpatrick Jeep Parts last week, I also ordered one of the last two things I need to complete the F stamped top bow replacements. this is the driver’s side forward top bow bracket with a nice F stamp! Ron’s out of the passenger side currently, so once he’s back in stock I’ll get one of those as well.
It came in a different shade of OD Green, so at first, I thought I’d just scuff it up and hit it with the correct 33070. But, I decided to just strip it down to the metal and start painting from scratch.

Here’s what the forward top bow bracket looked like before. Same exact thing, just without a F stamp.

And here’s after I replaced it with the new one. Chalk up another F stamped item for the GPW!
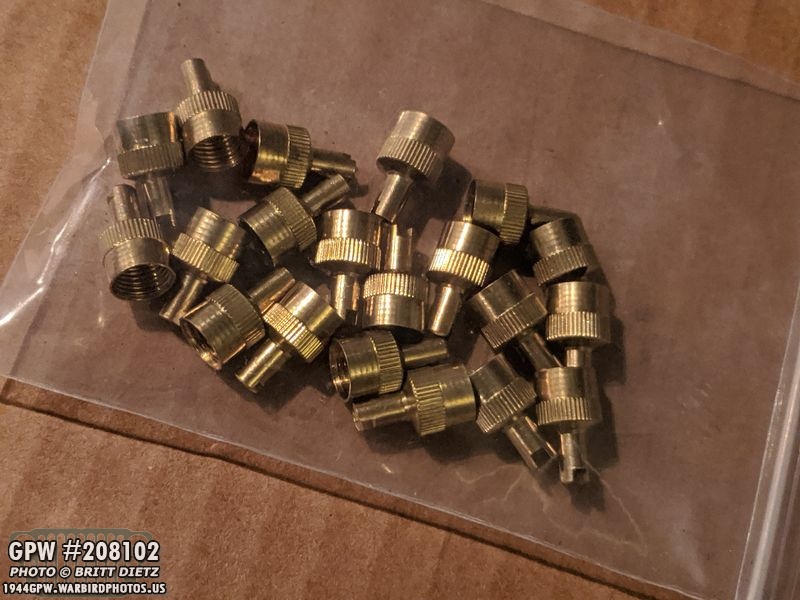
Another item I got which took several weeks to get here was additional Schrader screw-type tire valve caps. A few updates back I talked about these and how they were installed painted and unpaint (lots of shots of unpainted) on Jeeps. I replaced all the modern caps with these correct ones. I wanted an extra bag of spares just in case I lose some of them, so glad to have extras!

And many of you who restore Jeeps probably have something like this. During all the waiting for orders and parts for the engine project, I reorganized all the bolts I have into this much easier to find setup. The most typical sizes for Jeeps are hex bolts with 1/4, 5/16, and 3/8. Also LOTS of #10 slotted machine screws with flat/round heads. Plus the assortment of lock washers, plain washers, star washers, etc. And there’s also a drawer just with extra F stamped bolts.
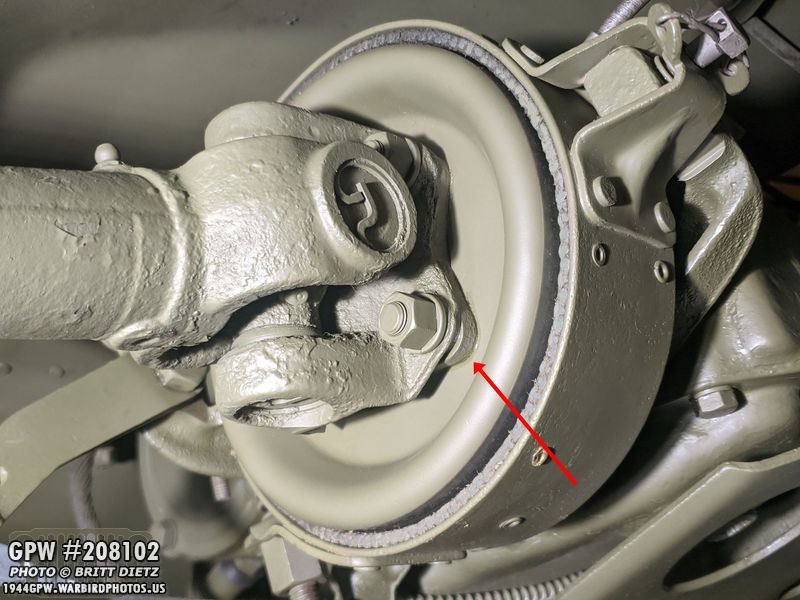
One thing I wanted to point out, a few weeks ago during the start of the pandemic and stay-at-home orders when I was ripping through tons of projects on the Jeep, I replaced my emergency brake drum that was damaged. Since then, I’d been noticing some drops of transmission oil. I was upset that the oil seal must have failed, but after taking some time to inspect the drum, I noticed it weeping out of the screw holes. Turns out, the nuts had slipped every so slightly. I retorqued the nuts, and sure enough… not more leaking!

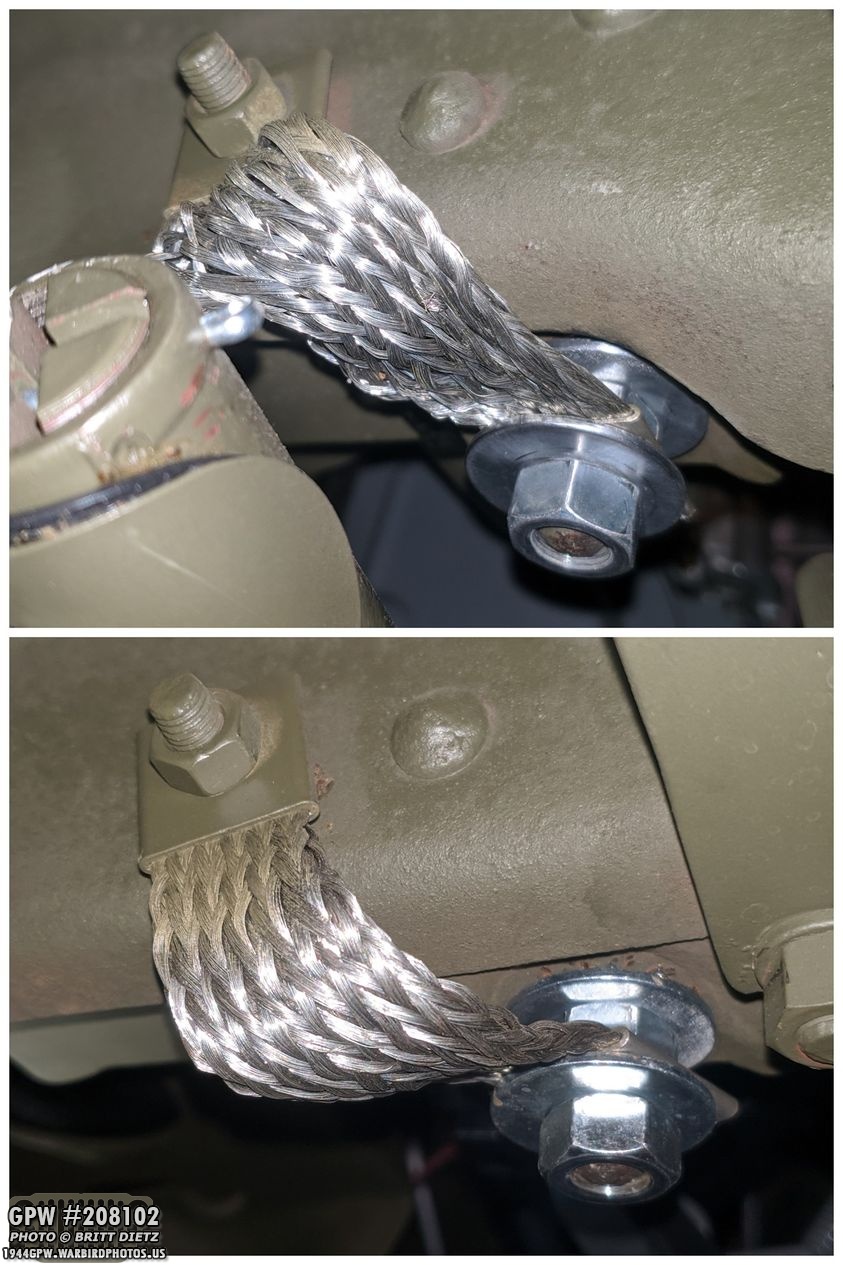
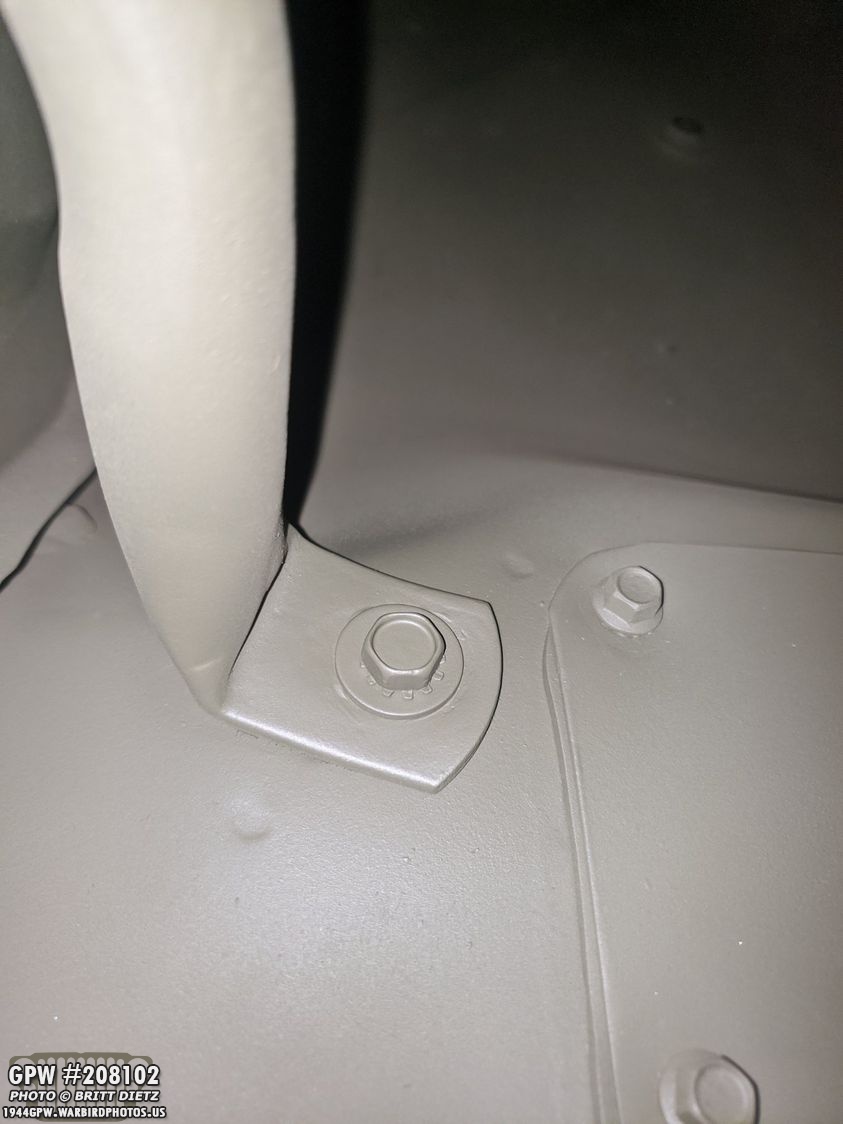
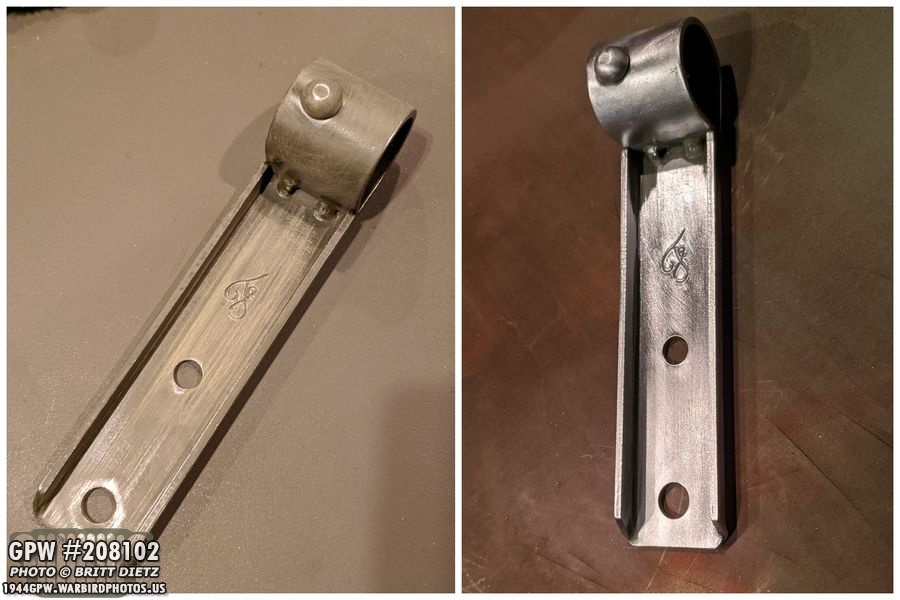
I had bought the set of GPW bond straps back when I started this restoration, and while I’ve put many on the Jeep, there’s still some I’ve not gotten around to because they are under the Jeep and either hard to get to, or really not easy to see so what’s the rush. I decided to add these two, both of which start at a hole under the driver’s side engine mount. One then goes to a bolt on the front cover flange, the other is a J cup that attaches to the exhaust pipe. Technically, it should be welded on to the exhaust pipe with a couple tap welds, but since I’m not there yet with my welding, I’m looking at other methods for the meantime.

Here’s both of them installed. The strap that goes to the engine cover flange I had to get a longer 3/8 bolt as the washer, bond strap, star washer, and lock washer made the previous bolt not long enough. Glad to have these installed. A small detail no one will notice.
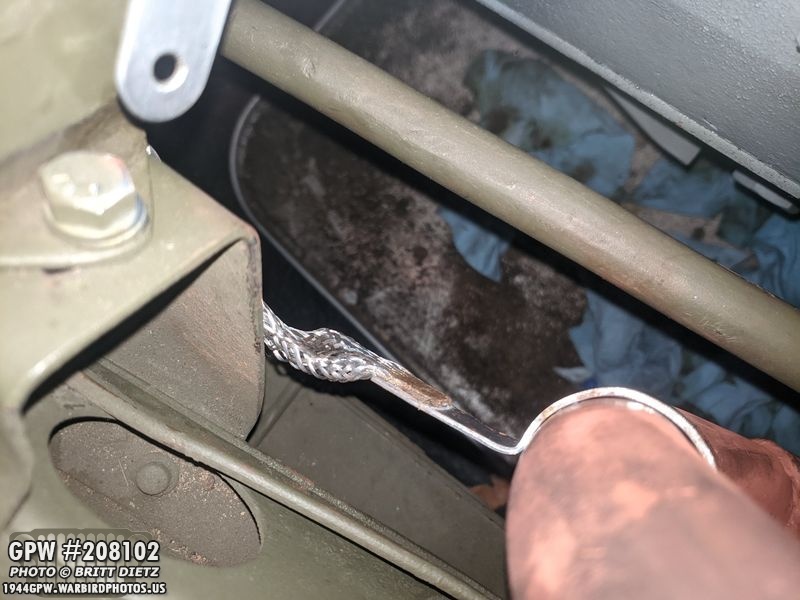
Just to show how hard it is to see them, here’s a look from above looking down. You can only barely see the strap going to the exhaust pipe.
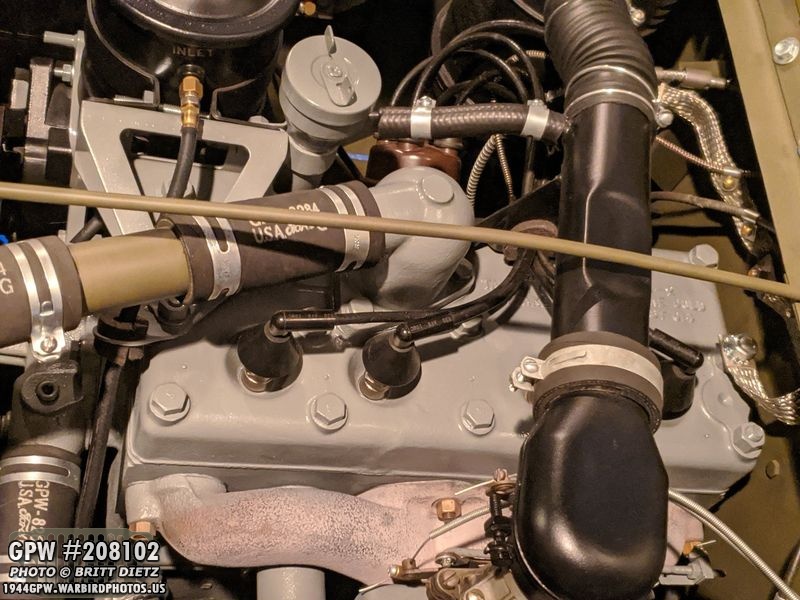
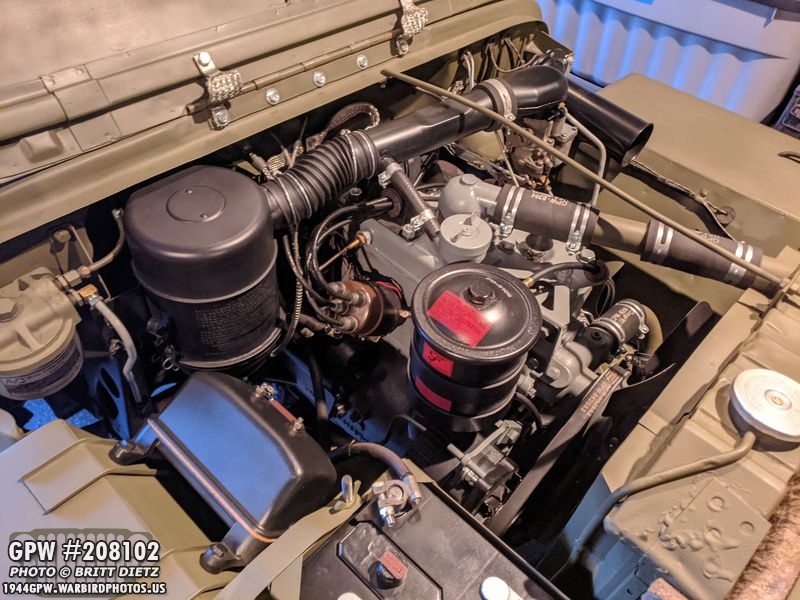
As I wrap up this update for this long week, here’s another look at the engine with the new head, studs/bolts, thermostat elbow, bond strap, etc. Lots of work went into this!

And I’ll end it here, with the Jeep back in the garage after the first two drives in several weeks. There’s still lots to be done, and I hope to get moving again on the GPW axles. I also hope to order the combat rims soon and get started on getting them ready with the firestone tires. So lots more to come! Till next week…