 Bolt Changes, Inspector Stamps, and an F Stamp Guide!
After the very big update last week with the engine head change, this week was quite light. I changed out the last two hex bolts with the correct style recessed head bolts, continued work on finding the perfect way to put an inspector stamp on the Voltage Regulator, and since the update is so short, I thought I’d put together an external F stamp visual guide!
Jeep is driving well after the head change and coolant flush! I’m starting to realize once I change out the axles/rims/tires, there’s not going to be too much more to do on the Jeep on a weekly basis except drive it! But, that’s a ways off still.
I continued replacing the last two hex bolts that should be recessed head bolts, something Ford GPWs had. Check the last few updates to see all the changes I’ve been making. The last two were the passenger seat bracket to tub bolts. Here’s a look at the left side as it was before I got started.
I mentioned last week how I’d been hunting all over for recessed head bolts getting them from various sources to see what looks best when I could have just gone to Harbor Freight Tools who has this wonderful assortment of recessed head bolts in the 1/4-20 and 5/16-18 sizes with no markings on the head (contrary to what the package shows). So I used two 5/16-18 x1 bolts. They are a bit longer than they should be for the passenger seat bracket, but they will work perfect.
Here’s the recessed head bolt with Red Oxide Primer, a star washer, and a plain washer. Underneath the body tub is a lock washer and a nut. Also, I should note that normally the seat is riveted to this bracket, but mine wasn’t so I’m using a hex bolt. Eventually, I’ll rivet it back in.
And here’s the otherside with the recessed head bolt. This side, the right side of the seat, is a lot easier to tighten as you can turn a rachet on top and hold a wrench on the nut on the bottom.
After tightening, I gave both sides a coat of 33070 OD Green spray paint from &Ron Fitzpatrick Jeep Parts
And the other side painted. All done with recessed head bolts on the Jeep!
Here’s a look at both under the seat. Note, that line you see is the rubber OD Green floor mat.
And it’s a bit tough to see, but here’s both the passenger and driver’s seat with the non-flange recessed head bolts.
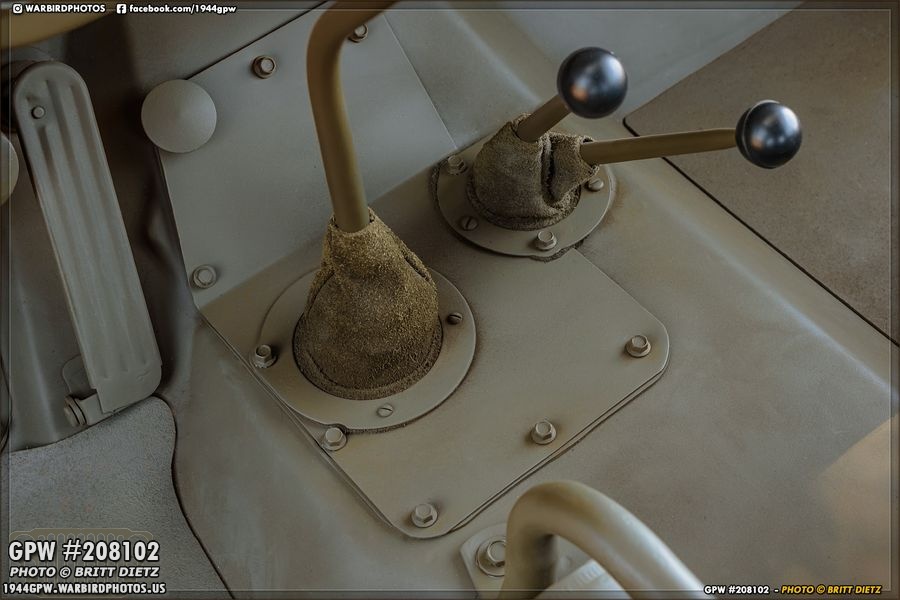
And here’s a look at the recessed head with flange 1/4-20 bolts on the transmission cover/seal rings. Jeep is looking a little dusty, it’s been quite windy the last few days. I’ll need to get the air compressor and blow it out soon.
A for fun shot while in the drive-through for lunch. Always turns heads when a Jeep pulls in to the drive-through. It’s almost been a week since I replaced the CJ head with a GPW wartime head. So far, still NO leaks anywhere that I can see. Freeze plugs are doing good, head gasket isn’t leaking, nothing from the thermostat elbow, etc!
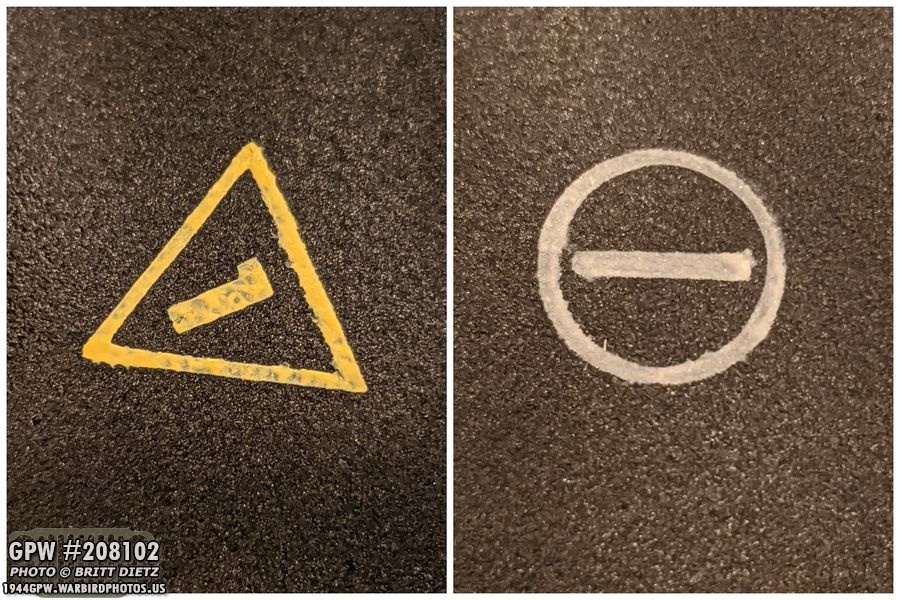
Last week, I started the process of replicating the inspector stamp found on the voltage regulator. Here’s a few photos that I found when researching stamps on G503. There’s several variations of the stamps (numbers and shapes), this was one of the two I like. It seems to be almost a neon green color.
The other style I liked is found on this wartime 1943 GPW engine photo, a 1 with a circle. It’s assumed that it’s a gray/silver stamp.
I tried using the Cricut printer to make stencils and paint them on a scrap piece of metal that I had painted with the same black wrinkle paint. Unfortunately, the stencils didn’t adhere well to the textured surface, and it turned out blotchy.
I tried painted them directly with more Cricut stencils, but it still didn’t look right.
So I went to Zazzle and made my own rubber stamps, which took about a week to get here.
I first tried using the same acrylic paint I was using for the stencils.
I attempted several methods; I tried putting the paint on a foam brush and putting the stamp on that. I tried putting the stamp directly into paint on a plate, and I tried to paint the stamp manually with a brush.
The acrylic didn’t seem to adhere well to the stamp, it was clumpy and not consistent. It was also runny. I think I need thicker stronger paint.
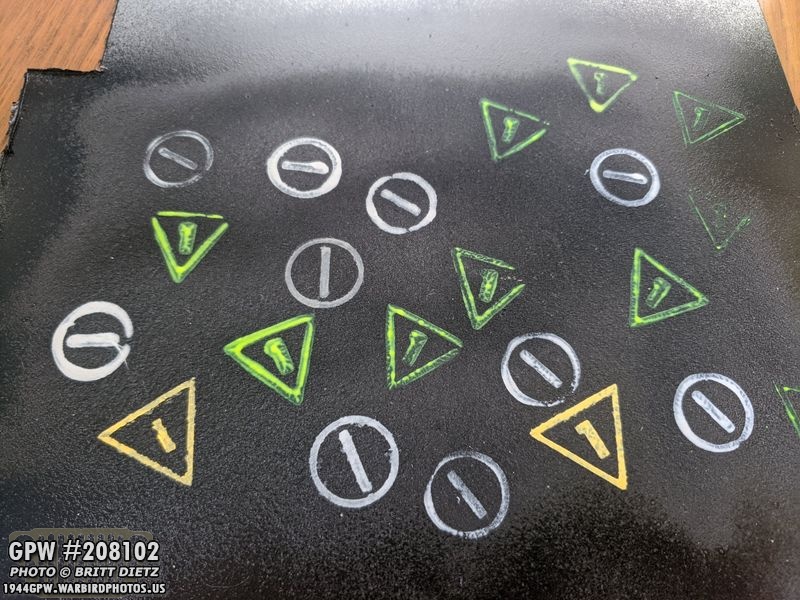
I tried stamping several times with the acrylic paint. The yellow colored triangles are from the Cricut stencils along with the middle left circle (the straight-edged one). The rest are from the stamp with the acrylic paint. It just came out goopy.
So, I decided to try several more methods… I went out and got Testors model enamel paint, a pigment ink pad, and even tried using spray paint where I sprayed a box, stamped the stamp int he paint, then stamped the test piece.
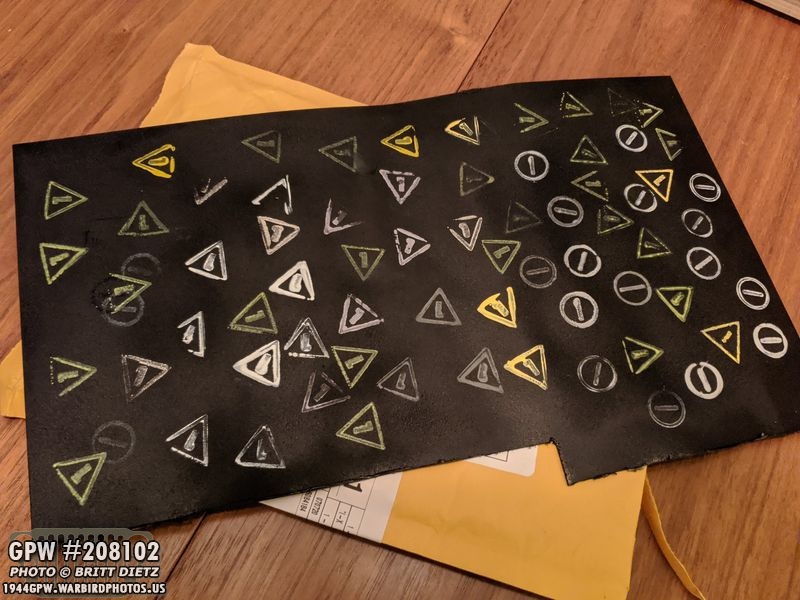
That’s a lot of stamps. So many I had to go and paint more wrinkle paint as I ran out of room. Some things look good, some things look terrible. But what I found seemed to work most well is the ink pad with the pigment.
The top two and the middle left triangle ones are from the ink pad pigment with the stamp. The top left one is pushing hard, the top right one is pushing softer. I think those have a much better ‘stamped’ look. I do realize I’m doing WAY more in depth to this than what they did in WW2, as they just stamped it whatever and moved on to the next one. So I’m going to practice some more this weekend, then make my decisions and stamp it. Look for the finished product next week! Do you have any suggestions?
And now for the main event! Since this week’s update was a bit small, I decided to put together a look at all the F stamped things on my 1944 GPW externally (meaning outside of the Jeep where they are mostly visible). Jeeps will vary on F stamps, especially opinions on what is and isn’t F stamped. With no real definitive guide from Ford saying what bolts were and weren’t F stamped, it’s a bit of a guessing game based on unrestored Jeeps and wartime photographs. My Jeep is still missing some F marked items, but it’s getting there.
So let’s start with the front of the Jeep. Want to take a guess at how many F stamps are found looking at the Jeep from the front? And before we continue, I know there will be some debate on what should/shouldn’t be F stamped. There’s arguments on both sides for many of these items, and I went with what I liked best along with what seems to be correct for my Jeep.
Yellow = Visible F StampGreen = Parts hidden behind things in this photoThere’s several F stamps (and a Ford stamp) just on the front. – The windshield glass has Ford etched logos.- The mirror has a stamp- The four bolts holding the two headlight brackets have F stamps and are upside-down, so not easy to get a photo. – The marker blackout lights have F stamps. – The crossmember behind the grill has a large F stamp. – The upper and lower gusset horns have F stamps.- Much debate on if the long bumper bolts are F stamped, but I got them free and liked the look so I went with it.- The wood insert for the bumper has a stamp.- And the bumper has a stamp on the inside, but it’s pressed hard enough you can make out it barely from the front.
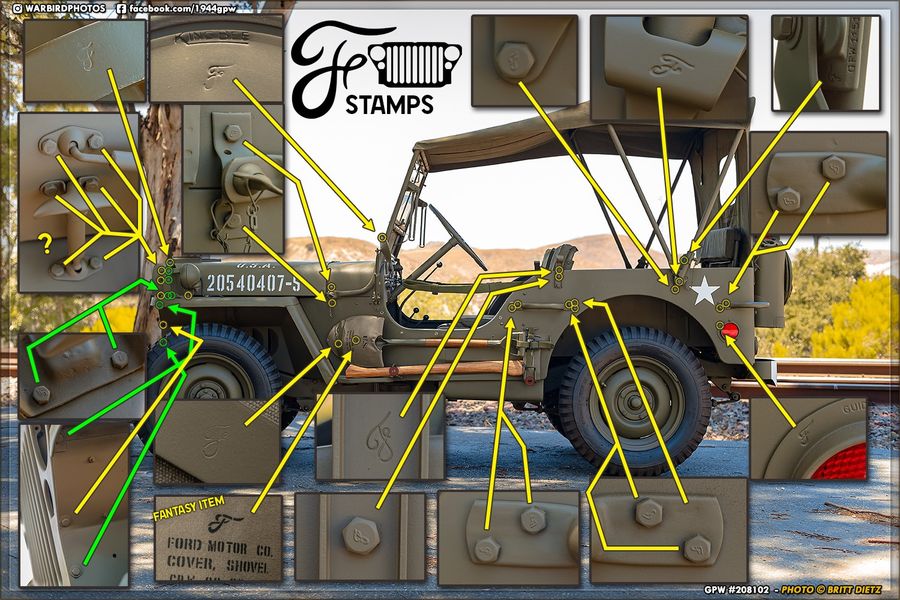
Driver’s side… this side has the most. Take a guess! And, again, I’m only covering the external F stamped items. Things like the frame under the body tub, bolts in the frame, transmission, shocks, etc etc are not covered. Also, since I haven’t yet replaced my CJ axles with the GPW ones yet, those are chock-full of F stamps that I would have added.
That’s a LOT of F stamps. Green = Parts hidden behind things in this photoRed = Parts that need F stamped versions- The mirror, again, has an F stamp on the back- The windshield pivot bolts are stamped. Also the safety chain is GPW style. – The blackout light on the fender’s shield ring has a stamp. – The 3 bolts holding down the blackout light have stamps.- There is MUCH debate on if the hood clamp/catches have F stamps or not. Some have said they’ve seen them, many say they have not. Mine had what looked like an original 1/4 F stamped bolt on one of them, so I went with it. This is largely based on opinion and if you like the look or not. – The three bolts holding the fender to the grill have stamps.- My shovel bracket has an F stamp. This was debated as well, but I’m pretty sure this bracket is original based on the pitting and rust. – Yes, the shovel cover has an F stamp. This is purely fictional, shovels never had canvas covers. But I loved the look. If they did exist, I’m sure Ford would have stamped them! – The forward Top Bow bracket has a F stamp and also a F stamped bolt. – The forward handle has four F stamped bolts and a faint upside-down F stamp on the handle itself. – The rear top bow bracket has an F stamp, an F stamped bolt, and the pivot bracket has an F stamp. – The rear handle has two (on this side, two more in the rear) F stamped bolts. – Finally, the reflector has an F stamp. Aside from the axles with all the F stamps, I’m also missing both the F stamped ax brackets.
Now on to the passenger side. Shares most stamps with the driver’s side, with a few less because of the lack of pioneer tools.
Since I just detailed all the stamps on the driver’s side, I won’t go into detail for this side. It’s all the same pretty much. I should note that my top bows are not F stamped. Normally they would have a single F by the pivot.
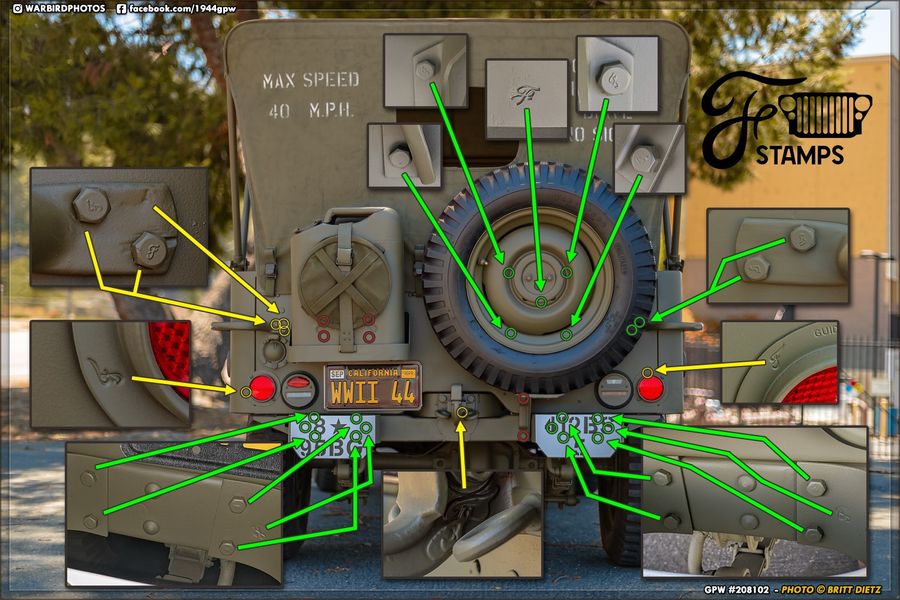
Finally, the rear of the Jeep… there’s actually quite a few considering it’s just the back.
Green = Parts hidden behind things in this photoRed = Parts that need F stamped versions- First, we have the spare tire carrier with four stamped bolts and the carrier itself stamped.- The left handle has two stamped bolts on this side and a very faint F stamp on the handle itself.- There’s F stamps on both reflectors on both sides. – The right handle has two stamped bolts on this side.- The pintle hook (trailer hitch) has one of the largest most decorative F stamps on the whole Jeep. – Each of the two bumperettes have 6 stamps! Four bolts for each bumperette (eight total) stamped, and two on the bumperettes themselves each. One you can see (the right side), and one you can’t when it’s mounted to the frame. I’m missing F bolts for the jerry can holder (which isn’t a big deal since you can’t see them at all when a can is in there) and also the spare tire support bracket, which I hope to replace in the near future.
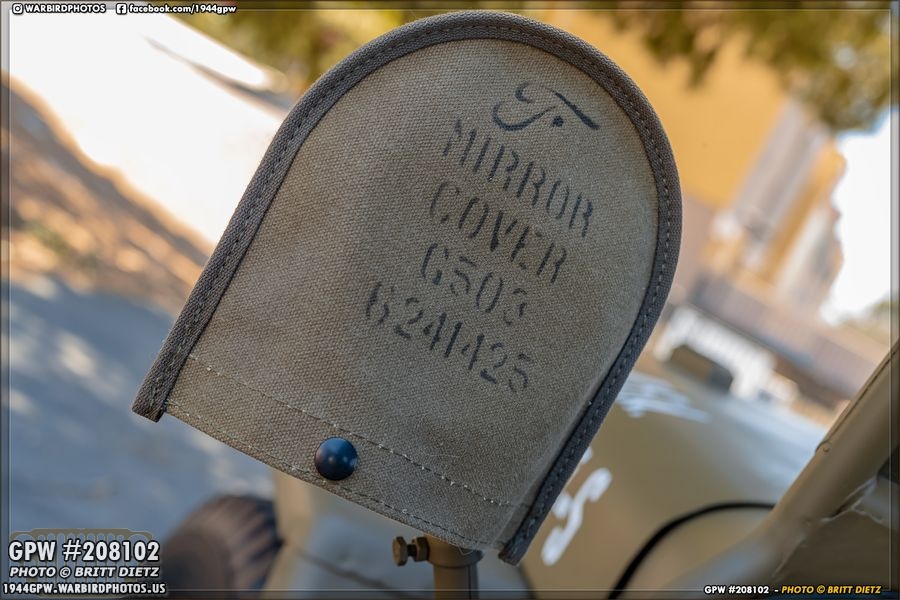
And to end this week’s update, one last F stamp when I have the canvas cover on the mirror! Next week’s update will have some goodies including a GPW hand crank and replacing more items with correct F stamped ones! Till next week….


