 Tackling the overheating Jeep – Part 2
It’s been a few weeks, but a lot has happened over that time! Here I continue the quest to fix the overheating engine with a special surprise help from a friend. Follow along as I continue to troubleshoot this ongoing issue!

It’s been a crazy few weeks but finally, there’s an update for the overheating issue on the Jeep. It’s been a long road this past month with different twists and turns, so buckle up! This is part one as social media won’t let me post as many photos as I need to tell the whole store so far!

A recap for new readers, I’ve had an issue with the Jeep overheating for some time now. I’ve been able to deal with it by not driving when it’s warm out or only driving short distances, which is very hard to do here in always-hot Southern California. This came to a head on the 4th of July when I had to drive home in the very hot heat, and the Jeep hit and went past 200 degrees, settling at around 215. The boiling point is at 220 for the most part, so I had to pull over and let the Jeep cool down. I decided something needed to be done as it was making the drives not as fun having to constantly keep an eye on the temp gauge.

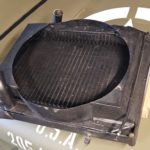
And let’s rewind a little more back to when I was restoring the Jeep, after the initial flush of the system this is what I saw in the radiator. Yuck. I ended up doing 4 more flushes with different products in the radiator/block followed by water flushes.

I used CLR, PEAK Radiator Flush, and numerous water flushes. Over the course of a month, I did all these flushes.

And the result was a pretty clean system. Water would come out clear. No blockage of the engine block petcock. The radiator cap was nice and clean. But I always wondered if there was some blockage still in the radiator, even though I did a ‘somewhat’ pressure flush myself.

Zoom forward to after the 4th of July this year when I did some experiments driving around going up and down small hills in the area and I hit that 210/215 pretty quickly.

I went ahead and drained out all the coolant, which was showing some gunk in the system still. Not much, but I had wondered if the higher temps were causing some gunk to come loose inside the block or, more likely, the radiator.

My next step would be to remove the thermostat (which is a 160 modern repro thermostat) from the system and try some test drives without the thermostat to see if that made a difference. That would mean I needed to take apart the cooling system.

With the Thermostat out, the coolant should start flowing through the system immediately. I wasn’t worried about the engine not reaching operating temps as it was still very hot outside.

I also checked the tightness of the GPW fan belt, which is when I noticed a nice crack/break in the belt! Yikes. It was still holding on pretty good but needed replacing.

Taking the belt off, there were actually two cracks!

Not wanting to be in a position of having to wait for a belt again, I went and bought two GPW fan belts.

Naturally, had to get the GPW Ford marked one!

It takes a bit of work to replace a fan blade with the PowerMaster custom alternator that looks like a generator. It does rock toward the engine like a generator would, but not as much. So, I had to loosen the PowerMaster’s bolts underneath to get to give a little more play to slip the belt on.

Here’s the other side as I was in the process of getting it on. At the time I didn’t know I’d be taking off a lot more than the belt!

I’m debating keeping that spare belt in the Jeep or in the garage, as the heat from the events I sometimes take the Jeep to can get pretty hot, and having that belt just bake in the heat might not be the best. But, then again, when you need the belt, the most will be when it brakes while on a drive!

So, to test out the system without a thermostat, I needed to put the thermostat elbow back on without the thermostat. So a bit of RTV to act as a seal (didn’t want to waste a gasket), and it’s ready to go.

After 24 hours of letting the RTV set to stop any leaks, I refilled the system with coolant and went for a drive on another warm, but a little less hot day. I did the same route/routine as the other driving tests going up the hills, keeping speeds at 30mph or less, and mostly in 2nd gear.

With no thermostat in, technically the system should stay at 160 or lower. The system actually did pretty well at first, holding at 140. But it slowly started to creep up. But in the 4th lap, it finally hit 180. Then it hit 185. It got to the point where it would raise to 185, but putting it back into first would take it back down to 180.

But then it started to go further. It went past 190, with no thermostat and the weather was getting cooler. So that meant there was indeed an issue, as with no thermostat and the weather cooling down, it shouldn’t be hitting over 190.

The general consensus at this point (and had been) was that it is the radiator not properly doing its job and is probably blocked. Now, I have looked into getting the radiator pressure tested/rodded/recored/etc… but finding places around here (even in SoCal!) has been difficult and those that do exist want upwards of $900-$1000+ to do that! YIKES! A brand-new exact replica (not aluminum) is only $675 shipped! So, I was starting to think that might be the route I have to go. I was about to pull the trigger on one…

When out of the blue, Scott Shiller (of the Team G503 Videos on YouTube: https://www.youtube.com/@TeamG503 ) had read my previous update and said he had a professionally cleaned, pressure tested, rodded original radiator that he was going to use on his CJ-2 Jeep, but decided against. He was willing to sell it to me and ship it all the way from South Carolina. I jumped on the offer, and soon the radiator was on its way to Southern California!

With the new radiator on the way, I wanted to make sure there was no more yuck in the system. Don’t want to plug up the new radiator once I get it! So, I drained the coolant out completely…

It looked pretty clean, but there was some slight discoloration.

This time I decided to use some Prestone Radiator Flush and Cleaner.

With the system empty, I poured in the entire bottle and topped off the system with water. I could have done a short 10-minute flush, but I opted to do the entire week flush since it would take some time for the new radiator to get here.

With the water topping it off, and with no thermostat in the system still, it was ready to start the flush.

So, I began to drive the Jeep about 20 minutes each day.

Day after day.

Lots of driving!

Did I mention driving a lot? After about a week, it was finally time to drain the system.

Remember, that went in as clear coolant flush and water. Granted, some of it is residual coolant, but it certainly did pull out a lot of gunk.

In prep for when I would be putting everything back together, I went out and bought three gallons of coolant.

Next, I did a water flush of the system. The first flush was to just run the water through the empty system.

Using a hose connected to the water pump, I just let it flush out the water straight as it went in.

I then filled the system with water, and drove around to make sure it’s clean.

Success, the water came out clear as can be from both petcocks.

And it was around that time that the radiator from Scott arrived!

That meant it was time to take everything apart. I also decided I would remove the water pump, so I could do one more water flush of the system and check the pump to make sure nothing was wrong with it.

Before I get started taking things apart, I wanted to touch back on the Thermostat. In the last update, I put the thermostat in a pot and slowly started to boil it. I found that once reaching 160 degrees, the 160 degree thermostat would only start to open up barely any. It seemed to need 175 or more before it was fully open.

A few people recommended that I go get an original style bellows thermostat, just like they had in WW2 Jeeps. I was able to find one pretty easy on eBay. The one you want to look for is an Autostat 30-F.

Mine came in the original box, but it was hard to read the list of vehicles it was for due to staining. But you can see it says ‘Willys and Jeep – All’. Some boxes will also say ‘Willys and Jeep – 1939-1952’

Here’s a good look at it. I think it’s NOS, but it’s tough to tell. It could be a take-off.

Looking underneath, it has the model, 30-F, and the temp, 160.

The box actually seemed to show the difference between the repro thermostat (left) which they call a ‘Power-Pill type’ and the original bellows (right).

Here’s a good look at the two and their differences.

One thing I noticed is that the bellows came with a pre-drilled hole on the top (which should be added to the repro thermostats to ‘burp’ the system of air). It seemed to be partially (and intentionally) covered with this solder material but is enough to let the air pass through.

And it fits just fine in the thermostat retainer.

You have to bend the retainer open a bit more to get it in there, but once it’s in, you can bend it back closed.

One other thing that I’ve been asked is if I’m using the correct cap for the radiator with the correct pressure rating.

I’ve been using the one in the middle, a perfect GPW 4 pound repro from DeBella Jeep parts. Along with the radiator, Scott also sent two different original radiator caps. So, now I have my choice. I will probably still use the GPW one, but I can switch them out if I think there’s an issue.

The alternate style one I might use is this one, which doesn’t require a gasket ring.

Scott also sent two petcocks I could use. The brass one is brand new, but I love the painted one! I’ve never seen one like it, it snaps open or snaps closed with a twist of the knobs and the spring. So much easier than the standard ones! I’ll be using that and keeping the new one as a spare.

And just like on my radiator, I put the rubber hose extension to the radiator overflow relief tube so it won’t dump coolant on my front axle turning it a brownish color. It worked beautifully before on my original radiator, so I wanted to continue that.

Finally, the day came it was time for me to start the radiator replacement!

First off was the radiator to elbow tube/rubber hoses. I also removed the #1 and #2 spark plugs for better access.

I’m going to jump a bit here since I was working a lot and didn’t take as many shots as I should have. But here I’ve removed the fan belt, fan, water pump, the lower tube/hoses, and the radiator. At this point, I did the manual flush of the system (a sort of pressure flush) to get any leftover crud out of the system via the water pump hole.

I then took off the elbow. I need to clean off the old RTV.

It took a bit of time, but it was finally ready to start putting things back ON!

First up, the elbow with the original bellows Autostat thermostat. Here it is with fresh RTV. You can see in the top right there’s a gasket on as well.

For the bolts, as always with any bolts that go into liquid, I use a white threadlocker (non-permanent).

After everything was torqued down, I noticed that the gasket stuck out REALLY far. Way further than I’ve ever had one stick out before.

Moving on, the new radiator is in!

I realized I needed a gasket for the water pump next, but didn’t have one! Oops! I also didn’t want to have to wait for one of the Jeep dealers to get one here. So, I found out that O’Reilly Auto Parts actually carries the correct gasket for Jeep water pumps. Go figure. I was able to pick one up asap. But, not wanting to have this issue again, I scanned the gasket into Photoshop and made a perfect copy of it that I can now cut using my Cricut machine! No more waiting in the future! I’m slowly amassing a large collection of Jeep gaskets that I can do myself now.

Gasket applied to the block.

Water pump and tubes/hoses reinstalled! I should mention I checked the water pump, no issues with the blades inside.

The fan belt is back on again. Much easier this time since I had just done it once already!

Now the upper radiator tube/hoses have been reinstalled!

Time to add the coolant!

But then, an immediate problem. The coolant started to leak out of the rubber hose where it attaches to the elbow (this shot does not show the leak, I was in a panic trying to stop it from leaking onto the spark plugs and then quickly draining the coolant out so the levels lowered down and the leak stopped).

So, I originally thought I didn’t tighten the clamps hard enough. But I realized, they were at max on the top. Turns out, the clamps had sunk so much into the rubber that it wasn’t able to clamp down with full force anymore. UGH! Not only that, I noticed the rubber was starting to ‘chip’ away on the edge. I think the hoses were wearing out.

And that gasket really really bothered me. It should NOT stick out this much.

So, I decided to do a full stop right there and fix it all. That meant removing the elbow (again) and the tube/hoses to fix all these issues.

I noticed that these thin cardboard gaskets I got form a vendor had already soaked up coolant all the way to the edge. I realized that this material just wasn’t going to cut it for the gaskets.

But, like the water pump, I didn’t want to have to wait for new gaskets. So, I decided to make my own. Using those gaskets as a guide I made the gasket in Photoshop, but tweaked it so the holes were more centered in their correct spot meaning less of it sticking out. But, I felt I could do better. See the next update for what I did!

With the tube/hoses off, you can really see how much the clamps have compressed the rubber.

And those hoses fought me the entire time to get off. It wasn’t easy, they were ‘glued’ almost to the metal tube. Once they were finally off, you could see how the rubber had melted to the metal. It was a mess. Glad I was replacing them.

But another issue was the thermostat elbow itself. It had gotten so pitted that it was also causing issues with the leaking.

So, I decided to fix that with some JB Weld Steel. Once cured, I’d be able to sand this smooth and it should remove that pitting. More on that in the next update.

And that’s where I have to end part 1 of this ordeal! It went from a quick radiator replacement to a multi-week intensive deep dive into things. Just wait till the next update when I go down several rabbit holes including what to do with the GPW marked radiator rubber hoses not being available anywhere.
And one more big thanks to Scott Shiller for the radiator!
Till the next update…