 Tackling the overheating Jeep – Part 3

Another long gap between updates, but this is a big one and also explains the long gaps between these overheating parts! This update includes custom radiator rubber tubes, fixing the thermostat elbow corrosion, some neat GPW finds, another fire extinguisher, and taking on a huge project!

Catching up with the last update, I have had an overheating issue with my 1944 GPW Jeep the last few months. It finally came to a head on July 4th when the vehicle almost boiled over on a hot day as I drove home from a parade. I decided to finally dive deep into the problem. I ran several tests with and without a 160 degree thermostat, and it came down to either an issue with the radiator being clogged, or a thermostat issue.

More testing really focused on the radiator, and I decided it was time to replace my original one. The cost to repair/recore/rod the radiator was quoted in my area to be close to $1,000! To get a perfect non-aluminum replica would be about $675. I was about to pull the trigger when Scott Schiller contacted me out of the blue with a completely fixed up and tested original radiator (shown here) he wasn’t using. I purchased it from him without hesitation!

After the radiator arrived, I got to work replacing my radiator with the new (original) one. I also took the time to check the water pump for any issues, and do another flush of the system while the water pump and thermostat elbow were off. This was after a week of a normal radiator flush with chemicals.

It took an entire day to get everything back up and together with the new radiator, but it was also a good time to give everything a good check as I reinstalled it.

And that led to my first problem. I ordered a repro gasket for the thermostat elbow, and after installing it I realized just how insanely oversized it was for the engine. It stuck out SO much!

And not just on one side, this thing was not shaped to the correct side of the engine. At first, I thought I’d just leave it as is, paint it Ford engine Gray, and live with it as I didn’t want to have to take it off again. But, I ended up having another issue with the thermostat elbow (I’ll get to that in a few), so I had to take it off anyway and decided to do something about it.

Taking off the gasket, you can see how the cardboard was already soaked with coolant.

I took the oversized gasket into photoshop via my scanner and made a perfectly sized replica. I then moved the bottom hole shown in this photo to the left, which was one of the reasons the gasket stuck out so much. You can see on the bottom gasket just how far to the right that bottom hole is. It should be more centered.

My thought process was to make my own gasket, which I’ve been doing more and more of. But instead of this cardboardish material that just soaks up the coolant, I wanted an actual sealing material. So I bought this cheap pack of Fel-Pro gasket material samples from Amazon. I knew which one I wanted from the pack, but I wanted the other samples so I could try other gaskets at a later date.

The one I wanted for the thermostat elbow (and the correct one for coolant related sealing) is the blue rubber-cellulose sheet that’s literally made for water, coolant.

But I realized the template I made for the thermostat elbow using the oversized gasket meant that while I’d fixed the location of the bottom hole, it was still oversized and would still stick out. So, I decided to go a different route. I took the thermostat elbow and literally scanned the bottom of it into the computer. Using photoshop, I made an exact sized gasket to perfectly fit the elbow.

I then took that Fel-Pro gasket material and, with my Cricut cutting machine, started to make the gasket.

For anyone wanting to try this, I used a custom setting ‘Natural Wood Veneer’ since the gasket material was a bit thick and a deep-point blade. This setting will cause the cutter to do the cut several times to make sure it goes all the way through.

And here we are, a Cricut cut gasket out of the Fel-Pro material! But, how does it fit?

Well, we can see the difference in the size between it and the oversized gasket I got online. What a difference!

And look at that, a perfect fit!

Even a perfect fit on the head of the engine. Now that I have this template, I can make these anytime in the future with the Fel-Pro gasket material. No having to wait for online orders! My goal is to be able to make my own gaskets for anything on the Jeep anytime I need.

But let’s back up a bit now and take a look at why I ended up removing the thermostat elbow again which led to redoing that gasket anyway. Well, once I had installed everything back up from the new radiator install, as I was filling the coolant back up, it started to leak like crazy from the thermostat elbow where it connects to the rubber tube. As you can already see, the tube is beat up, and that did bother me. But that was just one of many issues.

Taking off the clamps, you can see that they have dug into the rubber so much that there’s really not much left for the clamp to squeeze to make a tight seal. That was one issue.

And while the other side of that rubber tube was not leaking, it too water squished down.

Once I removed the cross over tube with the rubber tubes, I realized… I couldn’t get them off. They wouldn’t rotate off, even with a ton of force. I started to take a screwdriver to try and pry them off, but they still wouldn’t come off. Yikes.

Looking inside, you can see that the heat from the coolant was softening the rubber, causing it to fuse with the tube. That normally isn’t a terrible thing since it does seal any leaks, but in this case I couldn’t get the darn tubes off.

It took an hour of slowly prying it off before it final broke free. And you can see here how the rubber melted to the metal tube!

Since I was going to replace the rubber anyway, I cut one open to look inside. It was pretty messed up from being stuck to the metal tube.

So, with both of the rubber tubes off, I went to go order new ones… only to find that EVERYONE is out of stock with GPW/Ford marked tubes. I mean everyone. In fact, most places don’t even have unmarked tubes or any tubes at all for sale. I hear that getting a supplier of the tubes has been difficult, and everyone is out right now. Ugh!

As with the thermostat elbow gasket, my next step was to take matters into my own hands and just do it myself. The first step would be to mimic the GPW stamping. I cut out the stamping on one of the tubes and scanned them in to work on them in photoshop.

This proved to be difficult, with the fonts tough to find. I put a call out on G503 to see if anyone had an idea of the font or shots of original ones (you never know what the repro manufacturers may have used, they could be incorrect), and a fellow forum member posted this photo of originals. I ended up using this as my main reference.

My original thought was to use vinyl stencil material to make a sencil, which I’ve done here with the final design I made in photoshop replicating the fonts as best I could (I had to do some custom things). It wasn’t easy weeding out the insides of the letters!

But, it looked pretty good and was close, even, to the repro ones. Good enough!

I used one of the bad rubber tubes I took off as a test for this to see if it would work. Right away, I knew the odds of this working were slim, as the vinyl did NOT want to stick to the rubber.

I used a sponge brush and some exterior acrylic paint doing light taps straight up and down to try and minimize any bleed.

And this was the terrible result. Yup, that’s not going to work. I knew what I needed… an actual stamp.

As I was doing all this, I ended up ordering a 36 inch long tube from eBay, the same tube type (and company!) that the repro makers use. It’s a Dayco 76150 with a 1.5 inch internal diameter. Here’s how the uncut tube arrived.

But, as you can see, there’s a problem… it got this white product printing on it that I’d need to remove. Ugh! I tried using acetone, paint thinner, and even a light sandpaper to remove it, but whatever ink this is… it’s not wanting to come off.

So, I went the other route, I cleaned the surface of the tube really well and used a high-heat matte black spray paint and lightly hit only that strip. Perfect!

I used the same template I was using for the Cricut machine to cut the vinyl to also make a custom stamp, which I got a few days later from stampmaker.com. I’ve used them before on Jeep products, they made really awesome stamps in any size or style you want. Just upload your pre-made image and select the type! Here is the stamp compared to the repro stamping.

Next, I needed ink. I wanted it to be a permanent ink and not water based. I decided on a pigment style, which would stay on top of the rubber and not soak/attempt to run on the surface. Of course, I got a white color. I could have used some acrylic paint spread evenly on a flat surface, but I like stamp pads as you can control exactly where and how much gets on the stamp.

And here is the first test! It looks good… except it is cut off. I did not apply enough pressure to the rubber to flatten it. Whoops. But it looks a ton better than the vinyl stencil one at the bottom!

I did a few more tests with different pressures until I found one that I liked. Looks pretty darn good!

Now to cut the long 36 inch tube. I took the repro ones and used them as a reference, but I then went to the G503 boards and discovered that technically, they should be different sizes very slightly. Si, I did just that. The two repro bad tubes are in front, and the new cut ones are in back. You can see the back ones have slightly different sizes.

Then the moment of truth, I went ahead and stamped them both! While they are no perfect stamps, I think that’s actually better in this case. So I’m happy with them! Once the pigment ink was dry, I lightly misted some clear matte protective spray on top of the paint just to lock it in and protect it from moisture.

Now on to the next problem, the Thermostat elbow itself. The problem was that the tube where the rubber sits had gotten so pitted over time that it was not making a good seal.

You can see just how rough this has become.

So, I covered it with JB Weld Steel, and let it cure for a few days.

I then carefully sanded it down to be as flush as I could get it and primered it.

Much better looking!

And finally, sealed with VHT Ford Engine Gray (which that paint is now SUPER rare, so if you can still find it anywhere, BUY IT!). Looks a million times better!

I took the time to also clean up the metal crossover tube and repaint it OD Green.

And then it was time to put it all back together! I had everything sealed up as the week+ of waiting for things happened.

First on was the thermostat elbow, now repaired. Yes, I did use an RTV with the gasket to help give a good seal. Some people don’t use a gasket at all and just use RTV. I like using both. It will need a paint touch up.

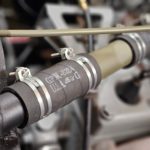
And now the two new rubber tubes before the clamps are on.

Clamps installed, and they tighten very nice, not like before!

Finally, things are ALL FINISHED after nearly a month+ of testing/working/waiting/installing.

I’m excited to really give the radiator a good testing to see if this has finally solved the overheating issue. I decided to leave it black instead of OD Green, which my GPW’s radiator would have been coming out of the Louisville, KY plant as 1) it’s a ‘replacement radiator’, so it should be black, 2) it’s a Willys MB radiator (correct for the later Louisville, KY GPW Jeeps… the original radiator was also an MB one), and 3) the black paint is a special heat dispersion paint so covering that with OD green would negate that feature.

It’s great to have a good seal and a repaired thermostat elbow. That will also help everything. Not to mention the NOS 160 degree bellows style thermostat I now have in there, just like WW2 Jeeps actually had (see the last update for all about that).

And it’s great knowing that not only am I able to stamp the rubber tubes, but I have a ton of the rubber tube left over, so if I need to replace them again in another 3-4 years, I can do that myself no problem.

So there we go! I have yet to really take the Jeep out on a hard drive to test the system to see if the cooling issues had finally been solved (more on why later), but I’m excited to hopefully be able to drive without having to always keep an very close eye on the temperature gauge. Here’s hoping this finally did it! I hope to update in the next two months with the results, but of course, it’s already starting to cool down (thankfully) here in Southern California… so I might have to really wait till next year’s heat to give it a real test.

Moving on, as I was cleaning out the garage for a brand new project that I acquired (building up the hype here), I came across the box I had been using with all the original bolts, parts, etc that I took off the Jeep during the restoration. Each group of parts were put into a bag, the bag numbered, and the number placed with a short description on a schematic chart of the jeep. All of the bags left in there filled with things that never made it back on the Jeep. 80% of it were modern bolts/screws/etc that had been added over the last 75 years that I replaced with either repro/nos items. But I decided to take another close look at the bags and see if I could uncover some goodies I’d forgotten about.

And it didn’t take long before I did find some items, like this bolt and washer set. If you look on the washers and the bolt, they have some of the original WW2 battleship gray paint and the factory OD green. I’ll keep items like this with the Jeep to show at events.

I found four pitted wiring clips that all have F stamps on them. I didn’t reuse these due to the pitting making the metal a bit thin, but I’ll keep these as well.

Here are the windshield bolts on one side, again they have traces of the original factory paint and the battleship grey. If I were to reuse these on the Jeep, then I’d have to sand them smooth, so I will also keep these out as examples of what the Jeep looked like.

Two half bond straps (where the other halves went in the last 75 years before I took them off, who knows?) that went on the top of the grill.

One of the original headlight ground wires, also still with the original battleship grey.

And finally, two recessed head SEMS bolts, not sure if these are original WW2 or not… but they look the part. SEMS was a manufacturer of bolts during the war that went on the Jeeps.

Moving on to another fun find, I was at the Pamona Auto Swap Meet (hint of the new project) and I found this SOS Fire Guard fire extinguisher. It’s slightly different than my early 1942 one (to the left) and has some minor differences including the font on the dataplate. Sadly, it has a gash in the dataplate, but it’s otherwise in good shape.

Here you can see the comparison with the early 1942 style, and this one on the right. I’ve been told that there’s a big debate over if this new one is correct for Jeeps or not. I think some people say it’s correct, some say it’s not. But I think it’d work on a Jeep regardless, and it’s more ‘wartime’ than the post-war QUICK AID extinguishers many people use.

One of the biggest differences is the lack of five lines going from the handle to the edge of the cap. This new one has grounds of five raised lines along the cap edge all the way around. Also, on top of the handle, the skinny long rectangle is a different size.

So let’s take a look at three SOS Fire Guard extinguishers. 1) is the early 1942 MB style extinguisher. 2) is the new one I just got that’s up for debate. 3) is a wartime decal version of the extinguisher used on GPW jeeps.

Taking a look at the top of all three. It’s interesting to note that the middle new one I got is the same top handle design as the right side GPW decal version.

And one final look at the new one’s dataplate. I think anyone who would put this on their Jeep would be just fine!

And, when I found the new one at the Car swap meet, it was strapped into this correct early style extinguisher bracket for Jeeps. Also adding to the mystery! Since you’ve made it this far, it’s time to unveil the big new project that has caused my Jeep updates to be very slow and long gaps in between….

Taa-daa! My new project, also a Ford built vehicle! I picked up this 1940 Ford DeLuxe Fordor sedan in early August. I’ve always wanted a civilian 1940s vehicle, and Ford was very high on my list. I started searching for 1941 Chevrolet Master Deluxe vehicles after getting the ‘bug’ when I saw a Chevrolet staff car for sale locally. That led me on a search for a civilian car as a birthday present to myself. Apparently, Southern California is ‘Chevy central’ as there are Chevys EVERYWHERE for sale. Most of them I went and looked at were needing a LOT of work, more than I really wanted to do (no, I don’t want to do another frame off restoration!). But I spotted an ad for a ‘barn find’ 1940 Ford on OfferUp, so I went and took at a look at it and just had to get it, even though it needs work.

It’s mostly complete. At the time, I knew little about 1940 Ford Deluxe cars, so I was sold on it being more complete that it was, about 90% original… and now having dove into the world of early V8 Fords head first, I know now that it’s more like 75% original from what’s no missing. But it has the original 85hp V8 engine, original radiator, rare heater, original horn, and most of the original wiring harness (yes, the 1940 harness… but it’s been spliced/repaired/added to for the last 80+ years, so it’s a Frankenstein). She’s sat for over a year, so she needs work before I can really drive her, but she does start up and runs for a bit.

Inside, she’s got a mostly original interior. Headliner, seats, and 3 of the 4 doors are original upholstery.

The rear floor mats are original as well. 1 of the 2 rear arm rests are original material.

But she will need a lot of work, and already at the time of this post being written, I’ve ripped out a ton and have a mountain of new/NOS parts to fix her up. My goal is to leave everything original that I can, replace all the wiring (it was a fire waiting to happen, wish I could have kept the 1940 harness, but it’s in bad shape), replace 3 windows that are broken, replace all the weather seals (most are missing), fix up the engine, clean up the interior, replace any missing items, replace the racing wheels with proper stock wheels and add white wall tires, and get her really running well. Finally, a new black paint job since this one is all over the place and cracking/peeling. When done, it’ll be great to have two Fords in my small collection! I’m not going to be doing a comprehensive restoration blog like the Jeep, but I’ll include updates on this Ford from time to time in with the Jeep updates! With that being said, it’s time to wrap this up.
Till the next update…