 The complete ‘clackity’ Axle Saga
It’s been 5 months now since I replaced the CJ axles on my Jeep with original GPW wartime ones. I’ve been plagued with a ‘clackity’ sound that just won’t go away after all these months, lots of work, lots of money, countless tests, etc. So I thought for this week I’d go through the entire story from start to finish. It’s been frustrating, to say the least! Join me on this ongoing journey…

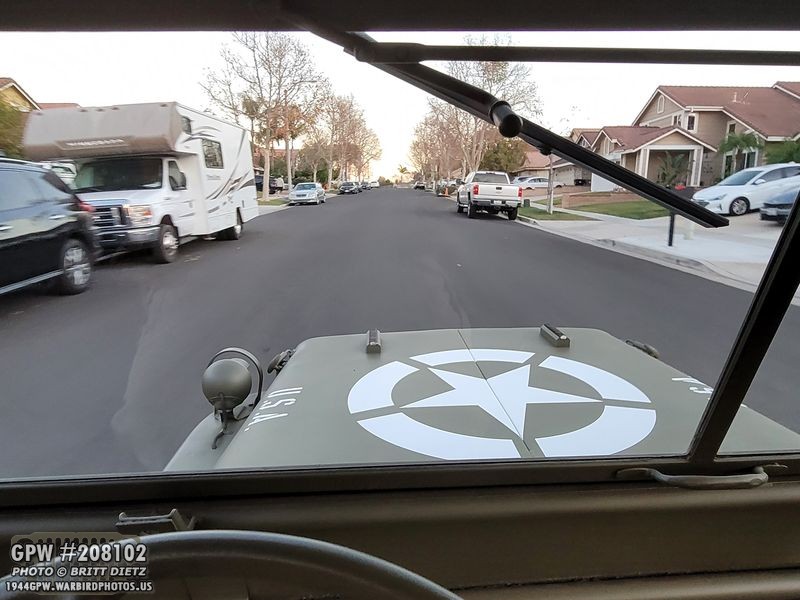
The past few months have been a roller coaster of work trying to figure out this mysterious clackity sound. At least the Jeep looks great with the correct axles and combat rims! So, let’s get started at the beginning.

This story involves five axles total, including these three rear axles. I’m going to start at the very beginning going back to when I first got the Jeep…
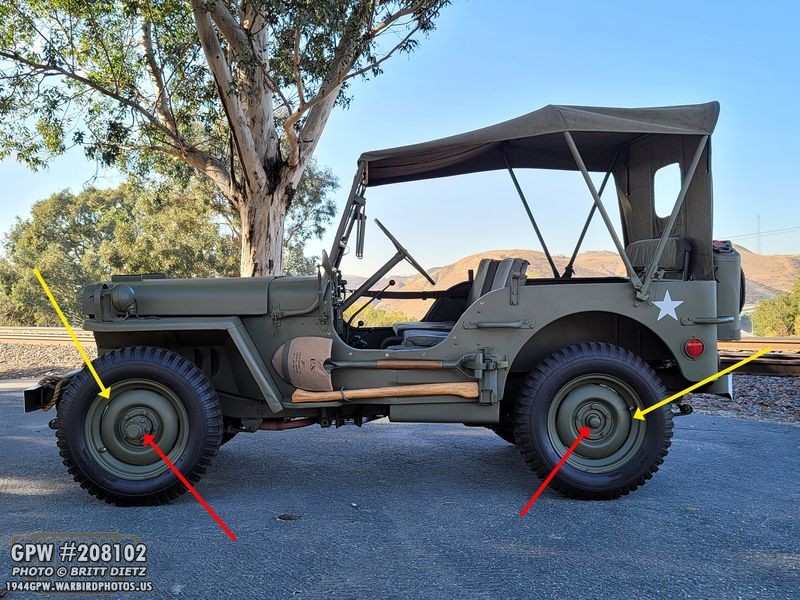
When I bought the Jeep in October of 2018 (this photo is actually from November 2020 after the rest of the restoration was finished), it came with CJ (post-war Civilian Jeep axles, red arrows) axles and post-war M38 rims (yellow arrows). Of course, I wanted the correct Combat Rims and correct wartime axles. It was at the bottom of my list, however, so during the main frame-up restoration I kept those axles and wheels and wasn’t in any rush to change them.

Post-War CJ axles have a different steering system. Instead of the bell crank being mounted to the axle like on wartime axles, the CJ bell crank is moved to the front crossmember to eliminate the left-hand pull due to the front axle rolling forward when stopping. So, at some point in myJeep’s life, something happened to the original GPW axles, and one of the previous owners (probably the farmer) replaced them with CJ axles which meant they had to drill holes in the front crossmember for the new steering.
The CJ axles worked just fine. Since I had both front and back CJ axles, I didn’t have to worry about gear ratio differences, as wartime axles have a different ratio. When you have a mix of wartime and CJ axles, that can be very bad when you drive in 4 wheel drive. I drove over 400 miles with the CJ axles, no clackity sound. At the time, I had even thought to myself that I might just keep the CJ axles and just get combat rims.
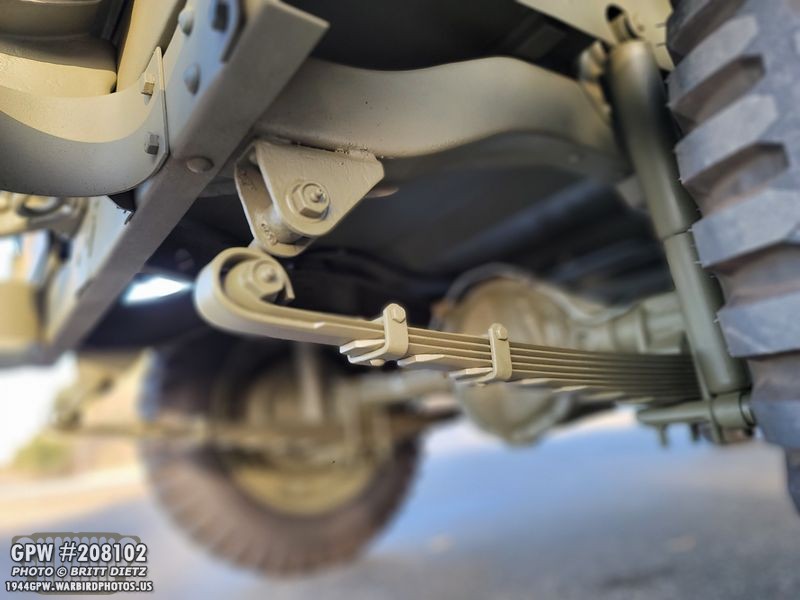
I also didn’t have a torque reaction spring setup because, as mentioned, when the steering was moved to the front crossmember, that eliminated that issue of the axle rolling forward on braking that would cause the jeep to turn left. The axle rolling forward would pull on the bell crank and drag link making the Jeep turn left. They added a very strong spring plate under the driver’s side spring which would make it stronger and more rigid, helping to reduce that left-hand pull. Unless I change to the wartime axles, the torque reaction spring wasn’t needed.

But, in the back of my mind, it did bother me that I didn’t have the correct axles. Being a perfectionist and someone who always likes the details, I knew eventually one day I’d probably work on replacing the CJ axles with wartime axles if I could find some. Plus, adding the Torque Reaction Spring and Combat Rims.
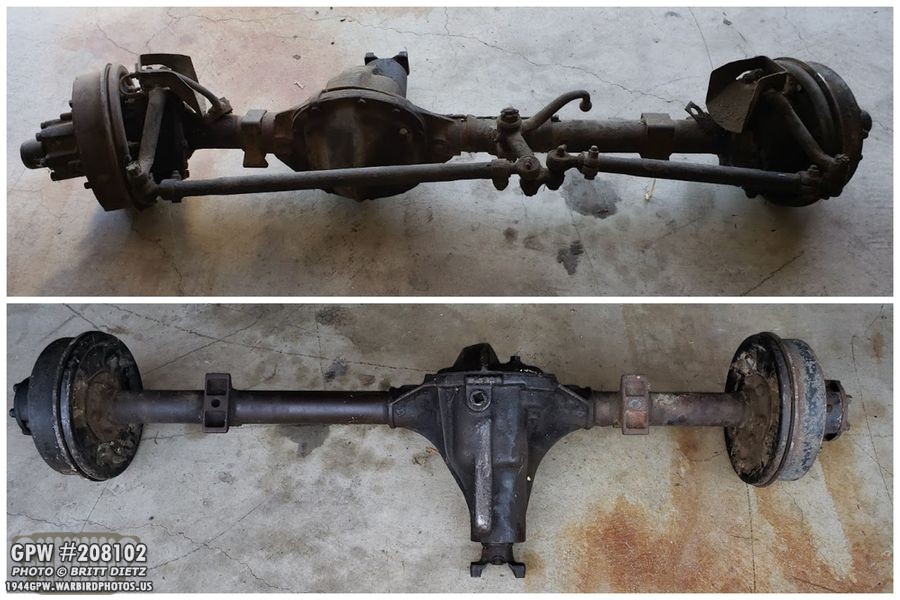
Well, that reality came sooner than I thought in November of 2019 when a fellow G503 member offered, for free, two wartime axles! He lived pretty close, and I was the first one to answer the call, so I went and picked them up. This is how they looked when I got them, rather beat up and needing a pretty extensive restoration.

Over the course of a few months, I took apart both axles taking anything that wasn’t welded on-off examining everything along the way. To my pleasant surprise, both were wartime GPW axles! The front axle is a mid-late war axle, while the rear is an early war axle.
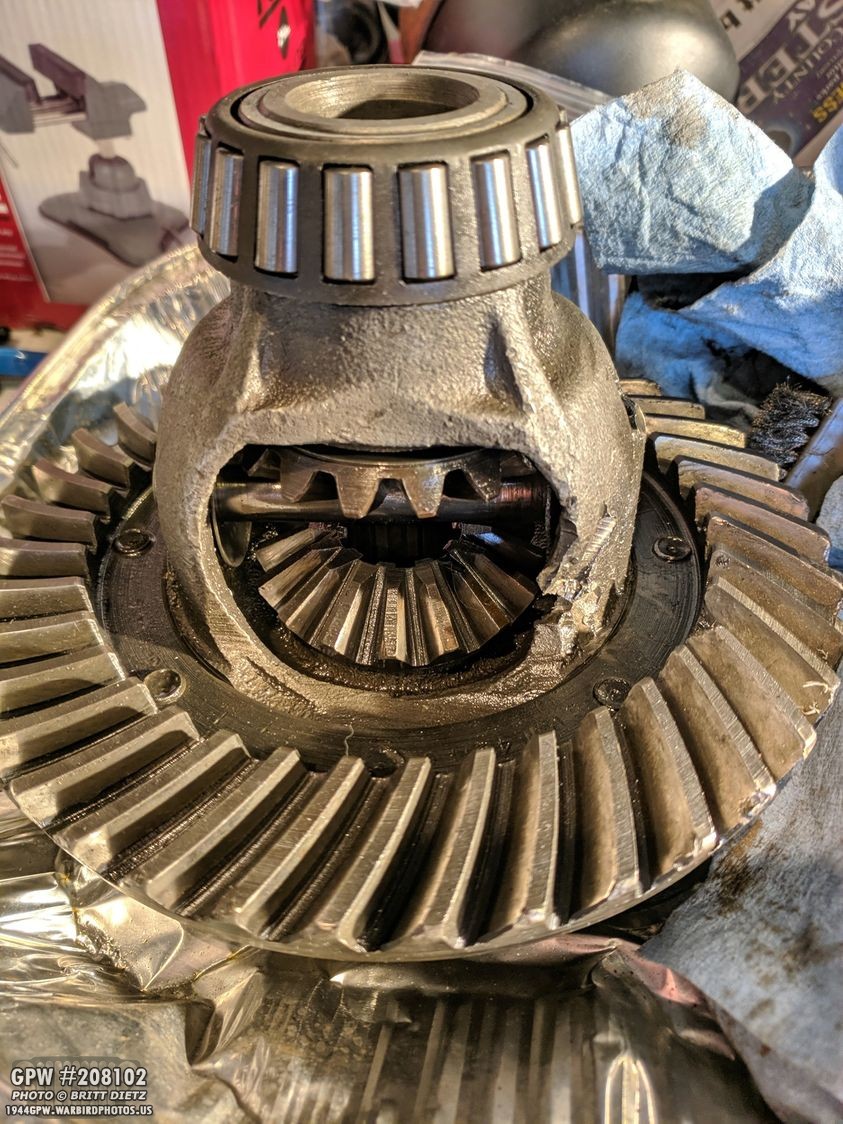
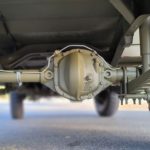
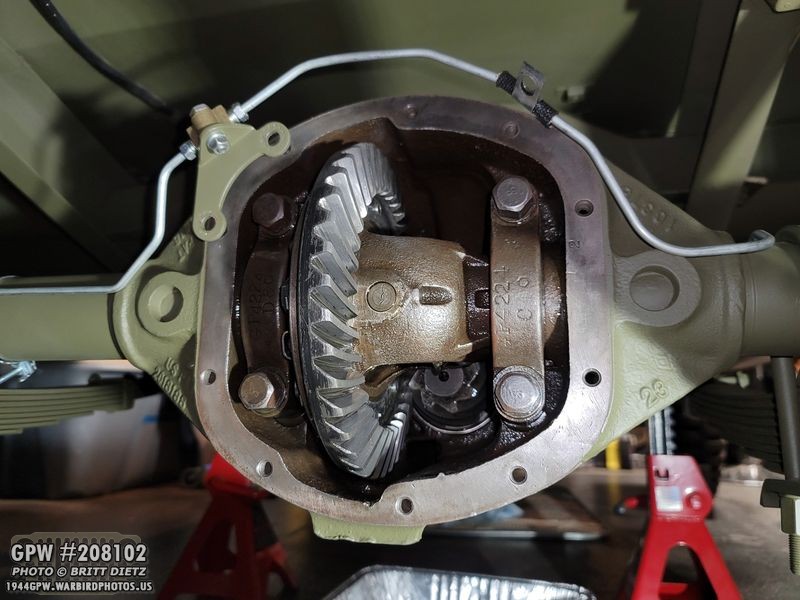
It was then that I discovered the rear axle had a major problem. At some point, it had a massive powerful spider gear explosion. As you can see here, the carrier was heavily damaged, the ring was damaged, and two of the spider gears were missing (they were in pieces all over inside the axle).

The explosion was so powerful, that it cracked the housing and also damaged the pinion. So, that’s the carrier, ring, and pinion that would need replacing, and the housing braze repaired.

The front axle was in impeccable shape, however, almost NOS! Everything had an F stamp (including the gaskets/shims) and looked original. I don’t think the front axle was ever taken apart.

I managed to track down on eBay a take-off GPW carrier (to the left) to replace the damaged rear one. It came with a pretty good set of spider gears.
It took almost 6 months of hunting and several setbacks (was sent a CJ one, got another pair that ended up being bad), I finally managed to get a NOS ring and pinion set. Still wrapped in wax paper and covered in cosmoline! And even better, the set was all GPW. Pretty awesome. It may look like a drumstick in this photo, but that’s the pinion.

Another issue with the rear axle was the drums. Both of the drums were way out of spec. Meaning, over the years, the brake pads had worn down the walls of the drums making them too worn down to safely use. I was fortunate enough to get two take-off GPW drums from another Jeep that were within spec (right photo) to use instead. The drums from the front axle were perfect, so I could use them.
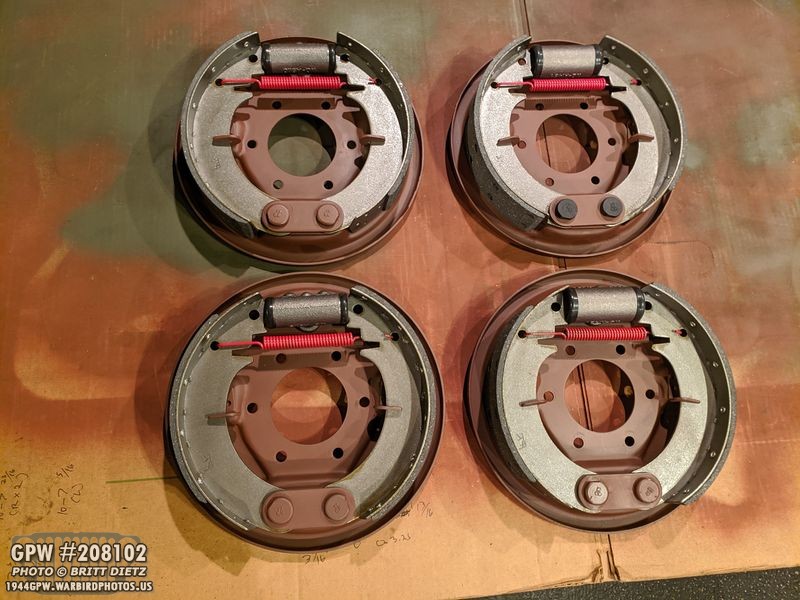
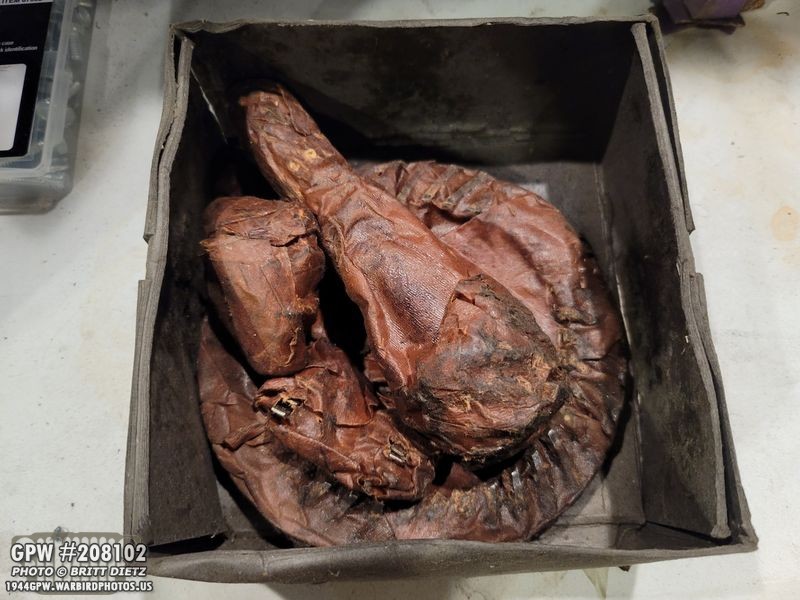
I used the original brake backing plates, but for safety I got brand new F marked brake shoes/pads, cylinders, and springs from Ron Fitzpatrick Jeep Parts. Those are not something you want to reuse, especially when you don’t know the history of the original ones.

It took nearly a year since I first got the two GPW axles, but I slowly (and methodically) rebuilt them using brand new bearings, shims, and brake lines. With both axles done, it was about November 2020.

The axles came a long way from when I first got them, a lot of hours meticulously restoring them and making sure they were perfect as perfect can be. Again, I’m very attentive to details. The rear axle, with a repaired housing, take-off carrier with good spider gears, NOS ring and Pinion, etc was now ready to go.

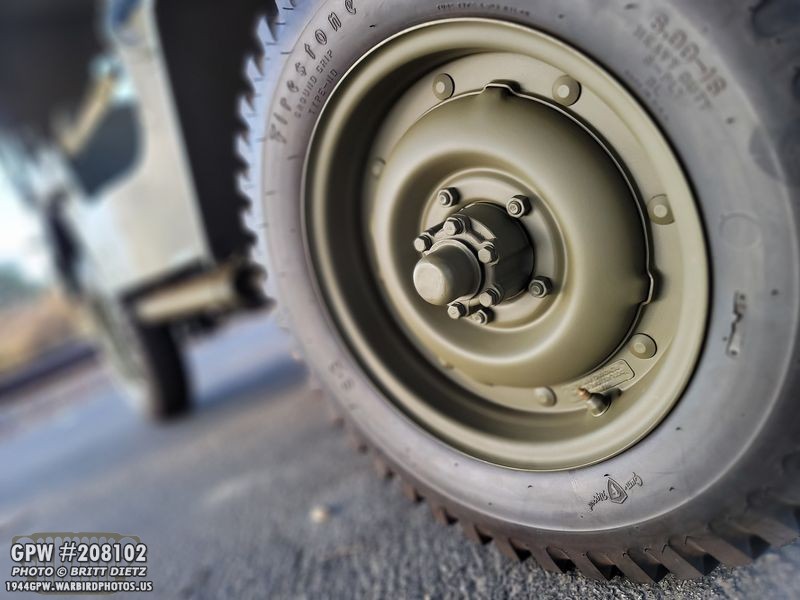
Around late summer of 2020, I purchased new Firestone NDT 600-16 (version 2) tires from Lucas Tires. I then finally got five repro combat rims (MD Juan). With real combat rims being hard to find in good enough shape to be safe, I decided to go with repro. The time it would take to repair originals, if I could find good useable ones, it was just easier to go with repro.

I put together the tires with the correct flaps and TR15 tubes. Axles were ready to go… Combat Rims and Tires were ready to go. Now, I just needed to get to taking out the CJ axles and putting in the new items.

And that started in December of 2020. With the bulk of the restoration finished and the projects slowing down along with the time off I had during the Christmas season, I decided I’d go ahead and start the long project of swapping the axles. I decided to tackle the axles one at a time, starting with the rear. I knew it would be about a month worth of work (figuring I might have to wait for parts if needed). Here is the CJ front axle removed.

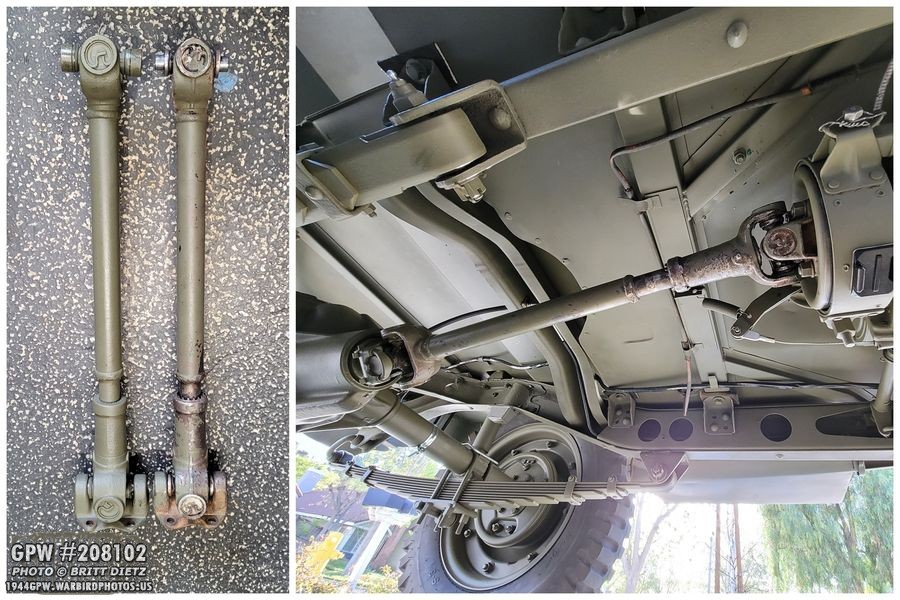
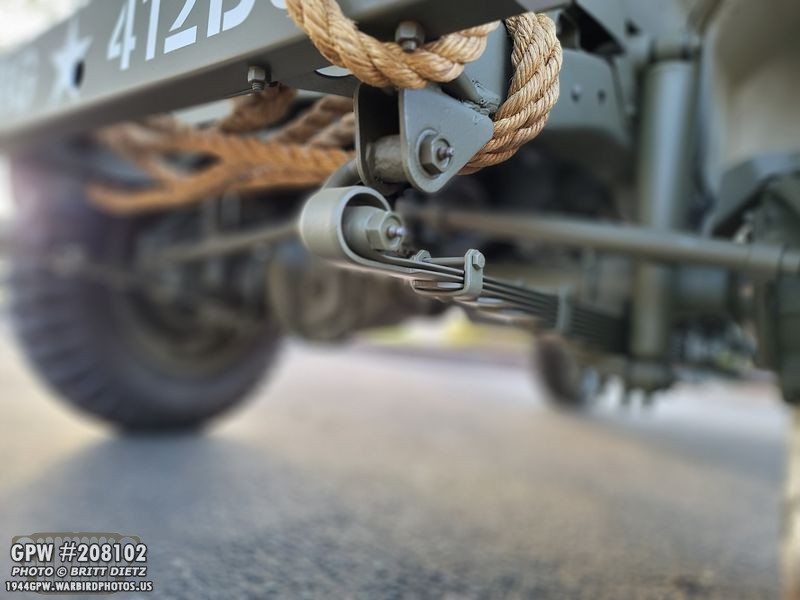
This also gave me time to check out my shocks, which hadn’t been removed, along with the driveshafts and springs. Unfortunately, the U bolts and leaf plates are different for CJ axles than wartime axles, which I didn’t realize. So I had to order a U bolt set from Ron (I got a GPW set). Shown here are the rear shocks, CJ U bolts, CJ leaf plates, and rear driveshaft after they were removed.

Thankfully, the springs and driveshafts for both the front and back were in great shape (at least so I thought with the rear driveshaft, more on that later), so I did a complete restoration. I did not, however, separate the spring leaves nor the driveshafts. All the springs and driveshafts are original GPW, and appear to be original to my Jeep.

The shocks were original GPW Gabriel shocks (both front and rear) and in GREAT shape, so all I needed to do, as well, is just clean them up and repaint them.

It ended up taking over a month to get the rebuilt GPW axles all installed, the brake lines installed, the restoration of the springs, shocks, and driveshafts finished, and finally, the brakes adjusted and brake lines bled. A mix of waiting for unexpected parts during the process and doing this all myself took a while!
And that’s when this story really began. On the first test drive in early January 2021 with the new axles, I first heard the clackity sound. I immediately noticed it as I was hyper-aware of anything out of the ordinary since I had changed a lot. It was a loud clackity sound that only happened when:
1) I was in gear (1st, 2nd, or 3rd) and at speed. Sound is gone in neutral.
2) Under load. The Jeep has to be on the ground and under a load.
3) 2 Wheel Drive. In 4 wheel drive, the sound is either so faint you can’t hear it, or it’s not there.
4) The Jeep is deaccelerating, if I press the gas at all the sound goes away.
5) It’s not a whine like from a bearing. It’s a distinct clackity sound.
Video: https://www.youtube.com/watch?v=s7QUmyWHcaM
That’s when the first tests began. I put the Jeep up on jacks… sound wasn’t there. Jeep needs to be on the ground under a load. I removed the REAR driveshaft, the sound went away (but it also does in 4 wheel drive anyway). I removed the front driveshaft, sound was there. It sounded like it was coming from the rear of the Jeep, so I re-opened the rear axle to check it out.

It had only been driven about 5 miles, and there was a ton of metal shavings when I drained the oil. This turned out to be the NOS ring and pinion rubbing making the shavings. But, the area being shaved was uniform around the entire ring, so that couldn’t be the cause as the clackity sound was distinct and not a whine, which this would sound like if it was the real issue.

The first thought was, perhaps it’s the spider gears. So, I got all new hardware (thrust washers, pin, etc) and replaced the spider gears with pretty much NOS ones.

We also checked the runout on the carrier to see if it was warped, perhaps causing the ring to slam into the pinion at one point when revolving causing the clackity sound. I removed both the ring and pinion to reset them and clean up any metal shavings in the bearings. It turned out that the carrier did have a bit of a runout beyond what it should be. After reinstalling everything, refilling the oil, and driving the Jeep again, the sound was still there. No change whatsoever.

The next thought was, perhaps it’s something wrong with the transmission or transfer case. I had not yet restored these two items (the previous owners made a good effort to restore the T-84 transmission, but the transfer case looked to be never opened since WW2).

I took several weeks and completely tore down, restored, and rebuilt both the T-84 transmission and the D-18 transfer case. A lot of the T-84 items were replaced, though it still had some original GPW items. I was able to reuse most of everything, but the 1st and 2nd gears were replaced, all the bearings/bushings and pins were replaced, the shift forks and shift rods were all replaced as well. Everything else was in good enough shape to reuse.
The D-18 was immaculate and ALL original. It was never opened, as mentioned, and everything had F stamps. And, it was in GREAT shape. I only needed to replace the bearings (as a precaution), one shaft, and one bushing. There was a lot of backlash in the D-18, which I reshimmed and got that backlash perfectly where it needed to be.

I then repainted everything, resealed it all with new oil seals, and reinstalled it back in the Jeep. I also got the T-84 shift tower repaired so shifting in the Jeep is nice and tight, yet fluid when moving. It’s amazing!
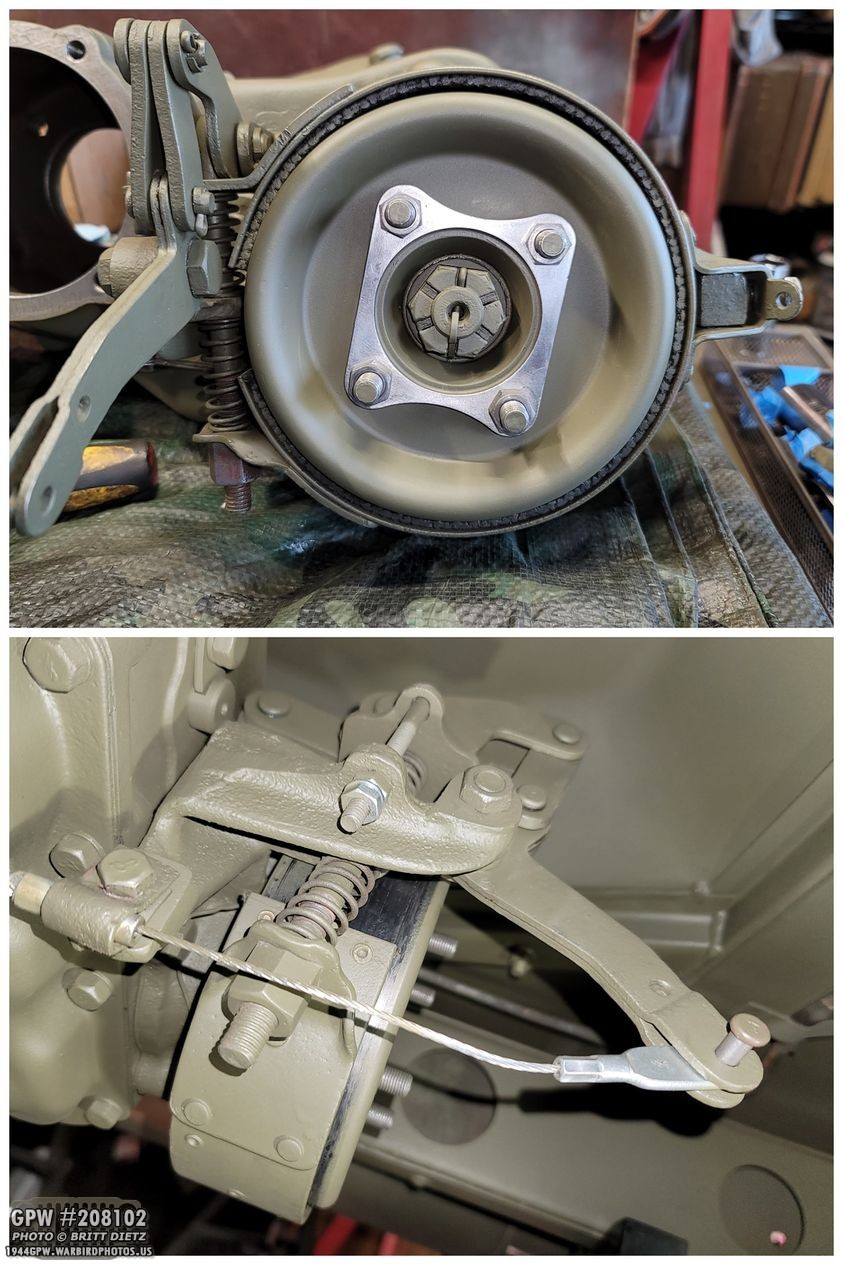
While I was restoring/rebuilding the T-84 and D-18, I also rebuilt the external emergency brake. I used a new drum since the drum on there was warped. I had a new brake pad added to the outer drum. I also got a new companion flange to replace the one on there as it was slightly leaking oil. I then put it all together exactly by the book. I will say to those saying to check this to see if it’s too tight, I’ve completely loosened the outer band so it’s not contacting the drum at all, no change in the clackity sound.

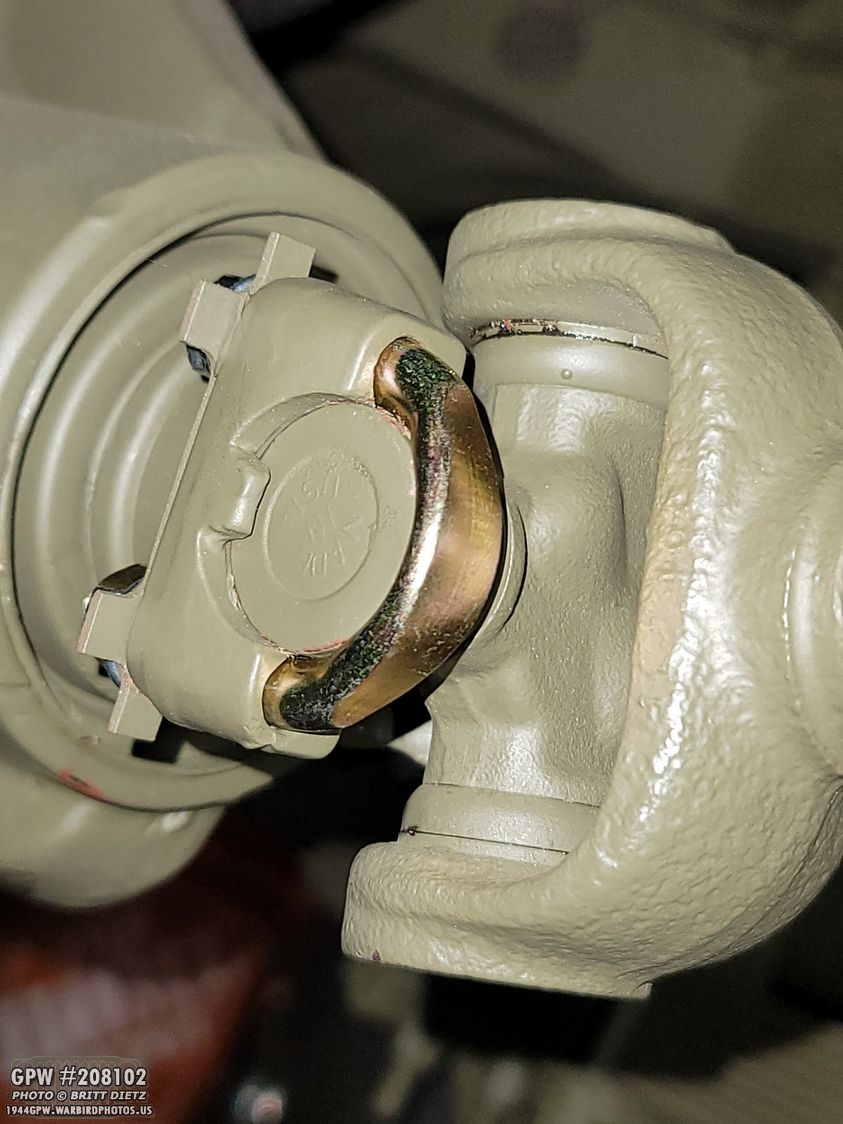
So, with the transmission installed, I tested the Jeep again. NO change in the clackity sound. UGH. Even having the floor plates open to the transmission and bell housing, the sound was not any louder. So that means it isn’t clutch-related. So, now I focused on the rear driveshaft. After some tests, it was discovered that the driveshaft was bent. Remember, this is the original GPW driveshaft that was on my Jeep even with the CJ axles.
First thing I tried, replacing the U bolts in case they were worn down and letting the driveshaft ‘clackity’ when turn. That didn’t change anything.
To test if the bent driveshaft was the problem, I borrowed a completely different driveshaft (that was perfectly straight with a totally different universal joint)… clackity sound was STILL there. No change at all.
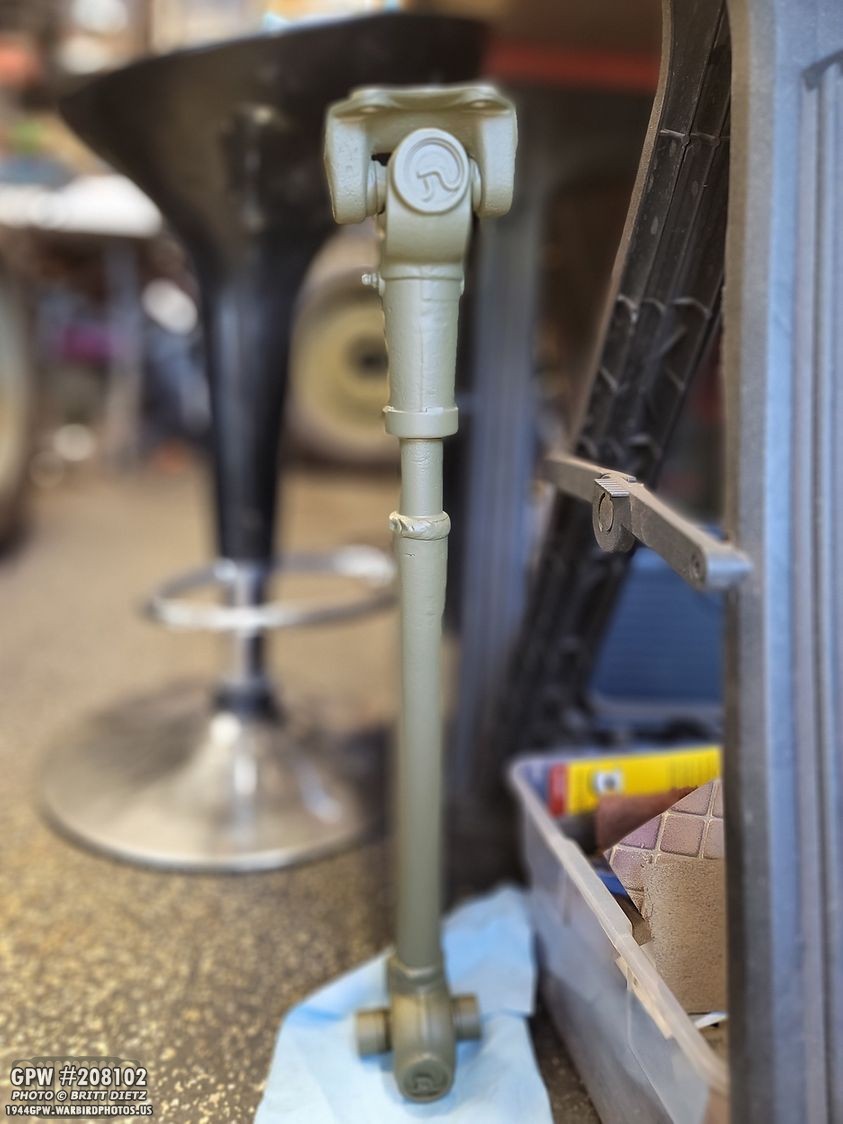
I also had the original driveshaft straightened, so I put it back on the Jeep. Again, no change in the sound. :-/ It also was given a brand new universal joint. So that’s two different driveshafts, three different universal joints, two sets of U bolts, and two companion flanges on the transfer case side. Sound did NOT change.

So, with everything and every test seeming to be exhausted, it was thought that the ONLY explanation is that the spider gear explosion did something to the rear axle housing, causing all this. Rather than continue to throw money and time into it, I went and got a SECOND GPW rear axle. This one is a mid-late war GPW axle (so it matches the front axle now!).

I was able to use the carrier, ring, and pinion in this axle (which are original to the axle as far as I can tell). I got brand new bearings for the pinion and carrier. Just in case!
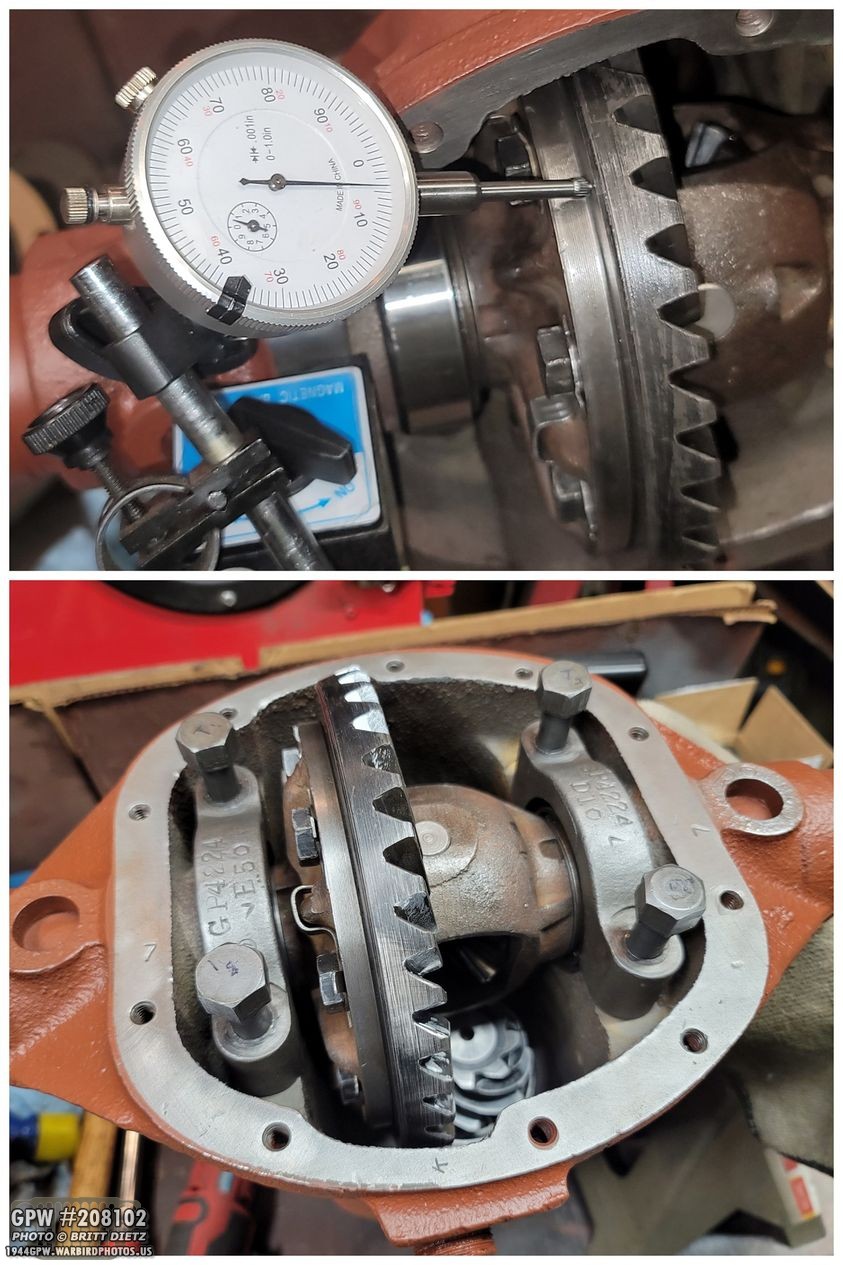
This time, I had everything checked down to the smallest detail. Runouts, backlash, shimming, torque, etc etc etc. Everything was meticulously set, checked, and rechecked. I had a Jeep expert help me setting everything and trust me when I say, we made SURE everything was set right and as perfect as perfect could be.

It took a few weeks, but I finished this second GPW rear axle. I only used a few items from the first GPW rear axle, such as the brake plates and drums (which didn’t come with this second axle). I also reused the brake lines, differential cover, and yoke. Everything else was new.

And then it was time to change the axles. I removed the first GPW axle (shown gutted here), and started work installing the second one. I was very meticulous installing the second rear axle making sure everything was done correctly re-checking everything along the way. I didn’t want any mistakes and wanted to be sure I’ve covered everything. The brakes were re-adjusted, and the lines were re-bled.

And the first test drive… the clackity sound was STILL there. At this point, it’s late April 2021. That’s a totally different rear axle, and the sound is STILL there and still coming from the rear of the Jeep. UGHHHH! We were running out of ideas at this point. Stumping those I consider to be experts with anything Jeep.

So, another idea was to rotate the wheels, in case one of the combat rims were bad. So, I removed all the wheels, deflated the tires, re-torqued the combat rims, re-inflated the tires, and rotated them in a X pattern. So, the front driver’s tire became the rear passenger driver. Rear driver was now the front passenger.

I double and triple-checked the lug nut torque on everything and made sure everything was where it needed to be… I figured (at this point) nothing would change. And I was right. NO change with the clackity sound.

I’m sure you can imagine how frustrated I was getting at this point. We’re now into early May 2021. This has been going on since early January 2021, and the Jeep has spent more time on jacks than her own wheels since I started all this in December 2020. At this point I’ve rebuilt the Transmission/Transfer Case, replaced the flange, swapped driveshafts (and new hardware on them), swapped the axles, and rotated the wheels.
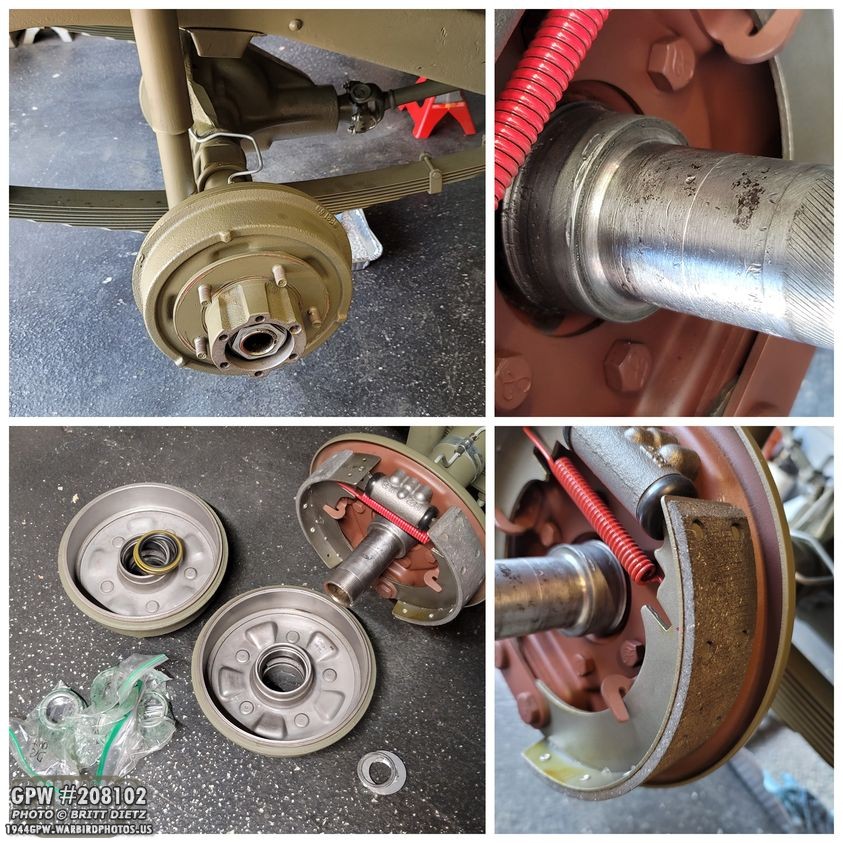
I was running out of things to check. But I wanted to focus on the rare few items I reused from the first axle. So, I removed the brake drums on the rear. I examined everything on the brake plates looking for anything that might be missing paint, have chips/nicks, or look like they were rubbing on something. I couldn’t find anything. I checked out the bearings in the drums, nothing weird with them.

Just in case the rear drums were catching on something being out of round, I took them to a local brake place and had them resurfaced making them perfectly round.
The rear axle yoke (which is from the first axle) was leaking a little bit of oil, so I put a speedi sleeve one (see last week’s update) which tightened it up. I’m thinking I might try and get a different yoke to test soon just in case, but after the speedi sleeve, it was nice and snug in there.

I checked every little thing with the rear driveshaft. Everything was tight, didn’t wobble/shake, and the backlash was perfect. The splines were in sync with each other and I had it as perfect as the TM manual can be.
Test drive… sound is STILL there. UGH! At this point, the Jeep expert friend who helped me set the ring and pinion finally came out and checked out my Jeep for a few hours. I drove it as he listened, he drove it and listened and felt for any weird vibrations/movements. He then went under my Jeep and thoroughly checked everything out. Nothing looked out of the ordinary, and everything felt perfect. He felt I should just drive it and ignore it. He felt that it isn’t ‘mechanical’ in the sense that it’s dangerous or going to cause something to fail. He feels it’s just a noisy item from wherever it is.
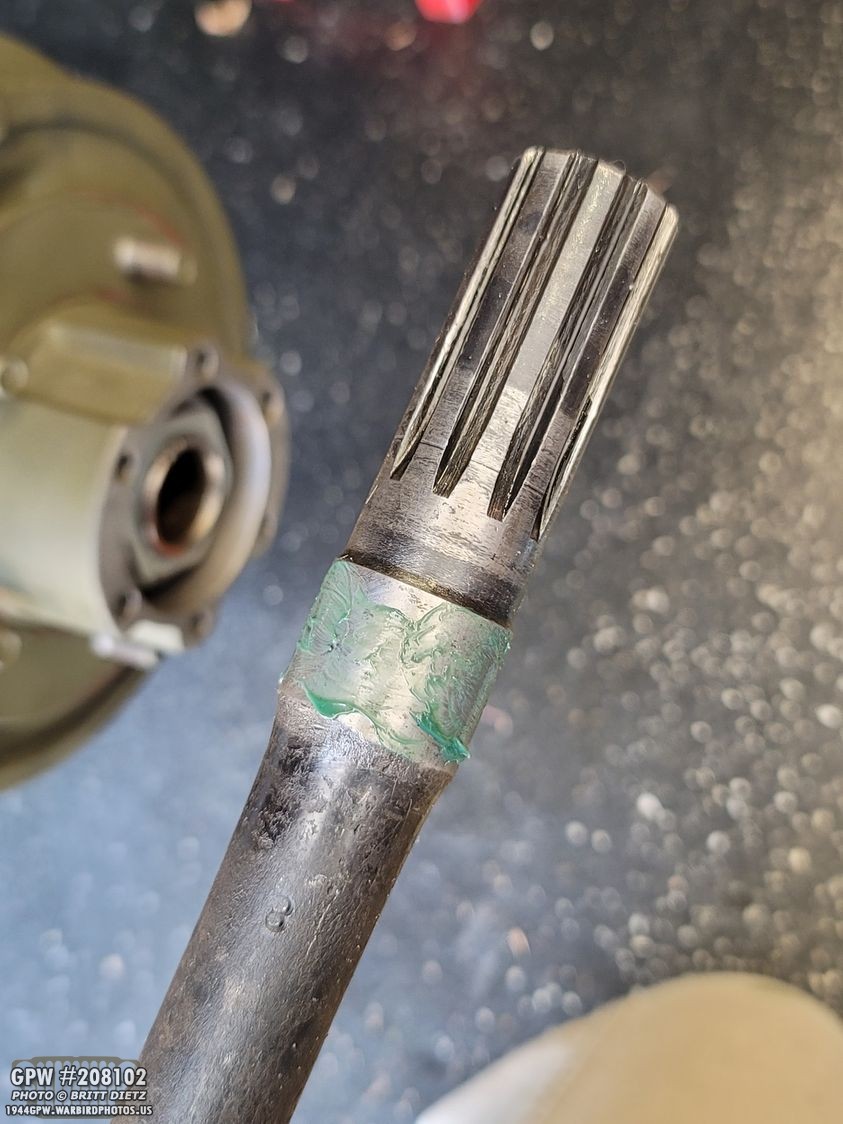
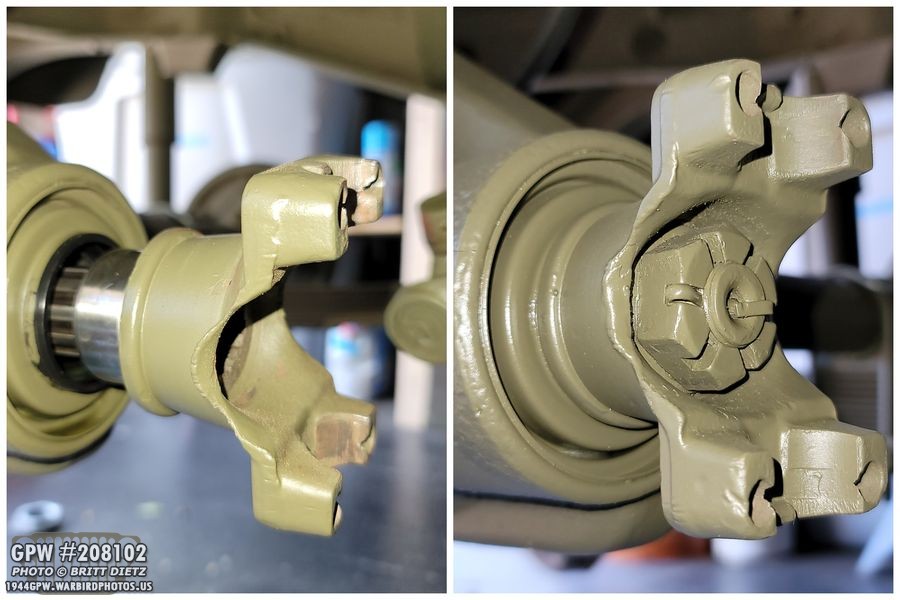
I just can’t ignore it, so I continued to do more tests and check more things off the list. I removed my axle shafts as both of them are from the first axle. I checked both of them out for any chips, wear, cracks, etc. Nothing wrong I could see. Both were straight. Typically, axle shafts are either they work or they brake, nothing much in between. But, I wanted to be SURE.

So, I made a trip out to a museum nearby where my friend keeps his Jeep. He let me go and steal the rear axle shafts from his Jeep to test.

After cleaning them up (they’ve not been restored in many many years), I put them in my Jeep and took it for a drive. As expected, the sound was STILL there. No change.

So that leads me to this week. I’m almost stuck. I have a few more things I want to focus on, mainly the drums and the wheels. I hope to borrow (from my friend’s Jeep), his rear wheels to put on mine to see if that changes anything. I also want to use different drums and see if that changes anything. I hope to do that in the next few weeks.

So, the question now is… where is this sound coming from? How do I know it’s coming from the rear, I also replaced the front axle?! Do I regret doing all this?
Well, I don’t know where the sound is coming from, but in the next few photos I’ll explain how I know it’s coming from the rear. As far as regretting it… yes and no. I love having wartime axles, combat rims, and correct Firestone tires. That really takes the Jeep to a new level. But, I also feel this ‘supposed to be one month’ long project has now been 5 months. I could have kept the CJ axles and slapped combat rims and new tires on the CJ axles and called it a day.
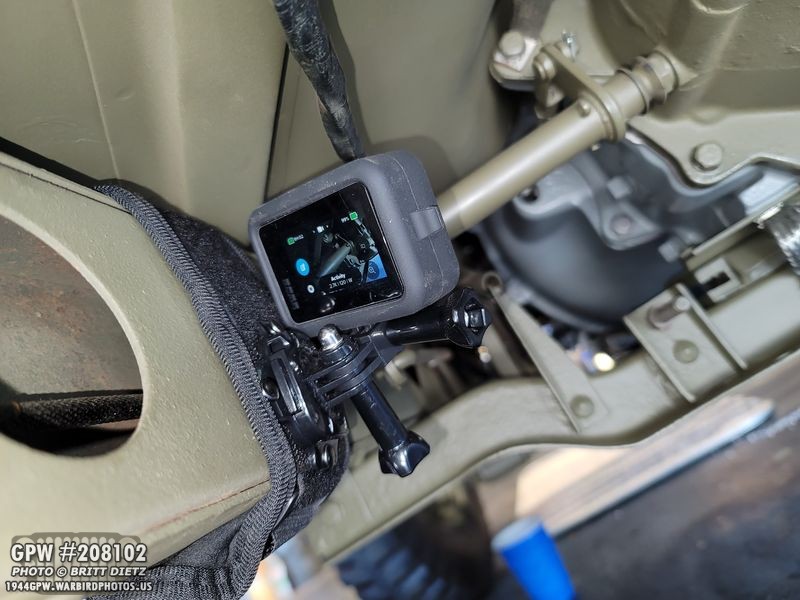
So, let’s first get into how I KNOW that the sound is coming from the rear. That’s thanks to GoPro. A little over a month ago, I went out and bought a GoPro Hero 8 to help me try and located where the sound is coming from. This allowed me to put the GoPro all over the Jeep in different spots, drive the Jeep, and then listen for the clackity sound in the videos.

I’ve probably shot over 20 videos now with the GoPro all over everywhere. Two days in particular, I mounted them one day facing all four wheels. I also mounted it facing every direction of the driveshaft. This week I took a day and mounted it all over the Jeep in different spots based on theories of people I know, those on G503, etc. The results?

In every single video, the sound can ONLY be heard well when the GoPro is facing the rear axle, above the rear axle, or facing the rear axle wheels. Anywhere else, you either can’t hear the sound OR it’s faint in the distance. If you’d like to see/listen to the most recent video which is all five of the locations I mounted it that day (including the last part from the rear bumper), you can clearly hear it’s not coming from the front axle, not the bell housing or the transmission, but the rear axle. See the video here: https://www.youtube.com/watch?v=Jj1l7FayQ9w

All videos point the sound coming from the rear of the Jeep. People that have driven with me in the Jeep agree with me that it sounds like it’s coming from the rear. So let’s go through it again quickly how it stands now. The rear axle is the SECOND rear GPW axle.

I’ve rotated the front wheels to the rear and checked them for any issues.
The rear springs/shackles were restored and checked. Since the clackity sound is something rotating, it’s not coming from them.

The front axle works great, and all GoPro videos pointed at it prove that the sound is not coming from there.
The GoPro videos facing the front wheels, the sound isn’t coming from them. Plus, the tires on there are the ones that were on the back.

It’s nothing to do with the Torque Reaction Spring assembly, which I am happy to have on the Jeep.
Nothing wrong with the front springs or shackles.

And all four of the shocks are not causing the issue. And that’s pretty much the only things that changed/were restored from the CJ axles to the GPW front axle and original GPW rear axle.
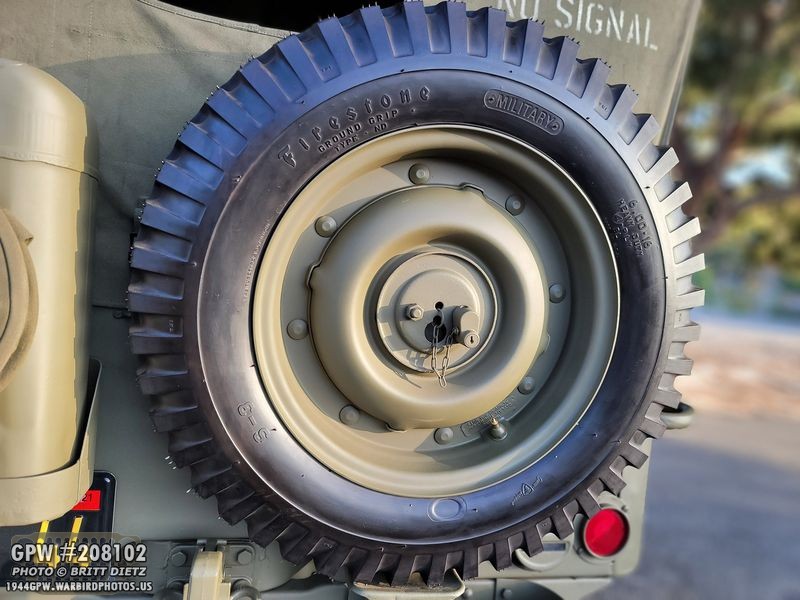
I haven’t tried putting the spare tire on the rear axle, but since I rotated the wheels, I don’t think that’ll make any difference whatsoever.

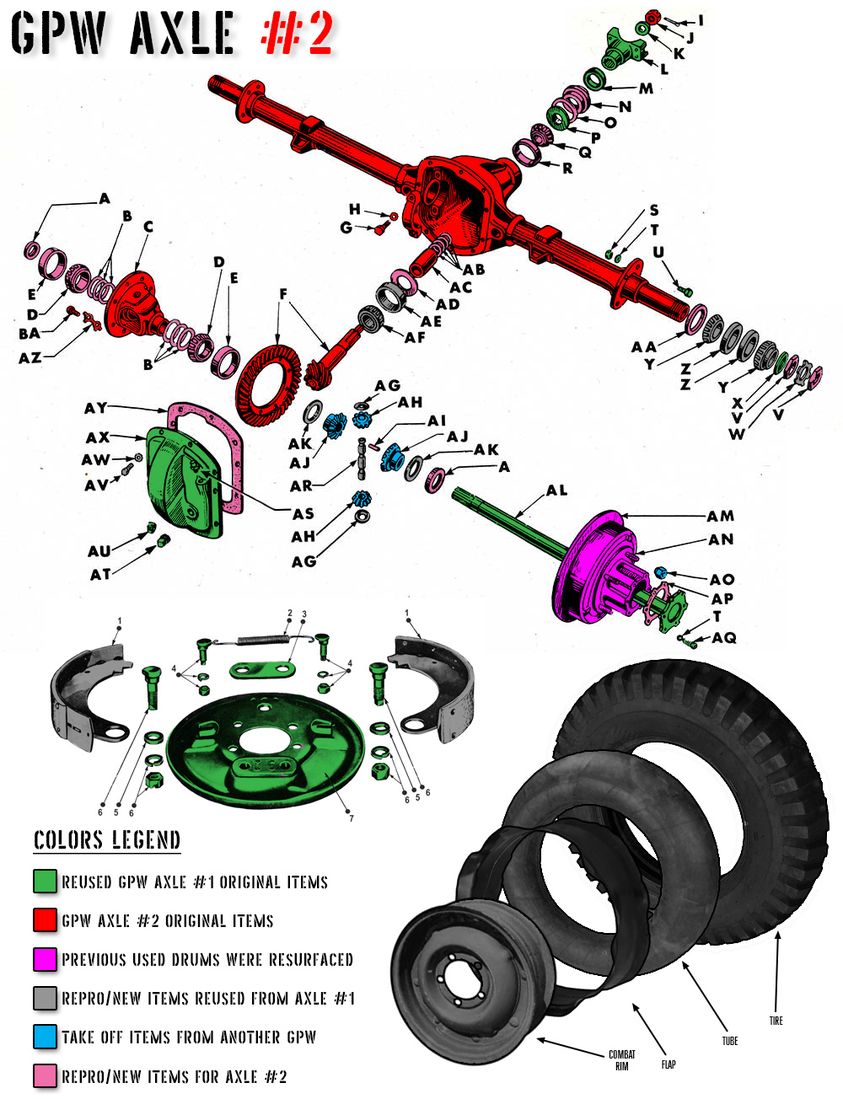
So, to keep track of things, I made a series of charts to help everything see what was done. Since we know it’s the rear axle, I’m focusing on that. Here’s everything that I did to the first GPW rear axle. As you can see, I used original items anywhere I could. Important things like bearings, brake pads/cylinders, shims, etc I used repro from RFJP. Since the rear axle drums were out of spec, I used the two in-spec take-off GPW drums. Remember, the first rear axle had a massive spider gear explosion sometime in its life, which meant I had to replace the entire differential items (carrier was a take-off from another GPW, and the ring and pinion were a brand new NOS GPW set). The combat rims are MD Juan, and the tires/flap/tubes are from Lucas Tires.
After the clackity sound appeared, I opened up the differential to find metal shavings from the ring and pinion. I replaced the spider gears in the carrier, thinking that might be the sound. No luck. We did tests to find that there was runout on the carrier and ring, probably causing the metal shavings, and possibly due to the spider gear explosion. We thought, maybe that ‘tweaked’ the housing in a way that’s causing the sound. So, I decided to go the route of a second GPW axle, in much better condition. This chart shows what was used for the second axle. The items in green were original items reused from the first axle, items in grey were repro things used from the first axle. I used new bearings and I used the ring/pinion/carrier that were already in this second axle after cleaning them up and resetting them. The take-off drums from the first axle were taken to a place and resurfaced.
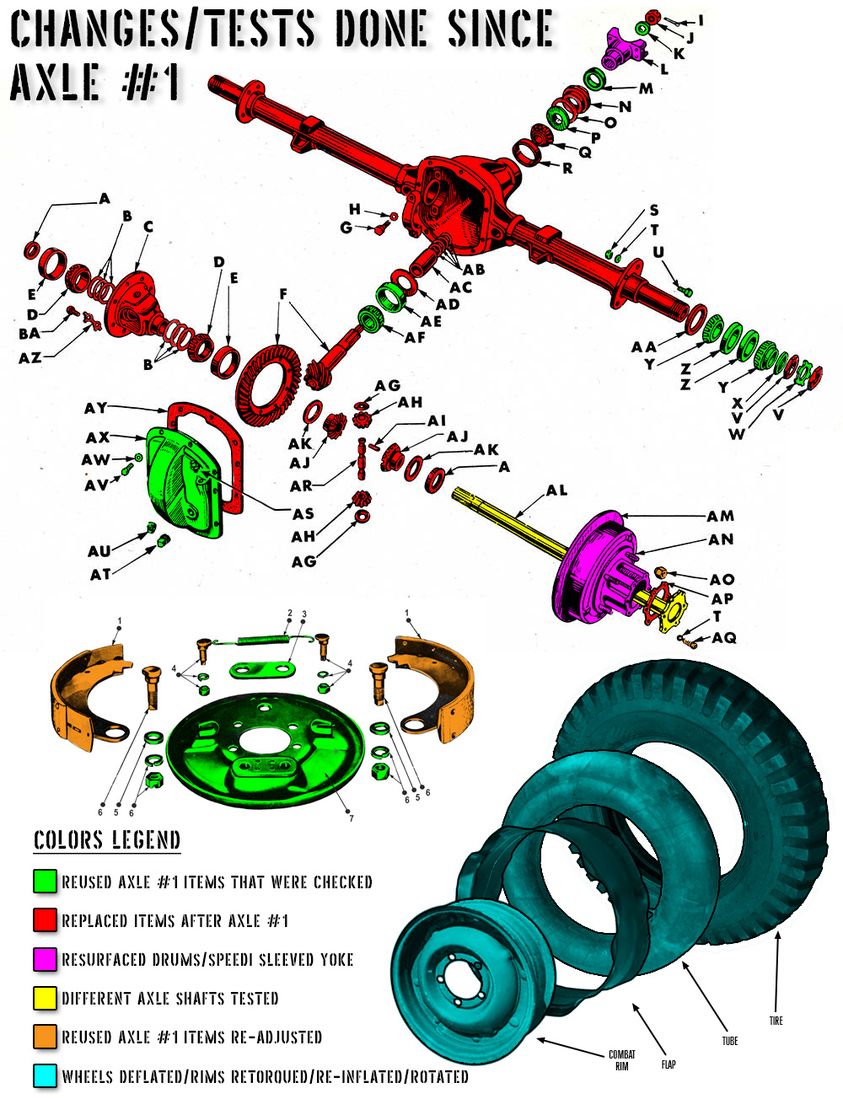
That leaves us with this last chart, which shows everything that I’ve tested/swapped/replaced/done as of right now. Anything in red has been completely replaced at this point from the first axle. Things in green are the only items still on there from the first axle (mostly the repro bearings and races I had bought, which have been checked… plus this sound doesn’t really sound like a bearing whine). I’ve also rotated and de-inflated/re-torqued, re-inflated the tires/combat rims.
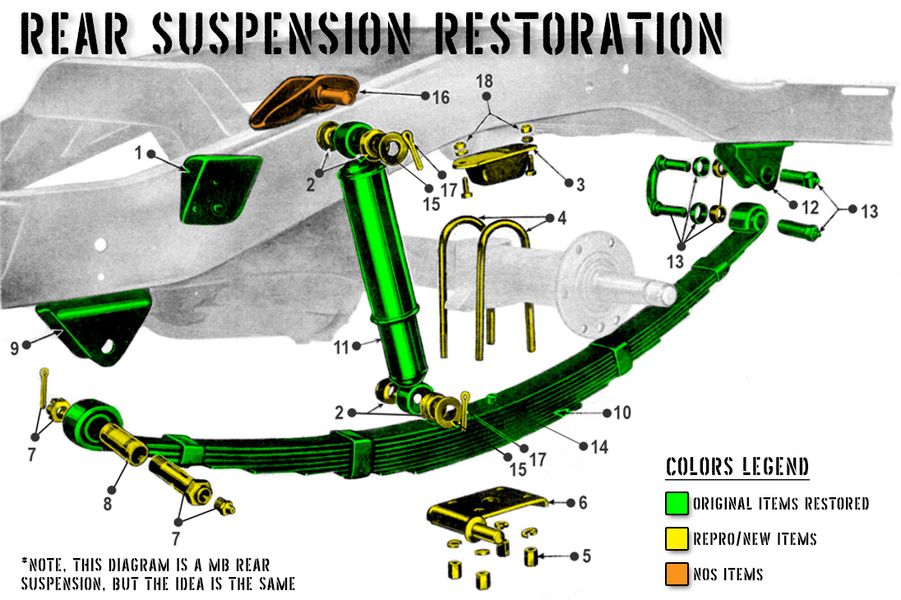
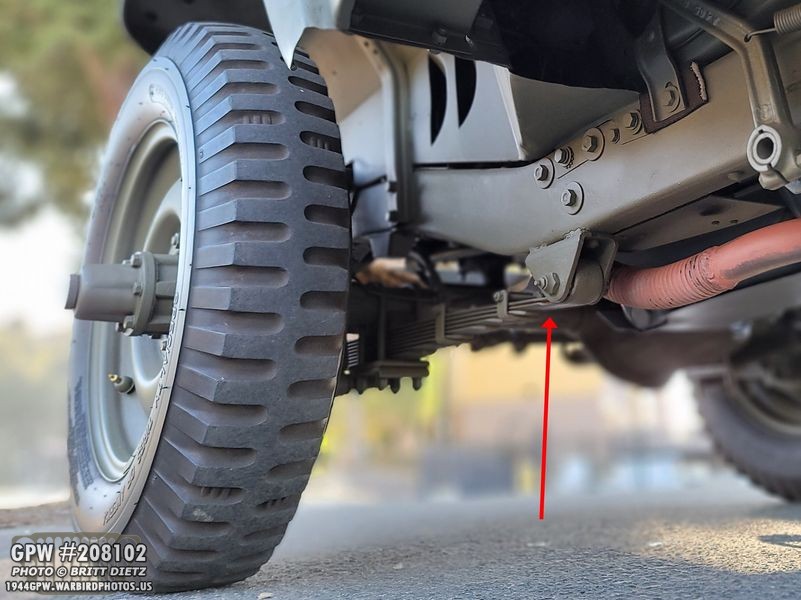
So, as far as the rest of the items I’ve done trying to check for any other issues outside of the rear axle I’ve done… here’s a look at what I did for the suspension (pretty much the same for the front and back, though I was missing the frame shock mounts on the rear, so I put take-off ones on. The original front frame shock mounts were still there).

Here’s a look at the T-84 Transmission restoration (original GPW to my Jeep) that I did. Remember, the sound did NOT change after this full restoration and rebuild.
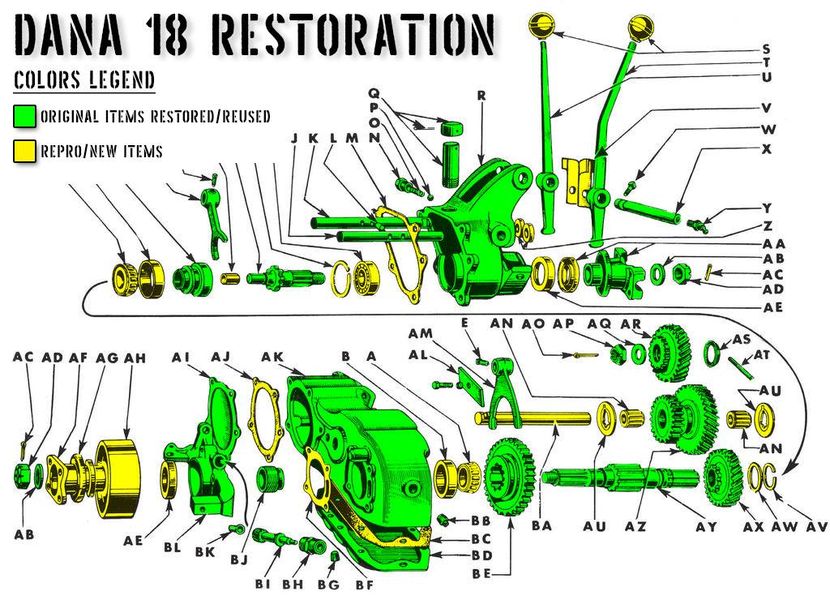
And a look at the D-18 transfer case, also original to my Jeep after the full restoration and rebuild.

And finally, a look at the brake system. I replaced the entire system when switching from the CJ axles to the GPW axles since the brake lines were pretty old (possibly original) and I wanted to switch to DOT 5. New master cylinder as well.

So, after this long journey (thanks for sticking through the entire thing!), here’s where we are. Mid-December to Mid-May this project has been going on. FIVE months! Here’s a look at the Jeep in early December, and then earlier this week. While I’m so happy to have GPW axles, combat rims, and Firestone tires… I’m hitting a wall with this clackity issue!

So, moving on to some quick things as I wrap up this update, I wanted to give an update to last week’s fix on the gas pedal linkage spring. Short recap, I noticed that the gas pedal wasn’t springing back all the way when pressing it down and letting go. I found the spring wasn’t stretched enough, so I shortened the top tab that the spring attaches to and moved it back almost an inch. That was perfect, it’s stretched enough now that the tension will spring the gas pedal back to where it should be! That’s some good news!

Next week, look for an update on my Jeep display sign I’m custom making. It’s pretty much complete along with the custom ammo can stand.

And that’s it for this week. Not as much of an update as it is a story and journey. I’ve worked on these axles so much the last five months that I feel I know them inside and out. That’ll be good if I run into any issues in the future, but this clackity sound still eludes me. But I’m going to keep at it until I literally check everything off. Wish me luck! If you want to follow along with the latest on G503, check here: https://forums.g503.com/viewtopic.php?f=4&t=323316
Till next week…
1 thought on “The complete ‘clackity’ Axle Saga”
Comments are closed.