 Ammo Crate Radio , Display Sign, & Flea Market!
Taking a break from the axle clackity issue this week, I focused on some fun side projects for the Jeep when it’s on display at future events. First, I had an idea for a custom-made Ammo Crate radio that looks like a WW2 soldier field mod! I go through the entire idea to finish product. I also finished my custom-made ammo can Jeep display sign. I also got some fun Jeep items from a local flea market over the weekend!

The mighty Jeep! This shot came out a lot cooler than it looked on my phone. Really gives the Jeep that ‘epic steed’ look.
Even as I still continue to try and figure out the clackity noise from the rear axle (see last week’s update), I changed gears this week and decided to take my mind off it and work on some fun ‘extra’ projects. Anyone who has followed my updates for some time knows I like to go above and beyond with details and fun custom builds, like a WW2 Coca-Cola overseas crate from scratch!

My latest project sprang from this image that I saw online a few months ago. It’s a Jeep with a loudspeaker and a soldier speaking through a microphone probably telling the Germans in the area ahead to surrender. The reason this photo made me pause is that my 1941 Zenith radio I converted into a Bluetooth radio was great, but at events outside it’s just too quiet. That got me thinking, the GIs were a crafty bunch making all sorts of field things out of nothing. The box the loudspeaker almost looks like an ammo crate, and that’s when I had the idea… what if a soldier turned an old ammo crate into a radio? I could make one that was loud enough for outdoor events!

It sat in the back of my mind until I happen to find this item at a local flea market… a late 1940s/1950s Jensen Intercom speaker. At $20 with the promise that it worked, I couldn’t pass it up. Even though it’s post-war, this still has the look and was perfect.

Doing research on the speaker, it’s a Jensen P8T, which is an amp speaker. That should be plenty loud for outside events! I hooked it up to my modern receiver, and it worked! It also got really loud. GREAT!

So, I came up with this design, that I modeled in 3D. I wanted to find an ammo crate that would house the ‘guts’, and the speaker would sit on top. Something I could easily see a GI do in wartime.

I wanted to lid to be hinged so it could rotate open when I need to access the internal electronics.

But I knew it would be top-heavy because of the speaker, so I needed some wires to hold the lid open but not go all the way back till it falls backward. Originally I thought, I might have to build a crate. Seems simple enough.

I knew it was going to be some time till I found the right ammo crate, so I went to work prepping the speaker. I cleaned it up (and the speaker), and painted it the same 33070 OD Green as the Jeep. (No, I did not paint the speaker). I added a little cast plumping pipe connector as a ‘neck’ where the speaker wires would go through.

Inside that ‘neck’ connector piece I got this ‘lamp pipe’ at Lowes that’s hollow in the middle to allow wires to pass through and it came with two sets of washers, star washers, and thin nuts. That would be perfect for mounting on the ammo crate!

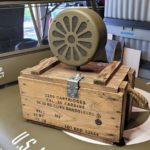
I wanted a crate that looks somewhat like the .30 Cal cartridge crate shown at the top but with a hinged lid like the bottom one. My two options were to build one myself (and with wood prices right now, it’d be expensive), or find one at a flea market. I scoured flea markets but hadn’t found one for sale yet…

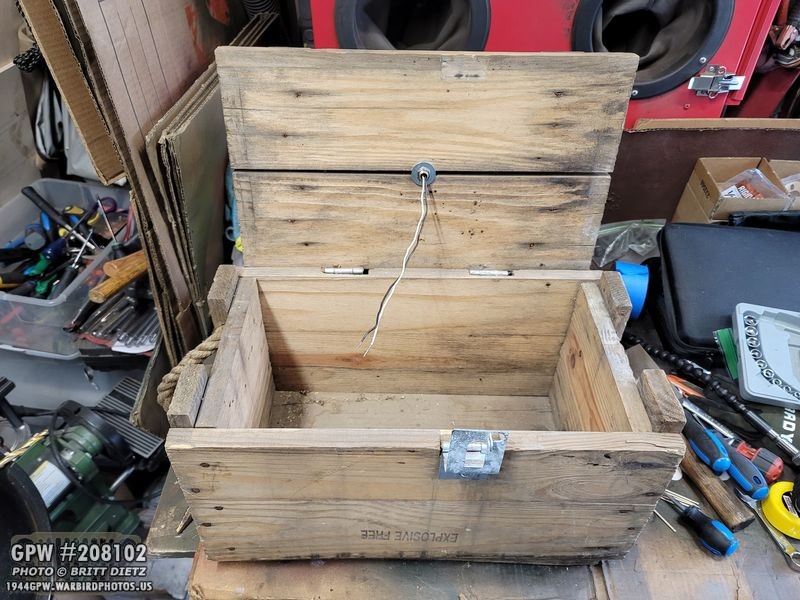
Until last Sunday at a flea market where I found this ammo crate for $20! It was a little larger than I wanted, but for that price and checking off all the other boxes (hinged lid, the .30 Cal overall style) it was too hard not to pass up!

Looking inside, it was rot-free and in really good shape.

The wood was in great shape outside, and the nails are still holding well. It has a nice ‘aged wood’ look to it. This would have been pretty easy to make had I needed to, once wood prices came back down. If someone can’t get ahold of an ammo crate, you could make it!

And, since I was going to have to drill into it, make holes, etc I really wanted to avoid messing up a real WW2 ammo crate. This one is dated on the bottom with Feb 1964! Perfect! On one of the sides, ‘Explosive Free’ was stamped, which the seller told me that they held practice ammunition.

Sitting the speaker on top of the crate, I could already see it coming to fruition!

Since I’d be putting this on the Jeep, I didn’t want the wood mucking up my paint job or makings, so I put some furniture pads on the bottom (same thing I did with the Coca-Cola wooden crate). Plus, it helps prevent it from sliding.

I drilled a hole in the ‘center’ of the lid (which is as center as it can get but looks off-center due to the top wood pieces not being equal). I then was able to install the speaker. Nice and tight on there, but with the ‘neck’, I can actually turn the speaker left and right to point whichever way I need.
Here’s a look inside at the end of the lamp pipe and the washer, star washer, and nut holding it to the lid. The speaker wires easily go into the box.

For the latch, I decided to have some fun and I took one of the spare lead seals I have and crushed it with my WW2 ordnance crimper. One side has the flaming bomb ordnance logo, the other with US. I then re-drilled out the hole so I can insert and take out one of the wires to unlatch it and get inside. Lead seals stamped like there were used on some ammo containers during WW2.

As mentioned when I was pre-designing the idea, I knew it would be too top-heavy and want to topple over when the lid is opened with the speaker. So, I went and got some vintage-looking rope and attached it as shown, the lid is not fully open but enough of an angle that gravity from the speaker is wanting it to stay open, but the center of that gravity is still mostly centered so the box won’t tip over.

I put another rope on the other side for support. Here you can see the angle of the lid, it’s very stable when open even though that speaker has some weight to it!
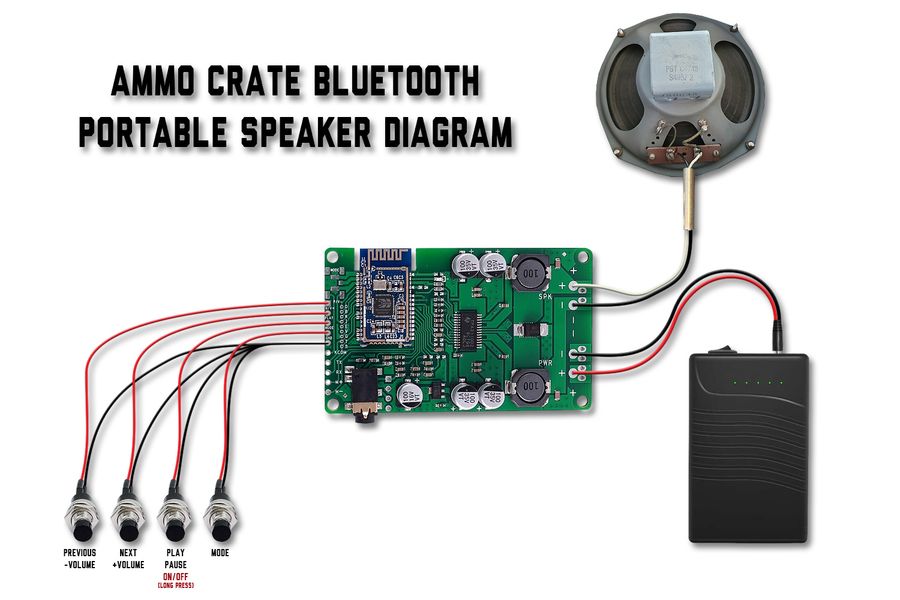
Now for the insides, the most important part. When I first got the speaker a few months ago, I went online and researched Bluetooth radios I could take apart for the guts that were powerful enough to be loud with the speaker. My 1941 Zenith Radio has BigLots ‘retro’ radio guts in it, but they are only 5w speakers. And, it needed to have a single speaker. After a few weeks of searching online and in stores, I couldn’t find anything. So, I stumbled across the world of Amp Boards. I found this PERFECT Bluetooth-enabled amp board that’s mono output! Only $18 on Amazon. To power it, I had to do some research but found this inexpensive 12v battery bank that should easily power it. Finally, to access the buttons, I would get some pushbuttons switches. It was starting to come together once I made this pre-plan diagram!
– Link to the Mono Bluetooth Amp board (valid as of 5/2021): https://www.amazon.com/Bluetooth-Amplifier-Board-BK3266-Audio/dp/B08FWV4PLP/
– Link to the 12v Battery Pack (valid as of 5/2021): https://www.amazon.com/TalentCell-Rechargeable-Amplifier-Multi-led-Indicator/dp/B00MHNQIR2

The items started arriving a few days later. I was excited, but also nervous as I wasn’t sure this would all work. And I should note, to do all this, you will need some soldering skills for the Amp Board.

And by the end of that same day, I had all three of the items! And to my surprise, the battery pack came with a female to two male cords. That would be perfect! That allowed me to not have to unplug the battery pack to charge it, I could just plug the charger into the female port, have one male port going to the battery pack, and the other with the end cut off soldered to the board.

I cut off one end of the cord, hoping that they’d be color labeled (I was worried they wouldn’t be). But thankfully, they were! Red is hot/positive, black is ground/neutral.

Before I went any further, I decided to dry test the setup. I have the two speaker wires in the ports on the amp board (the speaker wire is thick, so I could just stick them in and they’d stay). The battery pack wire is just carefully put in the holes and bent over on the other side to keep them there for now. So, I took a breath and turned the battery pack on…

AND IT CAME TO LIFE! Right away, it made a little Bluetooth jingle meaning it was ready to pair! Sure enough, I found it on my phone and it instantly paired! I went and found the first Glen Miller track I could find, and that Jensen speaker came to life with glorious swing music! SUCCESS! I cranked the volume up, it got LOUD. Like really really loud! With 12v going to the board, it was 20w on that speaker. If I got a bigger battery pack, I could (in theory since the board supports up to 24v) get 30w.

As for the pushbuttons to control the various aspects of the music (play, pause, on/off, volume, etc), I made this little setup and had planned to mount it inside the crate. I didn’t really need any of the buttons but the on/off and volume+/-, as the rest I could do in the phone. But, after I made this (the red wires are positive on the board, and all the black wires go to a single negative), none of them worked. I tested the switches with a multimeter, all good. But for some reason, the board wasn’t registering a button push. So, I decided that I really didn’t need them anyway since I can do it all on my phone, so I left them out.

For the battery pack, I wanted something that I could slide the pack into, but also left the front open so I could see the battery level light indicators. So I made this angled ‘pocket’ for the pack that has a nice open spot to see the lights.

I used some incredibly powerful JB Weld glue and some hot glue to attach the box to the crate. Super strong hold, and fits the pack nice and snug! It won’t rattle around or move, but I can pull it out if needed. This will also be how I turn on the whole system, thus the angle so it’s pointed upward. Since it’s tall, I didn’t want the cord to be squished by the lid, and I needed to see the lights, so this angle is perfect.

To hold the Amp Board off the bottom of the crate, I fashioned two blocks of wood and glued some computer screw mounts on the top.

With the Amp Board now attached to the wood blocks, I soldered the battery pack cable.

I used insulated washers between the screws and the board so no metal touched. You can see the soldered battery cable (top right), and I got some spare speaker wire from an unused speaker and soldered that onto the board. Those little circles you see at the bottom are where the pushbuttons would have been soldered. That port on the bottom right is to plug in a line-in plug if wanted.

Finally, I used some bailing strap to fashion my own screw brackets to hold the Amp Board onto the bottom of the crate. Everything is nice and secure.

I then wired the extra speaker wire I soldered to the Amp Board to the Jensen speaker wires. Instead of soldering those wires together and putting a heat shrink wrap on it, I decided to just use wing nuts so if the speaker ever blows or dies, I can easily replace the speaker with another 8 inch one and not need to unsolder/resolder the amp board.

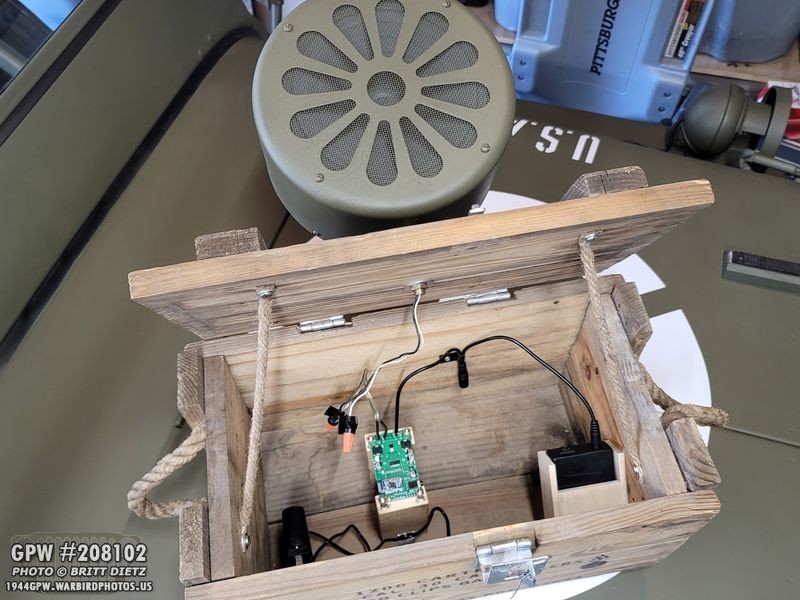
So here’s the entire setup! Super simple. I made my own ‘clip’ on the back wall that holds the female end of the power bank cord, where I will plug in the charger, which is in the bottom left.

I keep the charger from flopping around in the case, I stuck in and glued a piece of coat hanger that I could easily hand the charger from. Everything is secure!

To give that ammo crate looking final touch, I popped one of those original WW2 ammo crate photos into photoshop and recreated the markings. I wasn’t going for perfect on this and honestly didn’t want to spend a crazy amount of time on the stencils, which is why the font is ‘close’ but not exact like I usually do.

I then sized them based on the differences of this ammo crate vs the WW2 ones without hinges and used my trusty Cricut Explore Air 2 to make the stencils. I then used black acrylic paint with a sponge brush.

Boom! Now it’s looking like an ammo crate! Fun little detail, the lot number is the Jeep’s DOD date… June 26, 1944.

I then flipped over the crate and did the same thing to the other side. I had to loosen/remove the screws from the hinges to get the stencils where they needed to be.

Once the backside had dried (it goes quick as the paint soaks up the paint), I then decided to experiment (since it was the back) and I sanded the markings. I liked how that ended up looking.

I did the same to the front (before and after). I think that really blends better with the aged wood.

I had seen one photo of a crate with the Ordnance flaming bomb on the side, so I replicated that. I then sanded it as well to fade it.

And finally, another flaming bomb on the other side, also sanded.

And there we go, it’s complete! I turned it on and cranked up the music. Nice and loud, should have no issues with it being too soft outside at events. I think the entire neighborhood could hear the music. I’m going to take a video of it playing sometime this weekend, and I’ll post it on Monday. I did use a sound meter and found it was peaking at about 88db!
(notice how the furniture pads don’t make the crate ackwardly high off the ground, just enough to not scratch the hood!)
Overall, it was a super fun build, and I’m happy to have this unique accessory that really does look like a field-made radio. The only thing I plan to add is some weather sealer under the lid so that if it gets wet or ever starts to rain before I can put it away, the water won’t fall down onto the Amp Board. Since everything is off the bottom of the crate, I’m not worried about water from underneath. So there you have it, a custom-made ammo crate portable/rechargable Bluetooth radio!

NEXT PROJECT! I’ve covered this a bit two weeks ago, but I’ve wanted a sign that I could display at events with some history on Jeeps, my Jeep, and what the markings mean. Some time ago, I recreated my original dataplate in photoshop (cleaned up almost brand new looking, of course) down to the exact fonts and placement of the stamps. This was the start of the idea that I wanted to make an information poster on my Jeep.

I found a modern day ammo can (again, didn’t want to destroy a WW2 one) at a flea market for cheap. I drilled a large hole in the top center where I took some sprinkler pipe and put it nice and snugly in. I then filled the ammo can with concrete and let it dry with the pipe in. It only sticks out about a foot, with the threaded side on top. I added a female connector piece on the end.

This is the overall idea. I wanted something that could break down smaller, but be tall enough to have a 20×30 at eye level. It needed to have a heavy base so it wouldn’t tip over. You can see that connector piece at the bottom. I can screw in the longer piece that makes the whole pipe about 6 feet tall. That’s two parts there. Then, I’d use a brack to attach the poster to the top pipe. That’s three pieces. Finally, inside the two pipes is a 4 foot metal rod for stability. Four pieces total.

I painted the ammo can in Korean/Vietnam War 24087 OD Green, which I think is the perfect ammo can color. I painted the pipe the same 33070 OD Green as the Jeep. Under the ammo can I have some of those furniture pads to stop the ammo can from sliding, and also protecting the Jeep when I put the base in there for transport.

I then added some stencils to give it that look. While the .50 Cal stencils are correct (I loosely recreated the font), the GPW F stamp side is totally for fun.

I then primed and painted (OD Green after this) two straps that perfectly fit on the pipe. I did two as I wanted a spare to keep in the Jeep in case I ever forget the other one.

I got the finished sign printed 20×30, and I mounted it on thick foam board.

I carefully drilled through the print/board and used two F-stamped bolts to secure the bracket to the pipe.

And here’s the finished product! The top of the pipe is about 6 feet tall. That puts the sign at perfect eye level (I held my phone up high to get this shot). I have a second connector piece at the top, in case the one at the bottom ever breaks. Can’t wait to display this at the next event! The ammo can really adds a nice touch.

And if I need to travel light, the poster sits really nice in the passenger seat.

Speaking of flea markets, along with the ammo crate I found some cool items. I spotted this entire Jeep grill (Willys MB) there. It had some EC bolts on it, and some interesting additions like the chain and hood catch on the front of the grill. It had some original OD Green paint I could see in areas. I almost bought it, but I didn’t really have a need for it and I felt the money the gal wanted could be better spent on other things. If it’s still there next month, maybe I’ll pick it up.

But I did pick up this hammer! It’s a correct Fairmount 16oz hammer! I’ve been starting to search for the correct spare tools for my Jeep, and this is the first one I’ve found so far!

The head, length, and markings are the proper size for a Jeep.

Here’s a close-up of the Fairmount logo.

And the other side.

With the correct 16 oz. marking.
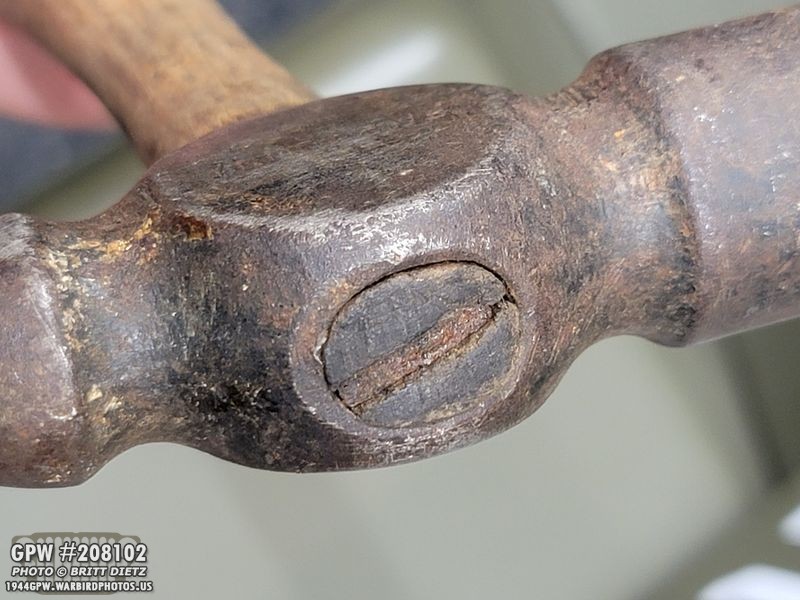
Here’s a look at the top. A nice addition to start my correct tool roll!

I also found a seller who had a bag of these screw-type valve caps. I use modern-day ones on my Jeep, but I’m not against using actual correct vintage ones if I find them, but these are not the correct brand from the bag. However…

These are! Quite an assortment of different types of Schraeder valve caps! I thought it’s a nice collection of different types of them.

To compare, here’s one of the modern day types you can get on ebay, amazon, etc. They are close enough (seeing as most Jeeps out there don’t even have them at all).

So, of the original Schraeder caps I got, which ones are correct for Jeeps and other WW2 vehicles? As you can see, each one has some slight variances to them.

In the Technical Manual TM 31-200 ‘Maintenance and Care of Pneumatic Tires and Rubber Treads’ from April 20, 1942, you can see this diagram showing the four different types of Schraeder valve caps used.

So, looking through the different styles, here’s what I’m thinking…
The red arrow doesn’t appear to be used on WW2 vehicles.
The orange arrows could be used on other non-Jeep vehicles
The green arrows are the correct Jeep screw-type style I typically see in the spare parts kits.
The purple arrow matches the diagram from the TM manual the closest.
So, I think either the green arrow ones or the purple would be correct for a Jeep.

Here’s a look at the Schrader U.S.A. marking on the one valve cap that is closest to the diagram. Since I don’t have a complete set of these yet, I’m going to hold off installing them for now. But I’ll keep looking, and eventually, I’ll complete a set and put originals on!

Here’s a not-so-clear look inside the cap (it’s hard to shoot, these things are super tiny). Inside there’s a thin gasket.

Couple more things to mention before I wrap up this update. I was excited to see this photo pop up on an auction on eBay. It’s from a 95th Bomb Group (my Jeep’s markings) reunion newsletter. See that white on the fender? I’ve been looking for confirmation that Jeeps with the 95th had those white markings as I really like them and have considered doing that to mine. But, I wanted to know if this was really a 95th BG shot and not some other group. So I won the auction (cheap, thankfully). A few days later it arrived. I was excited… until I realized, it’s a modern-day photo turned into a wartime-looking one. Ugh. Fooled me. I guess I should have seen some of the signs in the photo. Kudos to whoever edited the photo, it looks pretty darn real to me.

As far as the Jeep this week, I haven’t driven her much at all this week. But I did take her out locally to get some groceries. Always nice to take her out into the public, always see people snapping photos with their cell phones.

I also went and filled her up at the local gas station. I always love seeing people’s reactions when I lift up the driver’s seat and pull off the cap to fill up the tank. You can see the confusion as they try to work out what’s happening.

Even though I’m sad I couldn’t repair my original gas tank (tons of leaks, rust, etc… by the time I would have completely repaired it, stopped the leaks and any further leaks, cleaned out the rust, etc I would have spent more and wasted a lot of time vs getting a new one that I’ll never have to worry about) I’m happy with the Joes Motor Pool tank. It fit like a glove and exactly matches my original.

As far as the rear axle clackity saga, I plan to dive back into it this weekend and into next week. I plan to drain and open up the rear axle cover to see if there are any metal shavings or rubbing of metal anywhere in there.

I’m going to continue mounting the GoPro on the Jeep in some different areas above and even ON the rear axle to try and see if I can pinpoint the sound’s location better.

And as I wrap up this week’s update, I wanted to mention that the engine and everything around it are functioning well. The generator alternator is working perfectly. One project I’ve looked at doing soon is replacing the post-war repro water pump with a correct style GPW one. It’s on my list for some time this summer!

And that’s it for this week’s update. I hope you enjoyed the fun side-builds this week with the radio and display stand. There are two more weekends of flea markets coming up, so who knows what goodies I might find?
Until next week…