 The EASIEST method to perfectly time a Jeep L134 Engine!

After some engine issues earlier this month, I realized I needed to totally retime my engine. I ran across one of the easiest and simplest ways to perfectly time an L134 engine! Also, a look at the new ‘nose art’ on the Jeep and some shots of my Jeep with some warbirds!
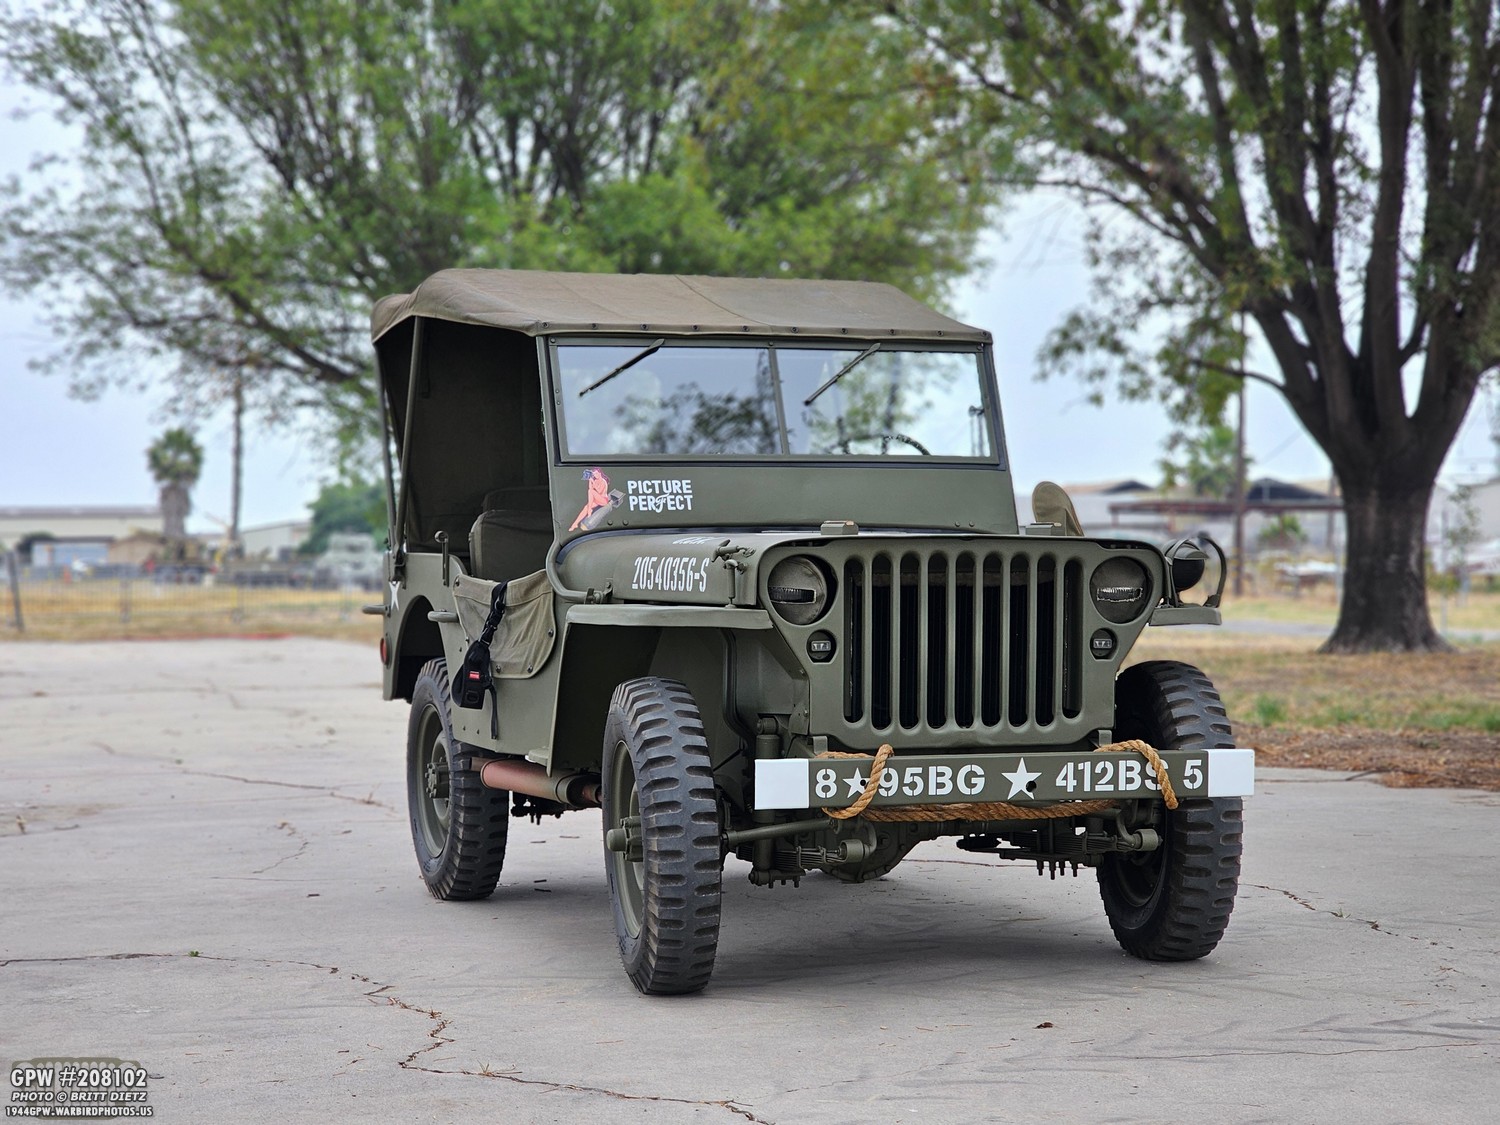
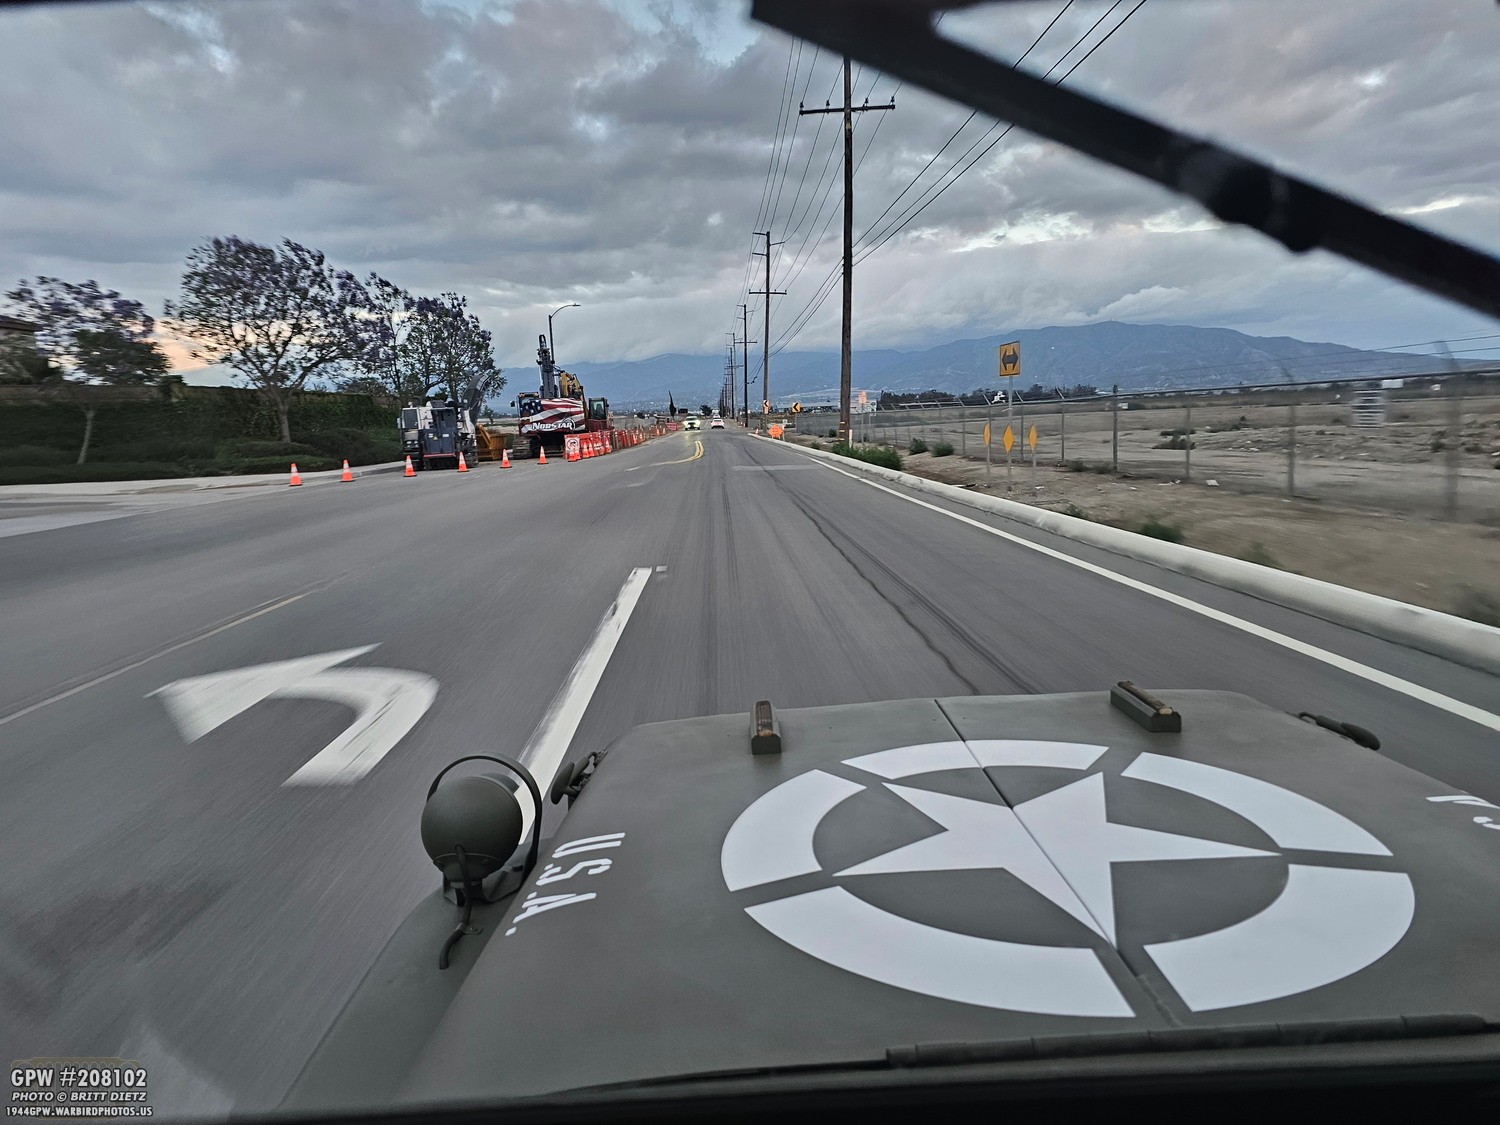
Following up on last week’s Wings, Tracks, and Wheels event, this event actually starts with the major problem that occurred when I was headed to the event on Friday morning. This shot here was once I’d arrived at the event (excuse the camera strap and the passenger side headlight cover that’s misaligned). Two updates ago, I had posted about the issue I had with the original Firestone spark plugs. Ever since I got those replaced and the new oil filter bracket on the Jeep, I’ve noticed that my Jeep was coughing an awful lot.
Then, on the drive over to the event, I started to get lots of coughing, some stuttering, and even backfiring from the engine bay. Yikes! I made it to the event no problem, but I was deeply concerned as I would need my Jeep all weekend long. Popping open the hood didn’t reveal the issue right away. I was focused on it being something with my distributor, spark plugs, or carburetor because I had just been working on them to fix the spark plug issue. It took a second set of eyes for us to discover the issue.
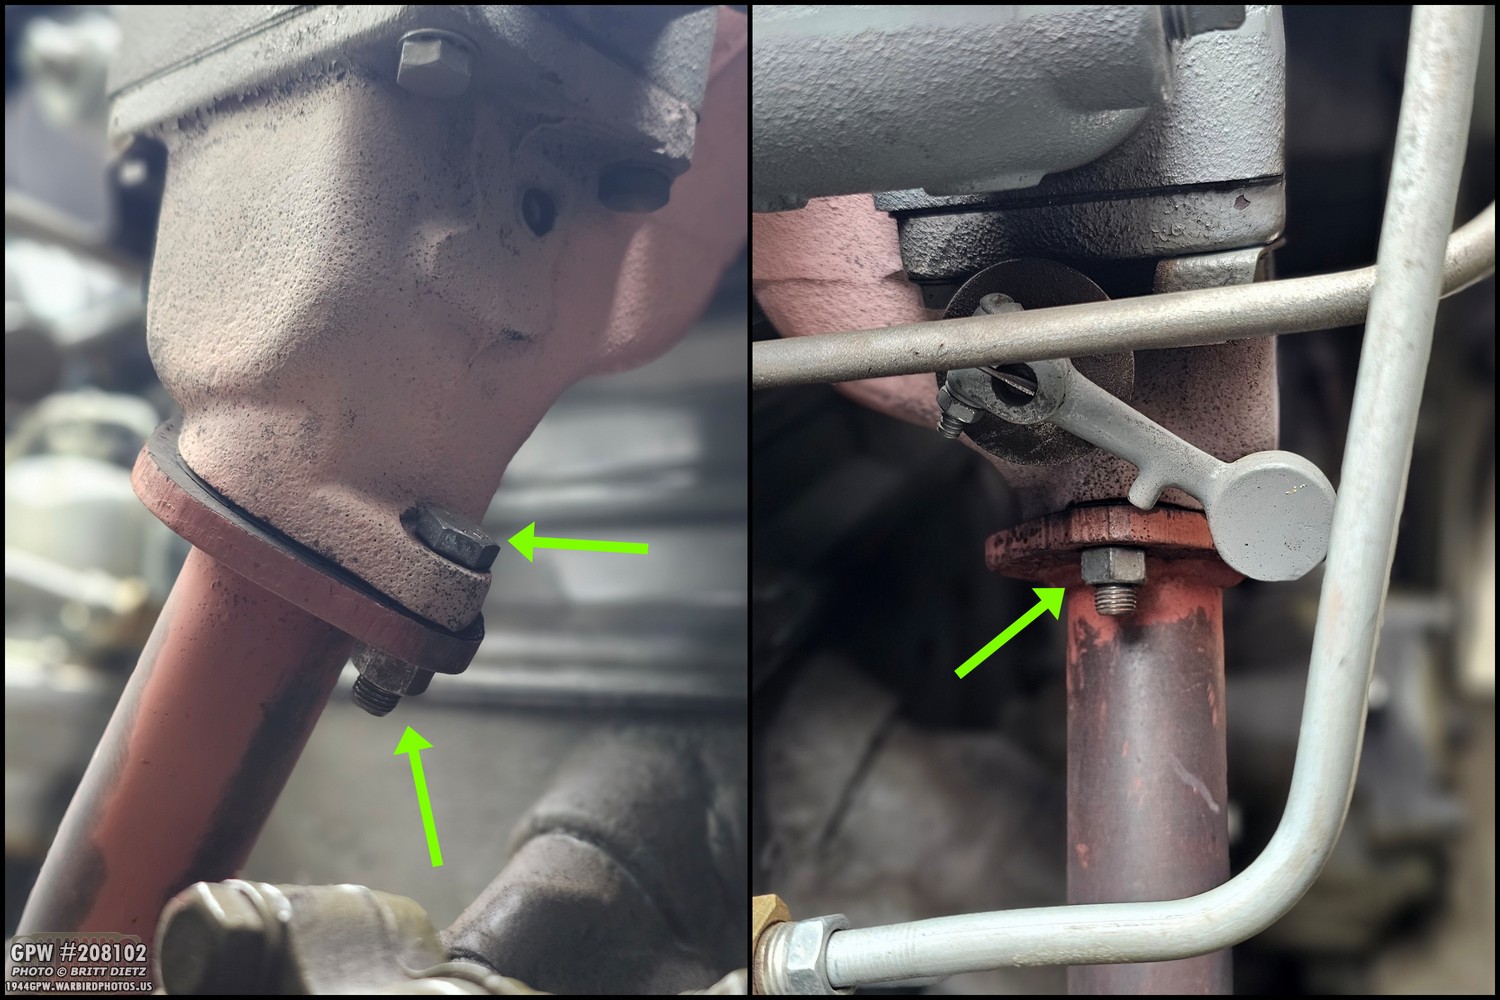
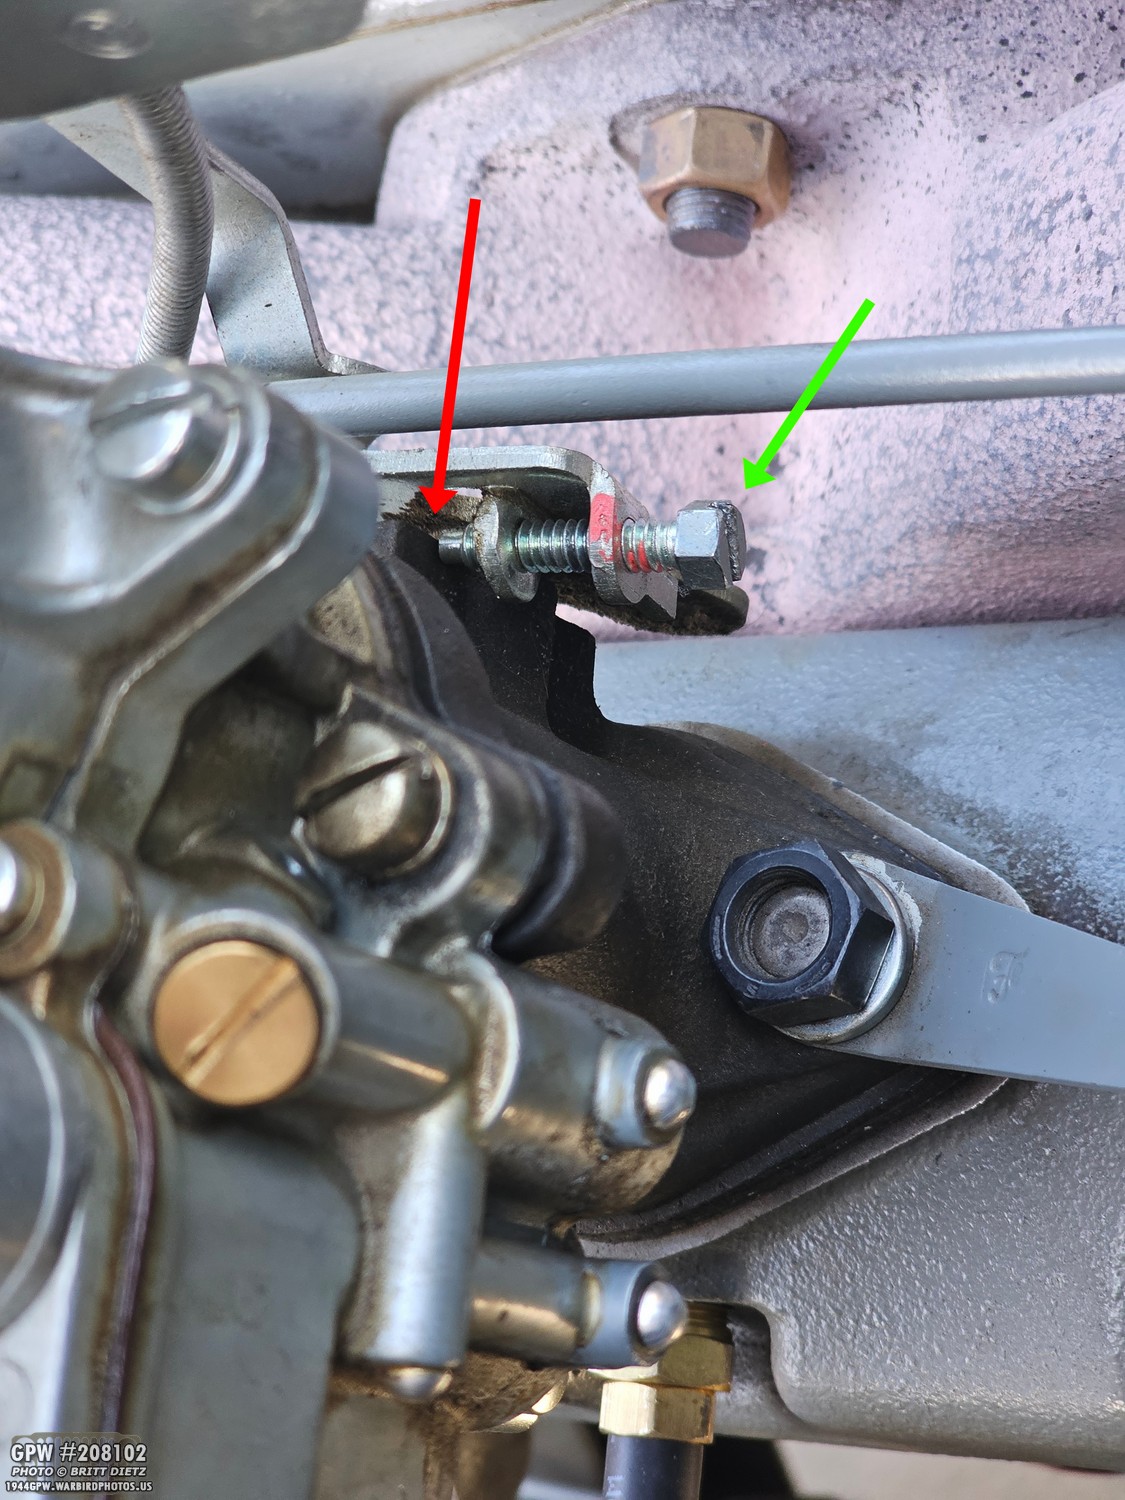
Turns out, somehow the vibrations of the engine had loosened both bolts holding the exhaust pipe to the exhaust manifold! My friend Tom Goodhope noticed the pipe moving when the engine was revved. The rear bolt (the left side photo) was missing the nut completely! It had vibrated off and was totally missing. The front stud/nut was also loose and partially unscrewed. That would certainly cause all the coughing and backfiring! These photos here show after I went and found a replacement nut and retightened both sides. I still need to add lock washers back onto them, but it goes to show that sometimes it really takes that second set of eyes when you’re so focused on one thing. Tightening the nuts fixed most of the problem!
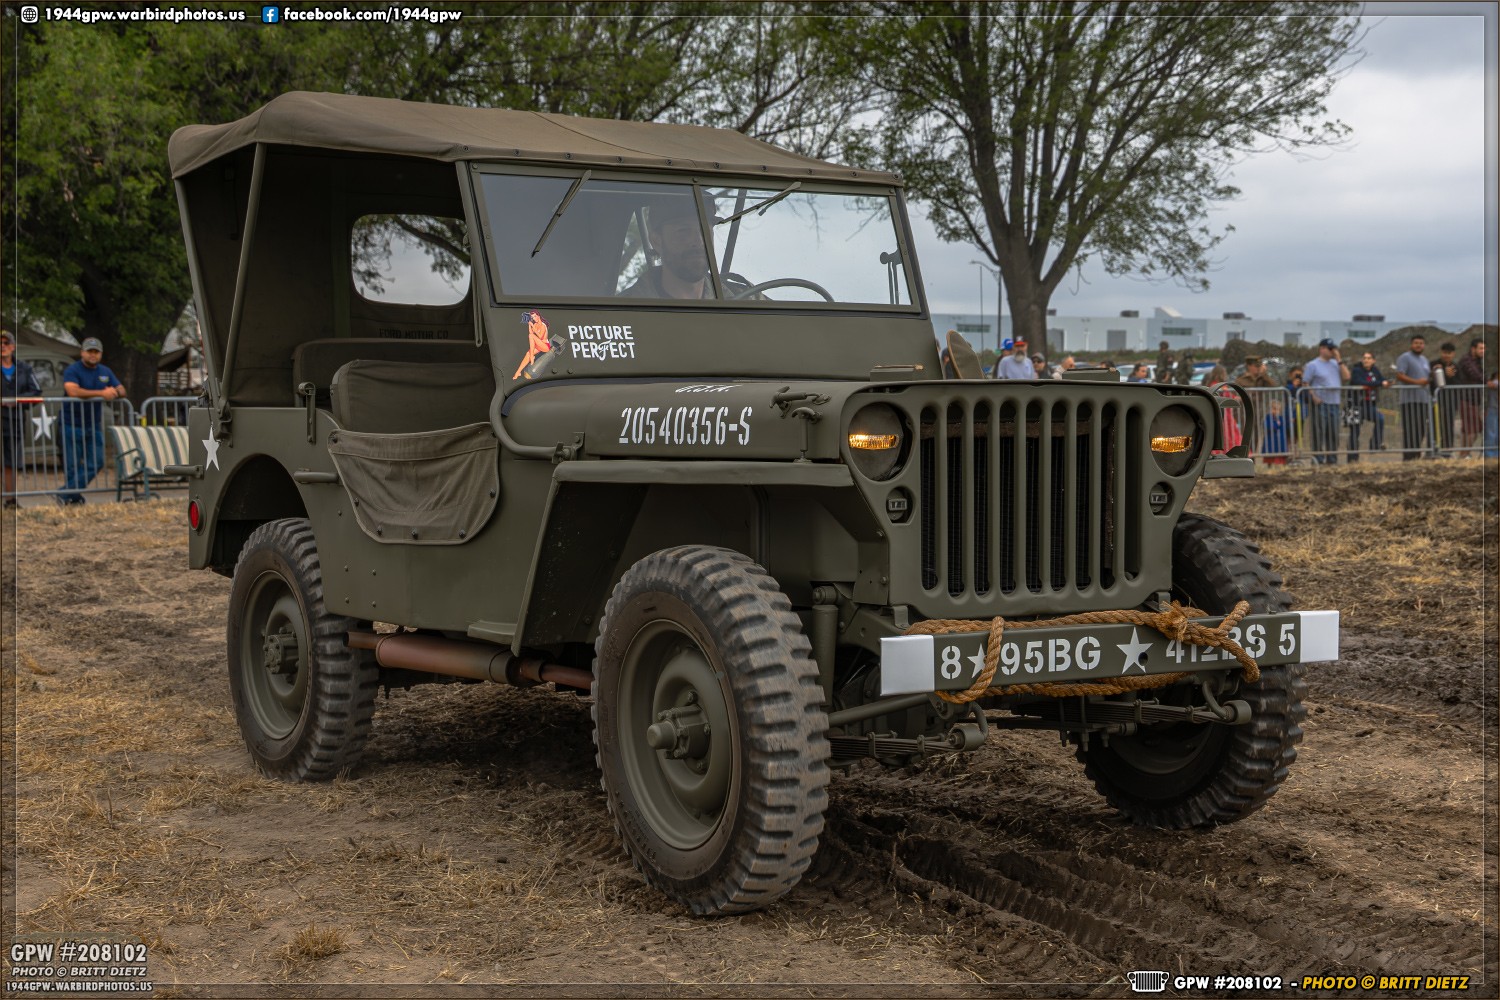
And as you saw in the last update, my Jeep was able to go on to not only be my ‘golf cart’ before/after the event but also take part in the event’s ‘Jeeps through History’ parade demo. That’s not me driving; I was directing the demo, so I had someone else take the reins.
Skipping forward to the drive home, while the majority of the problem with the engine was fixed, she was still coughing more than I’d like. She even struggled slightly with acceleration at times. Not much, but a bit. I realized that I’d been working on the engine so much over the last few weeks that it was probably out of timing. I wasn’t looking forward to retiming it as I did the old-fashioned ‘listening’ method where you adjust things till the engine falters, then bring it back. But it never seemed to really dial in the engine.
That was, until about a week ago, when I came across a post on G503 that mentioned timing an engine via a vacuum gauge. I had a vacuum gauge test kit that I’d gotten back a while ago when testing the engine, so I was intrigued. This led me to the 1966 Technical Manual TM 9-4910-477-10, which covered engine timing with a military vacuum gauge. This led me down a rabbit hole of posts online, and with the TM manual and some of these posts on forums, I came up with a plan that sounded almost too good to be true for precisely timing an L134 engine… specifically finding that ‘sweet spot’ for your particular engine. It doesn’t take much time, and you only need to purchase a few things!
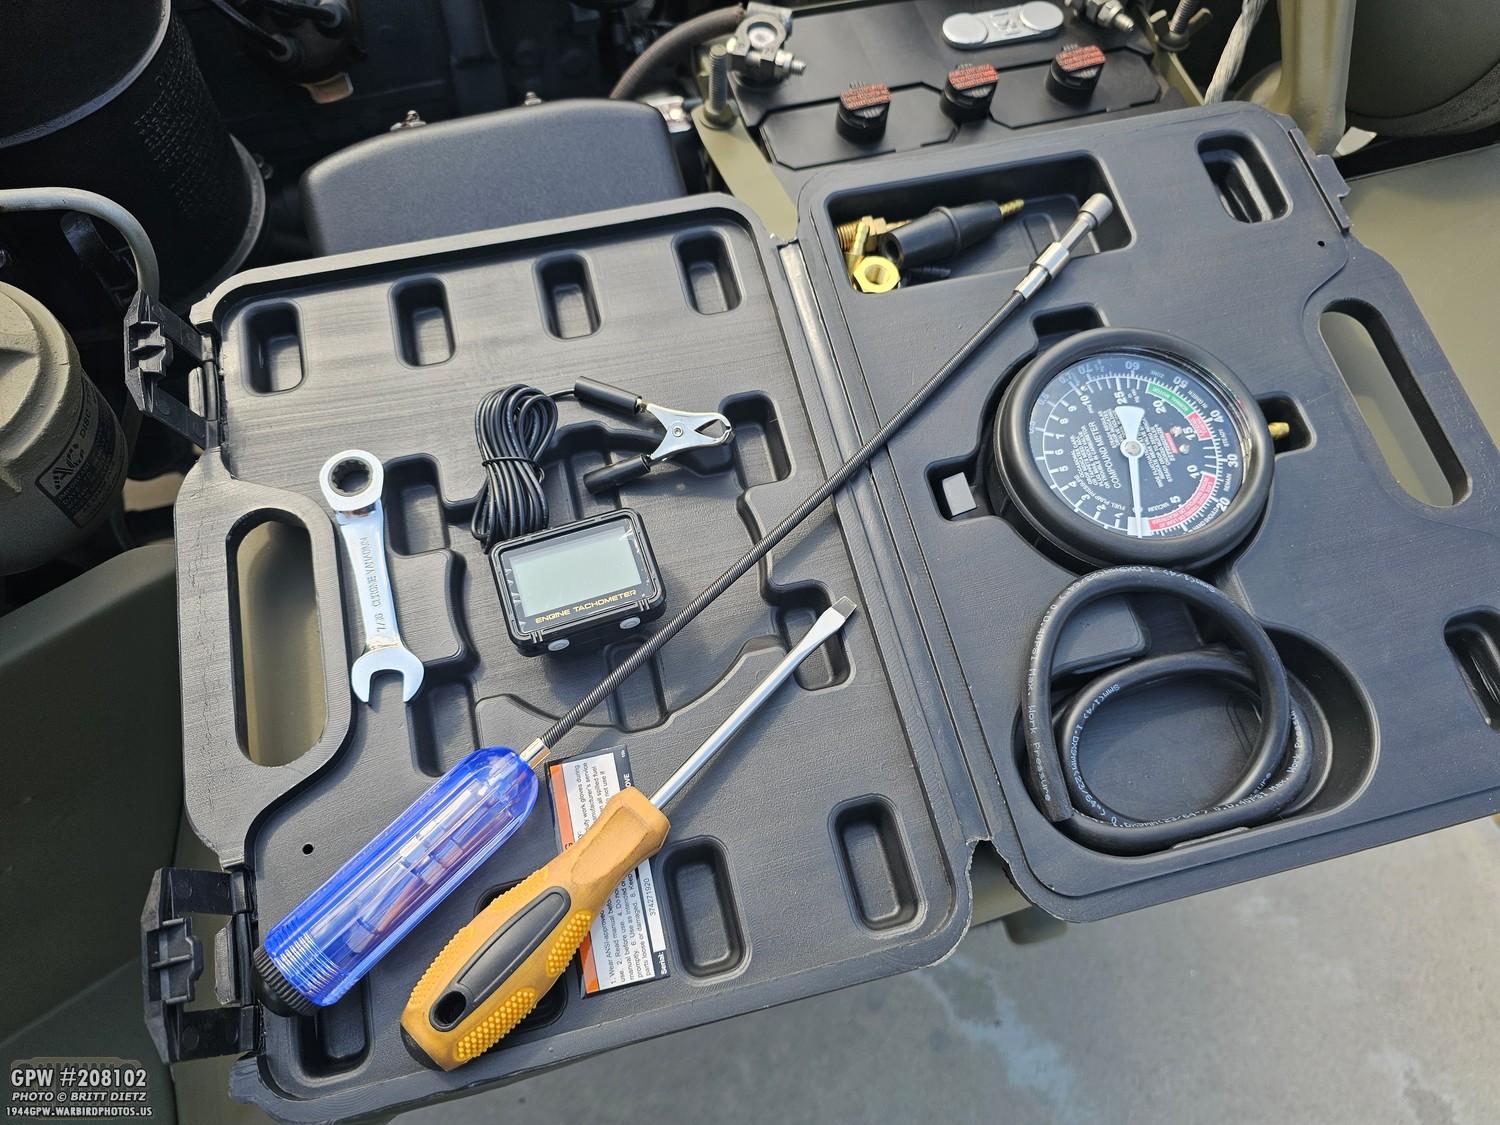
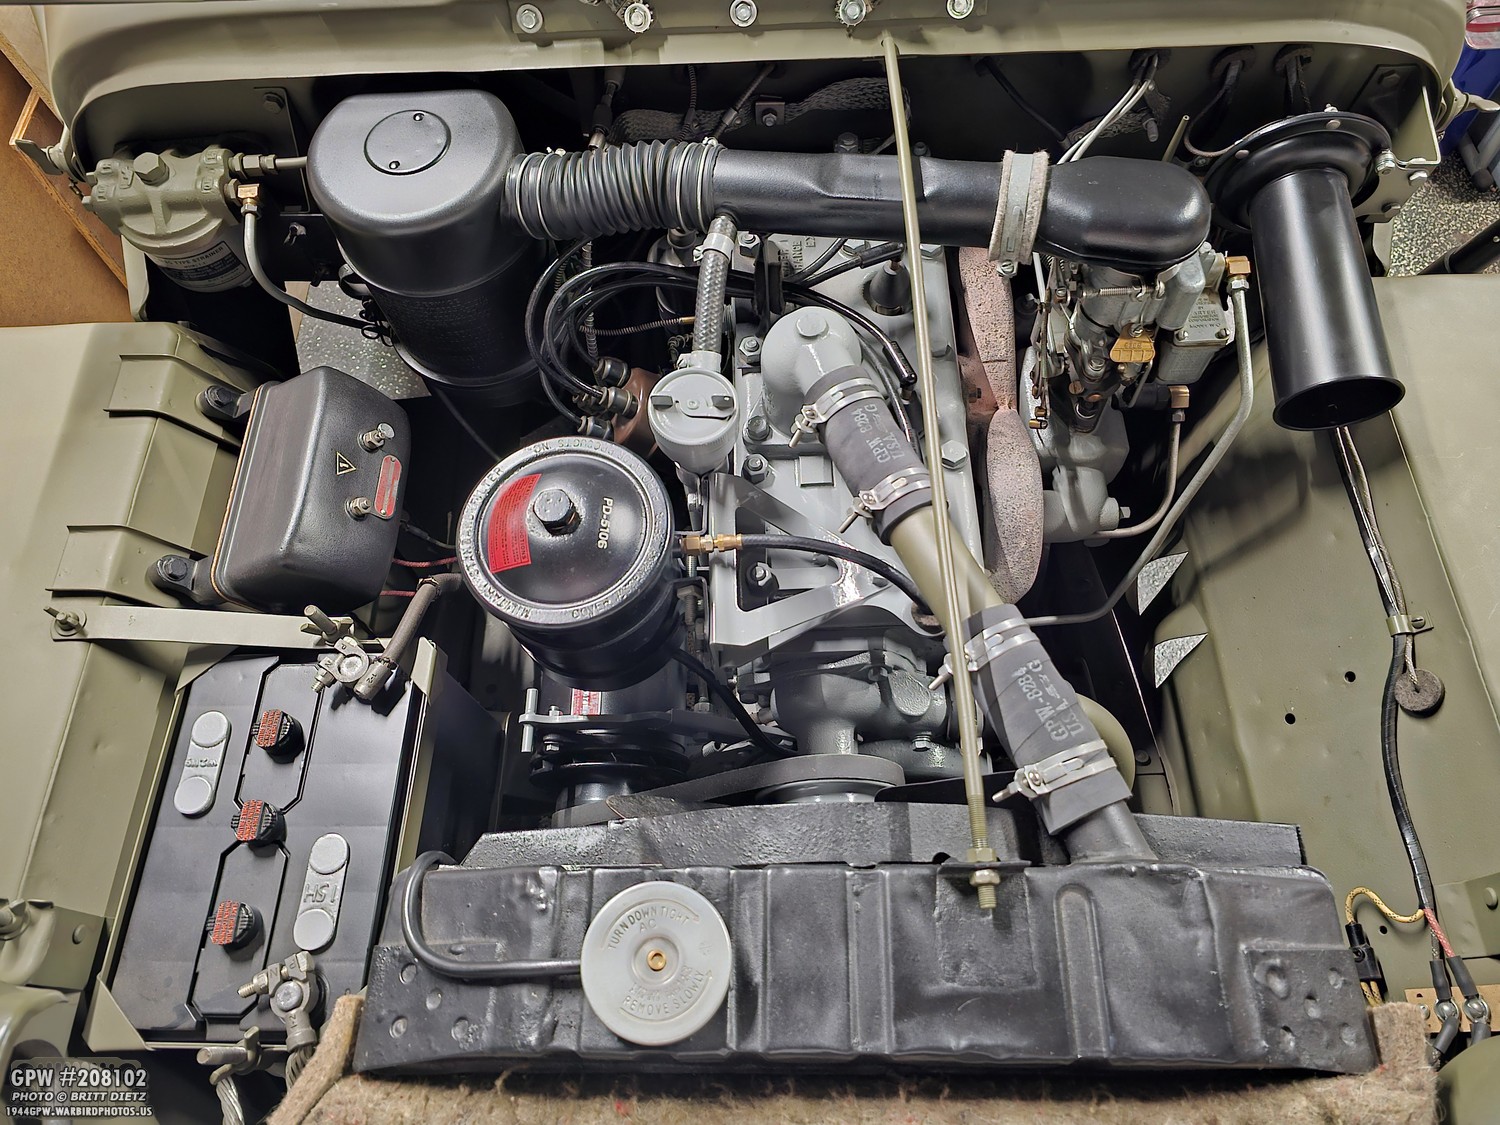
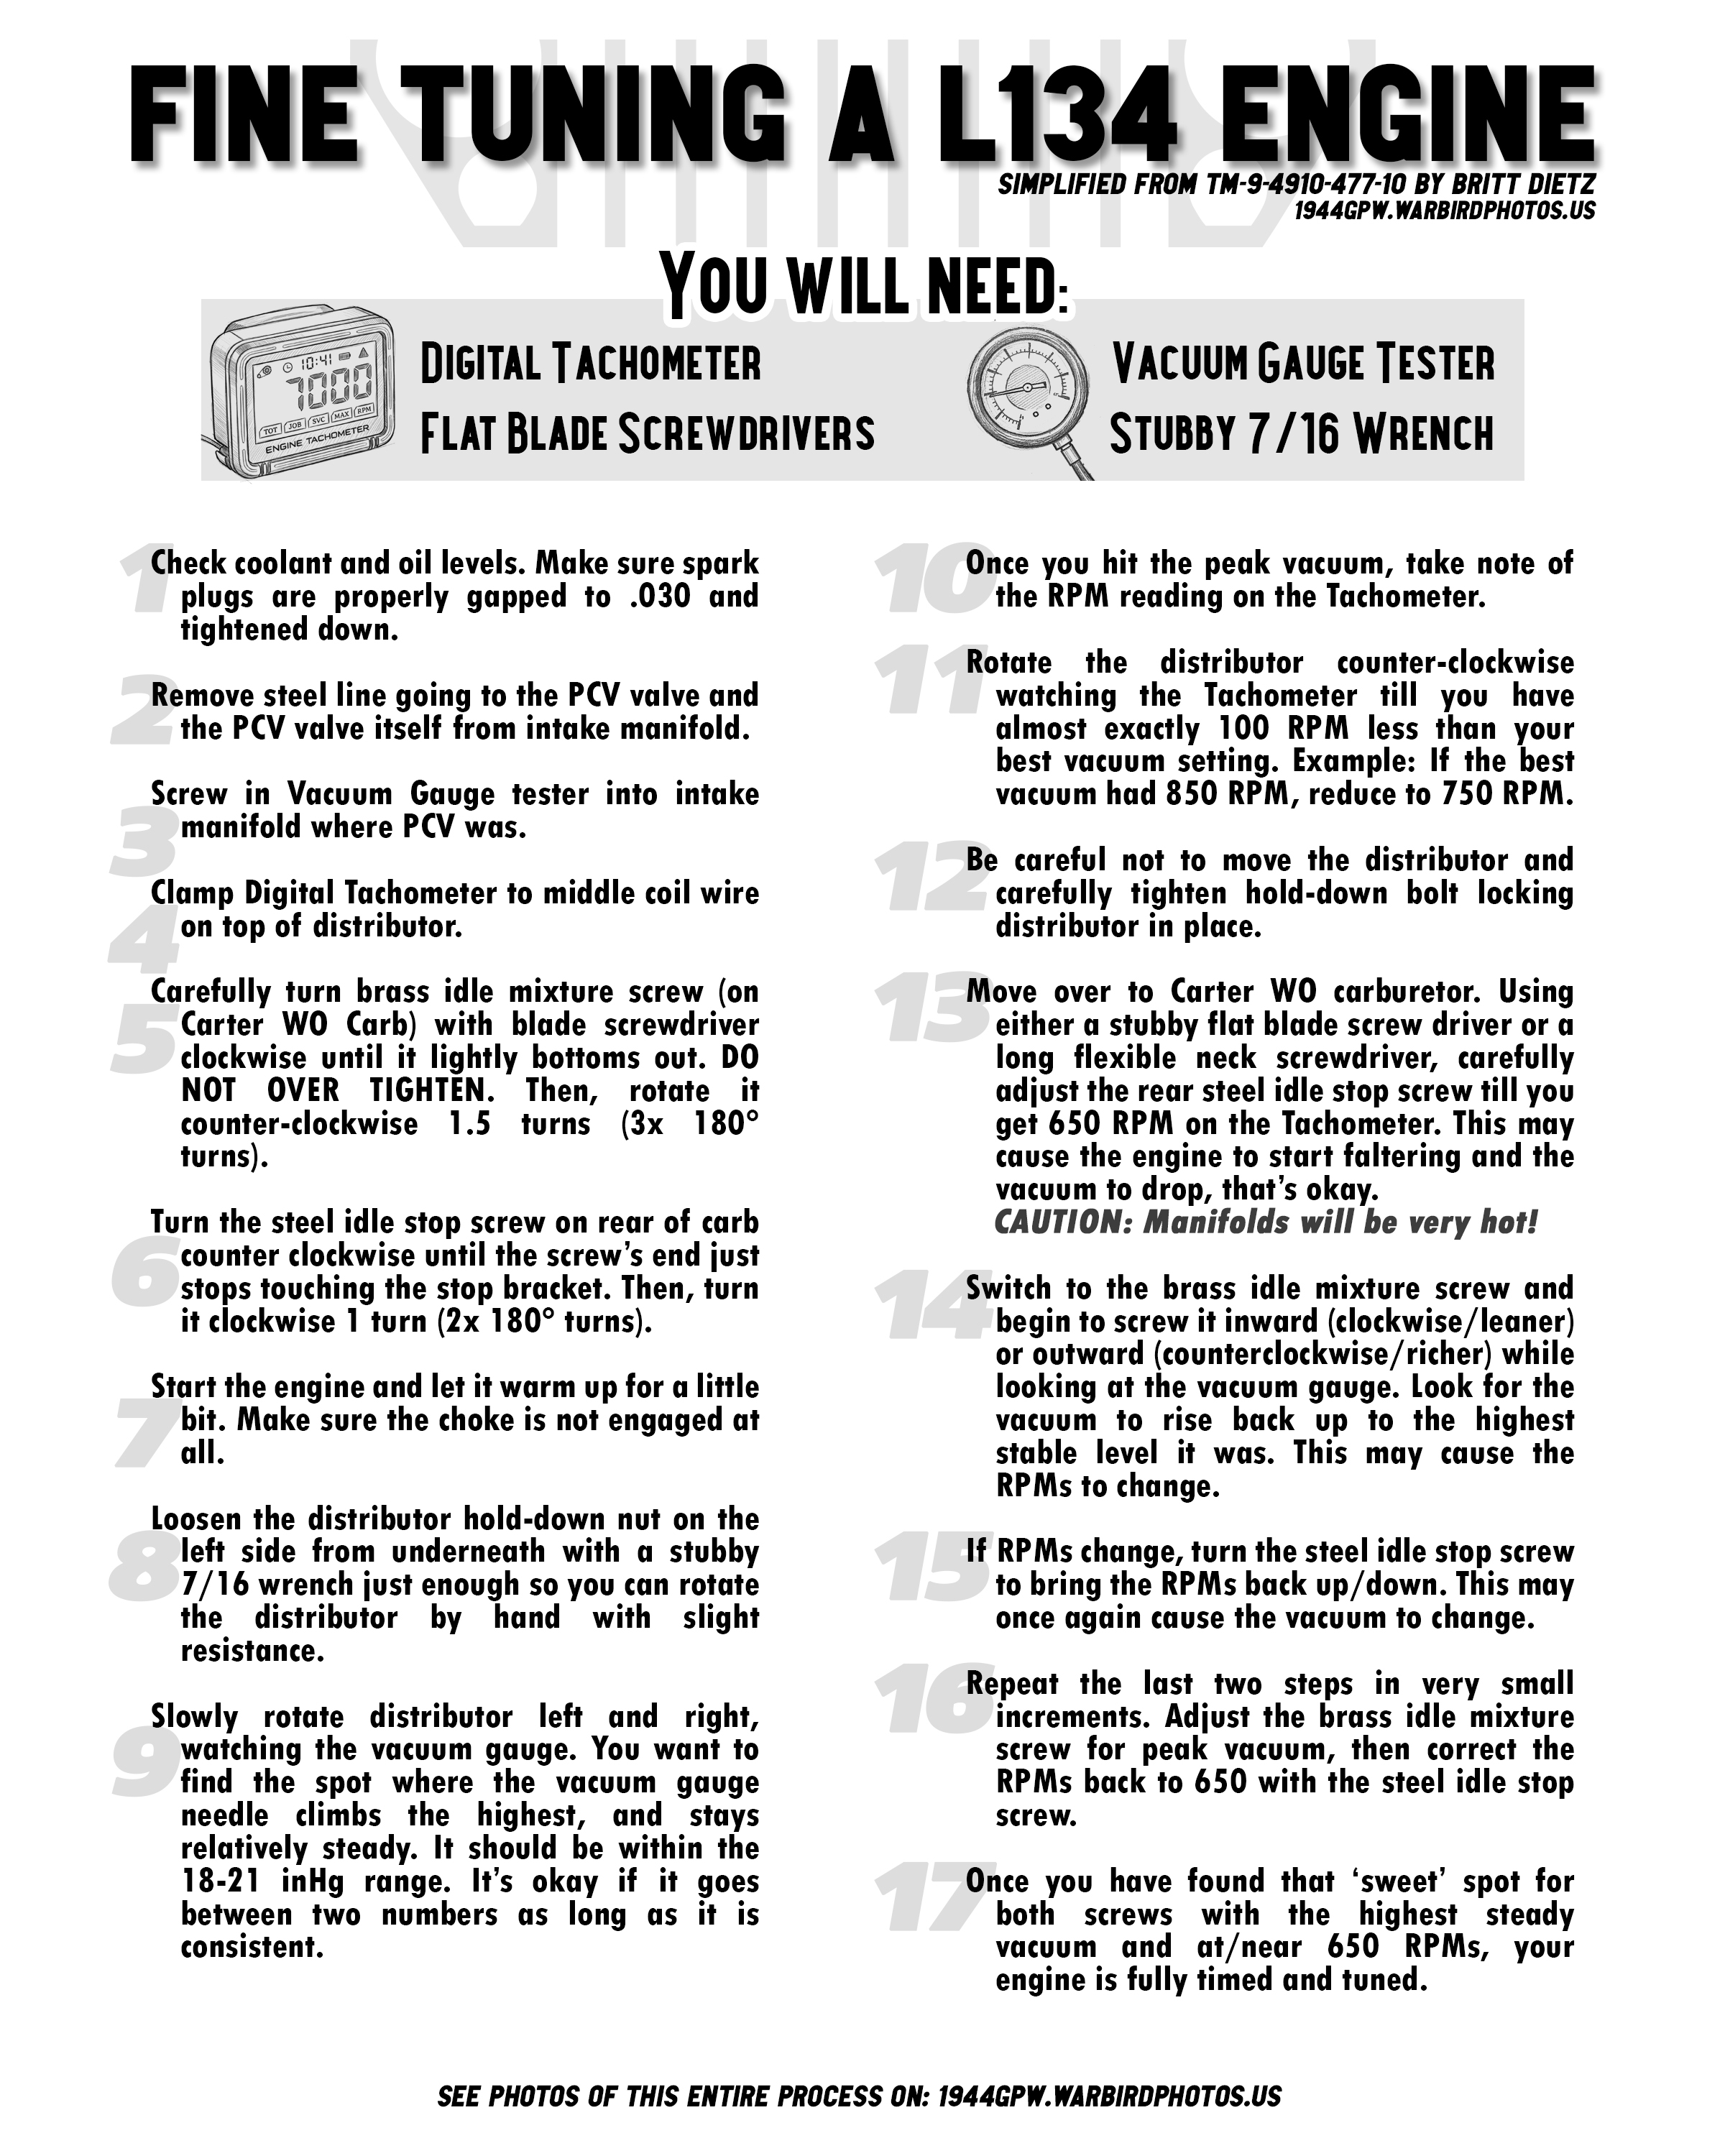
Here’s everything you need at the basics. The big thing you need is a vacuum gauge tester. I like the Pittsburgh one from Harbor Freight Tools ($18 as of 5/21/2026). Then, you need a Digital engine tachometer ($22 on Amazon as of 5/21/2026). You need a stubby 7/16 wrench and a flat blade screwdriver. To help you avoid getting burned by the super-hot manifolds, I went out and got this long-necked, flexible screwdriver ($13 on Amazon as of 5/21/2026). That’s basically it!

Totally optional, but good to have is a laser tachometer. This will be more precise than the digital one but with one major caveat…
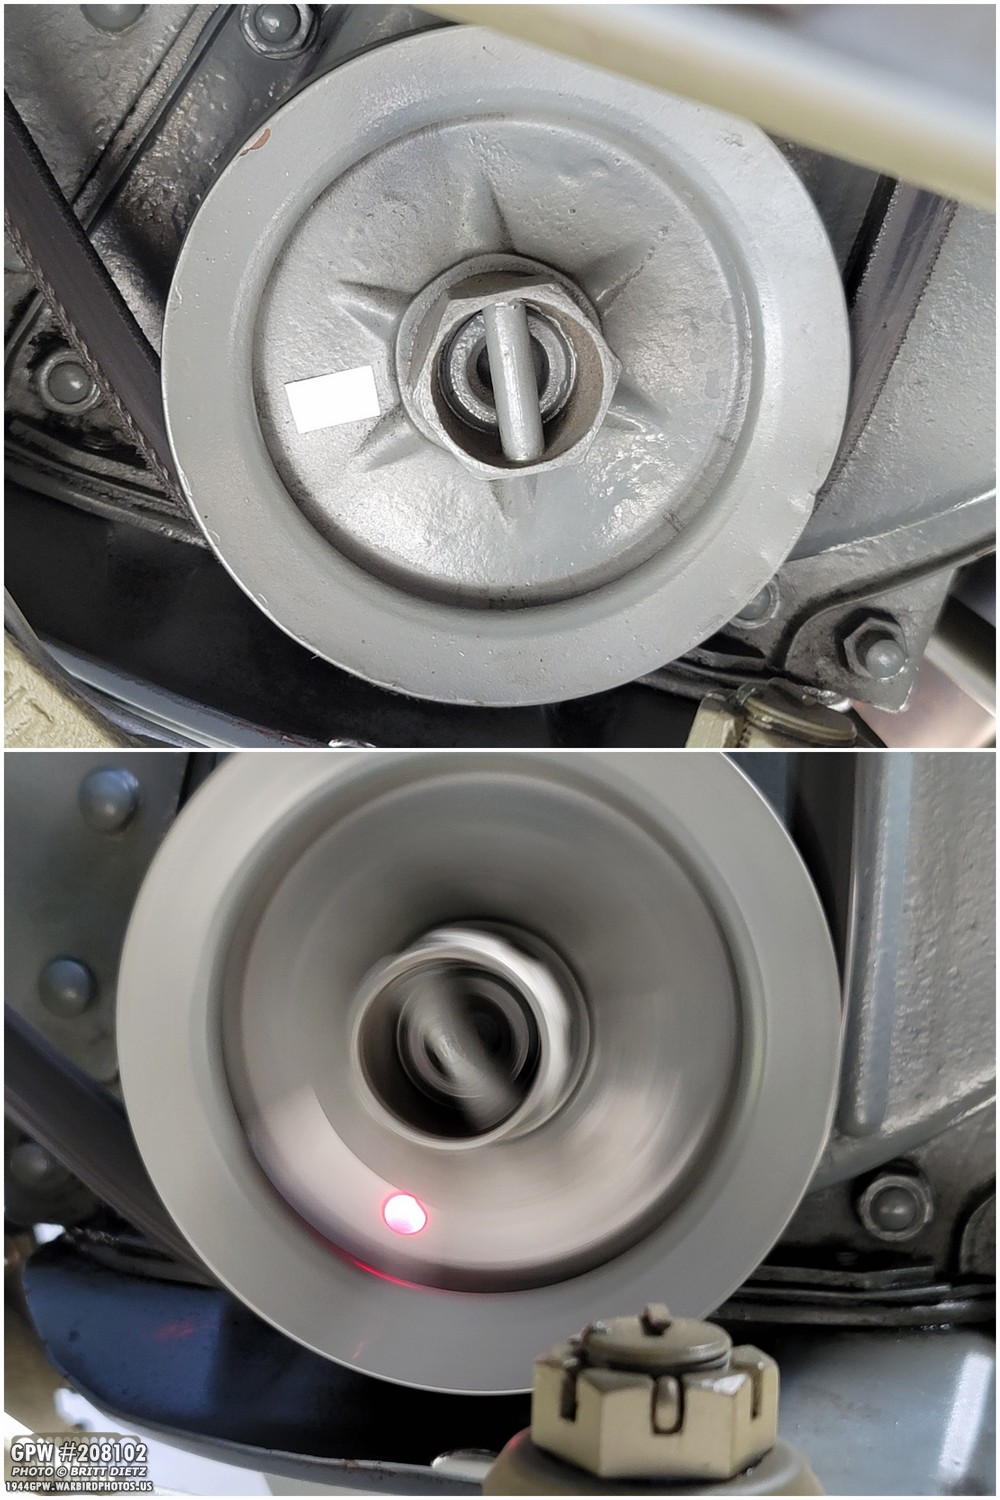
A laser tachometer needs something spinning for it to read. Basically, you place a small piece of reflective tape on something that spins, and the laser shines as the item spins. So, when the laser hits the reflective part, the tachometer can read the revolutions per minute (RPM)s. Putting that tape and making a reading on the front pulley is the best way to measure the RPMs. Then why do you need a digital one if this laser can do it?
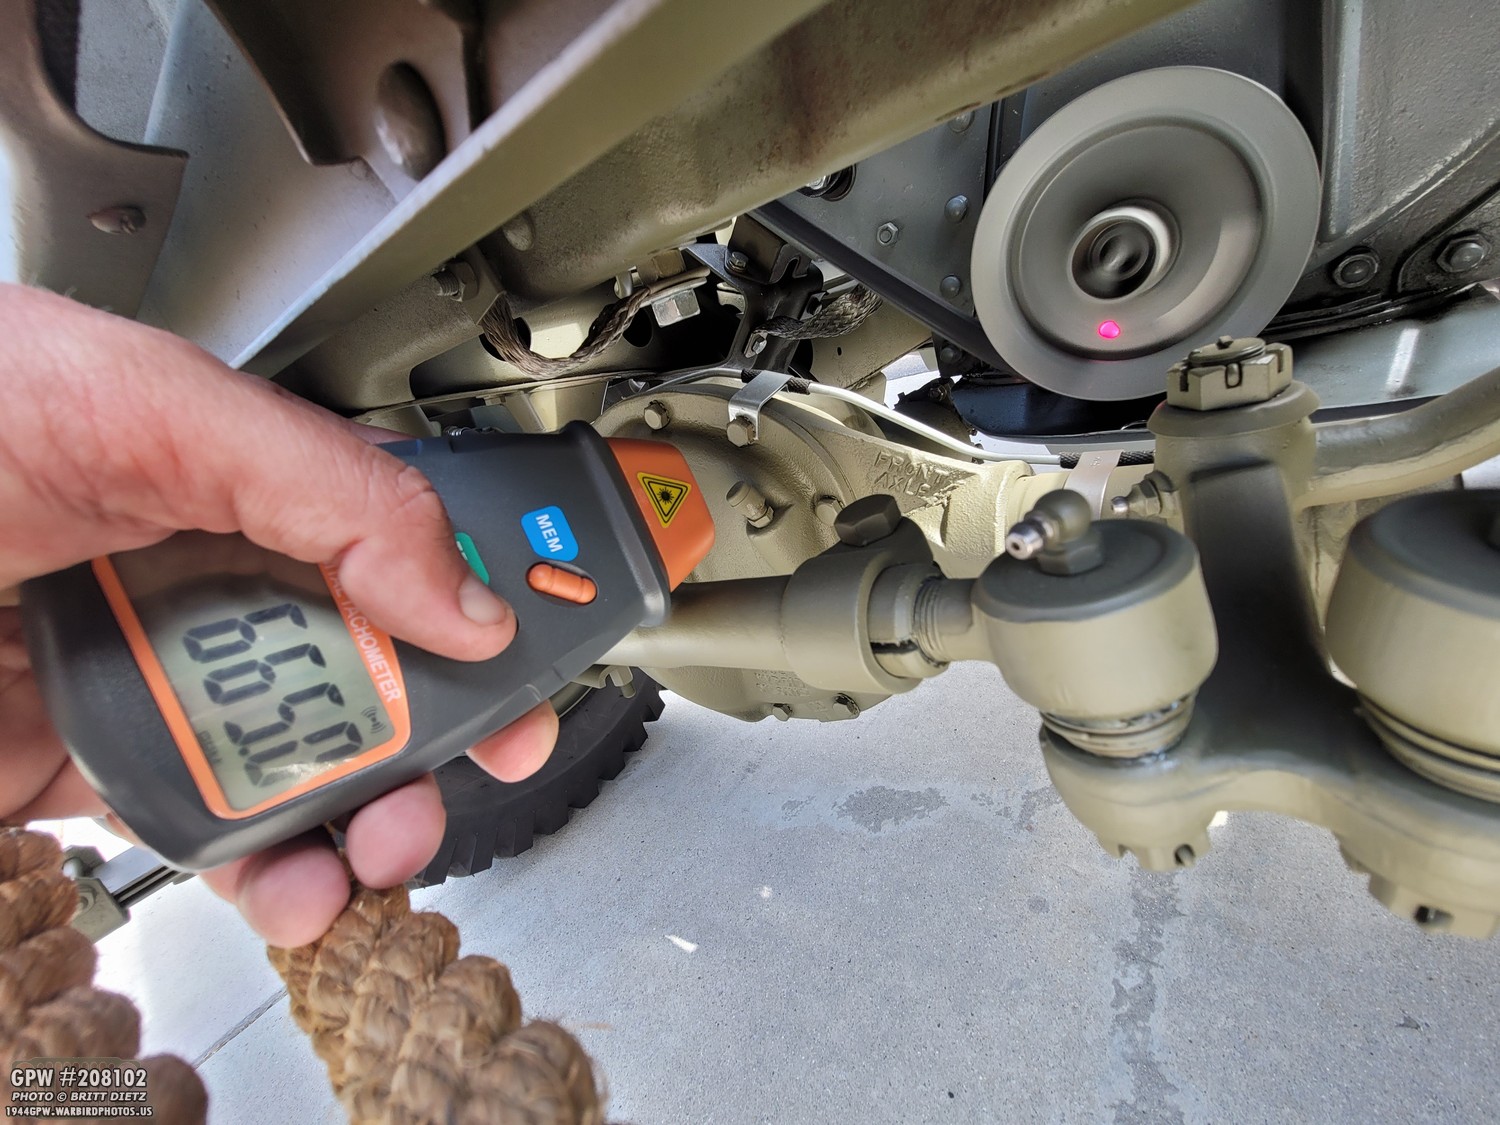
Because you have to sit there and hold the button as the engine spins. That’s great when you want to do a precise reading, but when trying to watch how the RPMs increase or decrease, it’s not effective. A digital reader is way easier. So, I recommend the laser Tachometer to ‘calibrate’ the digital one to make sure they both have the same reading. The digital tachometers often have calibration settings where you can add or subtract RPMs from the reading if it’s off. But again, the laser tachometer ($19 on Amazon as of 5/21/2026) is nice to have just in case!
So, now let’s cover what we’re going to be adjusting for this precise timing. First up is the distributor. This will be critical in the initial adjustments.
Then we’ll be moving to the Carter WO Carburetor. The carb has two adjustments that we will tackle. And those are literally the only two things we need to adjust. But the relationship between the distributor and the carb is what makes the Jeep’s timing perfect. The three adjustments we will do have to work together to fine-tune the engine. So, let’s get started!

First, some housekeeping… check your oil level (top off if needed) and, if you’ve never checked, it might be a good time to make sure your spark plugs are all gapped to .030. If they are not properly gapped, you could be getting false ‘sweet spot’ readings.
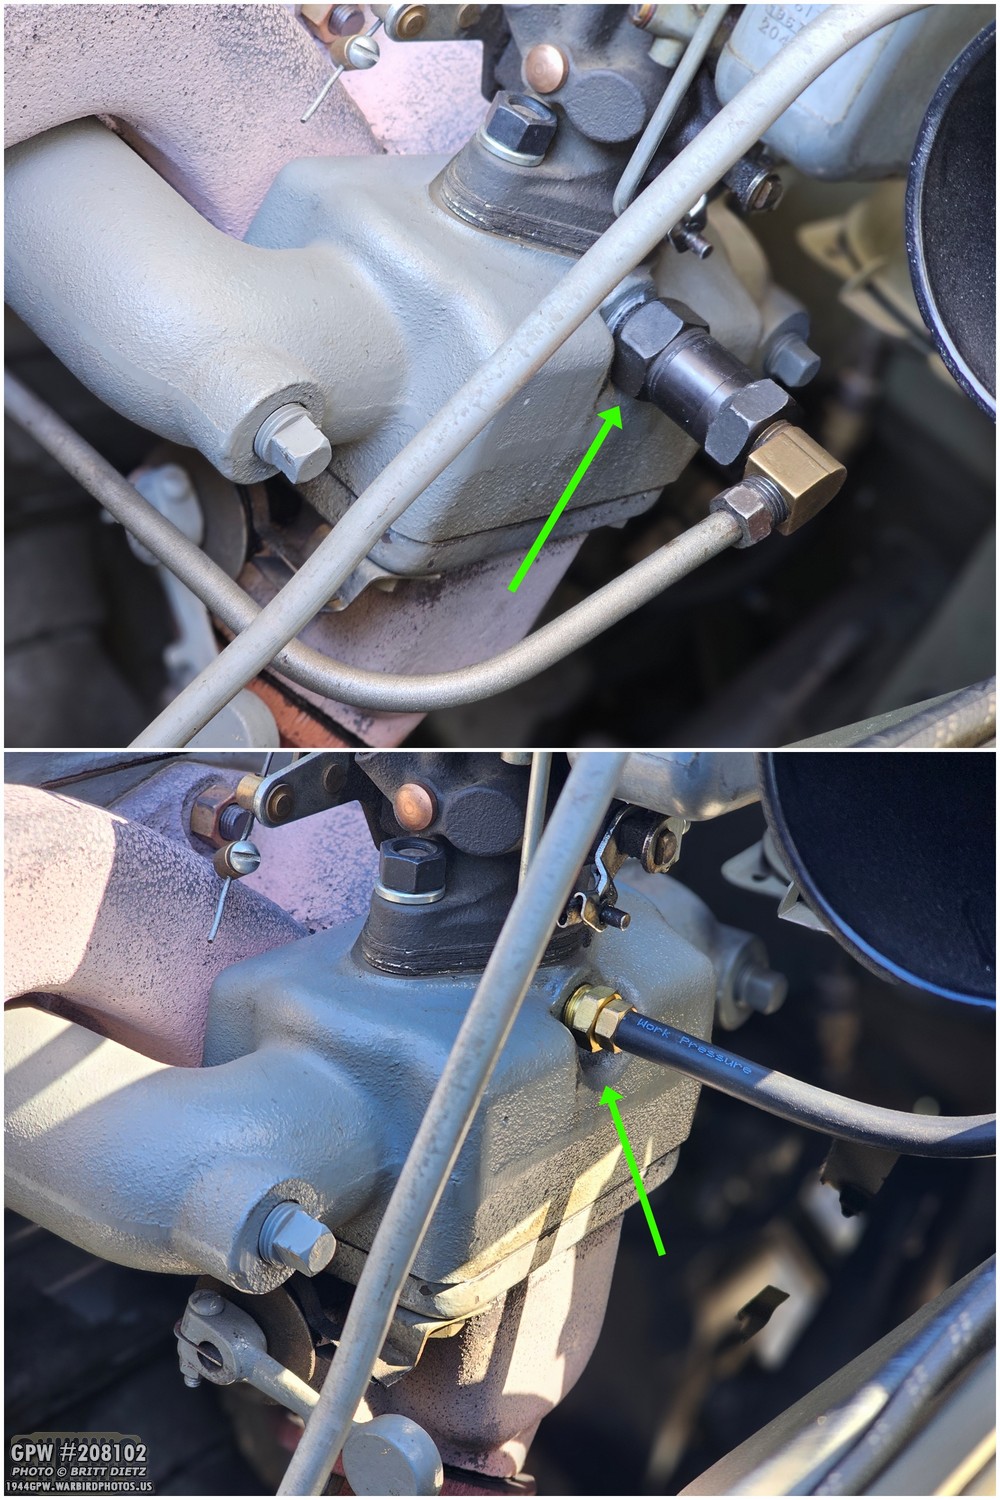
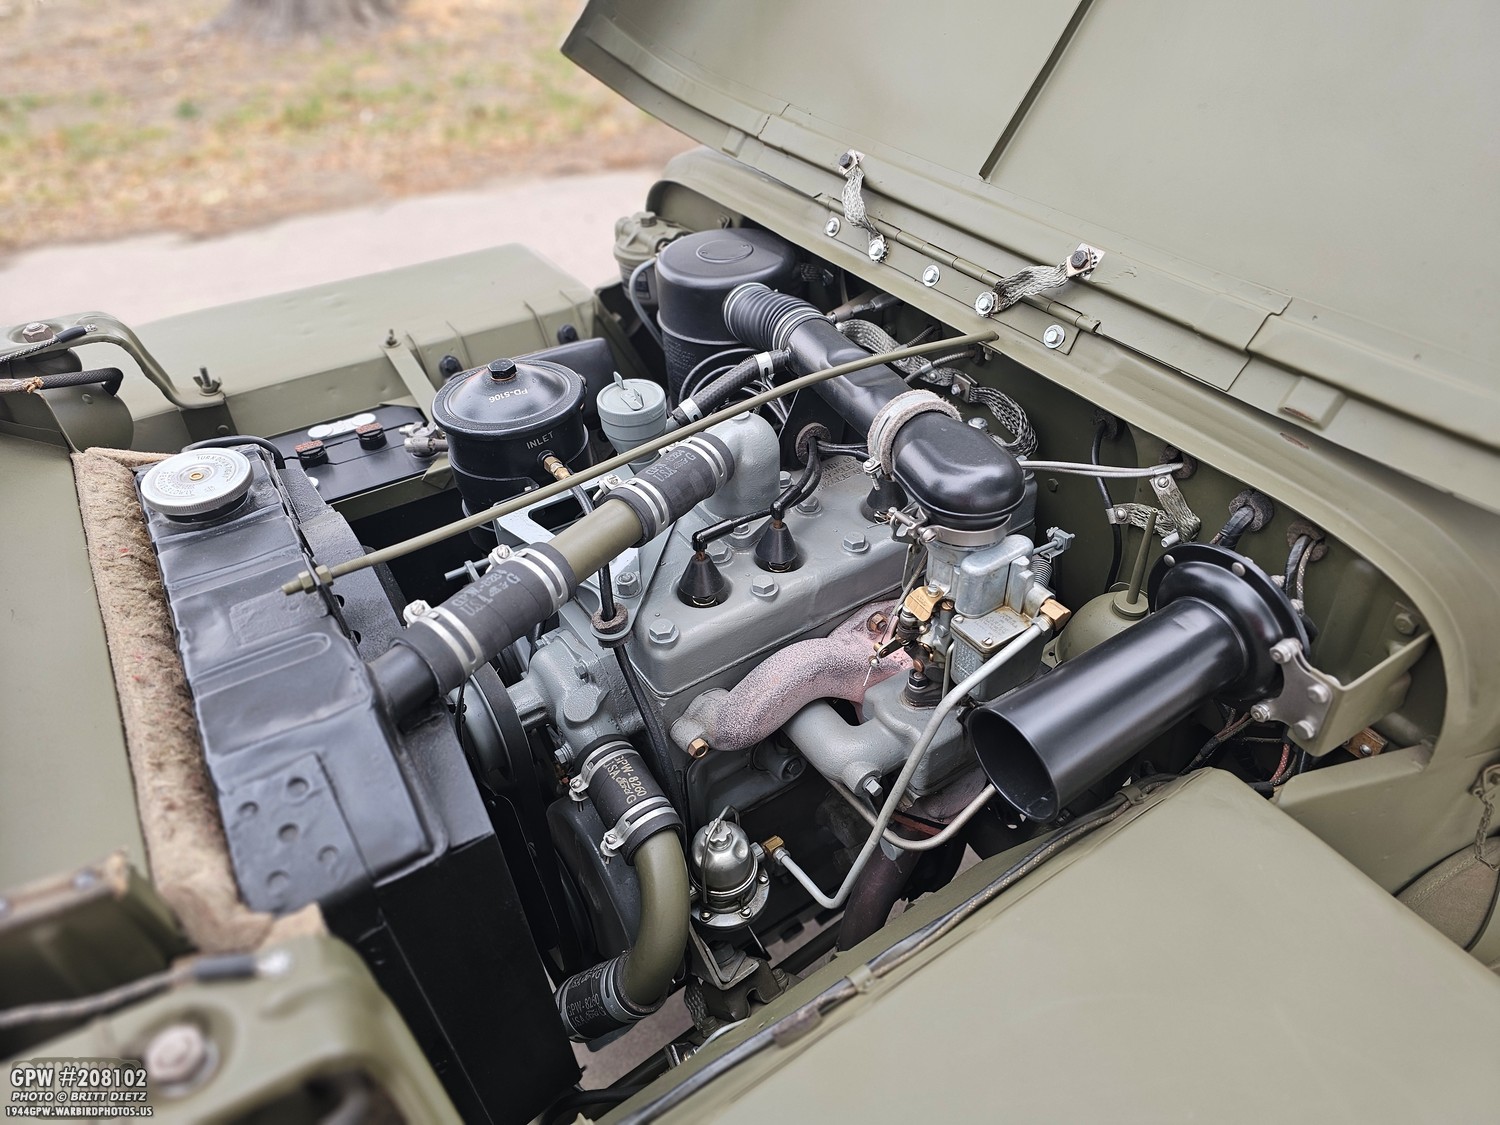
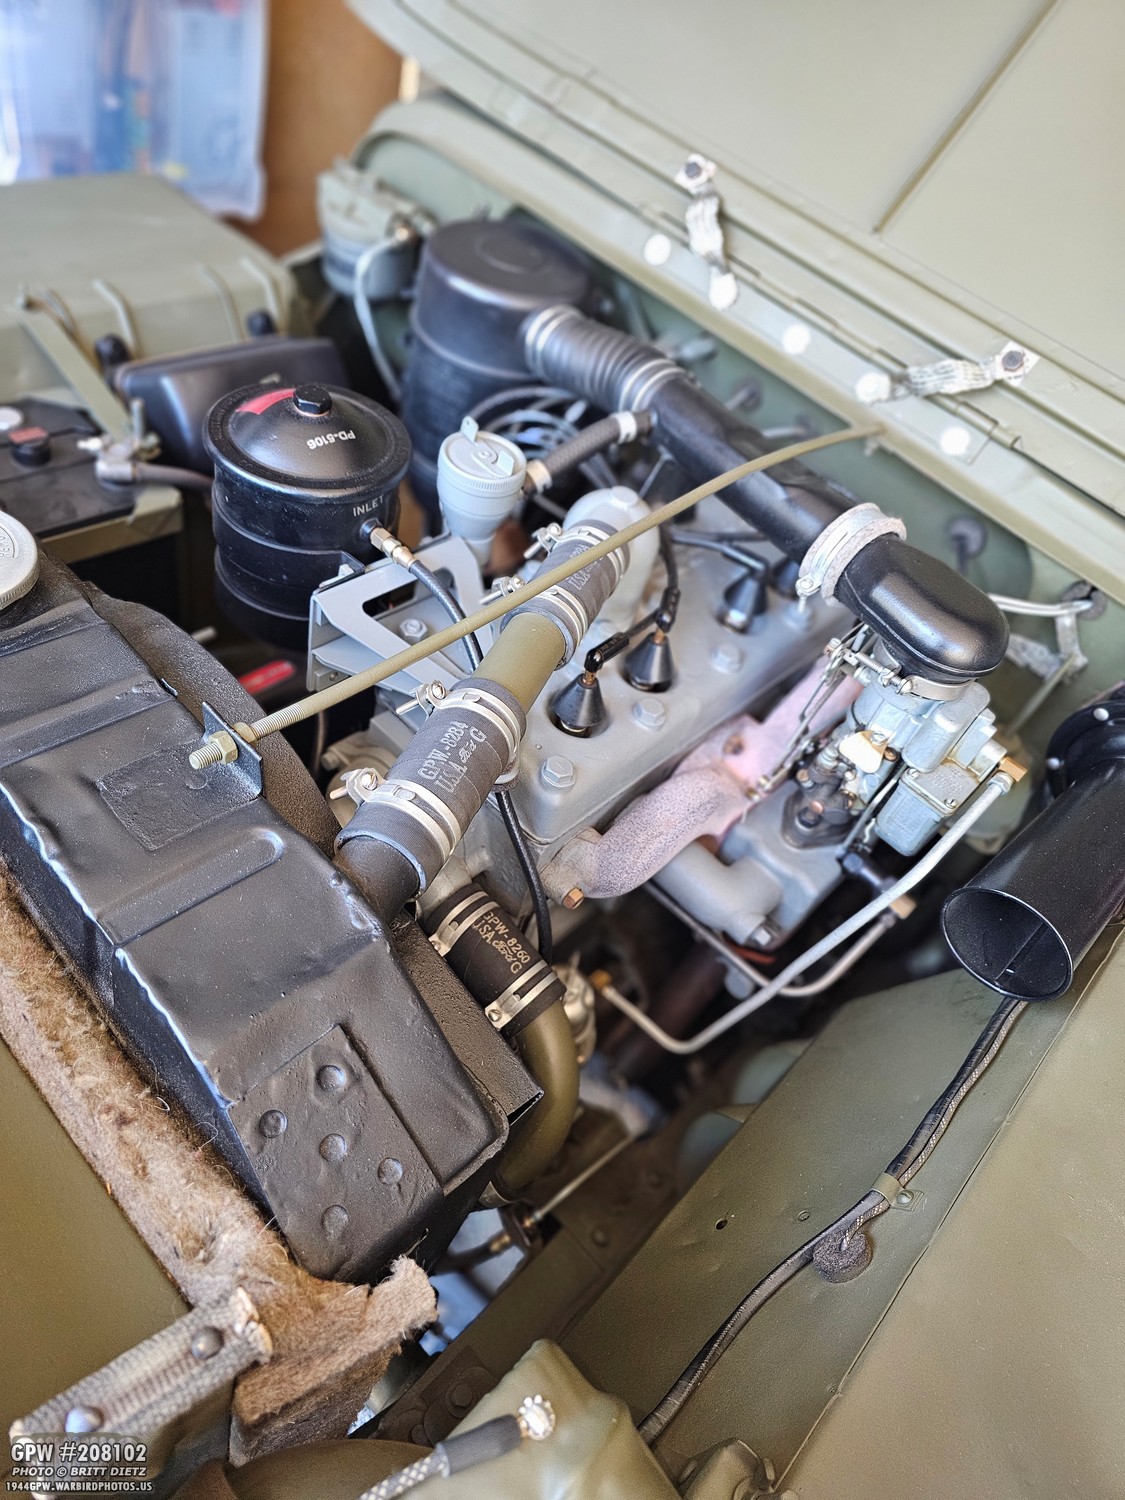
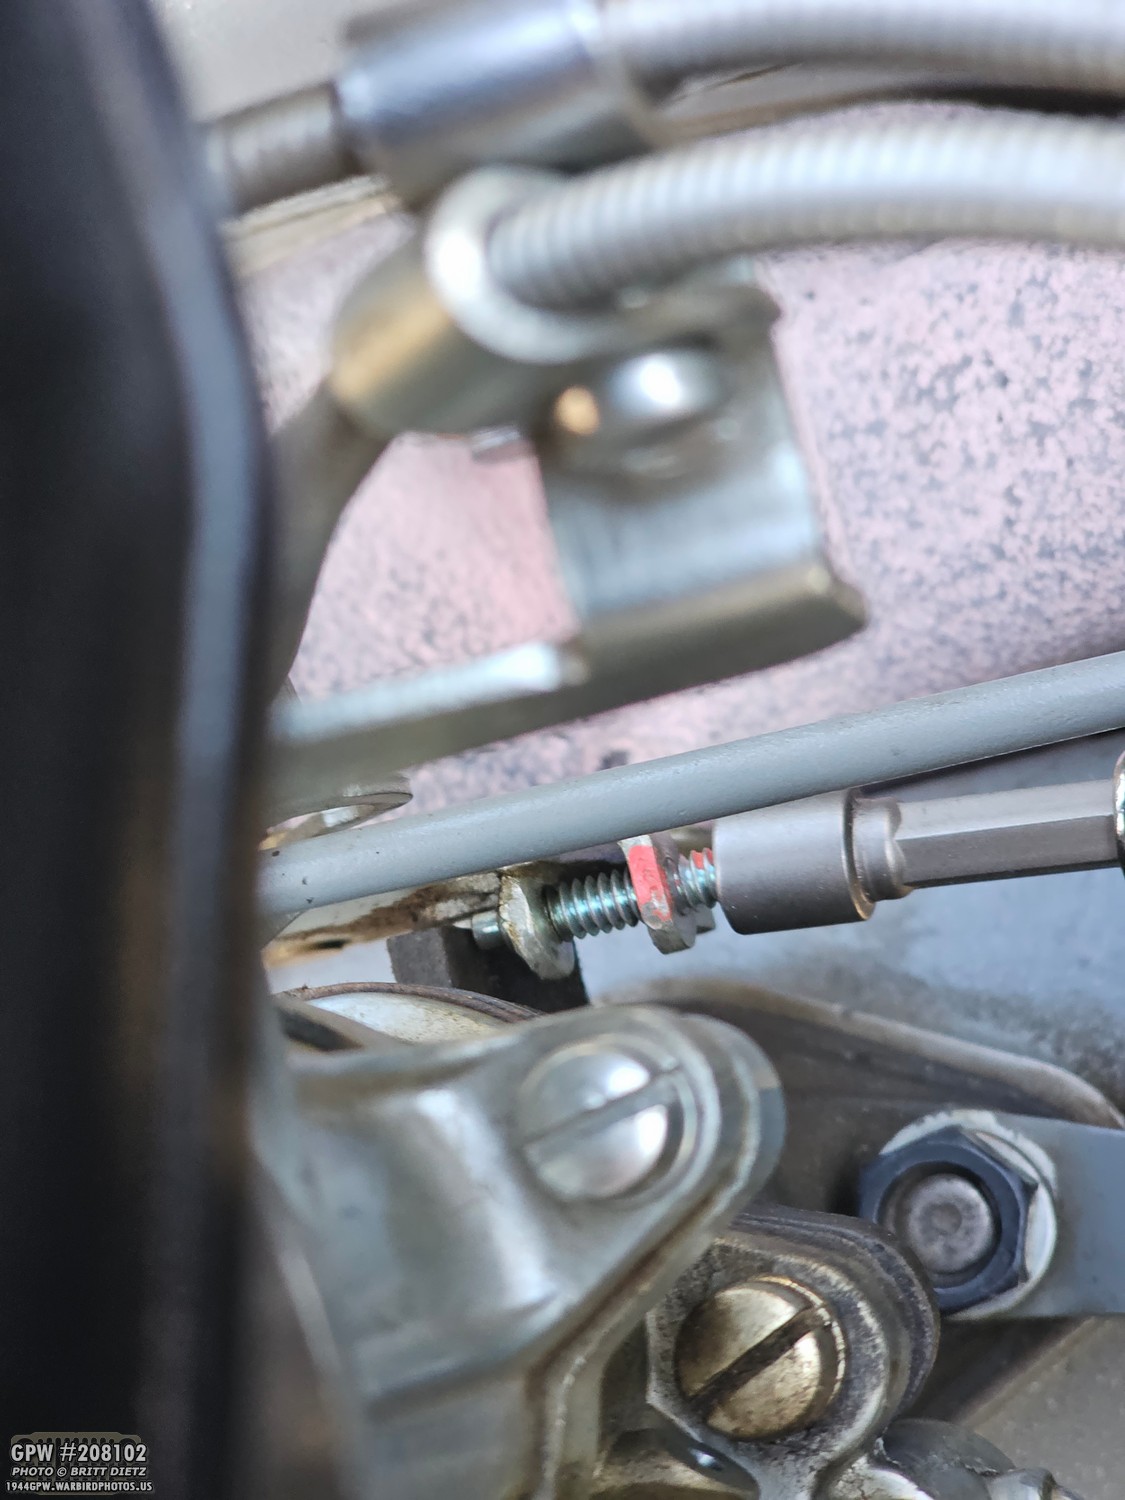
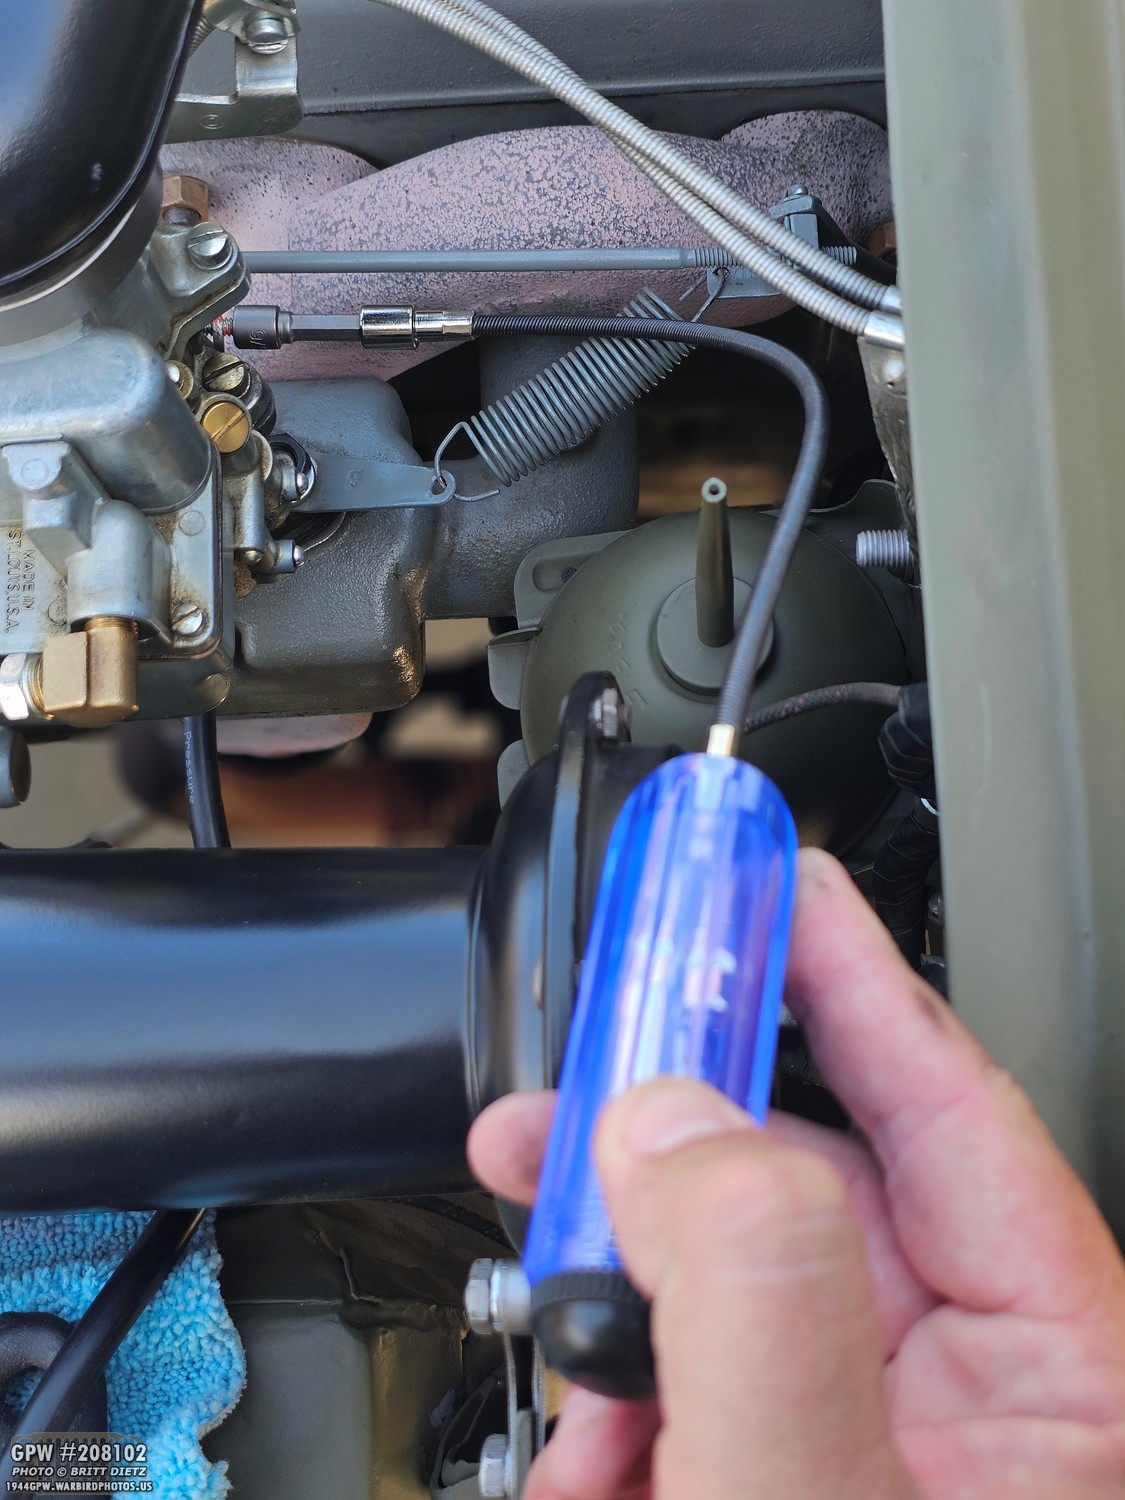
Now, to get the best reading of vacuum on the intake manifold, you’re going to want to use the spot where the PCV valve is screwed in. So, remove the side valve cover to the PCV valve, and then remove the PCV valve itself (top photo). If you got the Harbor Freight Vacuum Gauge tester, one of the adapters is a perfect thread fit for the hole on the intake manifold, and it screws right in (bottom photo).

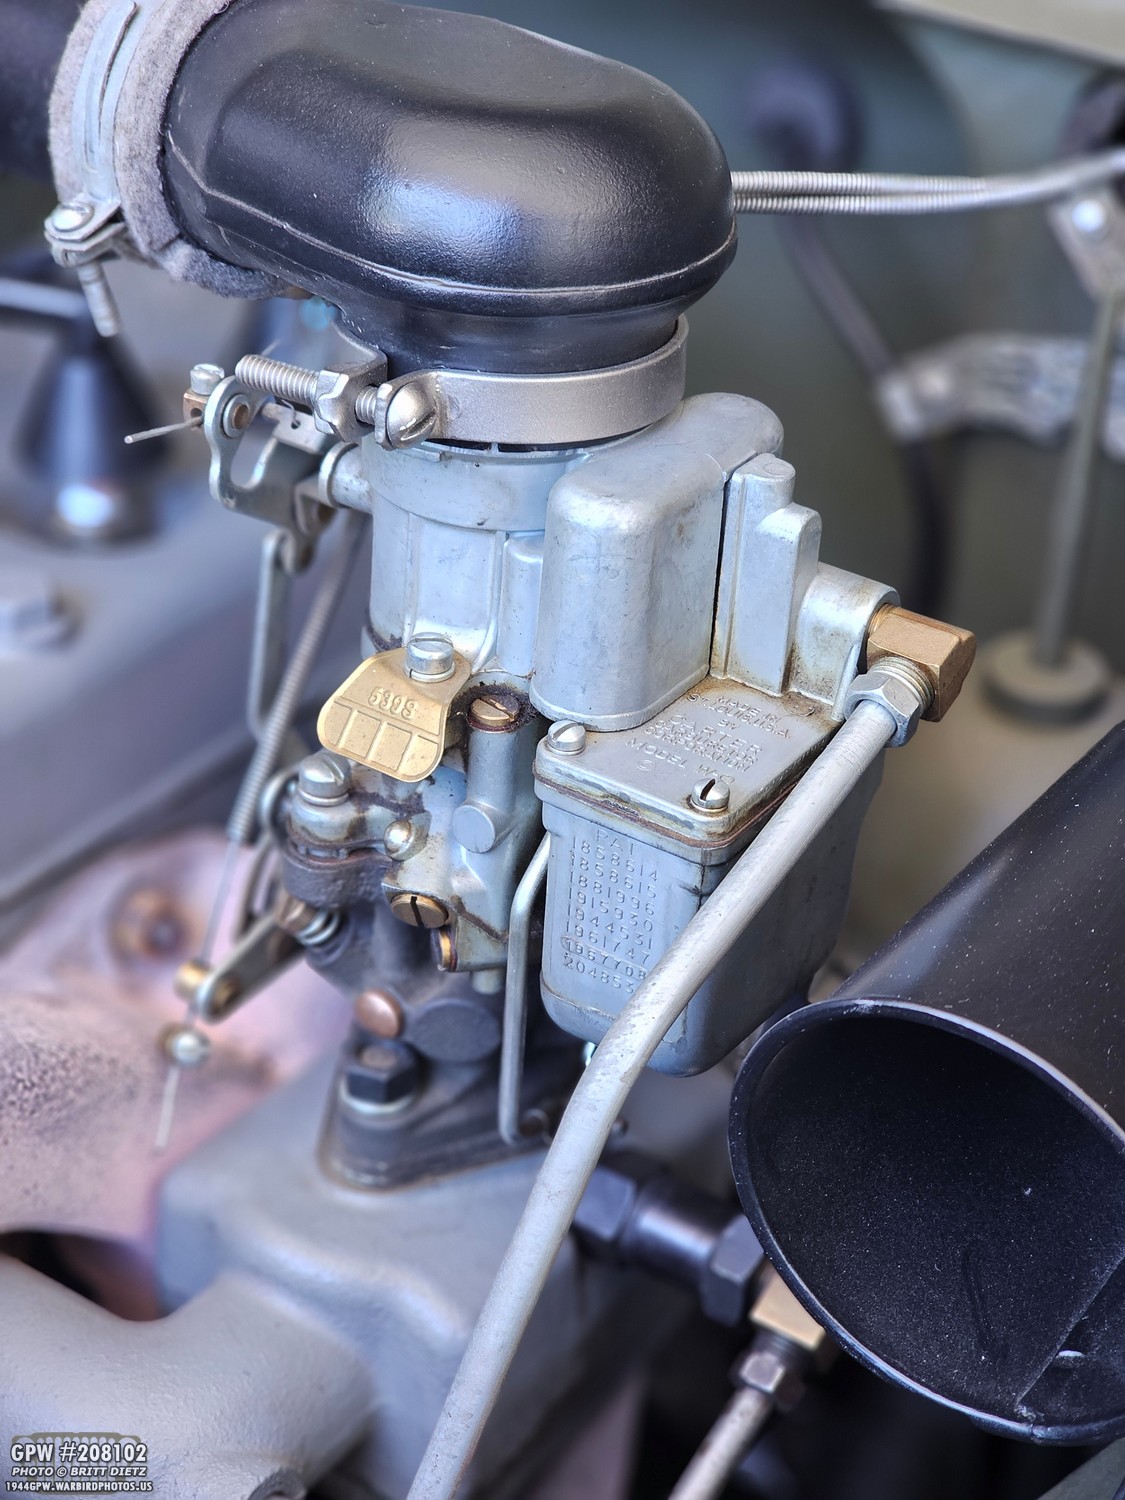
Now, we need to set two things on the carburetor to ‘factory default’ before we start adjusting things. First up is the brass front idle mixture screw. This will either lean or enrich the fuel going into the engine. For factory default, gently screw in the screw using a flat blade screwdriver until it bottoms out, and you feel pressure. BE VERY CAREFUL, STOP AS SOON AS YOU FEEL IT START TO HAVE PRESSURE. DO NOT over-tighten the screw. You just want it to ‘bottom out’. Once it’s there, turn it back out counterclockwise 1.5 turns (which is three 180-degree turns). The mixture is now set to ‘default’.
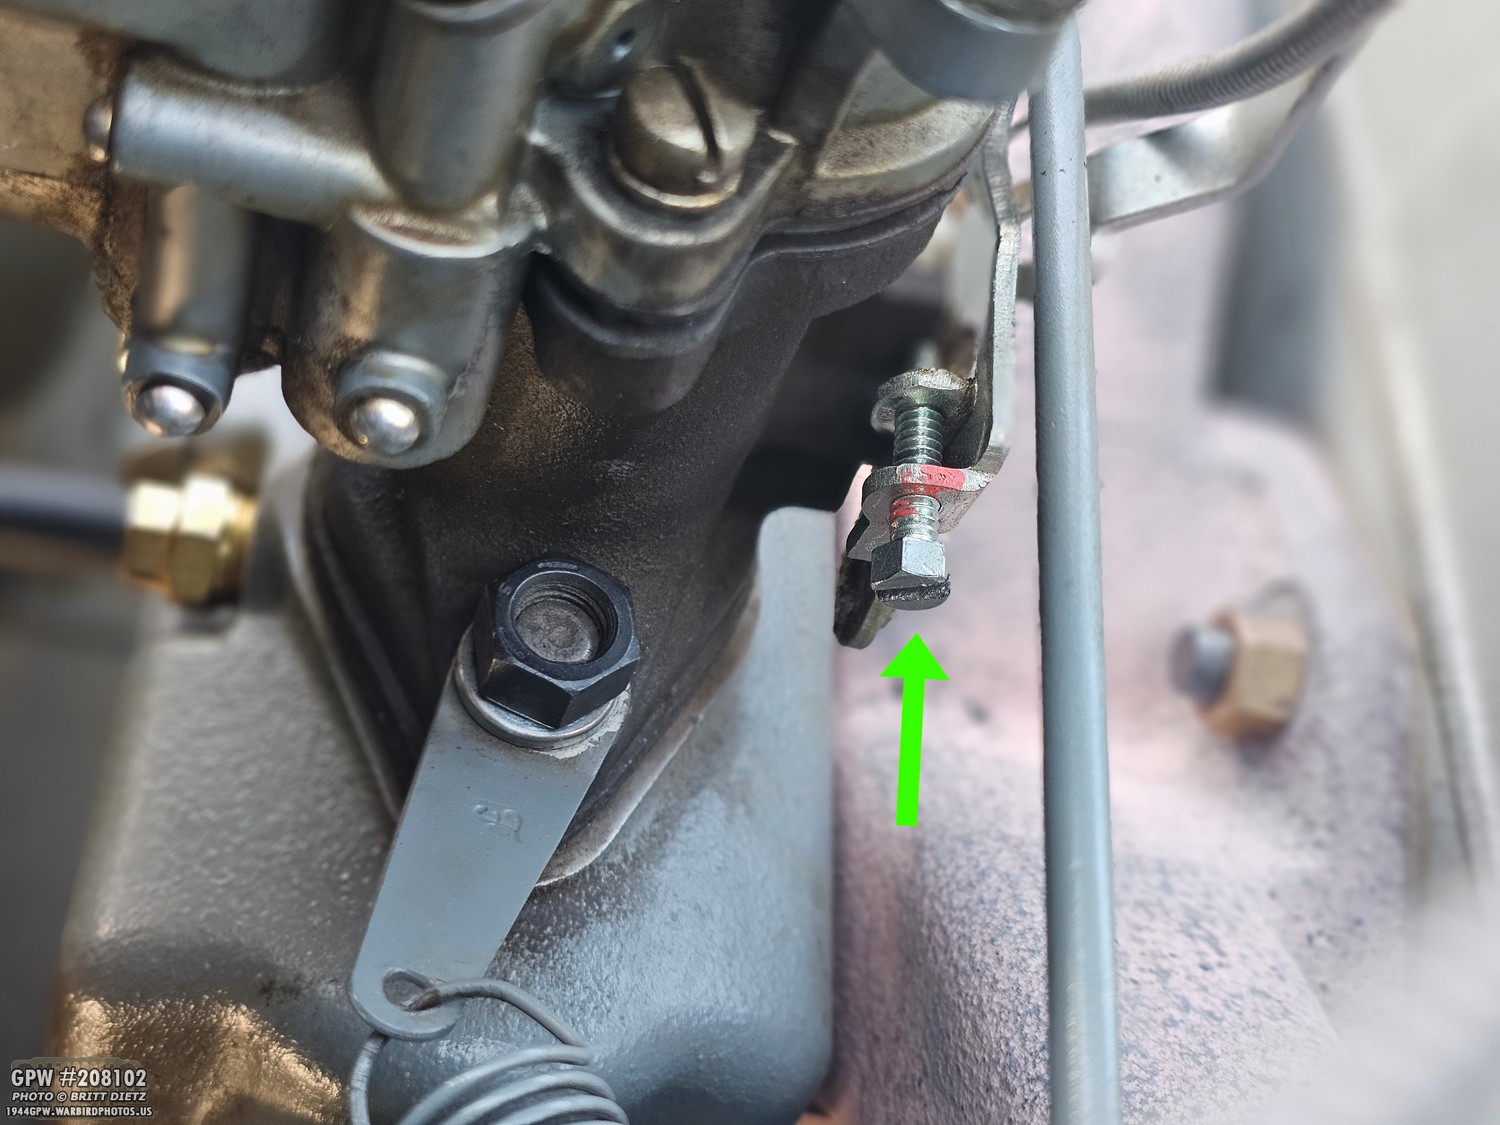
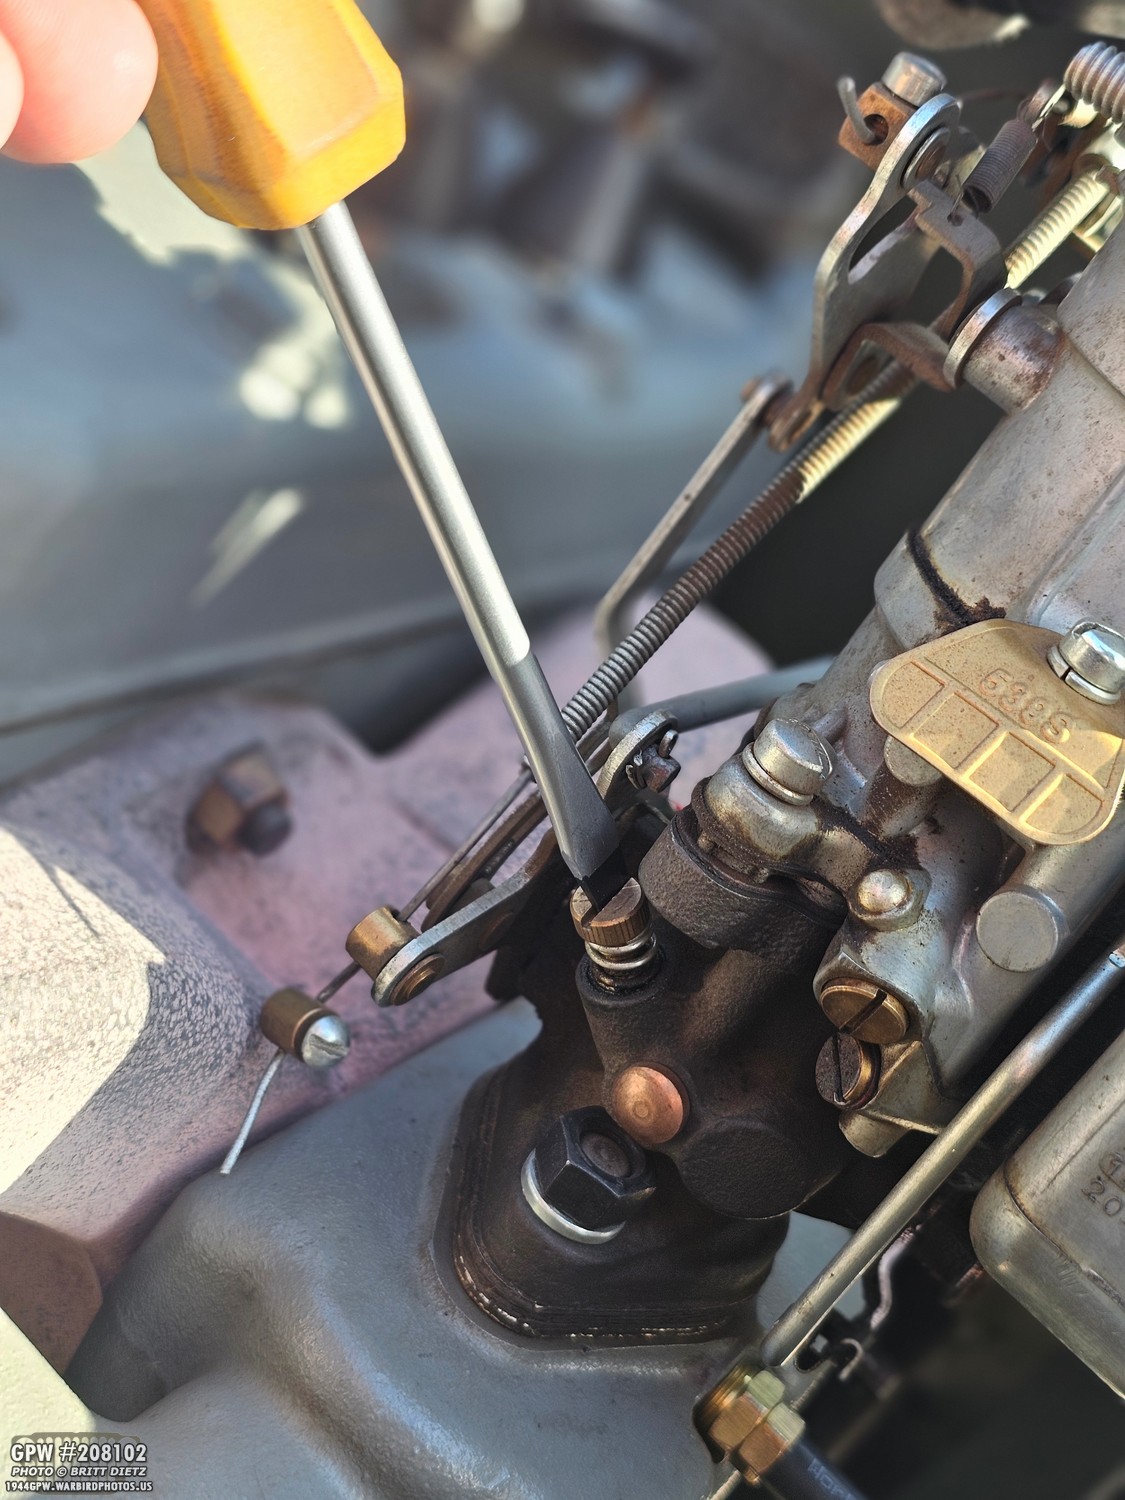
Turn your attention to the back of the carburetor and look for the idle stop screw. This screw, which should have a hex head, essentially adjusts your minimum throttle. Screwing it in (clockwise) will allow more air/fuel mixture into the manifold, increasing RPMs. Screwing it out (counterclockwise) will essentially choke the air/fuel mix, causing lower RPMs. What we want to do here is to unscrew the screw so that it just pulls away and is just barely NOT touching the black base plate (red arrow). You want it to just be pulled away and not making contact. Once you are there, then screw it back in 1 full turn (two 180-degree turns). The idle stop screw is now set to ‘default’.
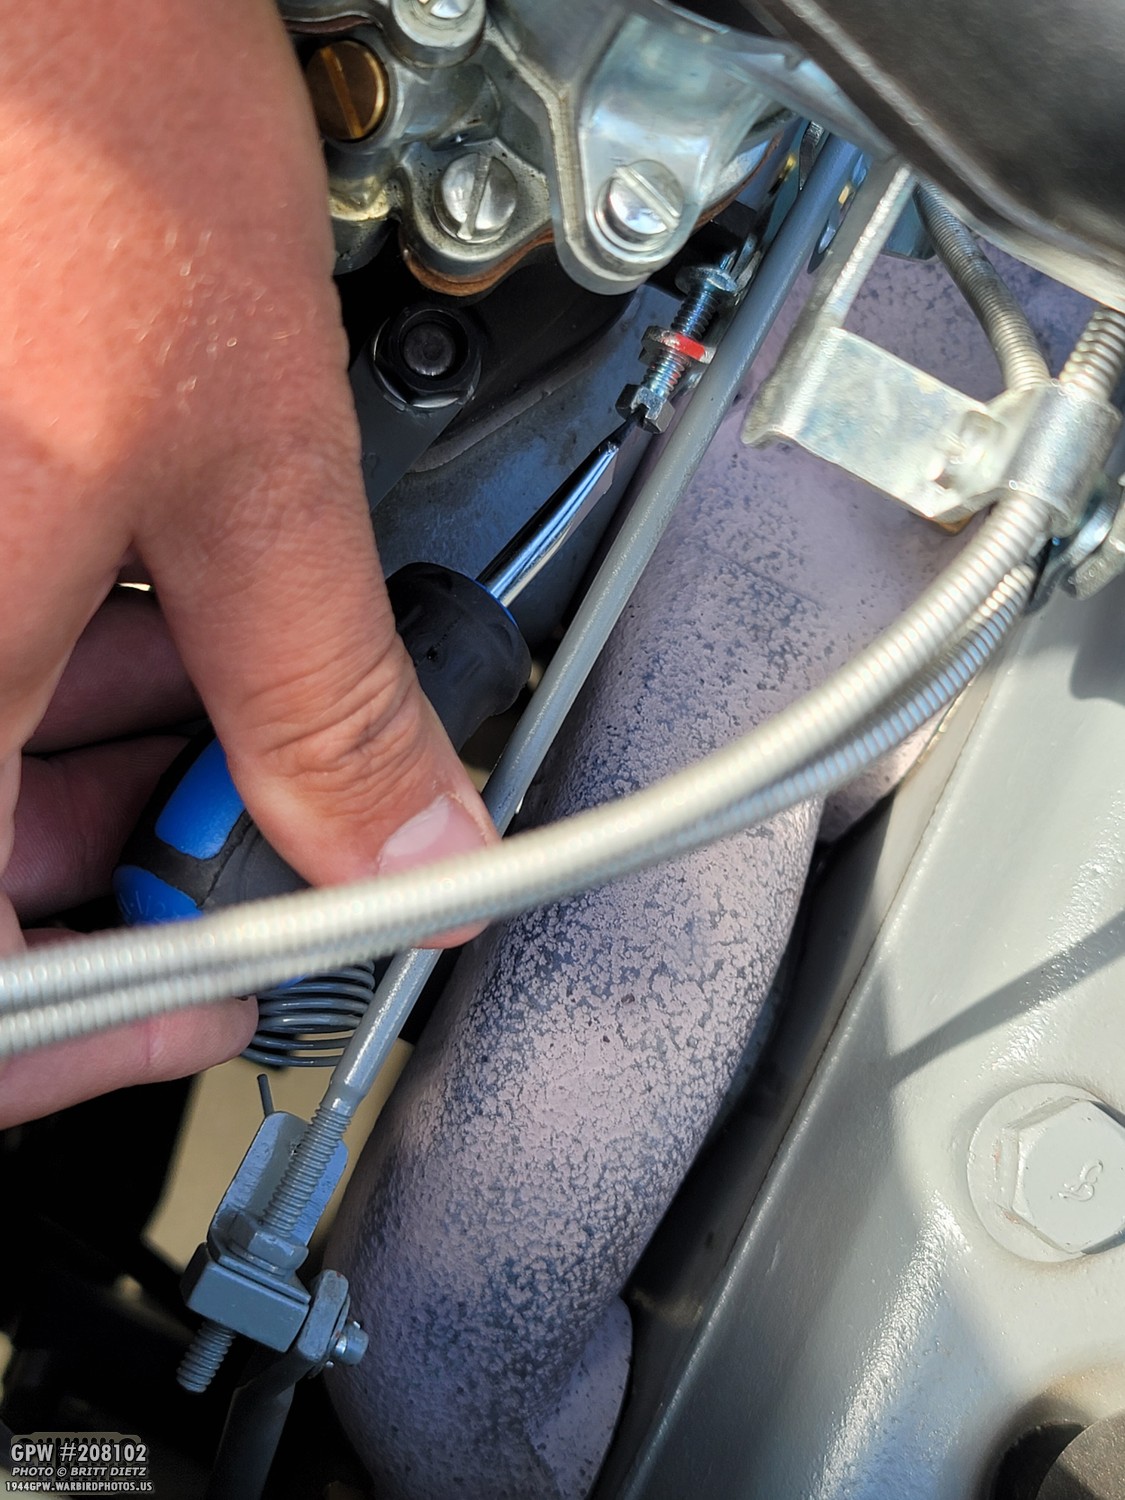
To adjust that idle stop screw, you can use a small stubby flat blade screwdriver as seen here… but this leaves your hand (and knuckles) VERY close to what will end up being an insanely hot exhaust manifold. I know all too well that momentary burning feeling when you make contact with it. It might be cool right now, but it won’t be in just a few… so this is why I suggest the long neck flexible screwdriver. You’ll see it in action later.

Now, your new Digital Engine Tachometer should have a metal clamp like this and is connected via a very long cord to a small screen.

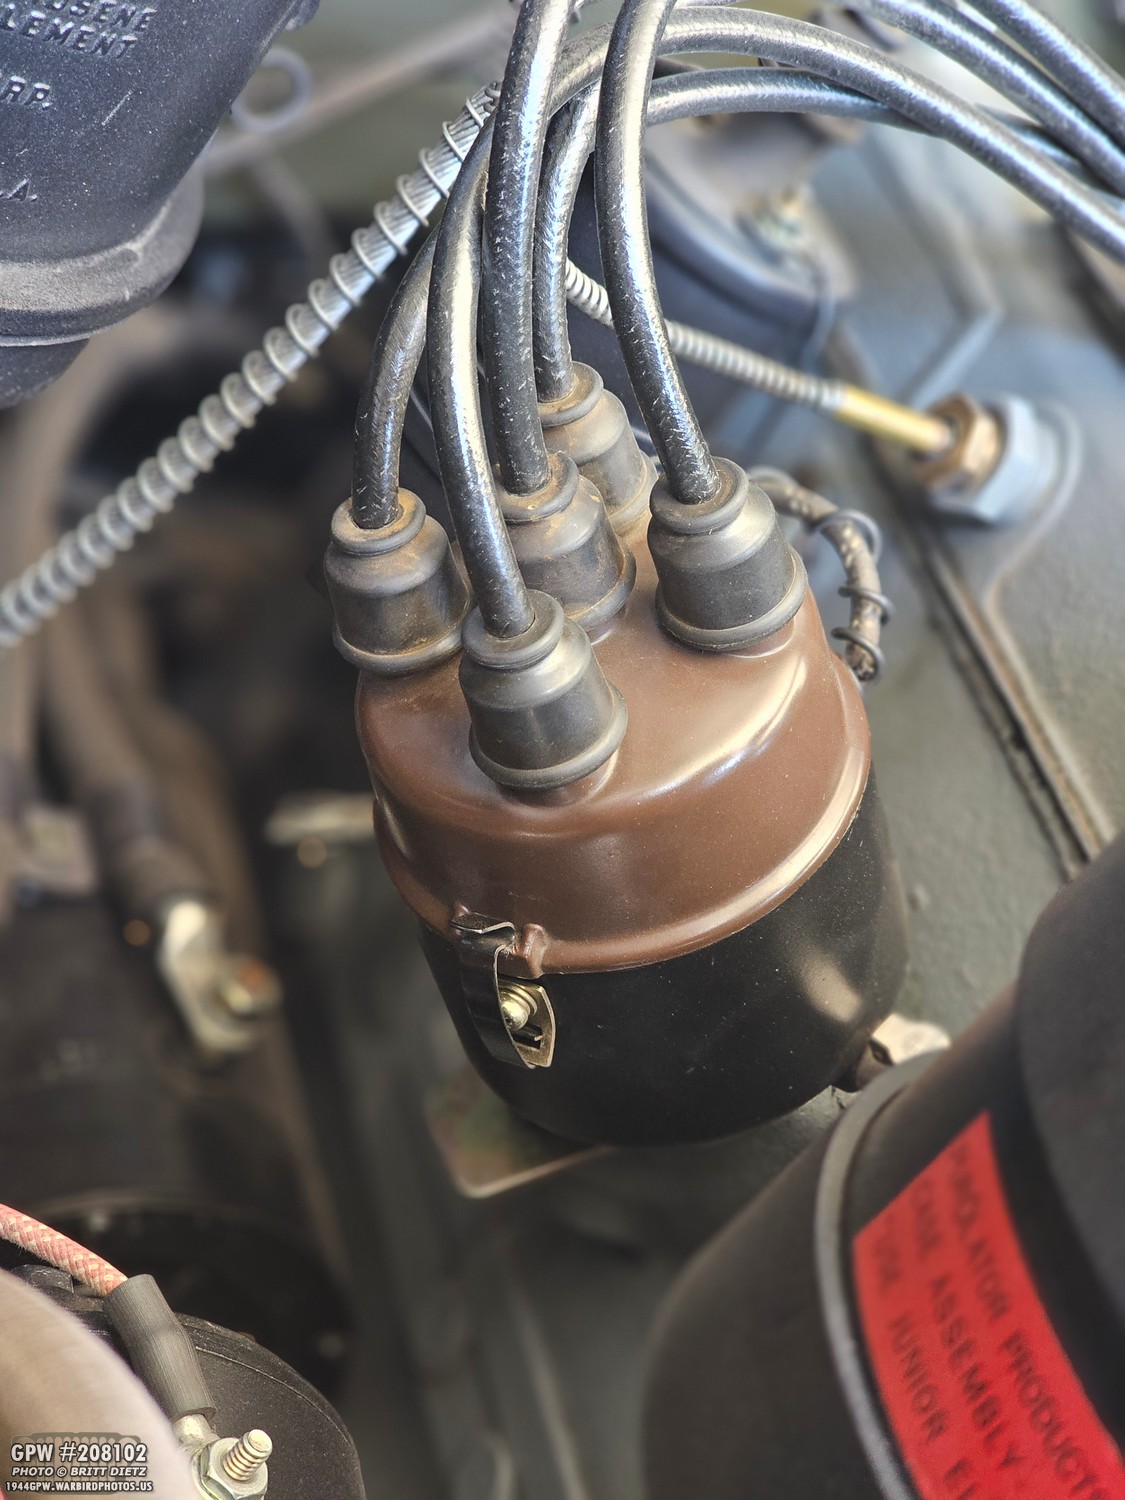
You are going to want to clamp the Tachometer’s clamp onto the middle coil to distributor wire as shown here. How the Digital Tachometer works is that it measures the electrical impulses (through the wire covering!) as it sends the electrical currents to the spark plugs. The sudden fluctuation of the electrical current through the cord correlates to the RPMs of the engine. For the Tachometer I got, as soon as I turned on the engine, it automatically came to life and showed me the RPMs. Pretty cool.
Place the Tachometer display and the Vacuum Gauge somewhere on the Jeep where you can see them (IMPORTANT), and they won’t vibrate off when the engine is running. ALSO IMPORTANT: The Tachometer’s wire is very long, so MAKE SURE that it cannot fall and get caught on the engine fan. That would be very very bad. Route the wire so it cannot get caught. So, we are all set up now… let’s get to work!
First thing to do is to start the engine… and let it run for a little bit. Not super long, just let it get a little bit warm. You can keep an eye on the Tachometer and Valve Gauge to make sure they are not vibrating off the fenders or wherever you put them as the engine warms up. Once the engine is warmed, make SURE that your choke is not engaged and fully pushed in.

First item to adjust is the distributor. Using the stubby 7/16 wrench, loosen the side hold-down bolt that is upside down, but don’t unscrew it completely. This should free the distributor so you can turn it left and right. When loosening the hold-down bolt, only loosen it enough so the distributor can turn snugly.

What you want to do is to start turning the distributor left and right. Not big movements, but slow small ones. You’ll notice as you turn it too far one way that the engine RPMs will drop and the engine will start to falter. Those are the ‘limits’ of the distributor rotation. Normally, the old way was to just listen for the ‘ends’ of these limits and eyeball dead middle to find the best spot. We’re going to do this more scientifically.
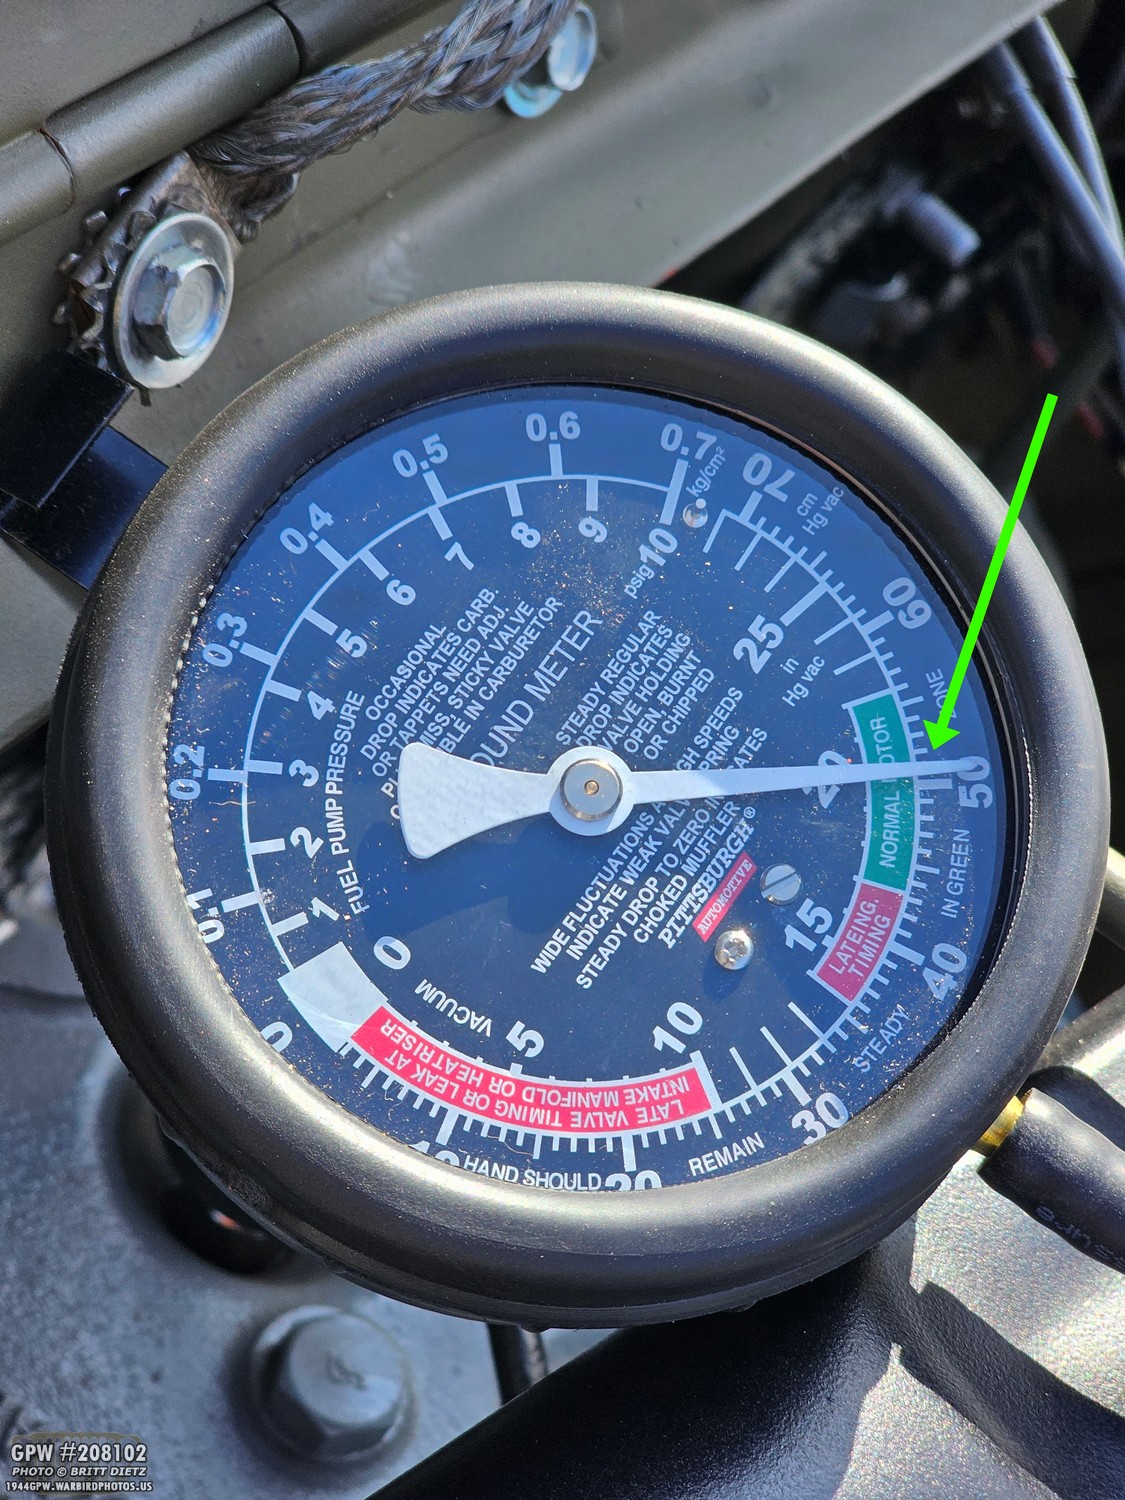
You want to start turning the distributor as you watch the Vacuum Gauge. What you want to watch for is the needle to go up a range of 18-21 in HG (the inside numbers). Keep turning the distributor, slowly, one way or another, until the needle goes as high as it can. In my case, I was getting about 20. Once you find the highest it will go, you need to do super small adjustments to get the needle to steady as best as possible. On a 4-cylinder engine, it’s normal for the needle to jump. I found the sweet spot for mine was when the needle was going back and forth between 20 and 21. Any slight movement of the distributor beyond that either way caused the needle to jump more and go lower than 20.
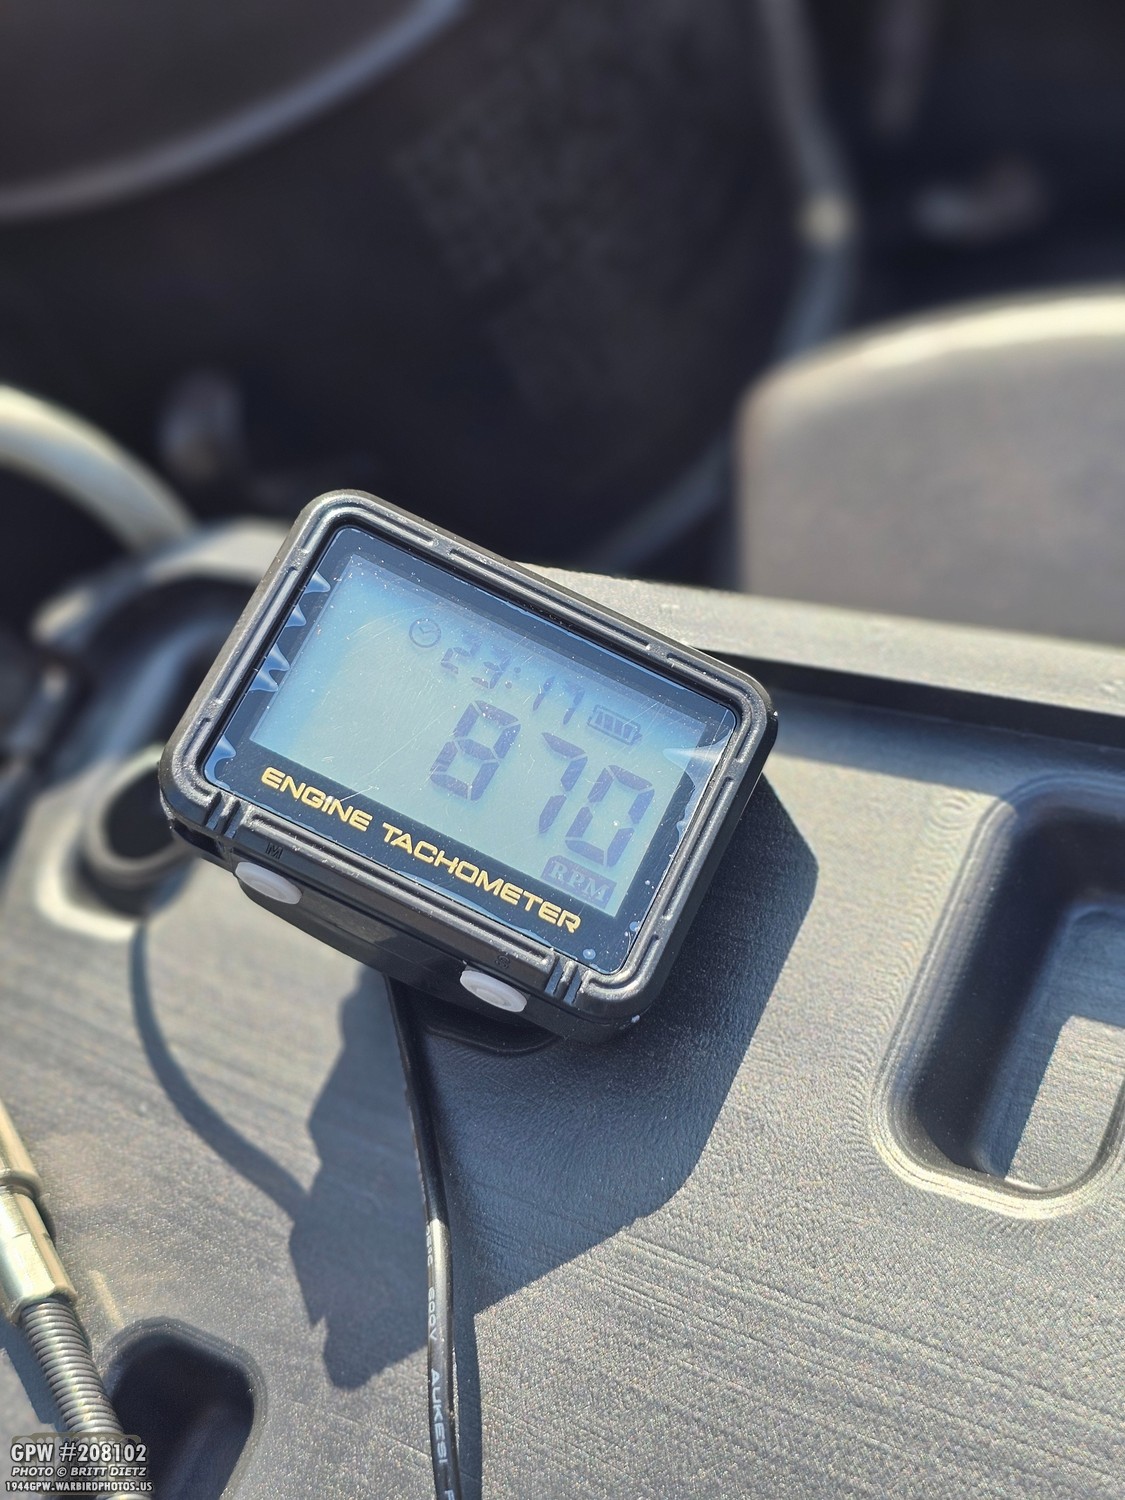
When you have found that vacuum ‘sweet spot’, immediately look over at your Tachometer and make a mental note of the steady RPMs it is showing. For me, it was quite high at 890 (this shot is just an example as I was adjusting the distributor). Make sure the RPMs are holding steady when you make this reading.
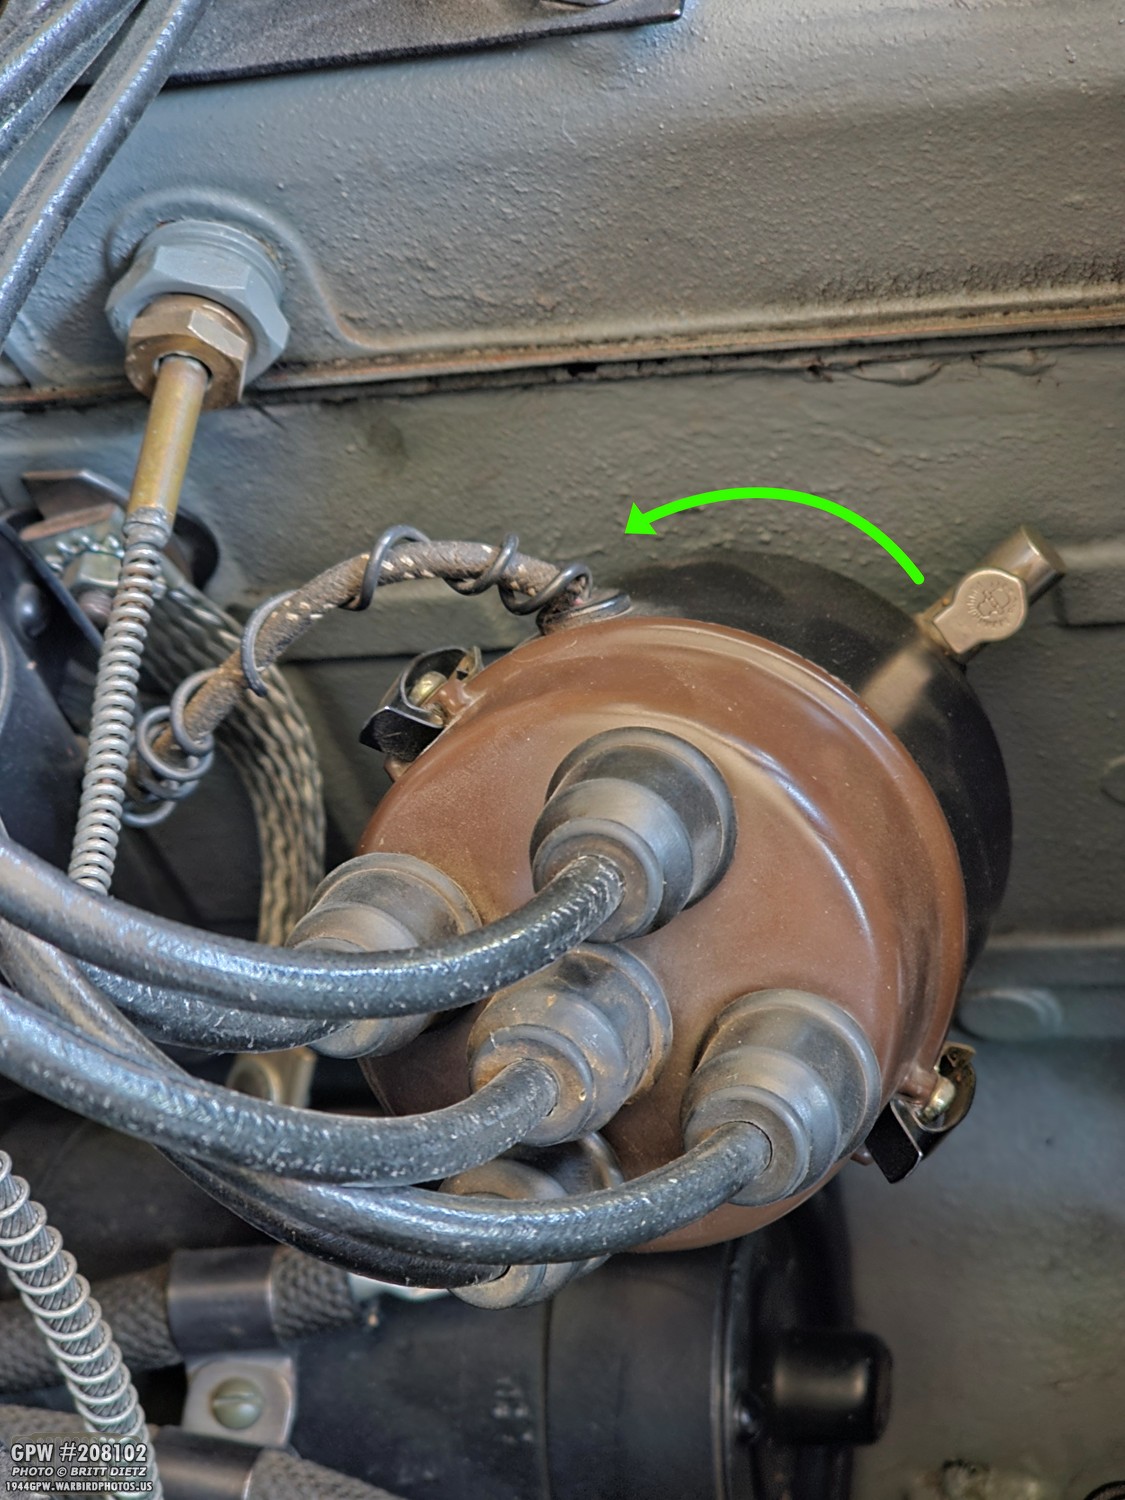
So, what you want to do now is to retard the timing by 100 RPMs for proper firing. You do this by moving the distributor very slowly counterclockwise, watching the Tachometer for the RPMs to drop. So, if you had 890 RPM as I did, you’d want to get it down to 790/800. If you go lower than 100 RPMs, just slightly turn it back clockwise, and the RPMs will rise. It might take a few slow turns to get it to the exact number. Once you are 100 RPMs less than your reading, very very carefully tighten the hold-down bolt to lock the distributor in place. Be careful, you can accidentally move the distributor as you do this. I find holding the distributor with one hand and then hand-tightening the bolt with the other helps. Then you can switch to the stubby 7/16 wrench to tighten it. It’s okay if the engine sounds sluggish at this point. We are done with the distributor!
Now, we’re going to move to the other side of the Jeep to the Carter WO carburetor. Move the Vacuum Gauge and the Tachometer (mind that wire!) so you can see them on this side. We’re going to adjust the steel idle stop screw next.
If you bought that long flexible screwdriver I mentioned, they often come with socket attachments. I found one of those perfectly fit on the head of the screw. This made things a lot easier. But if there is no socket attachment, you can use a flat blade screwdriver bit.
Here you can see how easy the long flexible screwdriver makes this part! What we’re going to do here is turn the screw and watch the Tachometer. If you ended up with high RPMs (like my 890 down to 790), you’ll probably want to start by unscrewing the screw to lower the RPMs. The goal we want is 650 RPMs. If you were below that with the RPMs, then you might need to screw the screw in to bring them up. Slowly turn the screw; a little bit goes a long way with the RPMs. The vacuum reading will drop once you get the RPMs to 650, that’s okay. We’ll get it back with the next step.
Now, take your flat blade screwdriver and turn your attention to the front brass idle mixture screw. Start to slowly turn the screw either left or right and watch the Vacuum Gauge. You want to get the vacuum reading to go back to that steady reading you had when we worked on the distributor. You’ll find the vacuum will quickly rise/fall as you turn the screw here. Once you get it back up to the reading we had, in my case 20-21, it will probably change the RPMs and you won’t be at 650 RPM anymore.
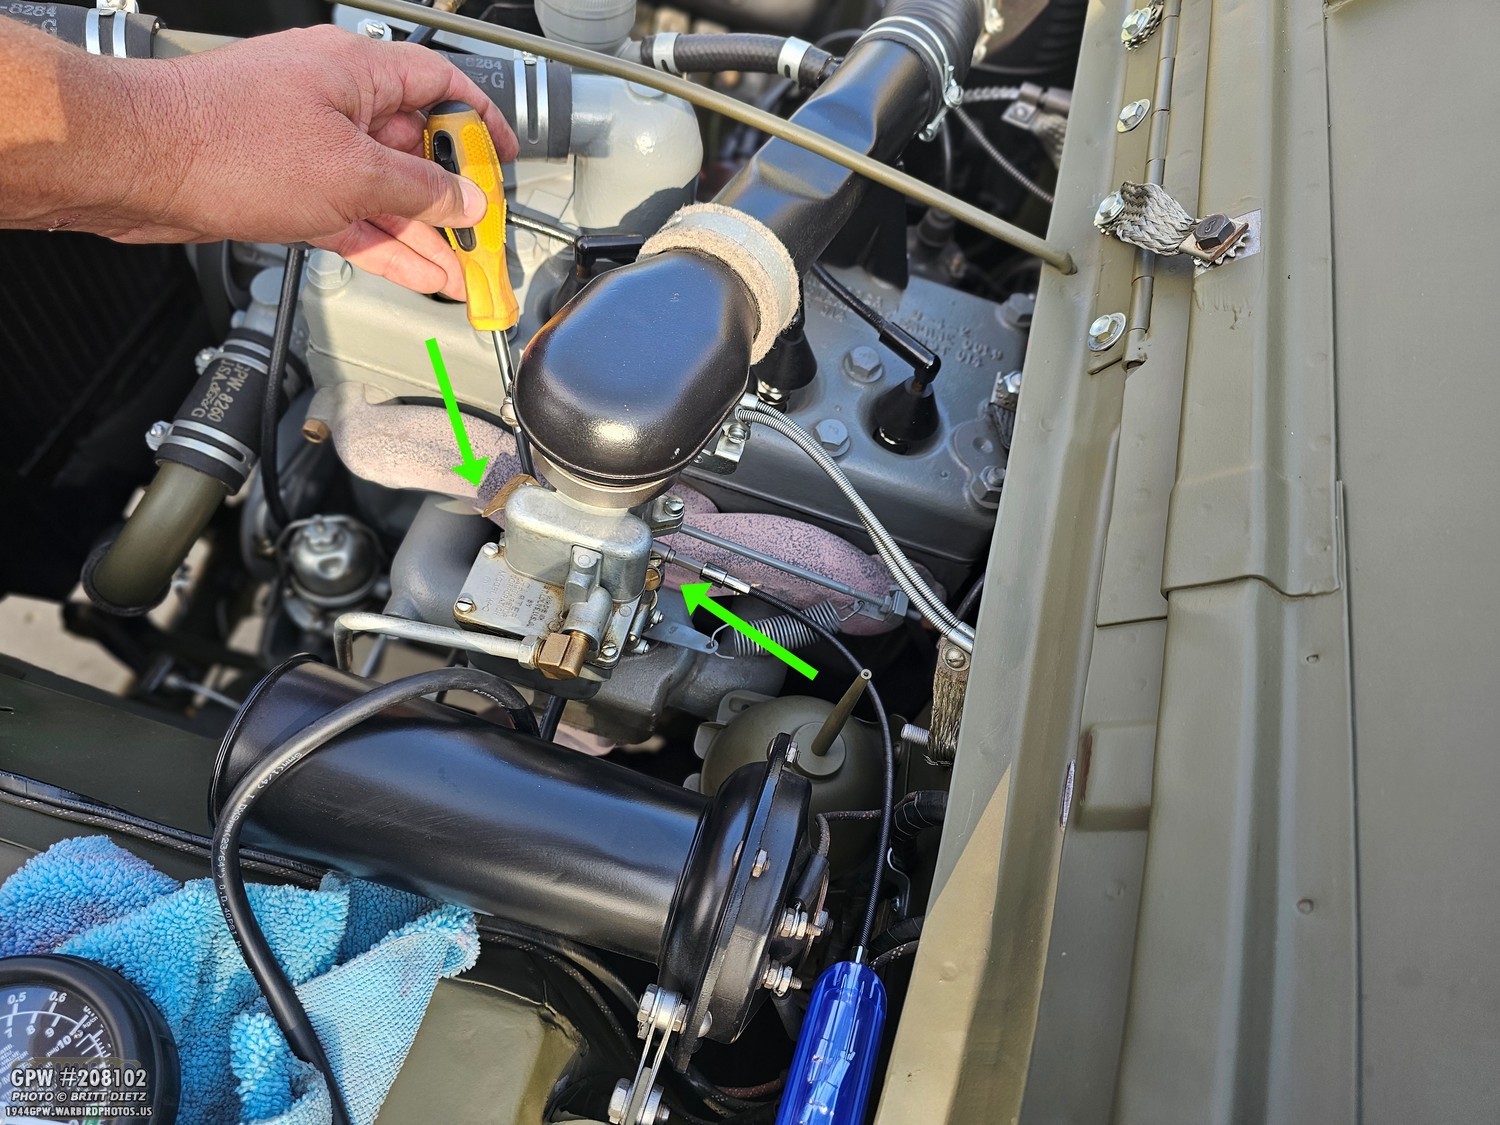
And this is where you start the dance between the two idle screws. You only want to do very slight movements of each screw. You turn the rear steel idle stop screw to raise/lower RPMs. You then turn the front brass idle mixture screw to get the vacuum reading back up to optimum levels. For me, it just took one more round of adjustment, and I got them to both be in the sweet spot.
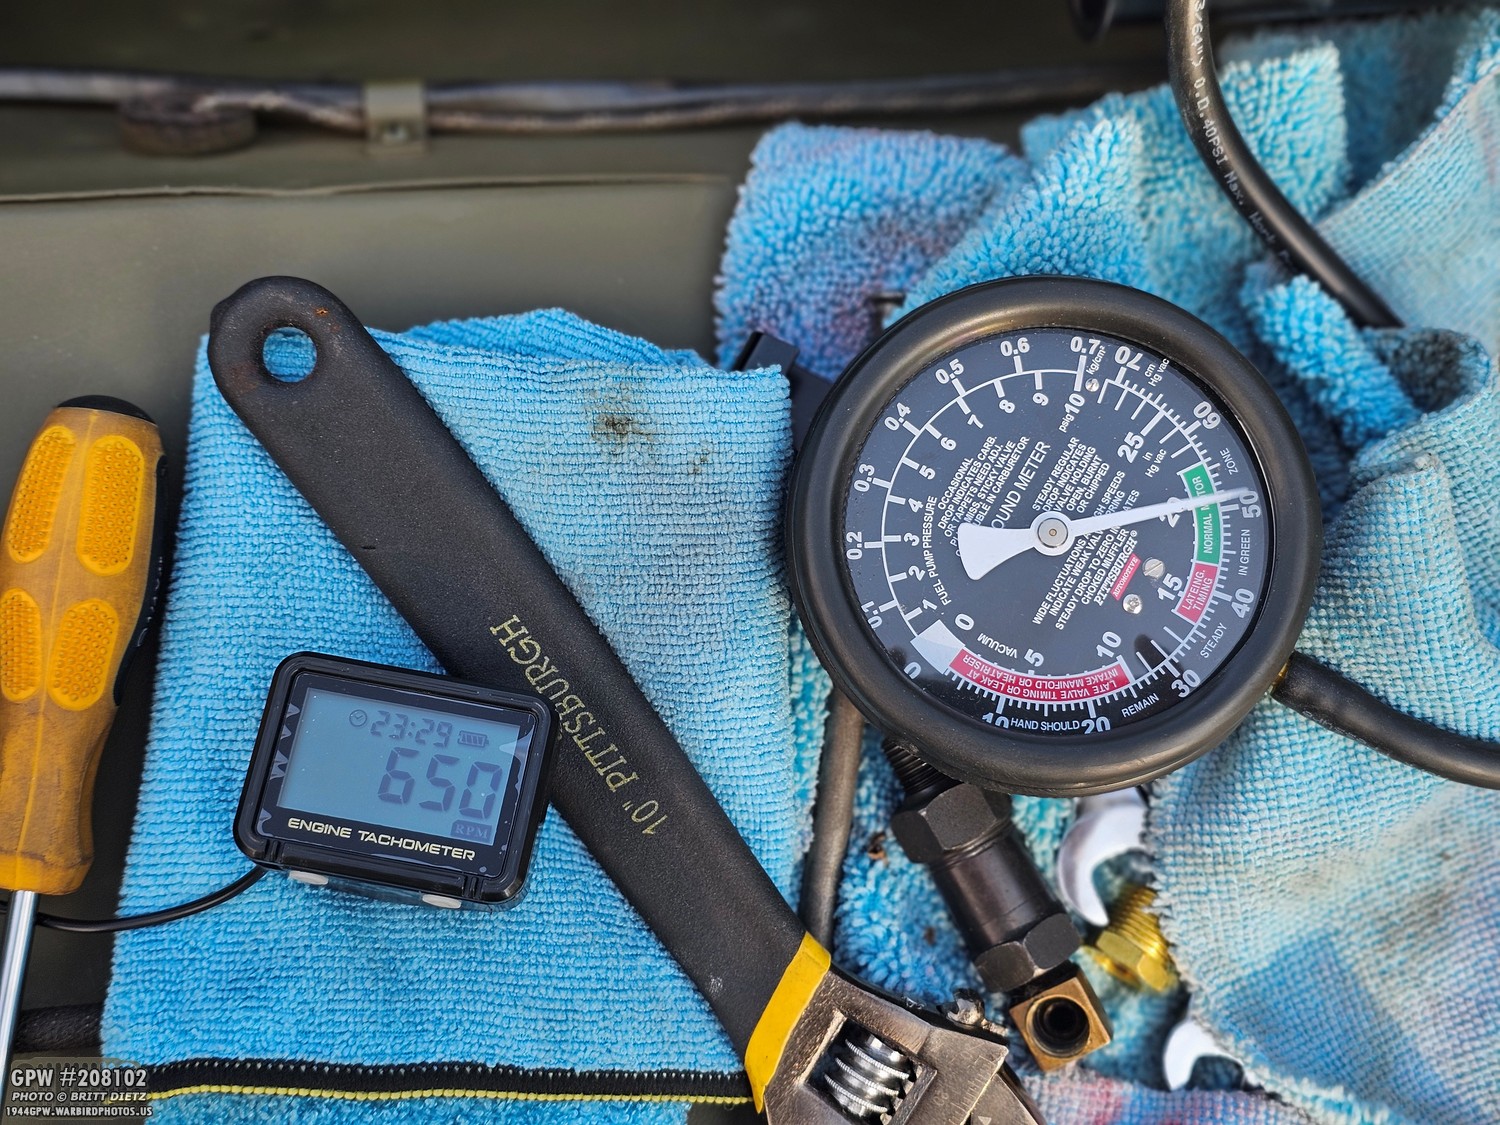
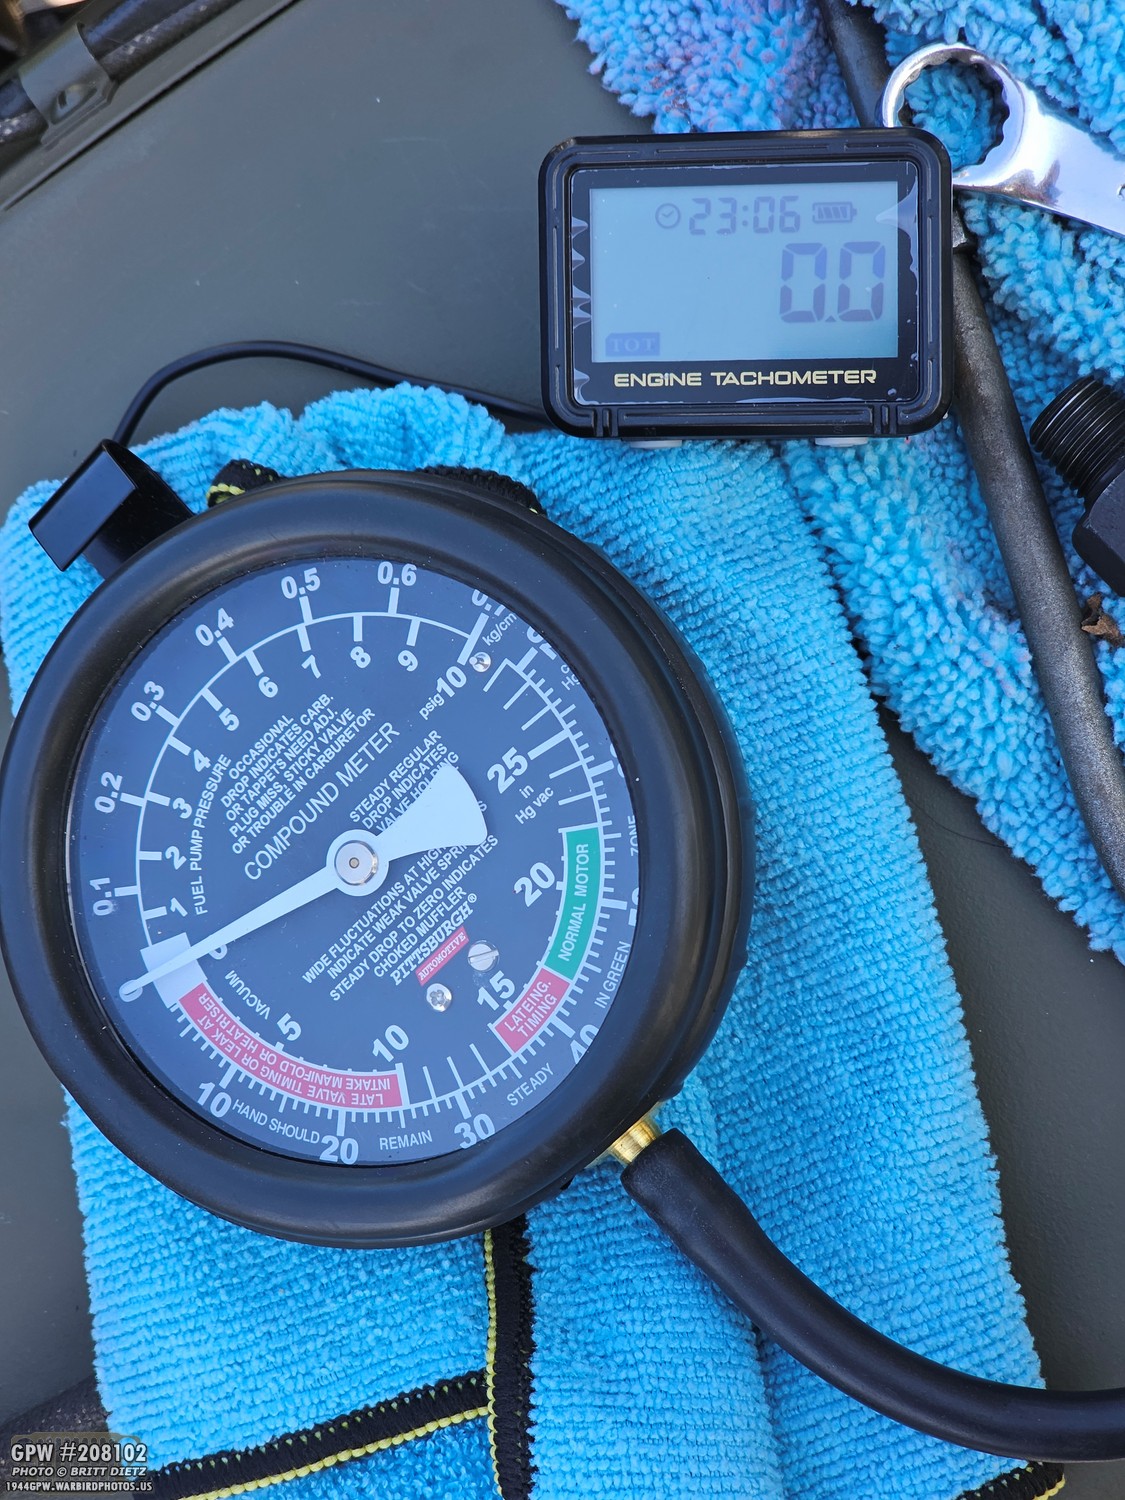
And here’s a look at how the Tachometer and the Vacuum Gauge looked on my Jeep, finding the ultimate perfect timing! The tachometer was pegged at 650 RPMs, and the Vacuum Gauge was sitting at the 20-21 level, holding steady. As soon as I started to get close to the sweet spot, I could actually hear the engine smoothing out and reaching a perfect steady sound!

So, you might be asking… did it really make my engine sound different? 1000%. As soon as I got to the sweet spot with the vacuum and the RPMs, the coughing TOTALLY WENT AWAY. Seriously, the engine smoothed out and not a single cough. Even when revving the engine a few times, she gracefully raised and lowered the RPMs without a single hiccup or cough. I honestly was shocked at how fast and easy this worked. So, I shut down the engine and removed the Tachometer and the Vacuum Gauge. I then reinstalled the PCV valve and the steel line from the valve cover to the PCV valve. It was time for the real test… a test drive!
And I’m beyond happy to report that my Jeep has never sounded better. It feels so nerdy to be so excited over engine timing, but I was over the moon with how good the Jeep sounded. Honestly, I don’t think it’s EVER sounded as good as it does right now. I’m going to chalk this up to a massive MISSION ACCOMPLISHED. And I hope this blog has inspired you to take a crack at this easy, and relatively inexpensive way to precisely fine-tune your engine. What’s best about this method is that it’s tailored directly to the best YOUR engine can do. So give it a try! In fact…
I put together this handy little instruction list for you to download and print if you want to give it a go. Let me know if you try it out! I’d love to hear how it goes for others. Okay, so now that this is done, let’s move on…
Now, if you’ve followed my restoration blog over the years, you know that I’m a big fan of pinup nose art on aircraft. I mean, who doesn’t love a good nose art? When I first got my Jeep, I knew that I wanted a pinup on it somewhere. As a Pinup digital artist myself, I wanted something special.
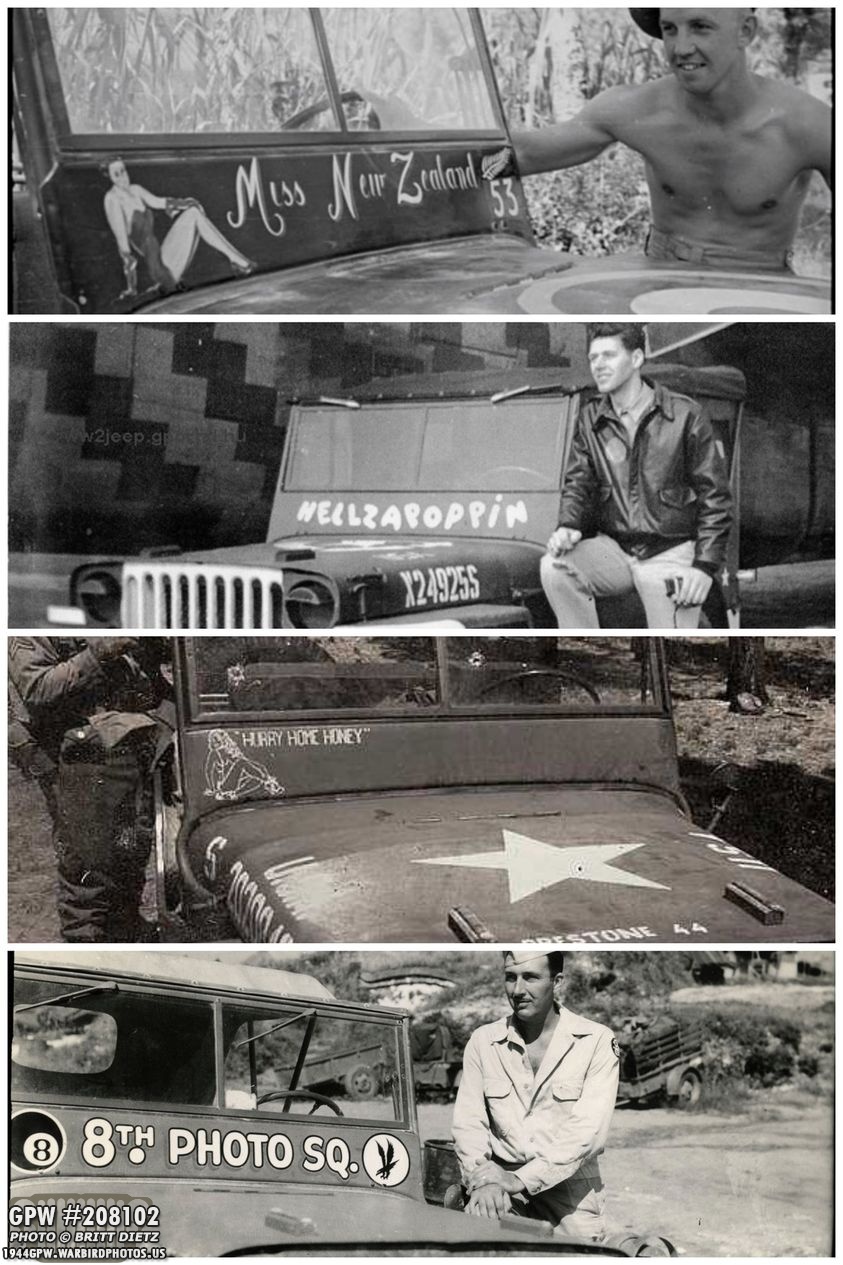
I’ve covered this in depth in an update a long time ago, but a quick recap of how my pinup ‘nose art’ came to be… looking at wartime photos, you can find many shots of decorated Jeeps. Some with names or sayings, and some with pinup gals. I decided that the windshield would be the best place for my pinup nose art.
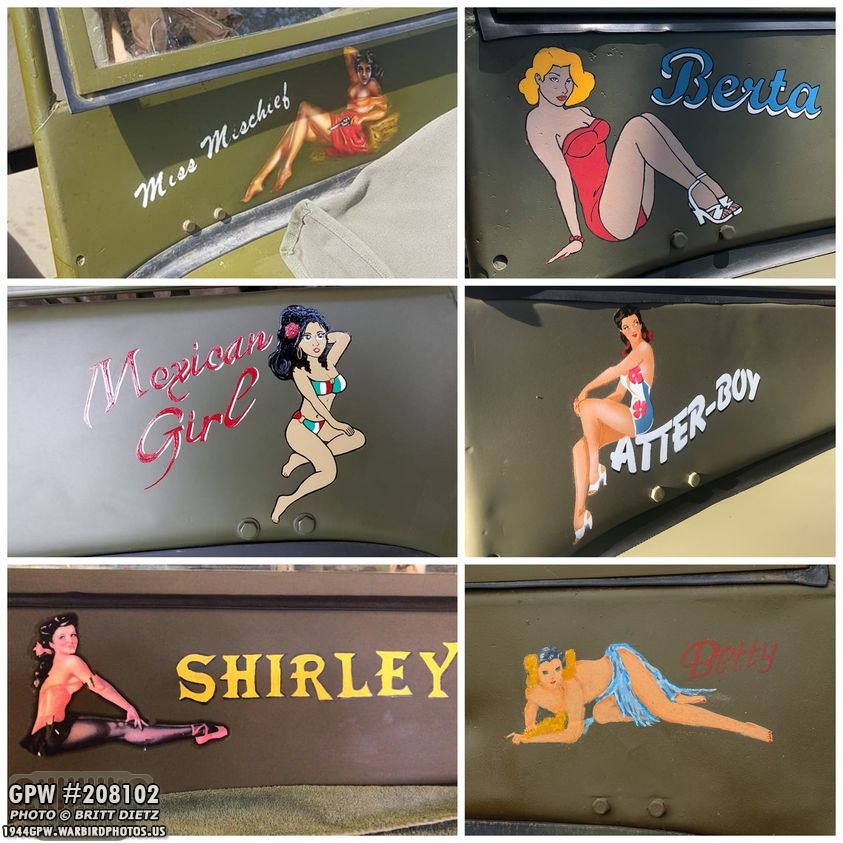
And I’m not alone. MANY Jeeps out there have pinups on the windshield. It was pretty common to see pinup gals on the windshield the two times I went to Normandy, France, for the 75th and 80th anniversaries of D-Day.

I initially envisioned something with a pinup shoot I did with my girlfriend many years ago, with ‘Dream Girl’ (meaning both her and the Jeep).
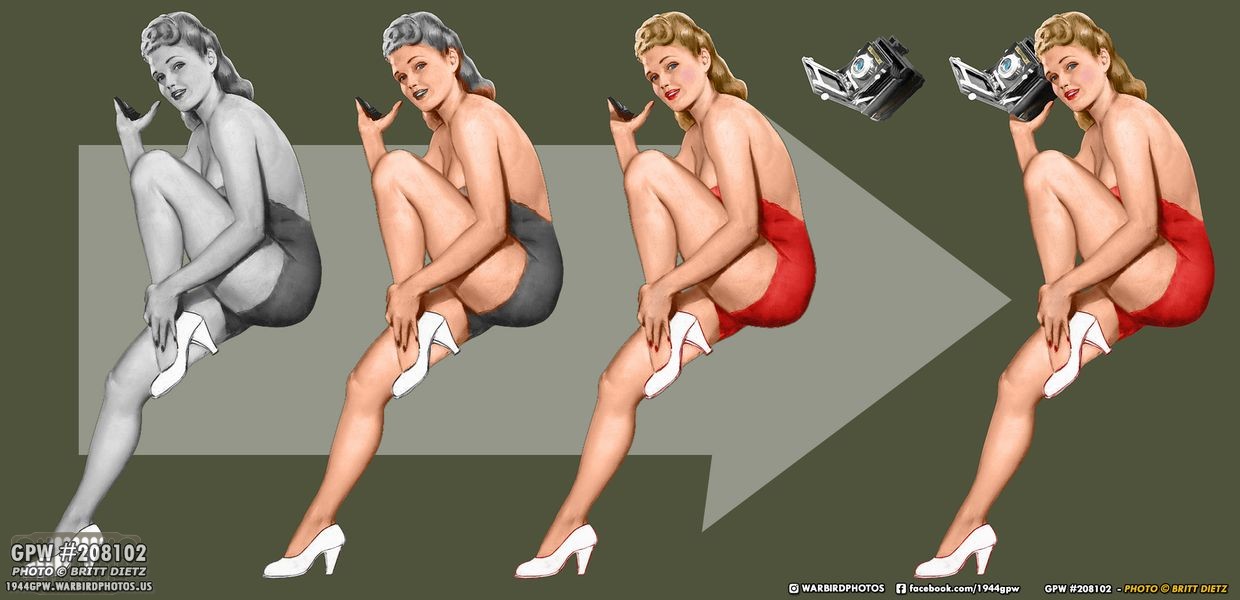
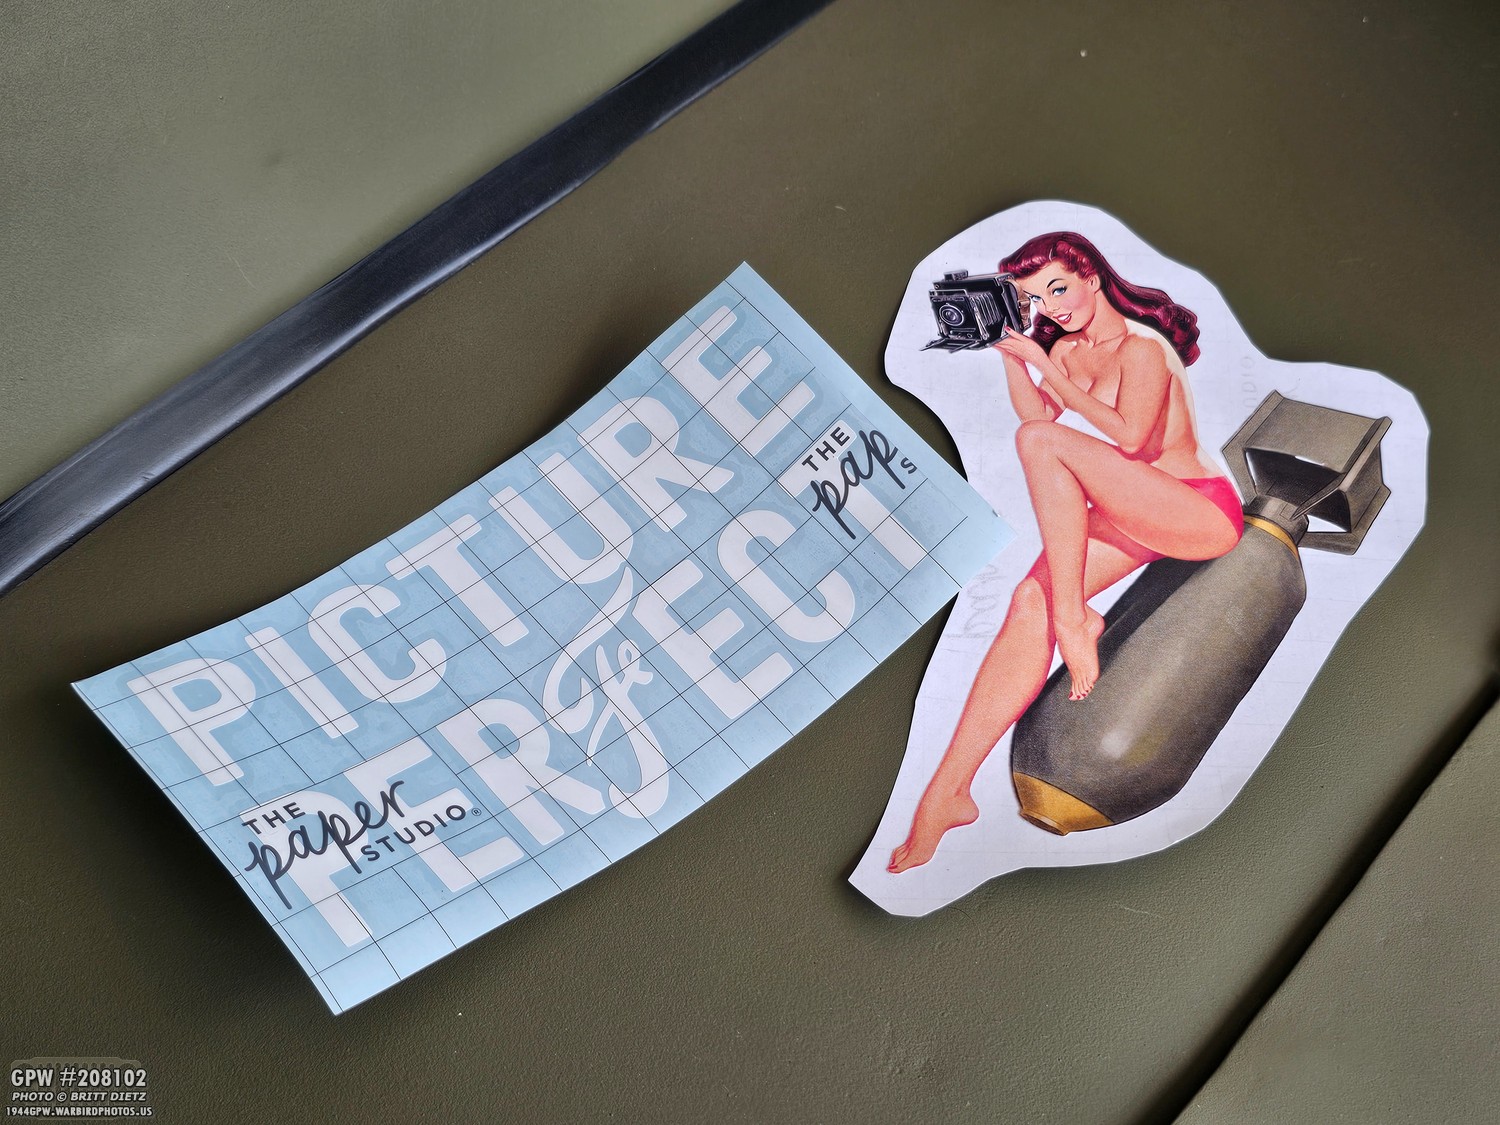
I ended up going with an actual pinup gal artwork that was in a March 1944 magazine that I colorized, and digitally drew a 1939 Speed Graphic 4×5 camera for her to hold. Originally, she was holding a small radio.
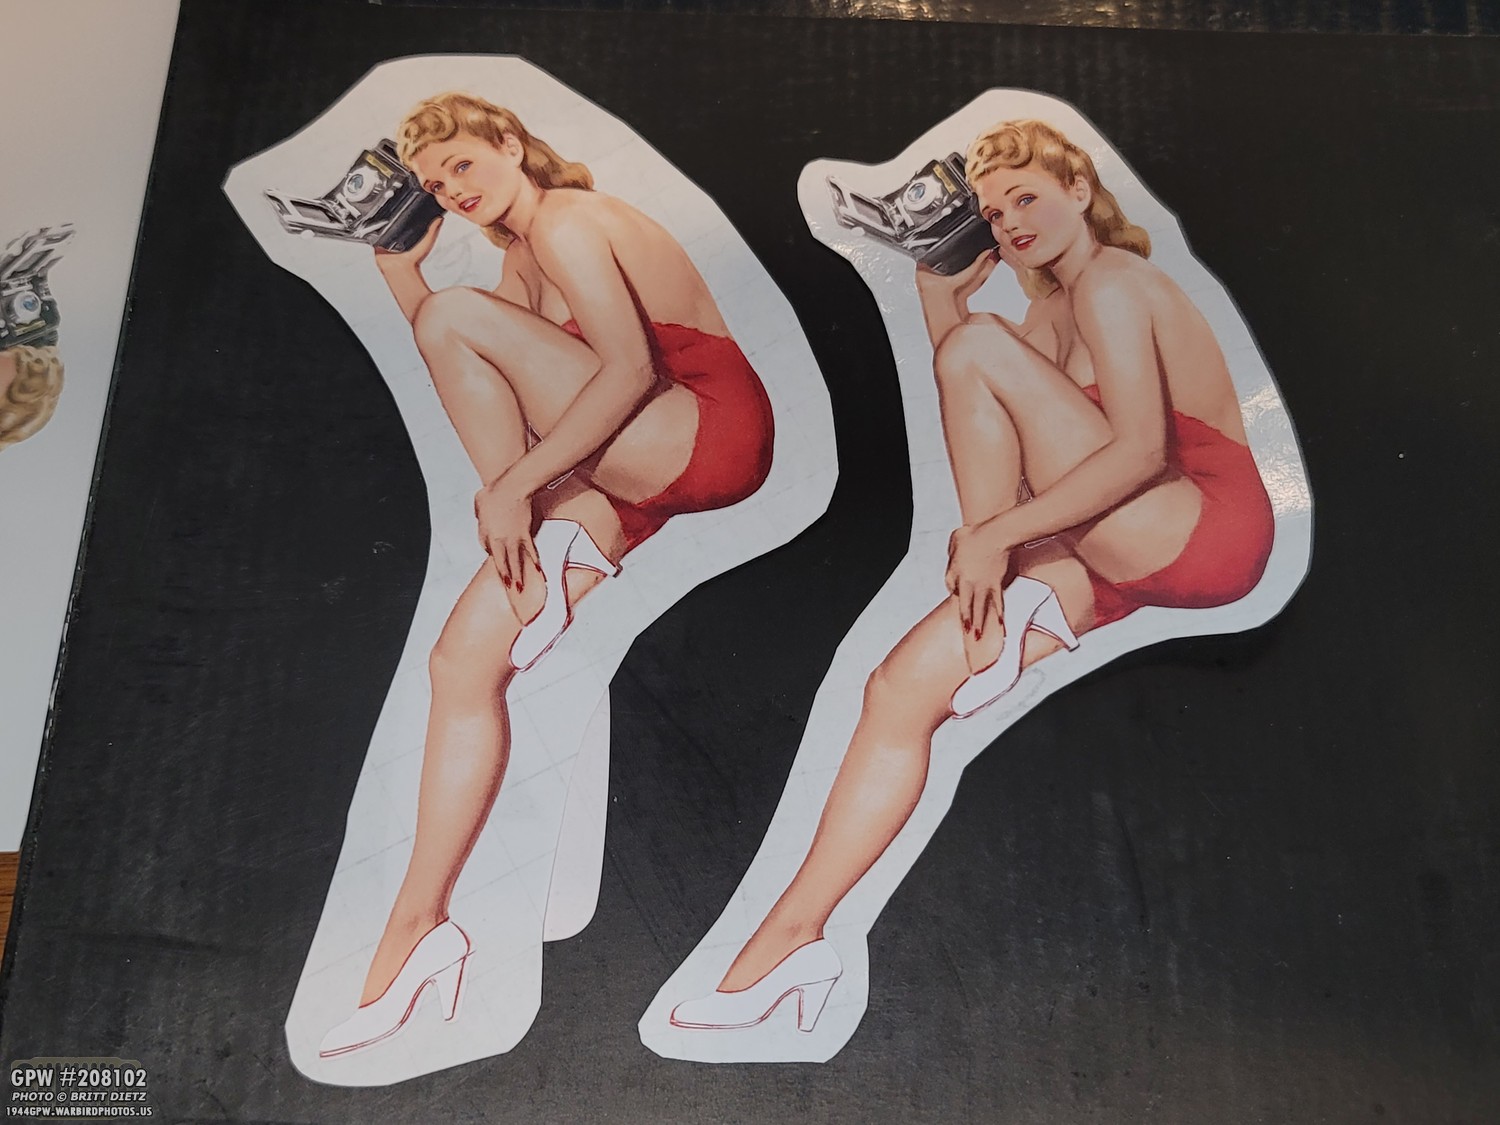
Rather than having them painted on the Jeep, I decided to go with vinyl cutouts. I printed them on vinyl sticker paper, and used my Cricut cutter machine to cut them out.
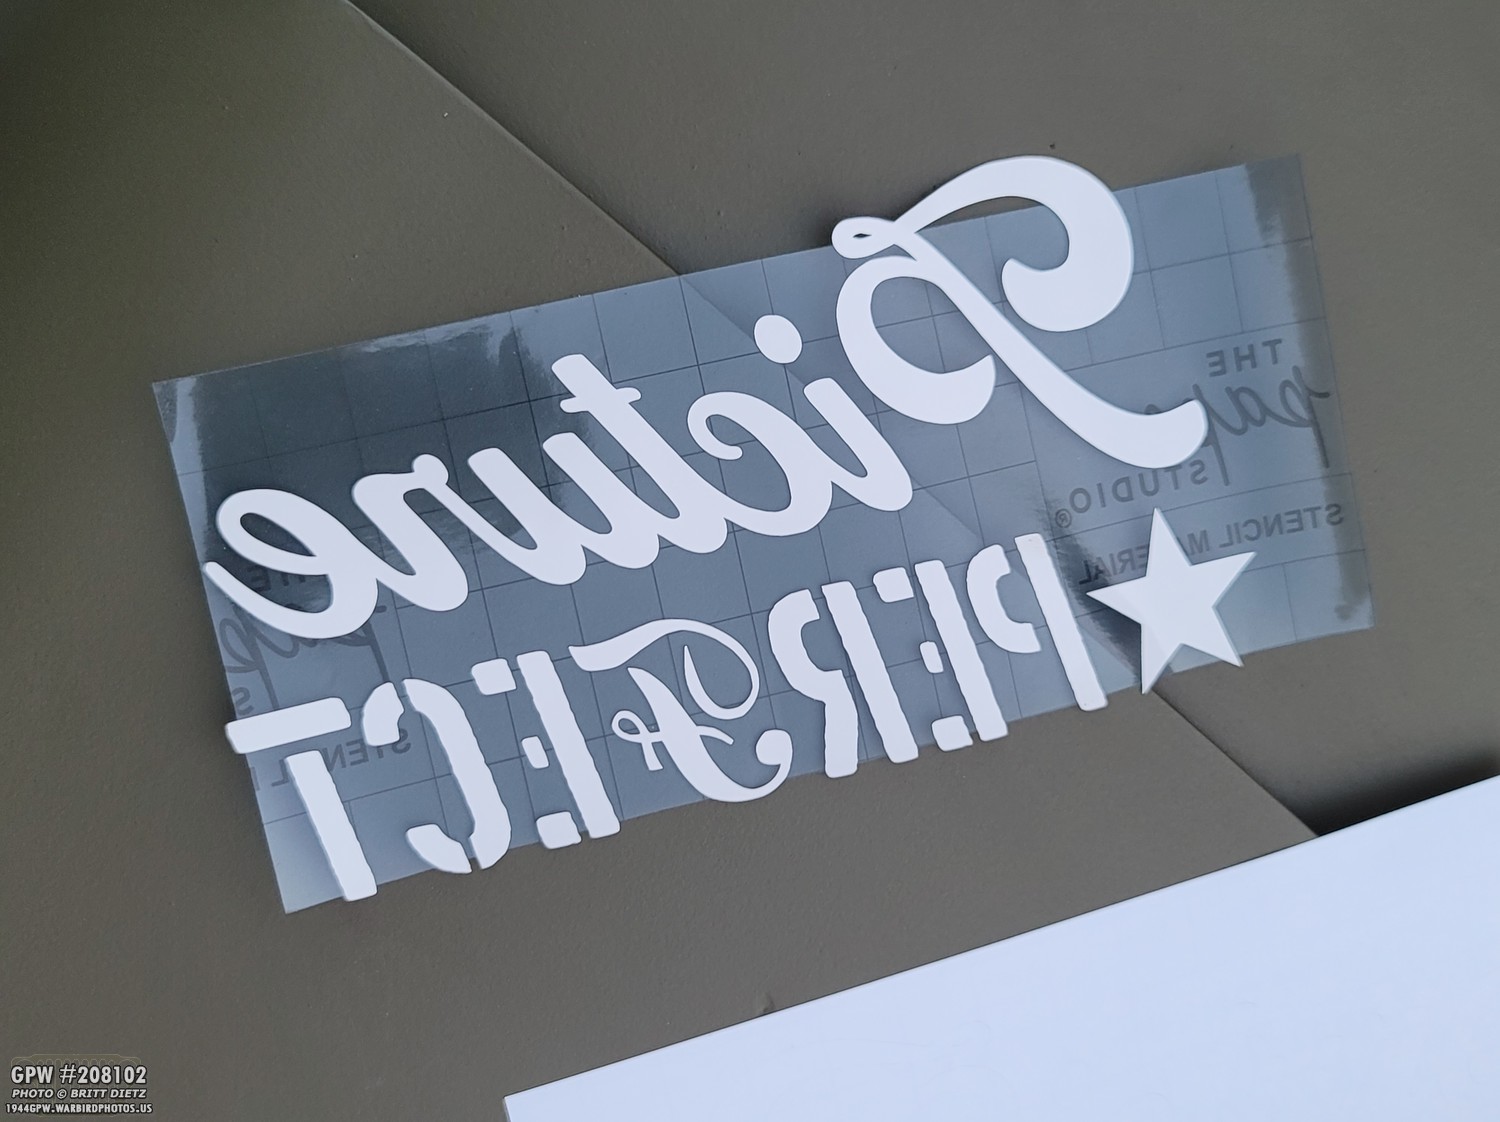
I chose ‘Picture Perfect’ (a pun on how everyone always says my Jeep looks too clean, that face that I’m a photographer, and the Ford F stamp because everything that should have an F stamp has an F stamp) for the name. I cut it out with my Cricut and used transfer tape to keep the letters together.

The result was the first incarnation of my Jeep’s nose art. This was on my Jeep for over a year.

I was fortunate to work with one of my favorite pinup models and friend, Kayla, and she recreated the nose art with my actual 1939 Pre-Anniversary Speed Graphic camera!

I did some digital artwork magic to turn her into vintage-looking pinup artwork, and replaced the other pinup artwork with her. Kayla has been on my Jeep for almost five years! But, my skills with pinup artwork have changed over the years, so I decided to once again change it up. This time, I wanted to change the entire thing.

So, I started to come up with some concepts for a new original pinup gal. I wanted it to be somewhat the same as it has been, but with a new style. These were the top three finalists after some revisions. The cameras were just there as placeholders.

I ended up selecting this one, as I felt it was the best of them all. It still needed a lot of work.

I further added some more refinements and also painted in my 1939 Speed Graphic again. I’d always wanted to add a bomb under the gal, so I used this round to add it in. My Jeep is, after all, in the markings of a USAAF 95th Bomb Group Jeep.

Here’s a look showing the progression of the pinup gals through all three of the incarnations. I guess you could say they’ve gotten a bit more risqué as time has gone on!

Next up was a new take on the ‘Picture Perfect’ name. I wanted to do something different, so I looked at aircraft nose art fonts and lettering and came up with several variations. I ended up settling on the bottom left without the stenciled letters and a better Ford F script.

Once again, I printed the gal on vinyl sticker paper and cut everything out on my Cricut cutter.
With transfer paper applied to the text, it was time for application!
Because it’s all vinyl, the original nose art came off without any residue or discoloration. It would be cool to have it painted directly on the windshield, but I also like the freedom to change it every so often like I have done.
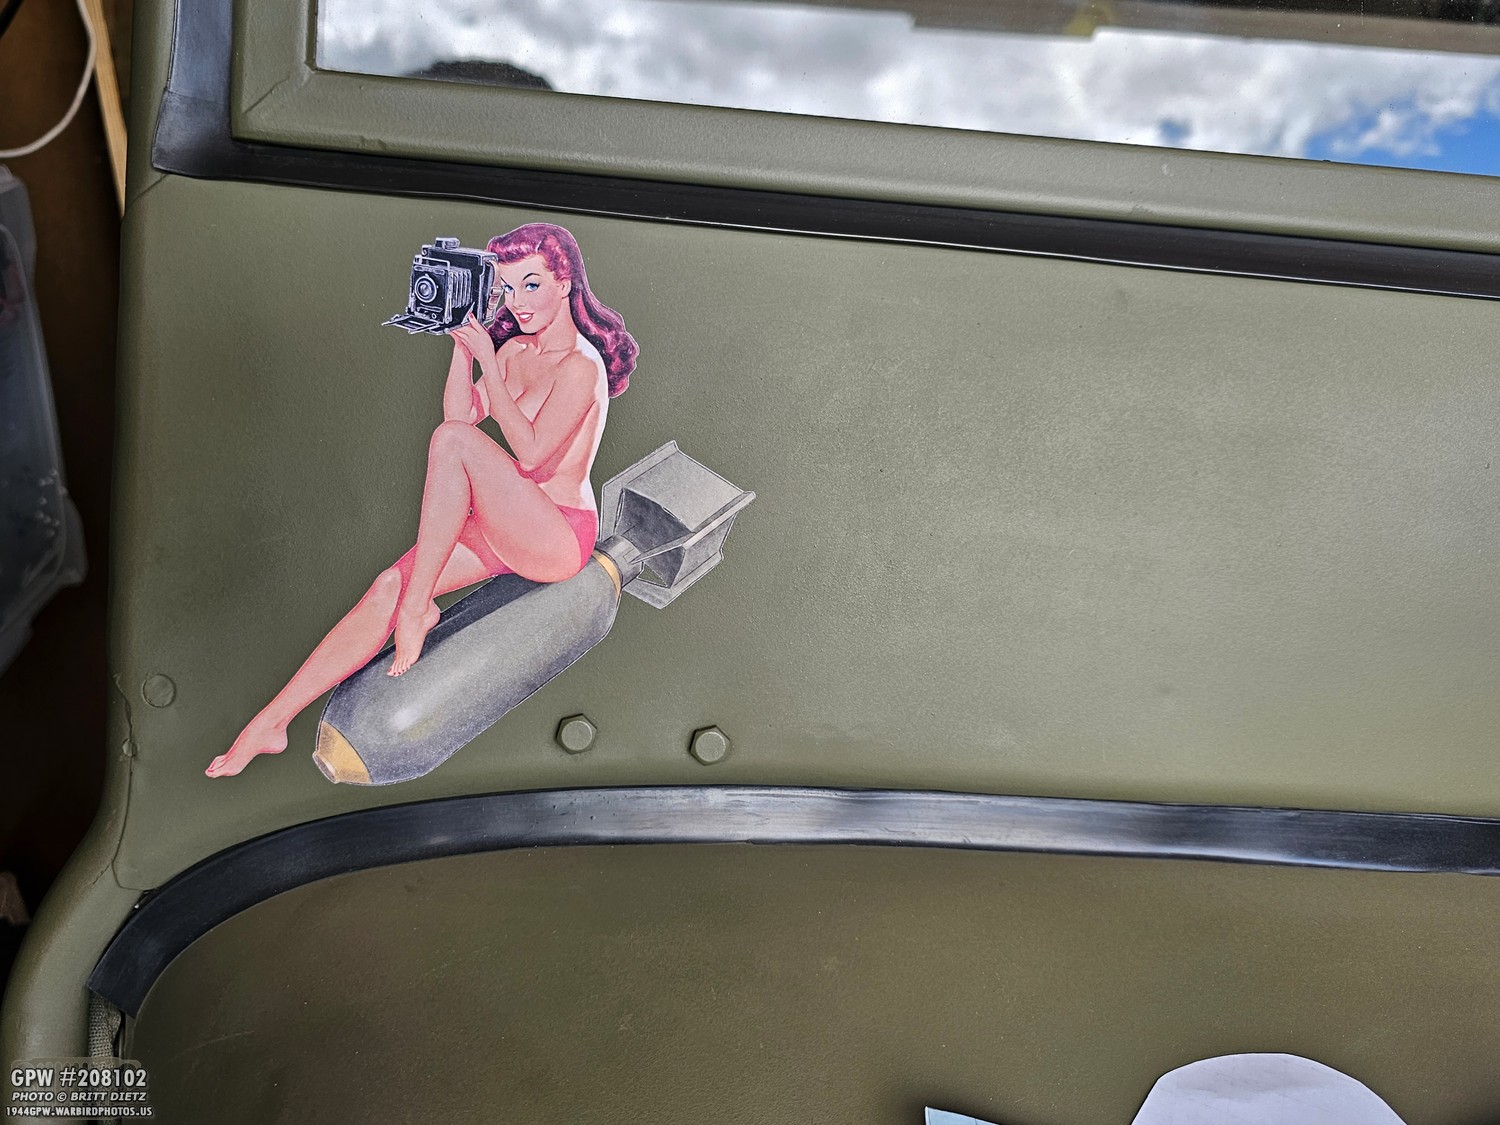
First I applied the gal…

Then the text with the transfer vinyl keeps all the letters perfectly aligned. Peel that up…

And there we go! The new nose art is applied!

So there we go, the new updated nose art for the 2026 year! It’s always a hit, I see people taking photos of the pinup nose art anytime I take the Jeep out on display. I suppose the only thing I should do is actually sign the with paint under the pinup gal my last name. But for now, this works!
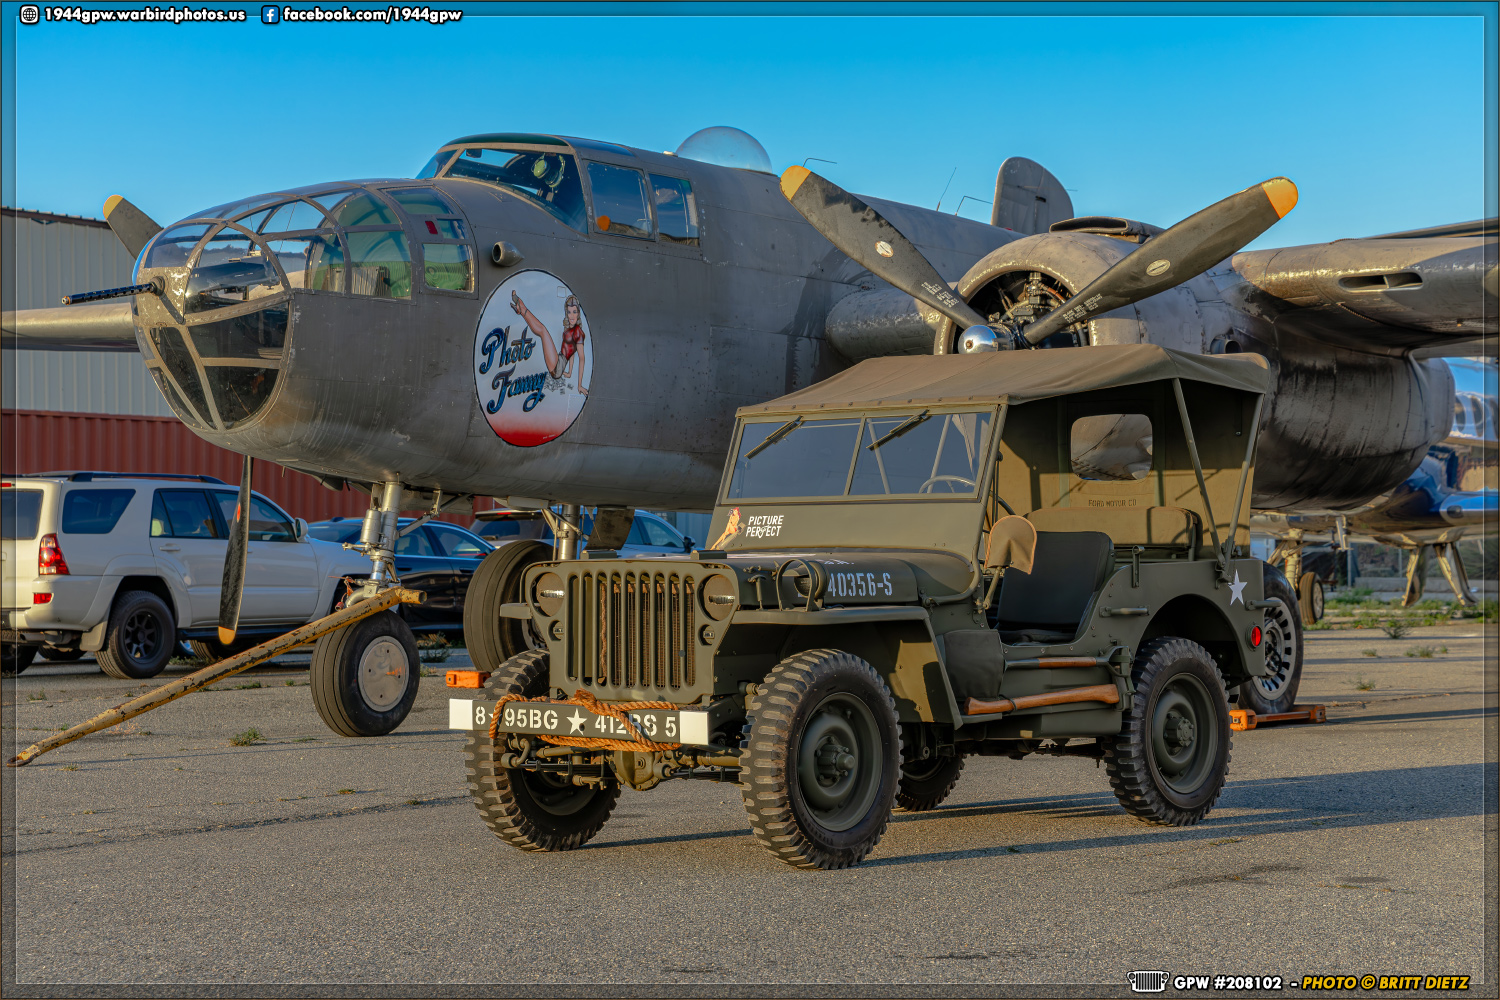
As promised in the last update, while I was at the Wings, Tracks, and Wheels event May 2-3, I took some opportunities when the various aircraft that flew in the event (from the Planes of Fame Air Museum, where the event is held) to get some shots of my Jeep with the aircraft. One of my favorites at the museum, and one I’ve shot with before, the North American B-25J Mitchell ‘Photo Fanny’. I feel like my Jeep and this B-25 go together well with the Olive Drab green, the nose art pinup gal, and both having ‘photography’ as the theme.
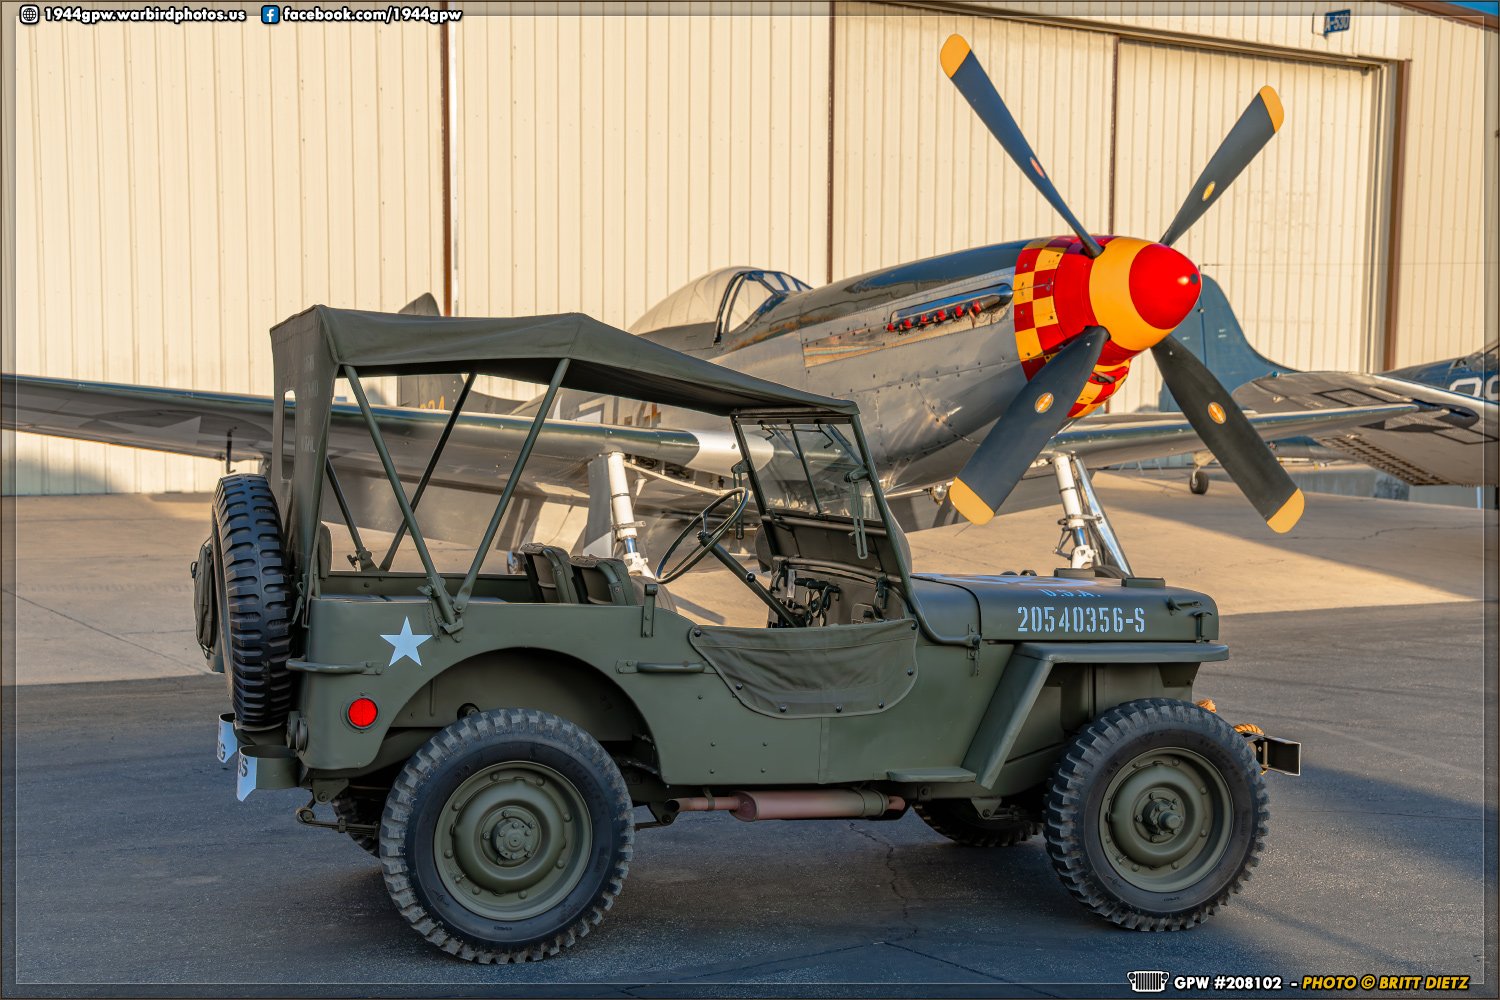
Next up we have the North American P-51D Mustang ‘Wee Willy II’.

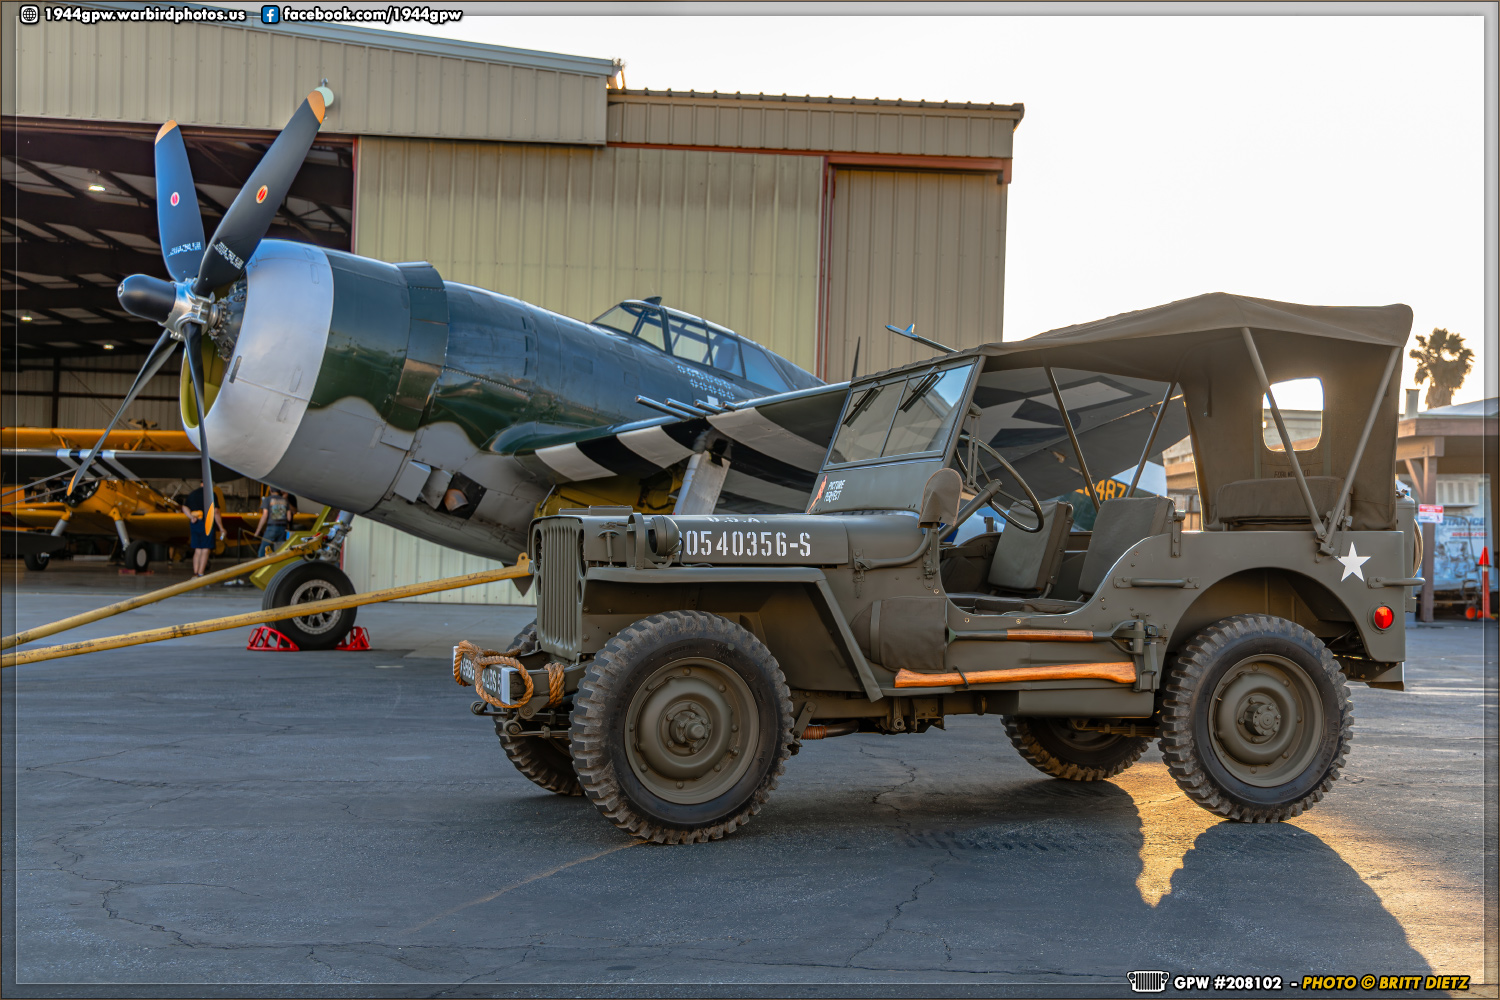
And then the Curtiss P-40N Warhawk. This Warhawk is a combat veteran, having shot down a Japanese incendiary balloon over Canada during WW2.
Fresh out of a huge overhaul, the rare Republic P-47G Thunderbolt (Razorback).
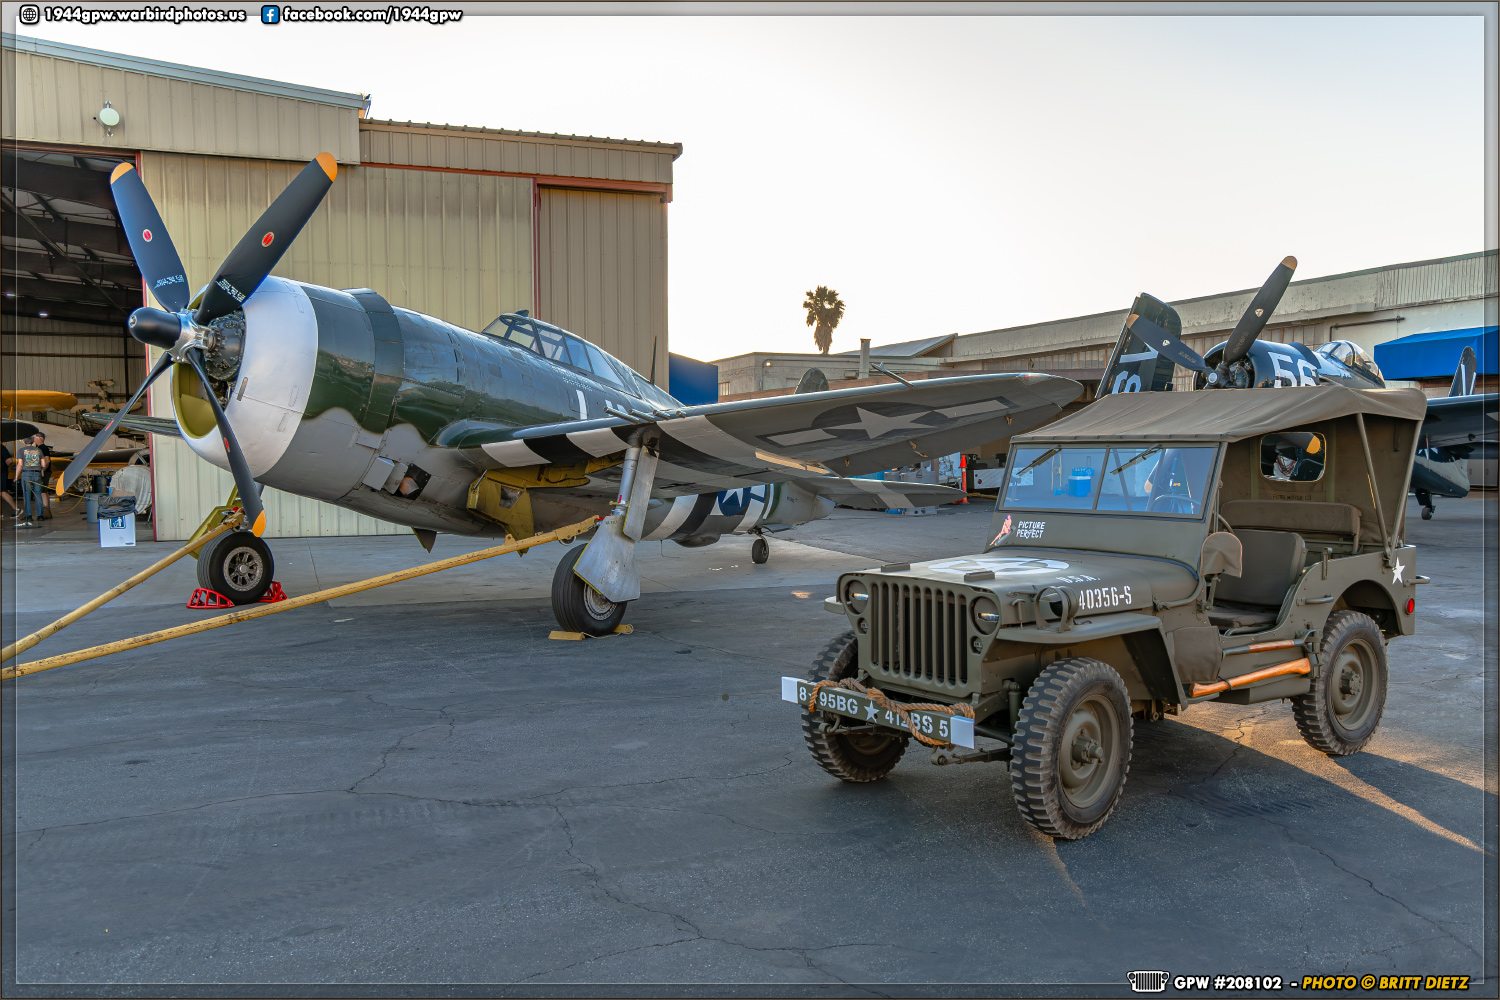
Another look with the Thunderbolt (and a Grumman F8F-2 Bearcat behind the Jeep).
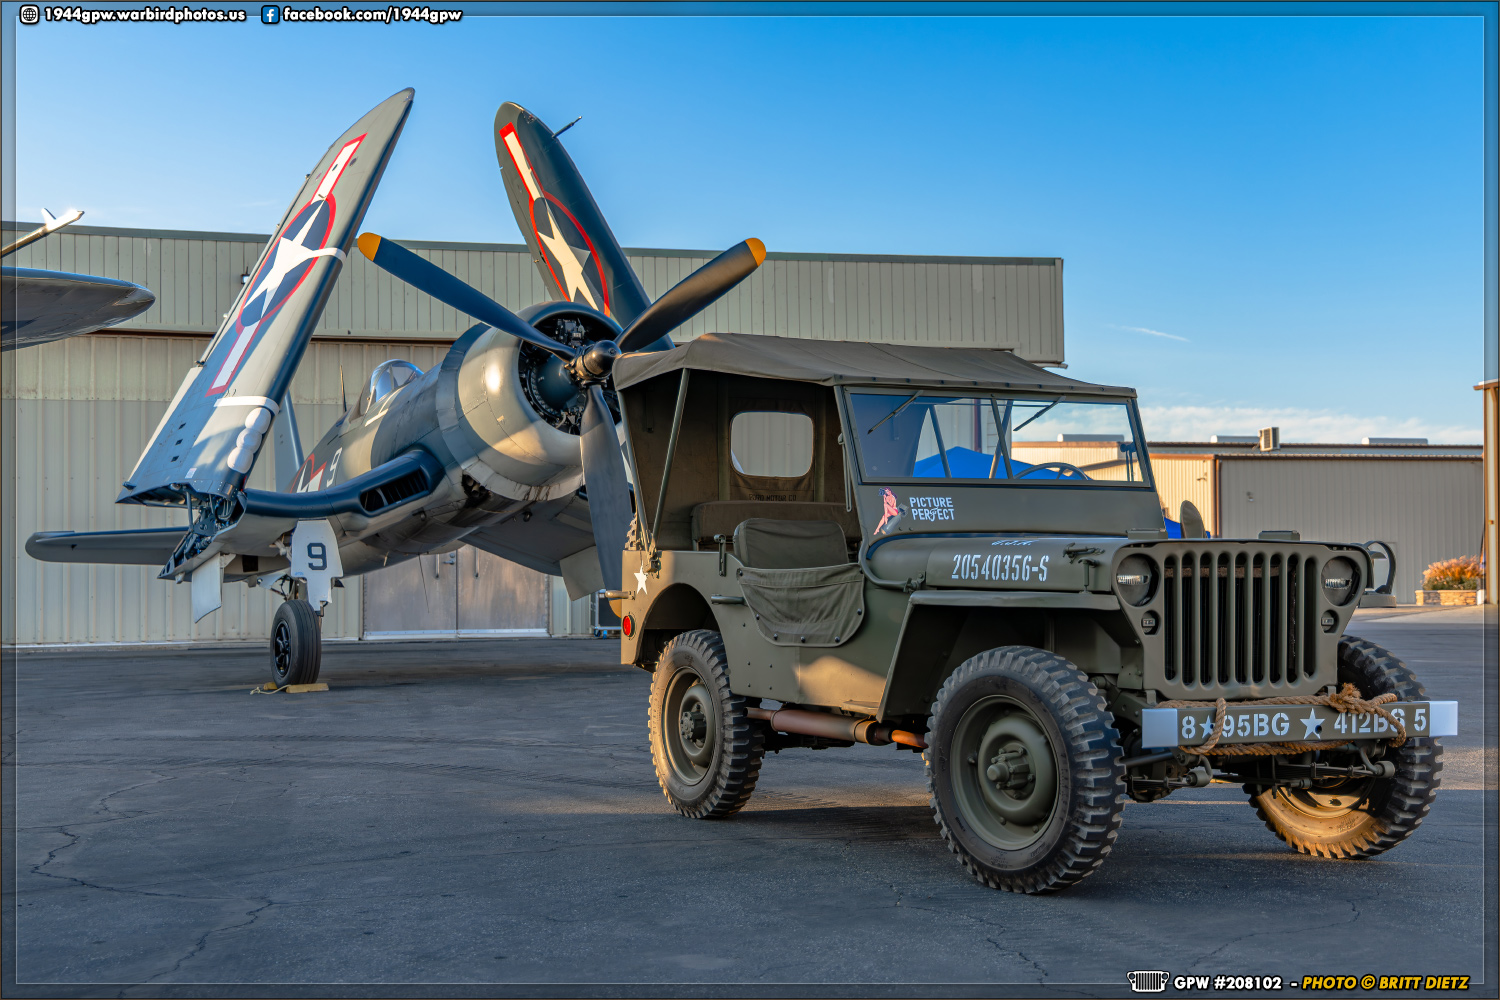
Another aircraft that is just out of an extensive multi-year overhaul, the rare Vought F4U-1A Corsair. It is an early version of the Corsair and a documented combat veteran in the Pacific. It was also used in the Baa Baa Baa Black Sheep TV series and the recent Korean War-era movie ‘Devotion’.
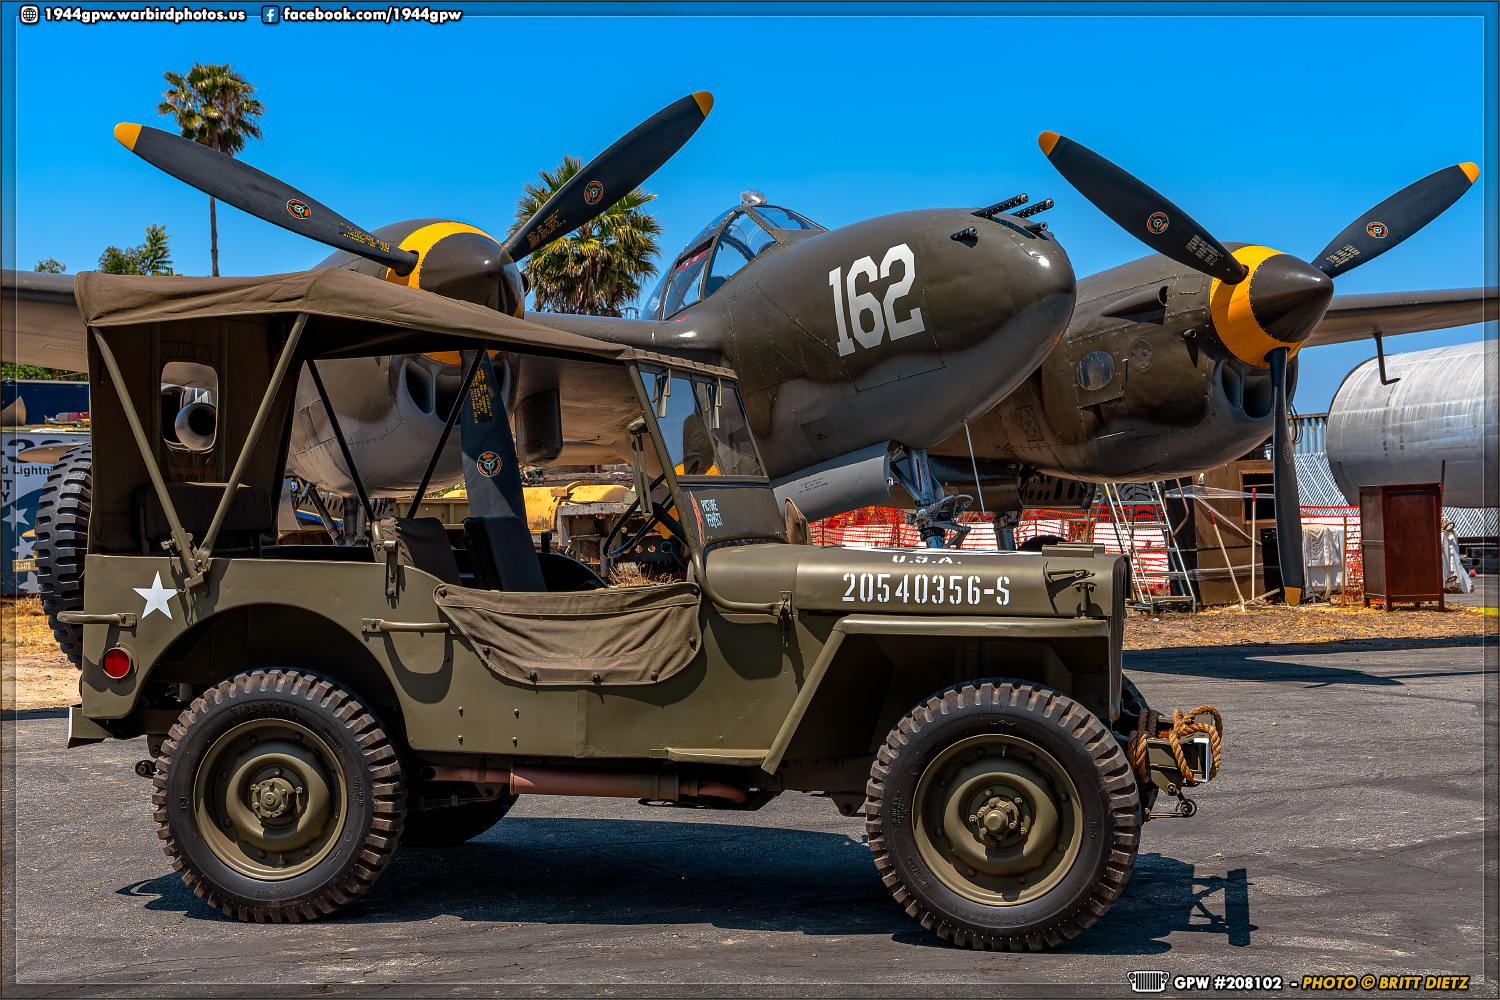
And finally, the Lockheed P-38J Lightning ’23 Skidoo’. It was built about a month before my Jeep was built in 1944.
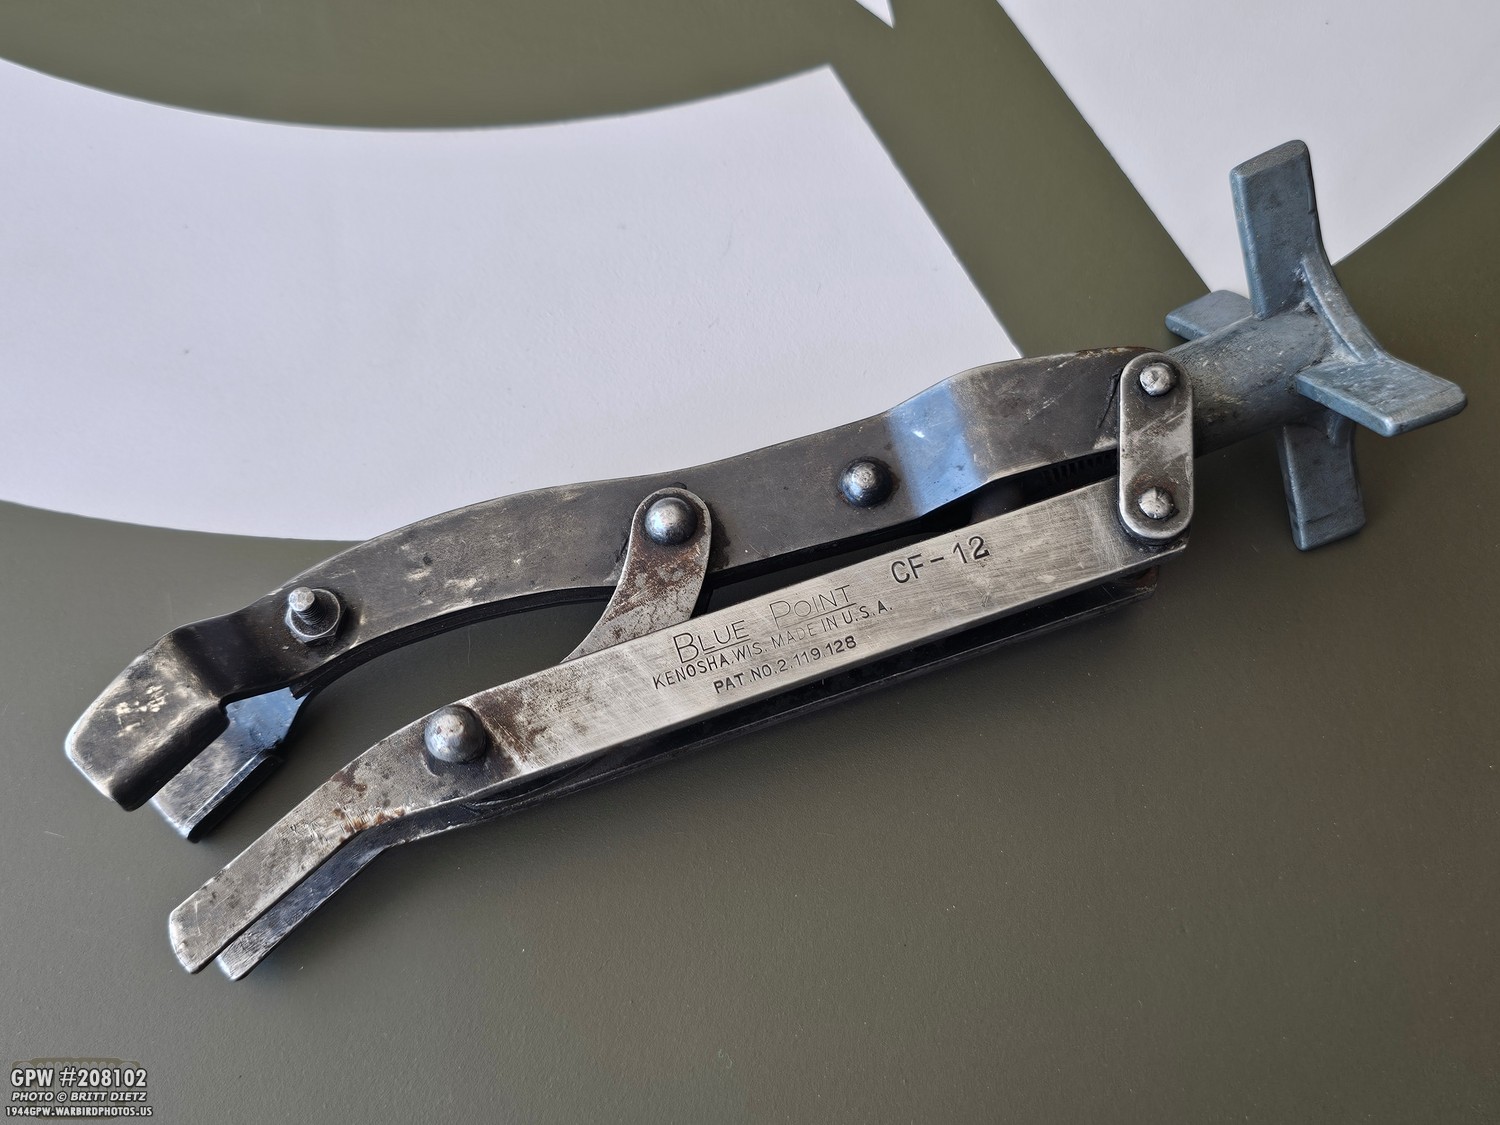
Looking ahead, now that I have the engine finely tuned, my next big project on the horizon is swapping out the worn valve adjuster screws that give my engine a tappity sound. To do that, I went and got myself an original Blue Point CF-12 valve spring compressor tool (correct for wartime), which I’ll use to compress the springs in order to get the adjustor screws out. It’ll be a huge process, but my hope is that once they are replaced, along with this vacuum tuning, I’ll have an incredibly fine-tuned and smooth-sounding engine.
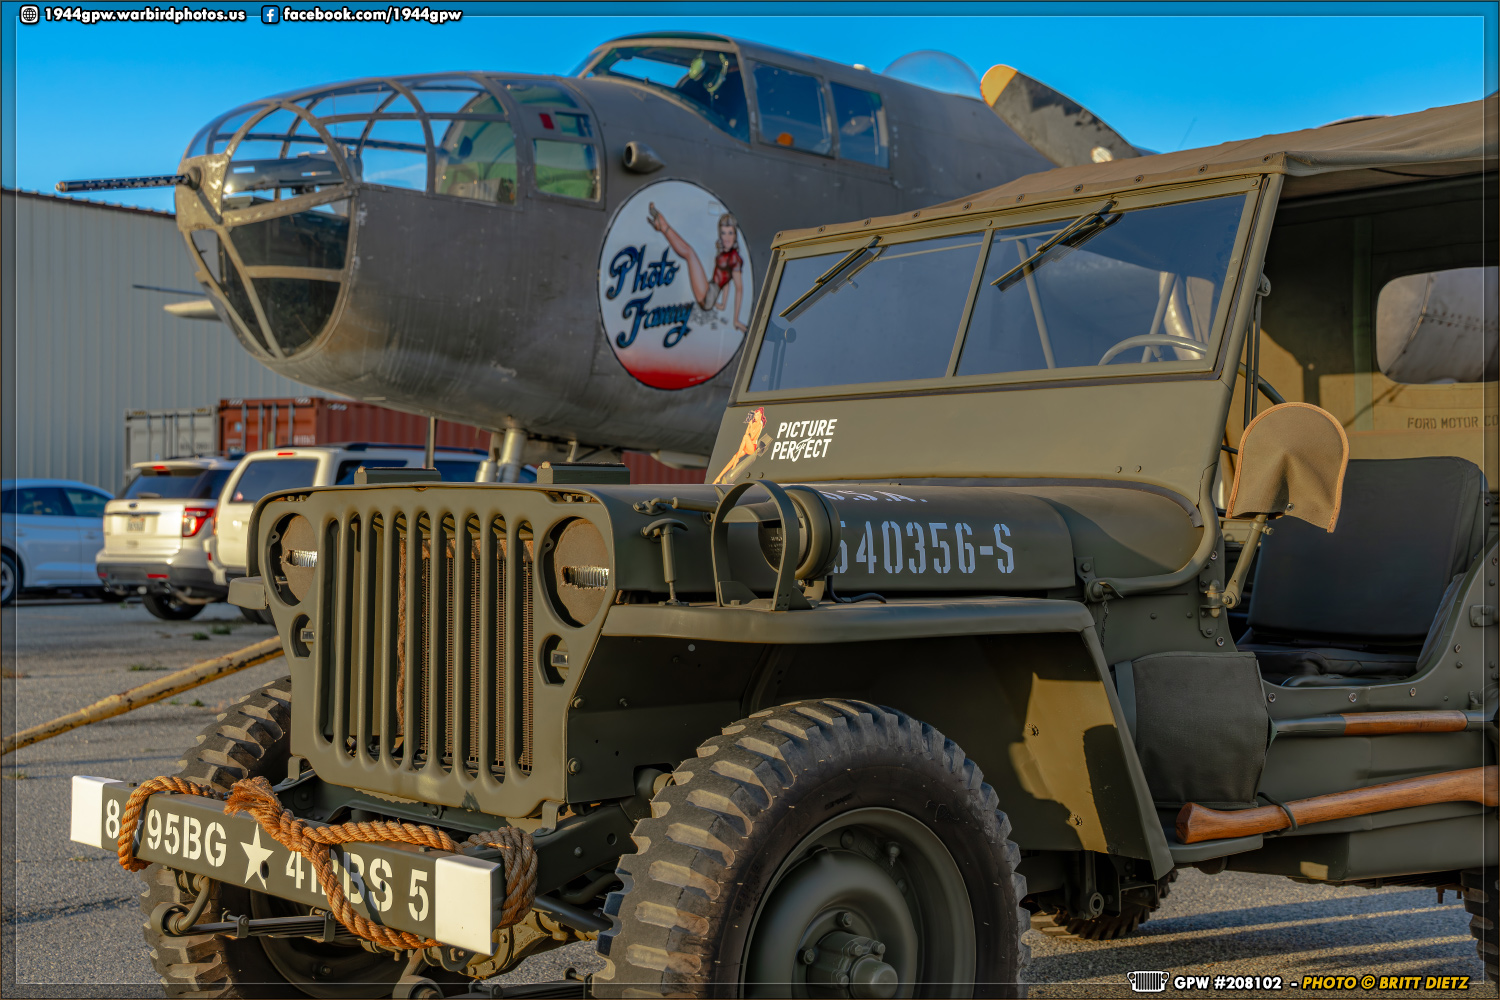
So now I leave you with another shot of my Jeep with the B-25J Mitchell ‘Photo Fanny’ as I wrap up this update for this week! I hope this update helps others to get their Jeep engine in top shape.
Till the next update…
Till the next update…