 Preventative Maintenance: Part 1
One thing often overlooked by Jeep owners is maintenance on their Jeeps! Here’s part 1 of preventative maintenance on a Jeep including greasing up the various spots on a Jeep and changing oil!

It’s about that time of the year again when people begin to think about taking their military vehicles out of a winter slumber. For those of us in SoCal, we are able to run our vehicles year-round in relatively warm weather. But we still have to think about the periodic maintenance that will keep our vehicles going strong for years to come.
It has been about 1000 miles since I finished the restoration of my Jeep, at least to the point where I could drive it. It was time to do full preventative maintenance on her!
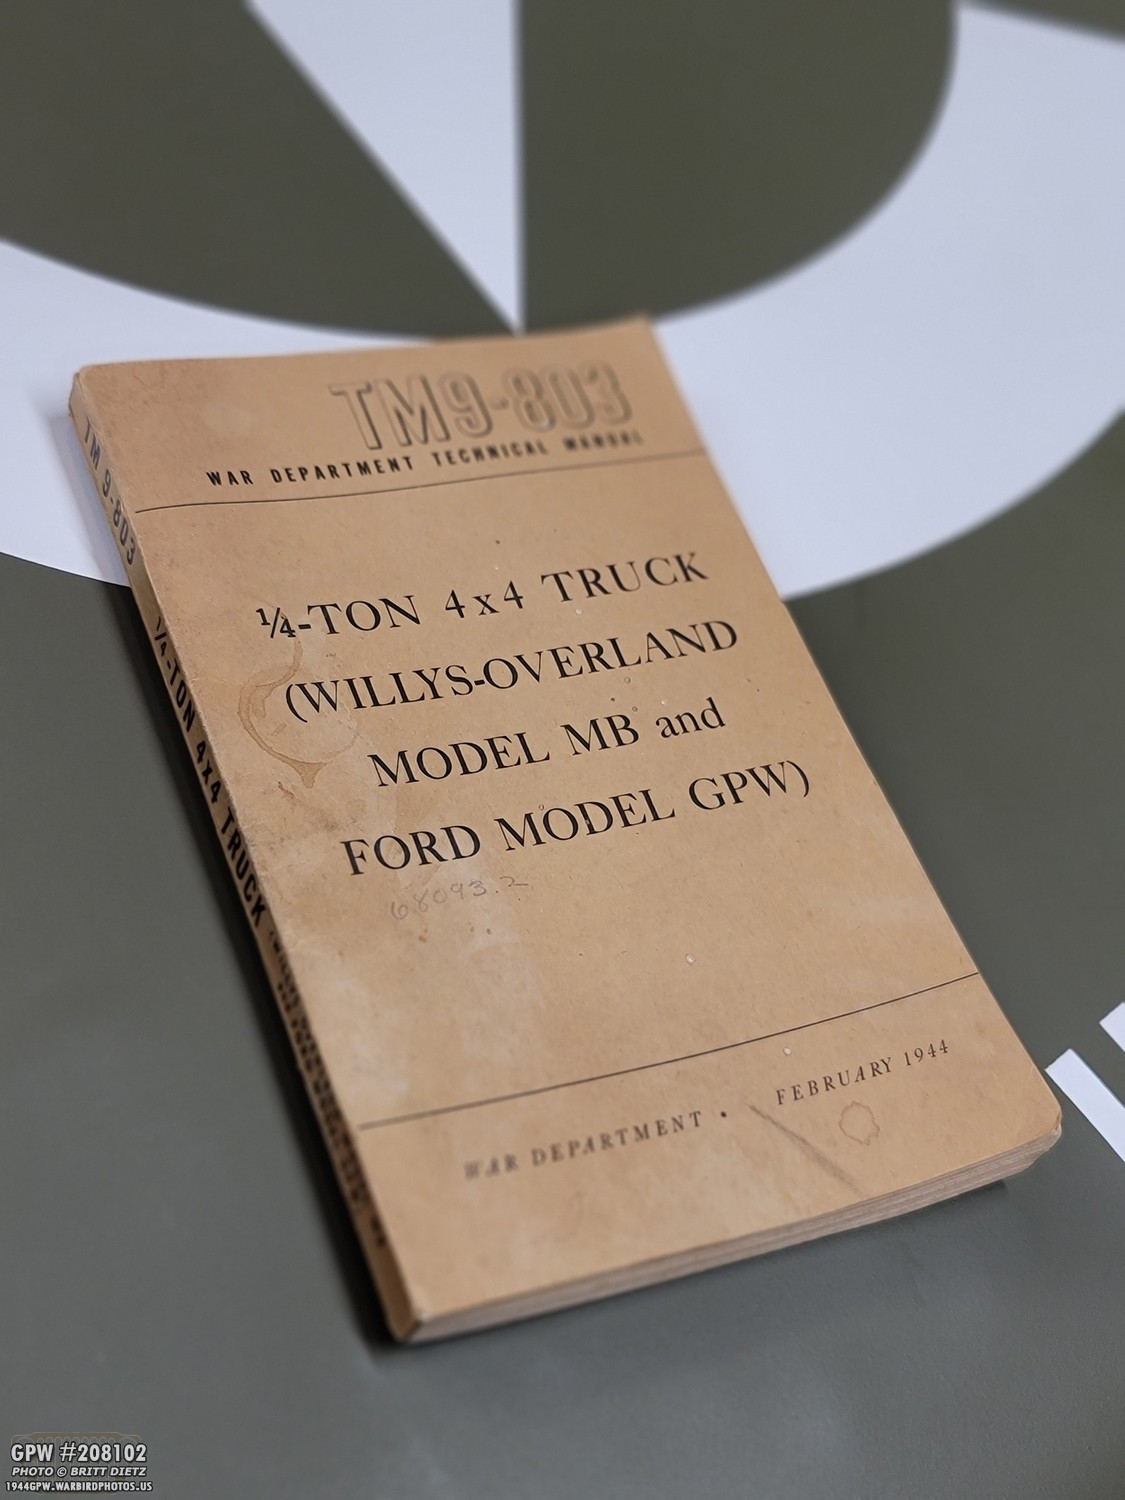
For those unsure what all should be done, get yourself one of these TM9-803 technical manuals. These TM manuals are the bible of Jeep maintenance. If you don’t have a 1944 original, like seen here, then you can download a PDF here courtesy of jeepdraw.com http://jeepdraw.com/images/jeepdraw/ADOBE_ACROBAT_FILES/TM9_803_1944.pdf
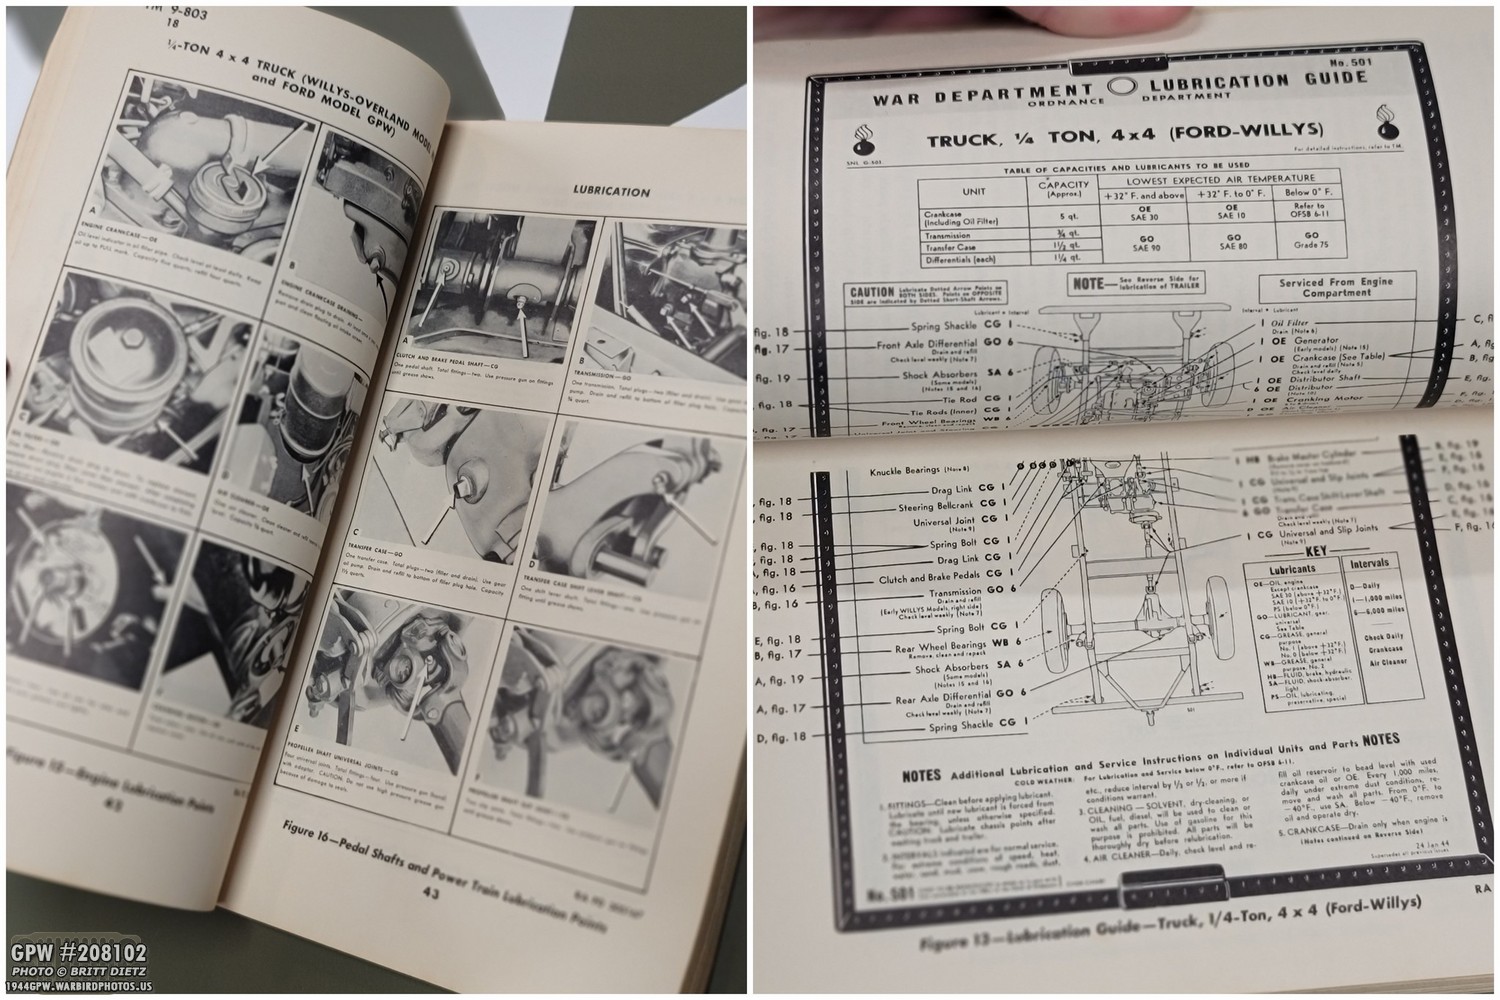
In the manual, you can follow step-by-step maintenance on the Jeep, much like I’m going to showcase in this update. If you don’t have a Lubrication Guide chart under the hood of your Jeep (like me), this technical manual includes that.

So, let’s get started on the first (and easiest) step: Lubrication! We’re going to focus on greasing the various zerk fittings on a Jeep. These are pretty crucial to help combat wear of various parts and ensure smooth operation when driving.

What you’ll need for this is a grease gun. Some like to use original WW2 guns, but I prefer the modern style. And ESPECIALLY helpful (and saving you time if you don’t have a lift) is a flexible hose great gun to get into the hard-to-reach spaces. Some gloves and shop towels will be helpful to clean up excess grease and not make a mess.
One thing I forgot to shoot is the grease I use. There are a lot of different greases out there you can use. I personally use Green colored Lucas Oil X-Tra Heavy Duty grease. It can be found at almost any hardware store (especially Home Depot and Lowes). It’s formulated for auto bearings and chassis lubrication. I use the same grease for all my bearings.

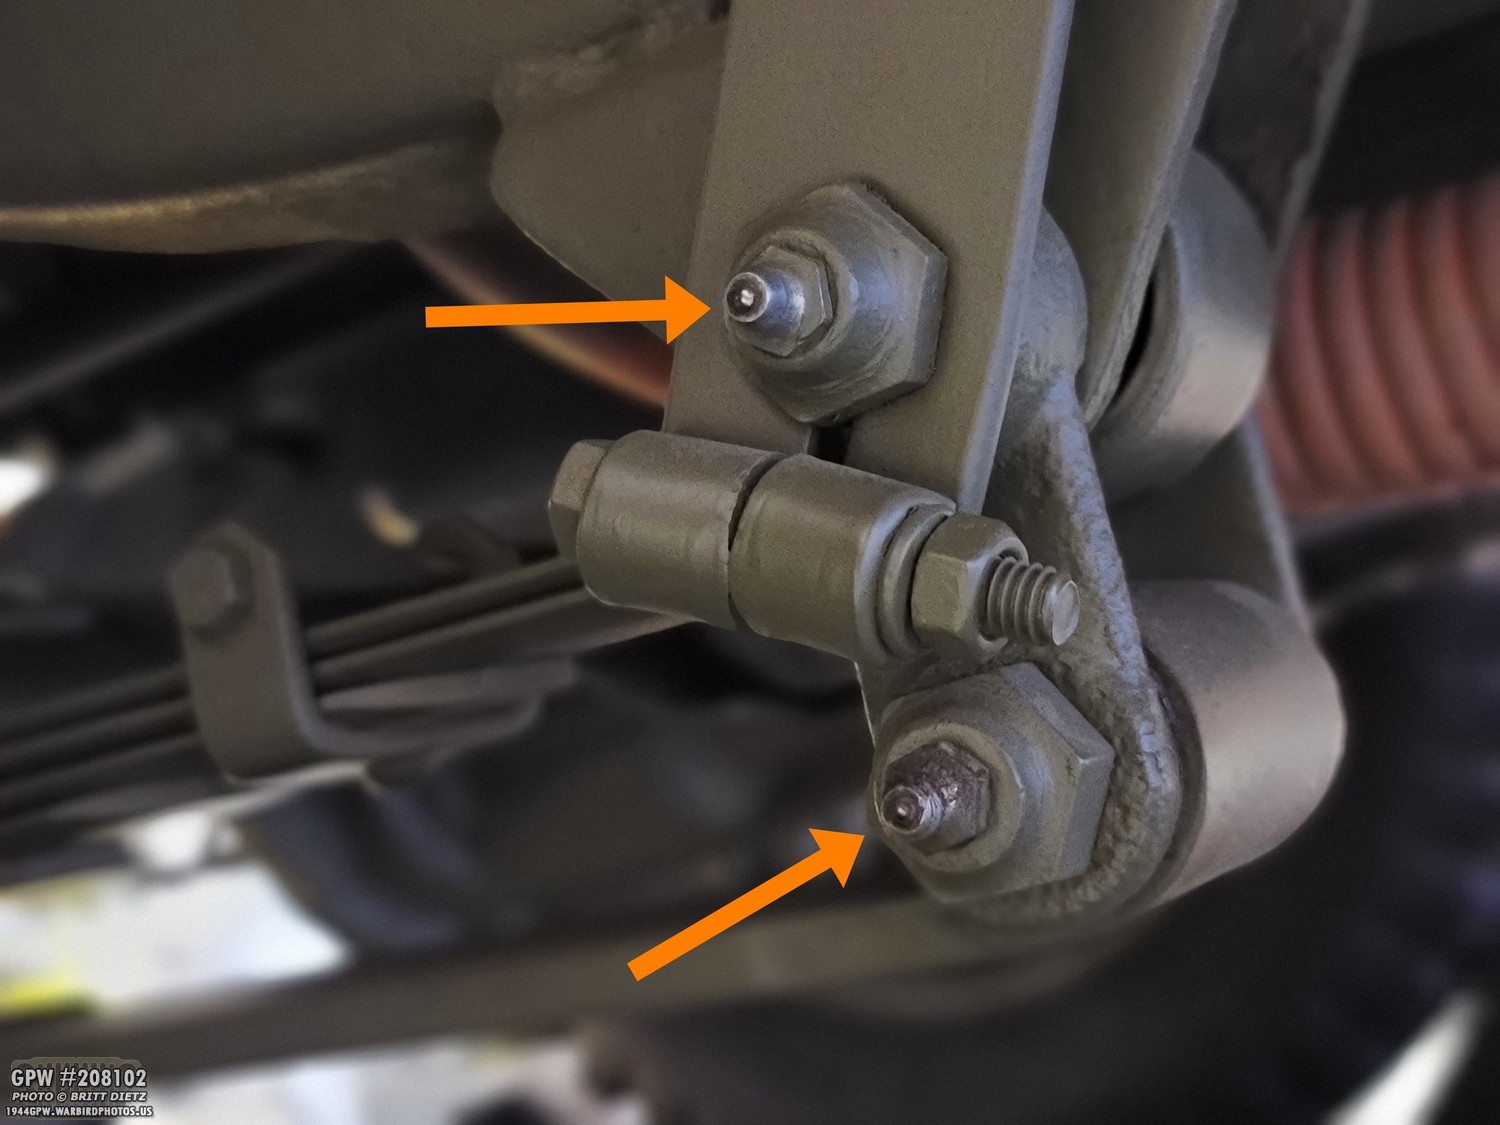
So, let’s get started! We need to first identify all the zerk fittings on a Jeep. Let’s get started at the rear of the Jeep. On either side, there are two spring shackle bushings. One is on the frame pivot bracket, and the other is at the end of the spring. Both have zerk fittings as shown.
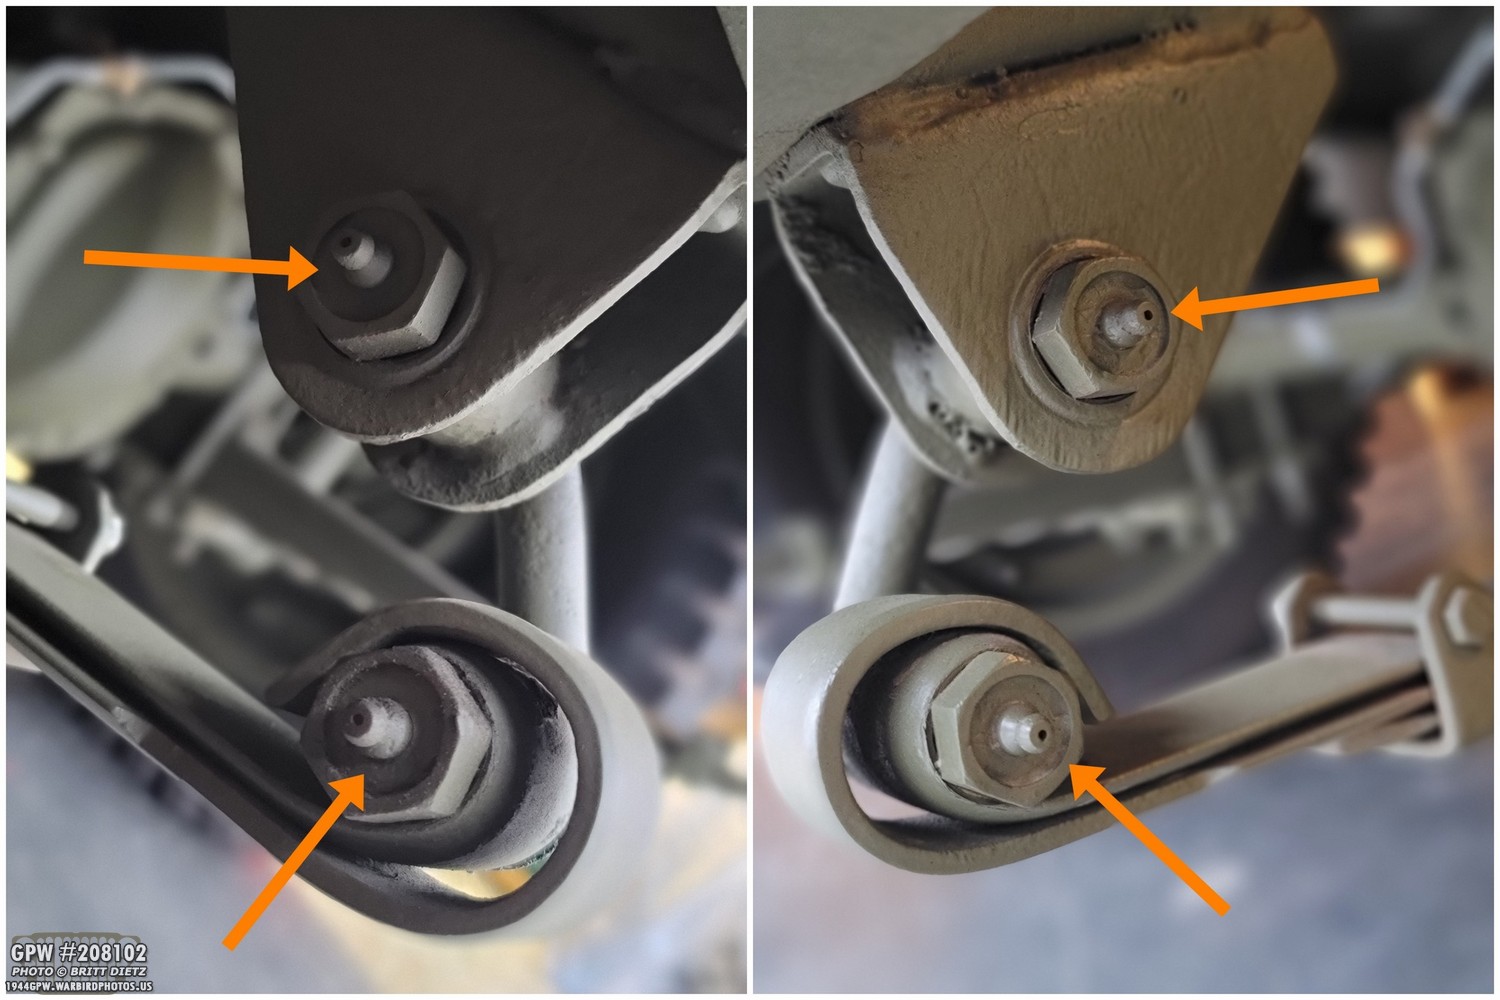
Moving to the front of the Jeep, under the bumper you’ll find the same thing for the front springs. Two zerk fittings on each side.
Staying with the front, on the other end of the driver’s side spring you’ll find two zerk fittings. This is due to the Torque Reaction Spring (TRS). Mid-late Jeeps had this setup, so early Jeeps might not have this and instead a single zerk fitting on the pivot bracket connected to the end of the spring.

On the front passenger side, the end of the spring is a single fitting, unlike the driver’s side.

Moving back to the rear, there’s a single zerk at end of the passenger spring.

Finishing up the springs, on the rear driver’s side spring, we have one more zerk. We’re up to 13 zerk fittings already!
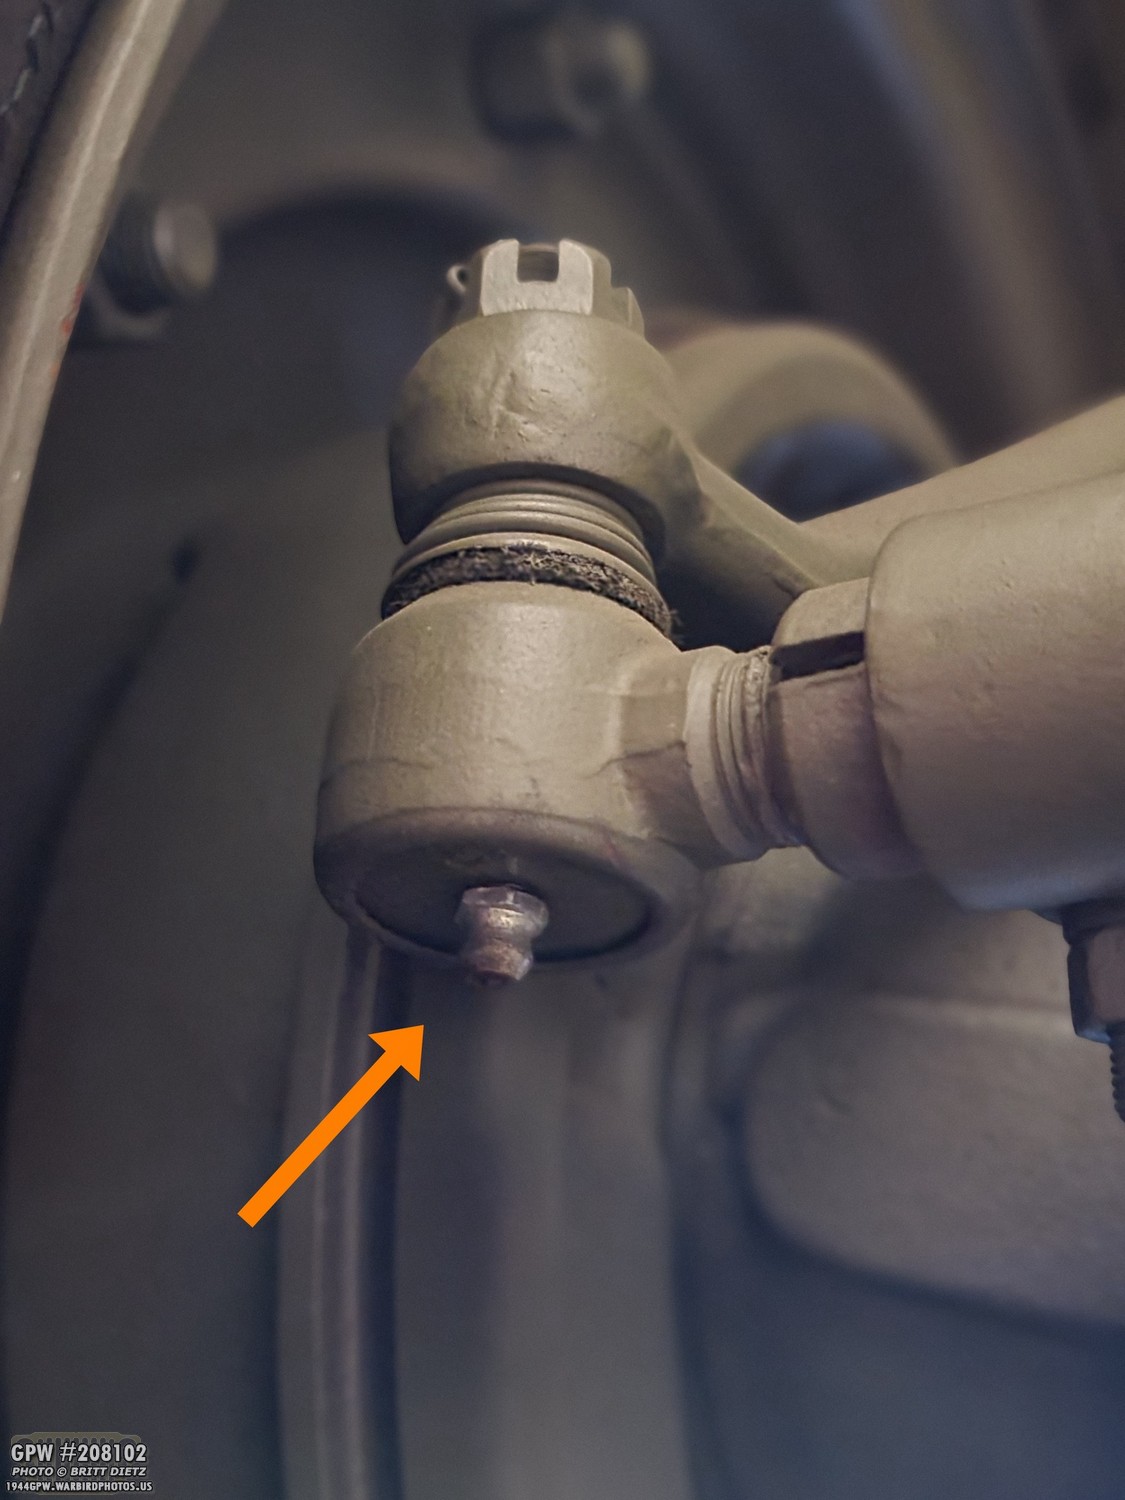
Heading back up front, we have a vertical zerk fitting on the passenger side tie rod, next to the right front tire, that will be pointing down. This one is where it’s nice to have a flexible grease gun.

In the center of the front axle, we have two zerk fittings on the two center tie rods.

And next to the left wheel, we have another upsidedown verticle tie rod zerk fitting.

Going back to the center of the front axle, we have the bell crank with a single zerk fitting. All of these on the front axle (five so far) are important for smooth steering.

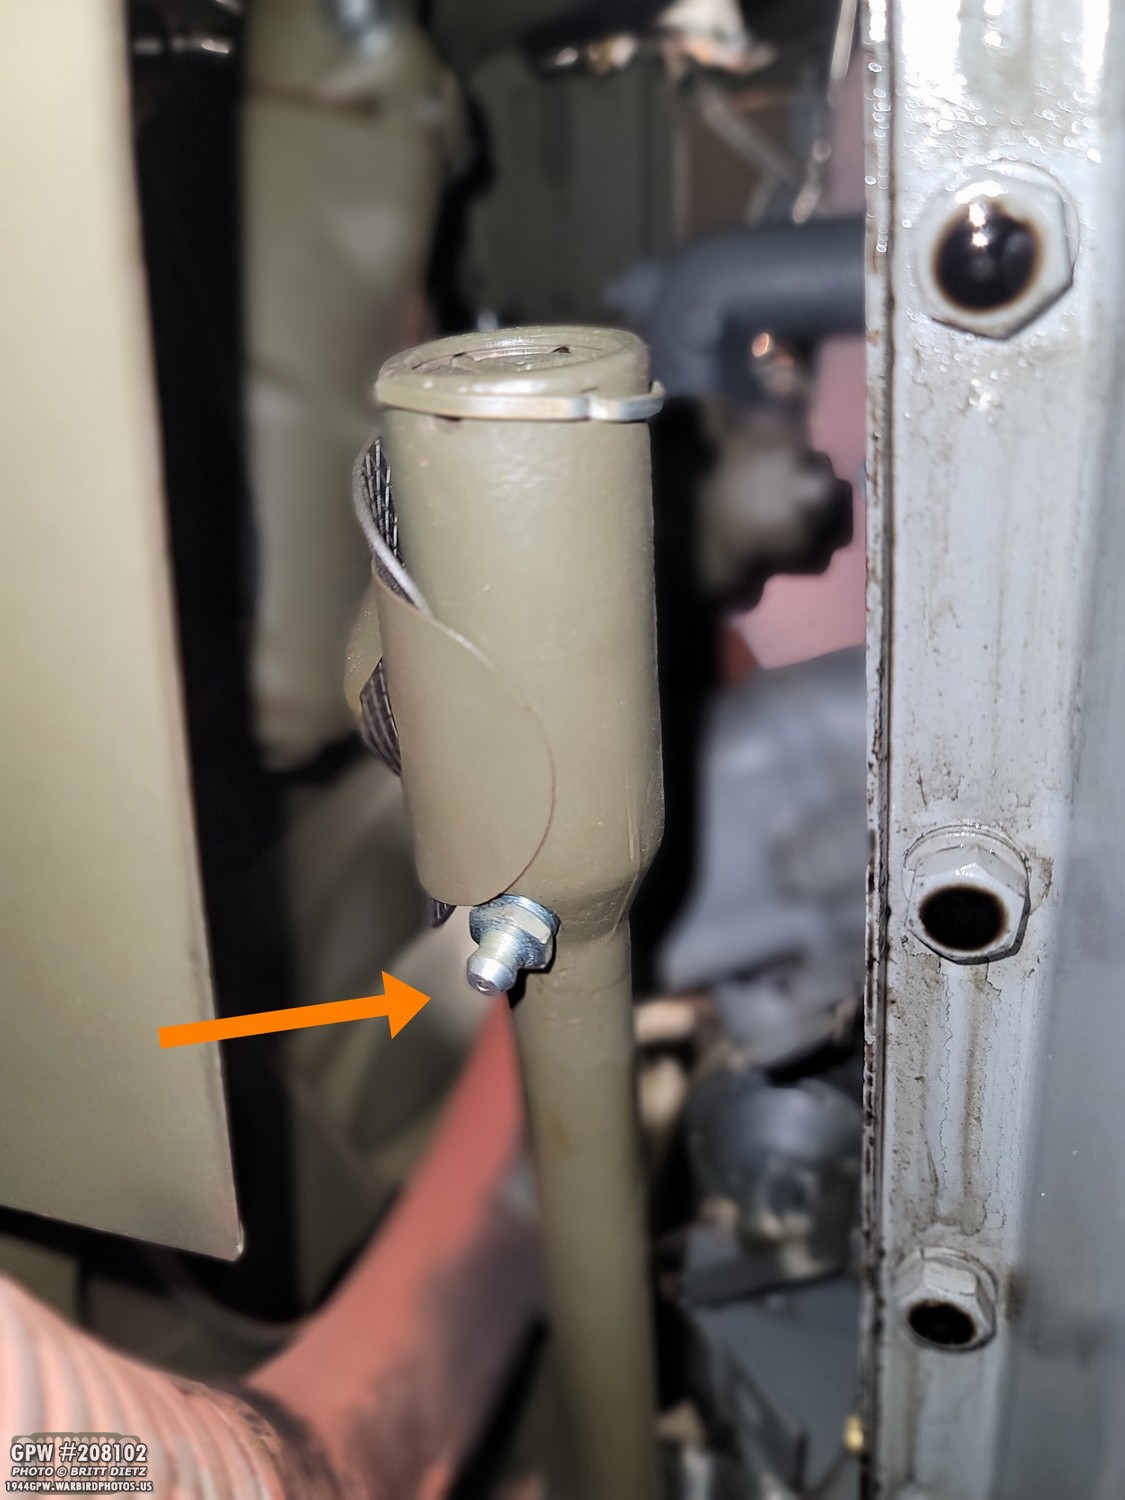
The bell crank will be connected to the drag link. There are two zerk fittings on either end of the drag link. Again, having a flexible grease gun will make this very easy to get to.
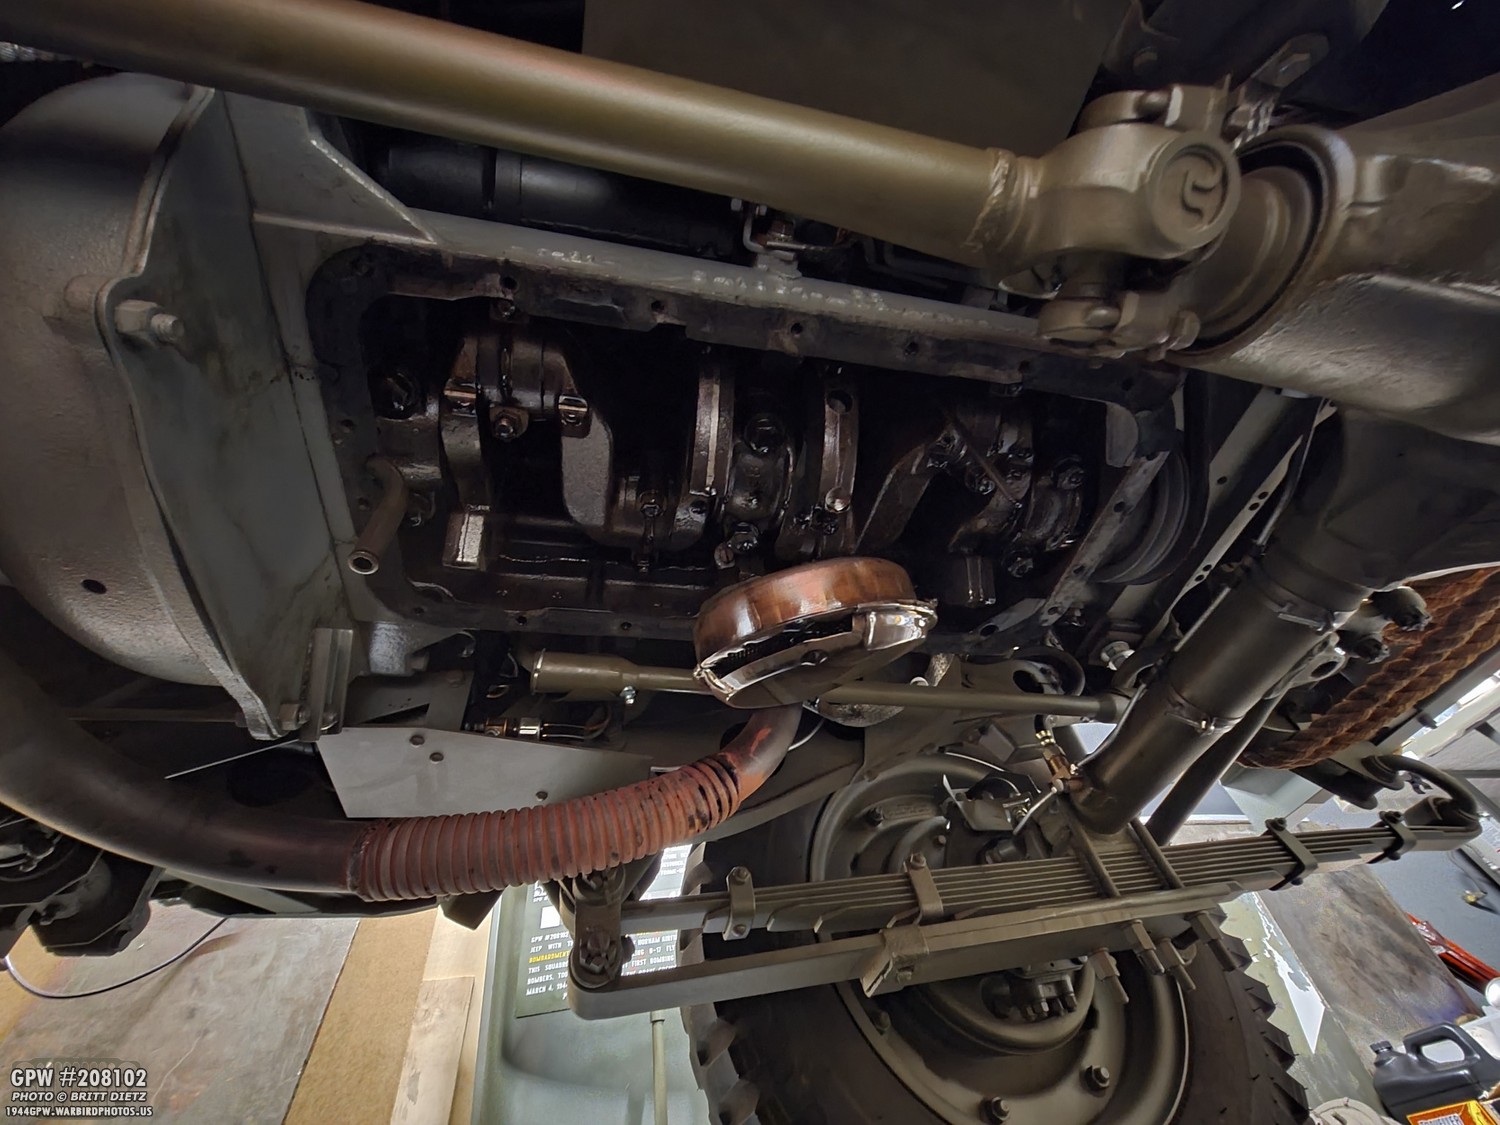
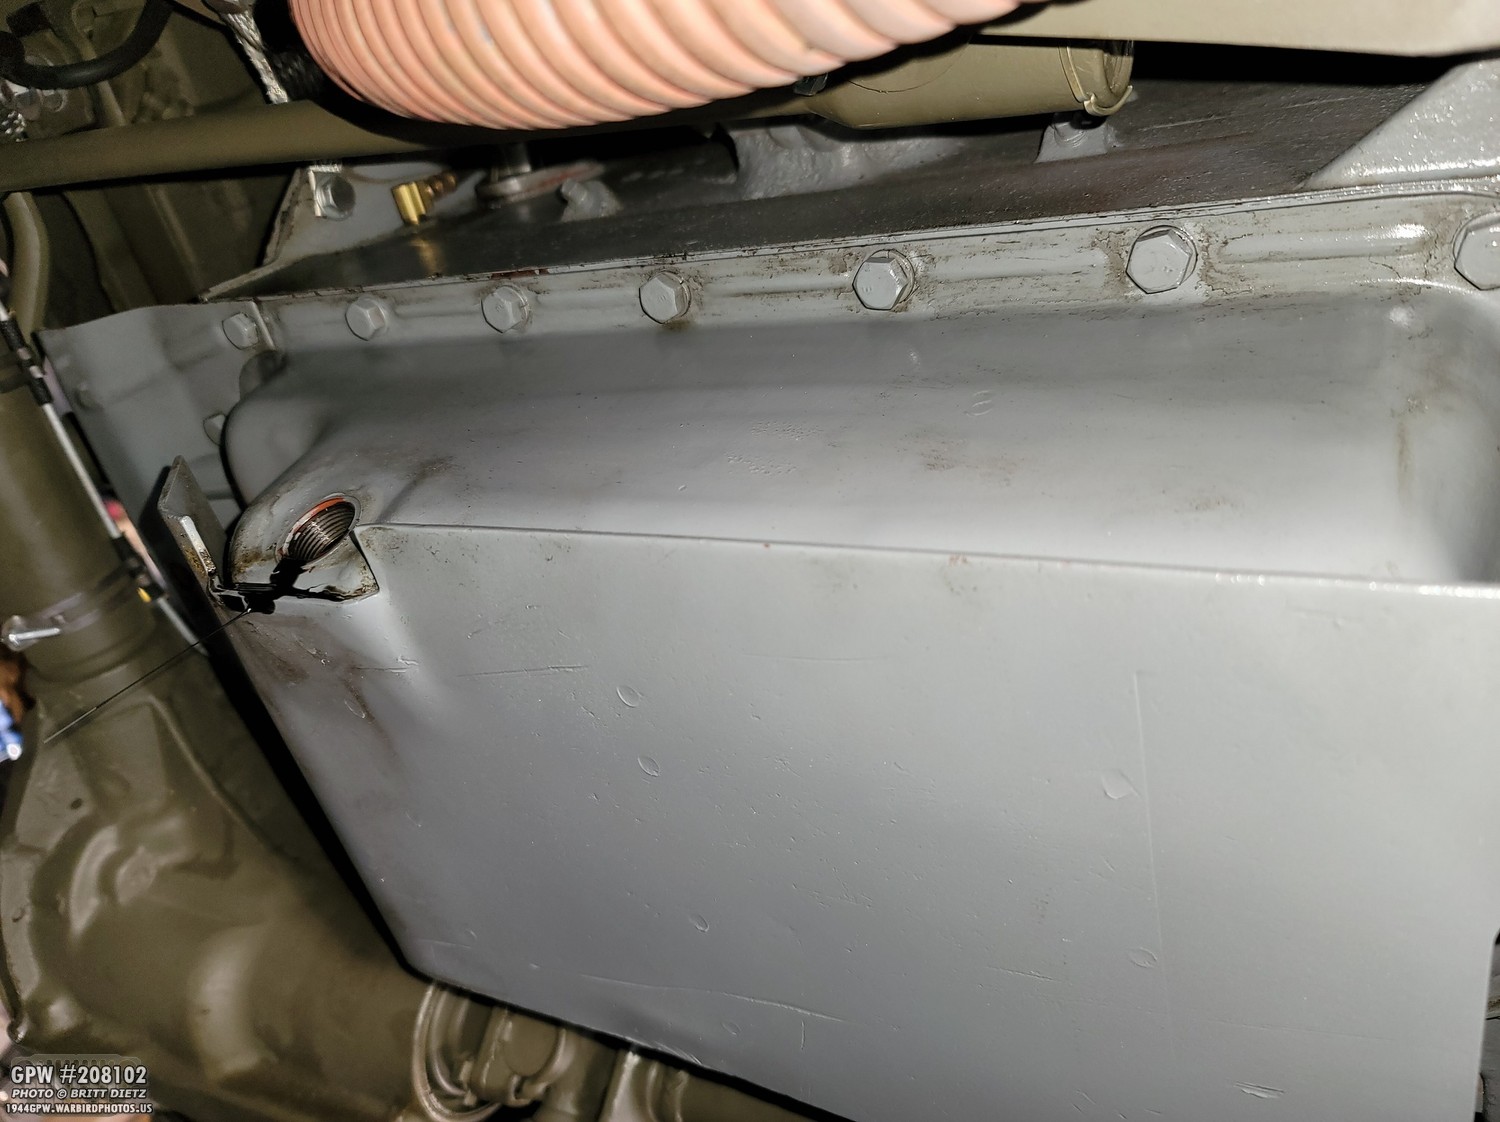
And here’s the other end of the drag link with the rear zerk fitting. Note the oil droplets on the oil pan bolts. More on that later.

Moving over to the pedals, we have the pedal shaft assembly for the clutch and brakes. There are two zerk fittings on this.

Some people might have a zerk fitting on top of the steering box, and some may have a plug. By default, a plug should be there if from the factory, but a lot of people fitted zerk fittings to the top of their steering boxes after the war (such as mine). There’s a lot of debate and opinions on what should be in the boxes (a grease/oil mix, only oil, etc). So depending on what you do or have on your Jeep, it’s still a good idea to check the fluid/grease/mix in the steering box.

Moving under the Jeep, in a very tight spot is this zerk fitting on the high/low and 4-wheel drive shifters.

Let’s move on to the axle drive shafts. They have three zerk fittings each. Since we were right next to the shifter columns, right underneath on the transmission is the front drive shaft. On this side, going to the transmission, there will be one zerk fitting on the shaft body, and the spicer universal joint. This one is a bit tricky to get to (bottom photo) since you might have to roll the Jeep forward or backward so it appears between the U bolts.

On the other side of the front drive shaft going to the front axle, we have another zerk fitting on the universal joint.

Moving to the rear drive shaft, we have again three zerks. The first two are on the side with the emergency brake (e-brake). One on the shaft body, and one on the universal joint.

And again, one last one on the universal joint on the other side of the drive shaft going into the rear axle. And there we go, that’s all the zerk fittings you’ll want to lubricate on a Jeep!
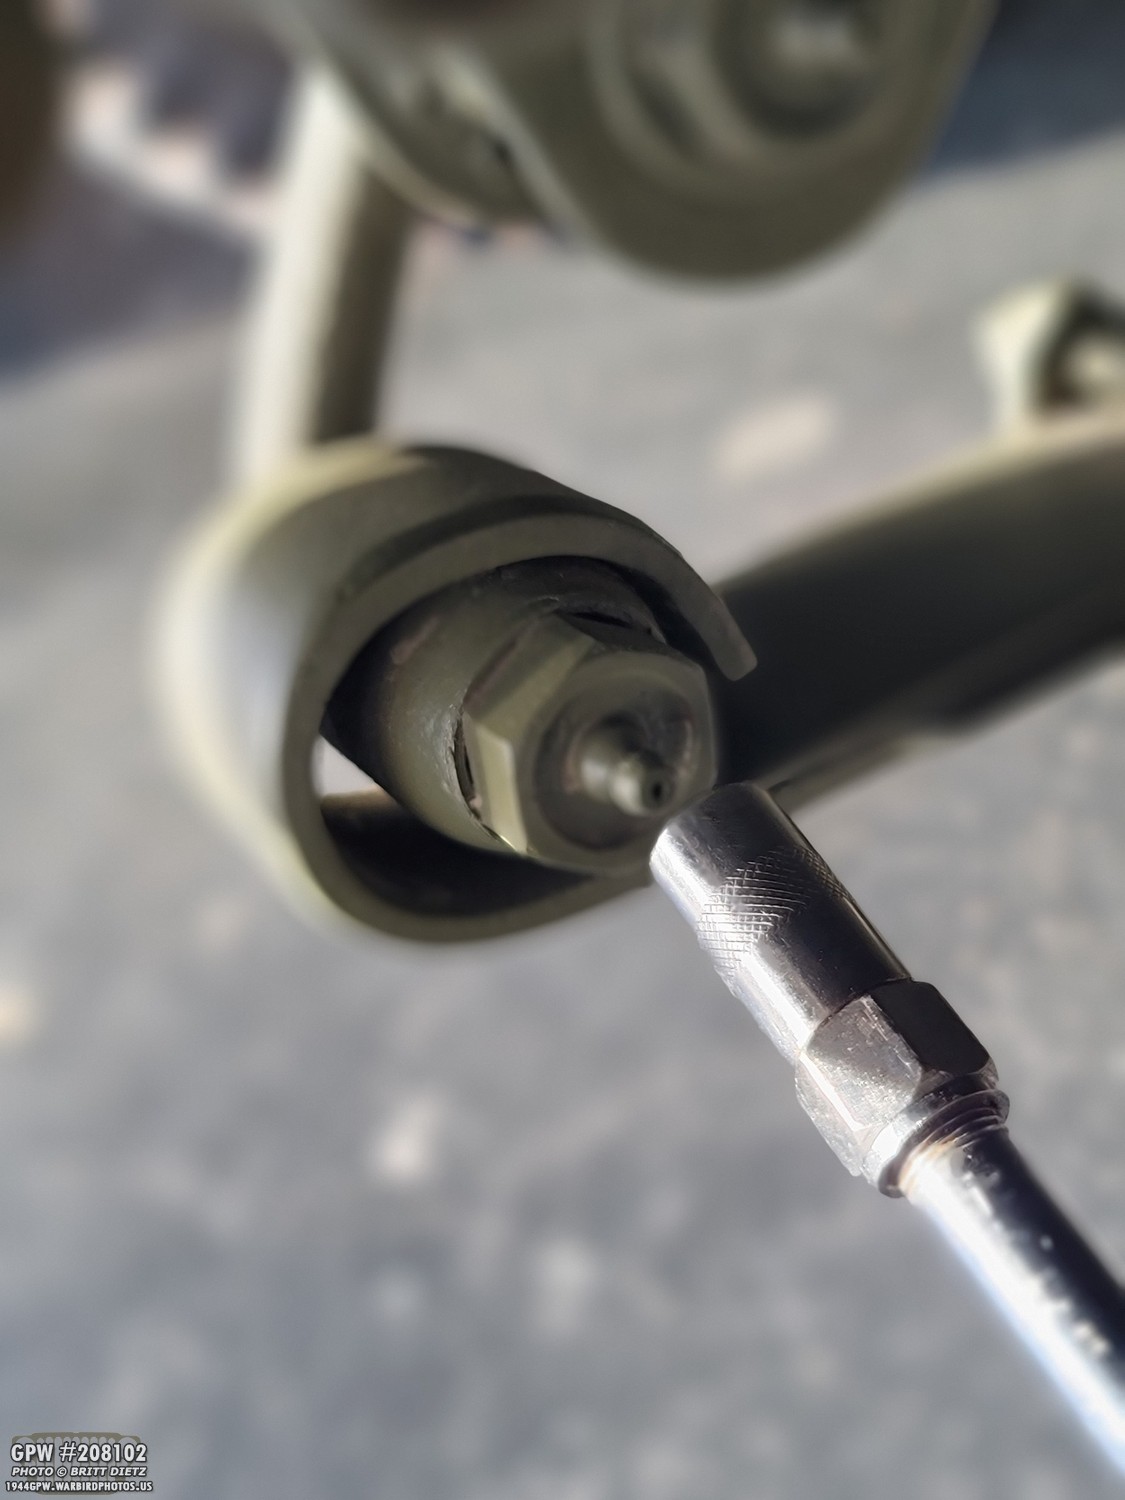
Lubricating them is easy, as simple as pushing the grease gun nozzle onto the zerk fitting until you feel it ‘snap’ into place. Then, go ahead and squeeze/pull/push however your grease gun works to force the grease in. Once you finish, often times you’ll find you can’t just pull the gun off directly because it’s snapped into place. I find rocking the gun/nozzle left and right will eventually make it snap off the zerk fitting.

How much grease should you put in it? For me, I keep pumping until you audibly hear that crackling sound of the grease squeezing out at another spot. As you can see here, the grease has started coming out of the rear spring shackle bushing. I’ll wipe that off, including the grease on the zerk fitting, and move on to the next one.

And here are two examples where having the flexible grease gun nozzle helps out tremendously! There are some spots you just cannot get a grease gun without lifting the Jeep otherwise!

Now, since you have greased up all the locations, you will probably get something like this after you drive the Jeep. Grease will fling from the drive shafts and leave a nice pattern like this in four spots. It’s pretty easy to clean up, but still an annoying mess, especially if you drive through water and it waters down the grease that’s oozing out.

Now that everything is greased and ready to go, let’s do some visual checks for any fluid leaks. This is especially important with the brake lines. Better to find out now that you have a brake fluid leak than when you’re traveling 40+ miles an hour down the street and find you don’t have brake pressure. Check both sides of the flexible lines on all four of the axles. You’re basically going to be looking at any brake line joints for any liquid leaks. If you’re using DOT3 brake fluid, it might be easier to spot since it will eat the OD Green paint when it leaks, but DOT5, which many people convert to (myself included), won’t eat the paint so you need to look a little harder.

Check under where that flexible line (previous photo) connected to the hard line on the axles. Also, make sure your brake line hose retainer clips are present and not starting to wiggle their way out.

Now check the short metal brake S-shaped lines on each axle. Where it connects to the wheel cylinders on the back of the brake shoe backing plate is a common leak point (bottom arrow). Also, the small bleeder can possibly leak if not tightened.

Next, check the T joint on the front axle. There are three connection points here, so check all three for leaks. I didn’t take a photo of it, but also check the T-junction on the rear axle as well. That will be on the top of the axle.
And check the connection on the rear of the Jeep through the rear frame cross-member. And, check that the brake line hose retainer clip is still snapped into place.
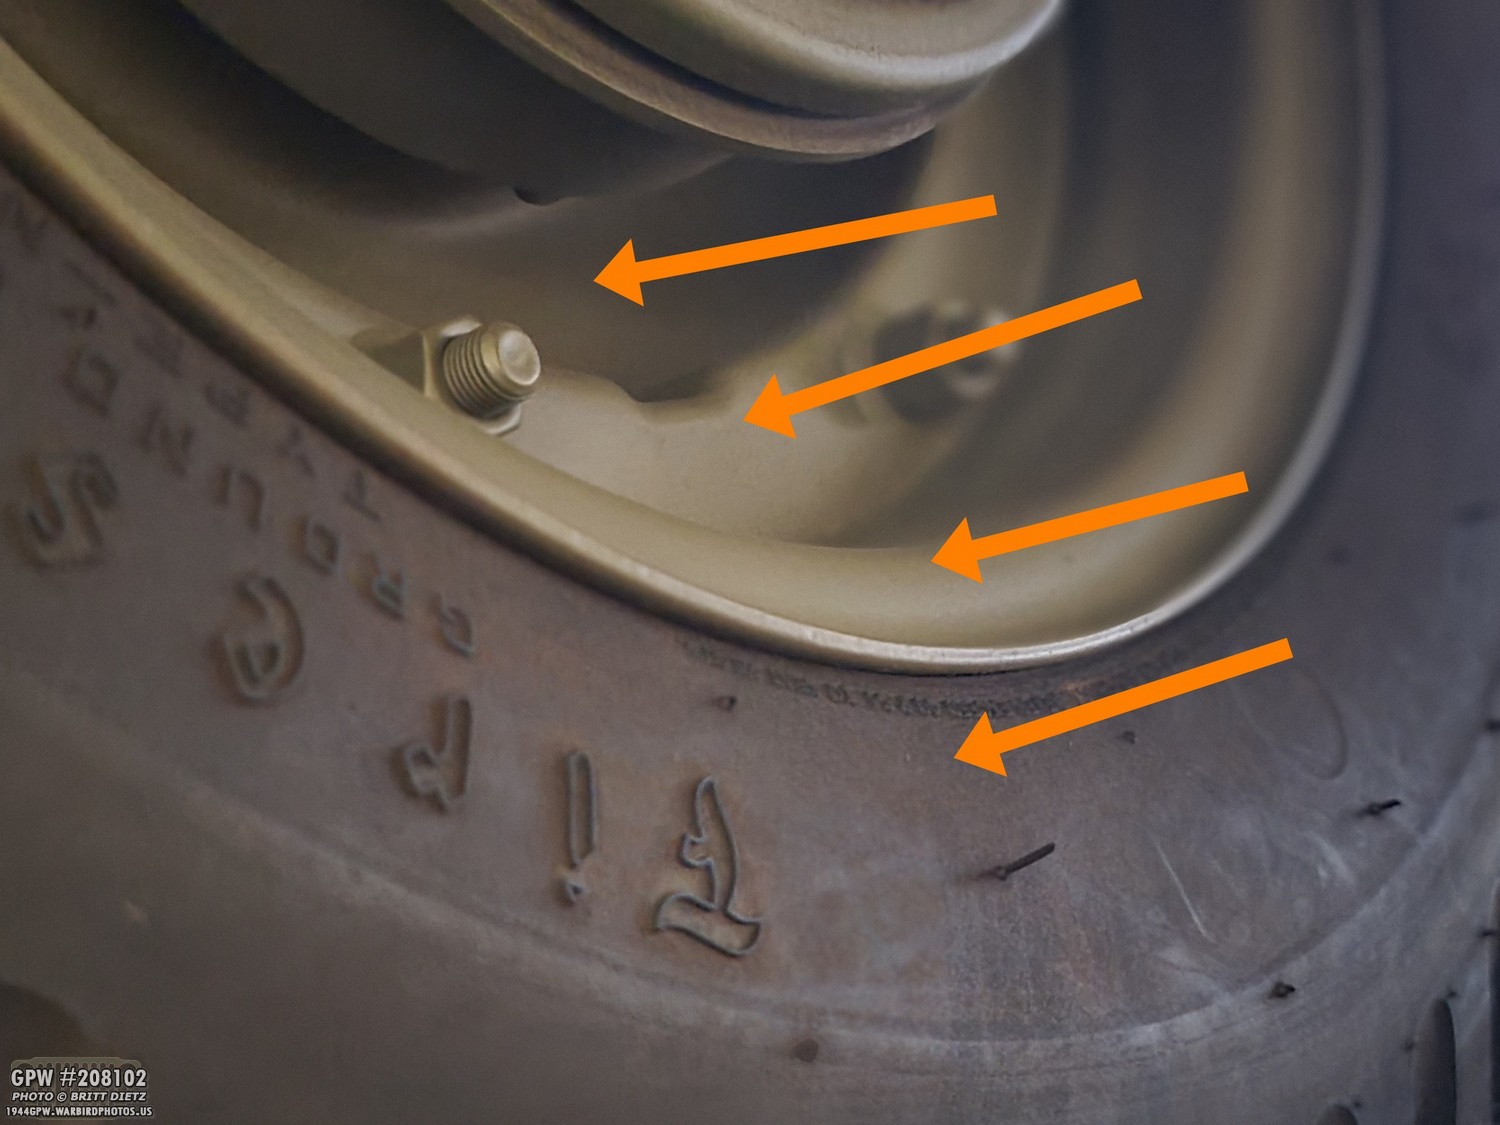
One quick way to see if you have a brake fluid leak from your wheel cylinders is a leak trail going down this path on the back of your rims/wheels. Again, especially if you use DOT3 fluid, it’ll be very obvious. DOT5 should still leave a visible trail, unless you wipe it off or, I suppose, drive through water.

Don’t forget to take a moment to check out your fuel lines. There are a lot of different joints to check out, so now might be a good time to look for any fuel leaks, fittings coming loose, or damage to the lines.
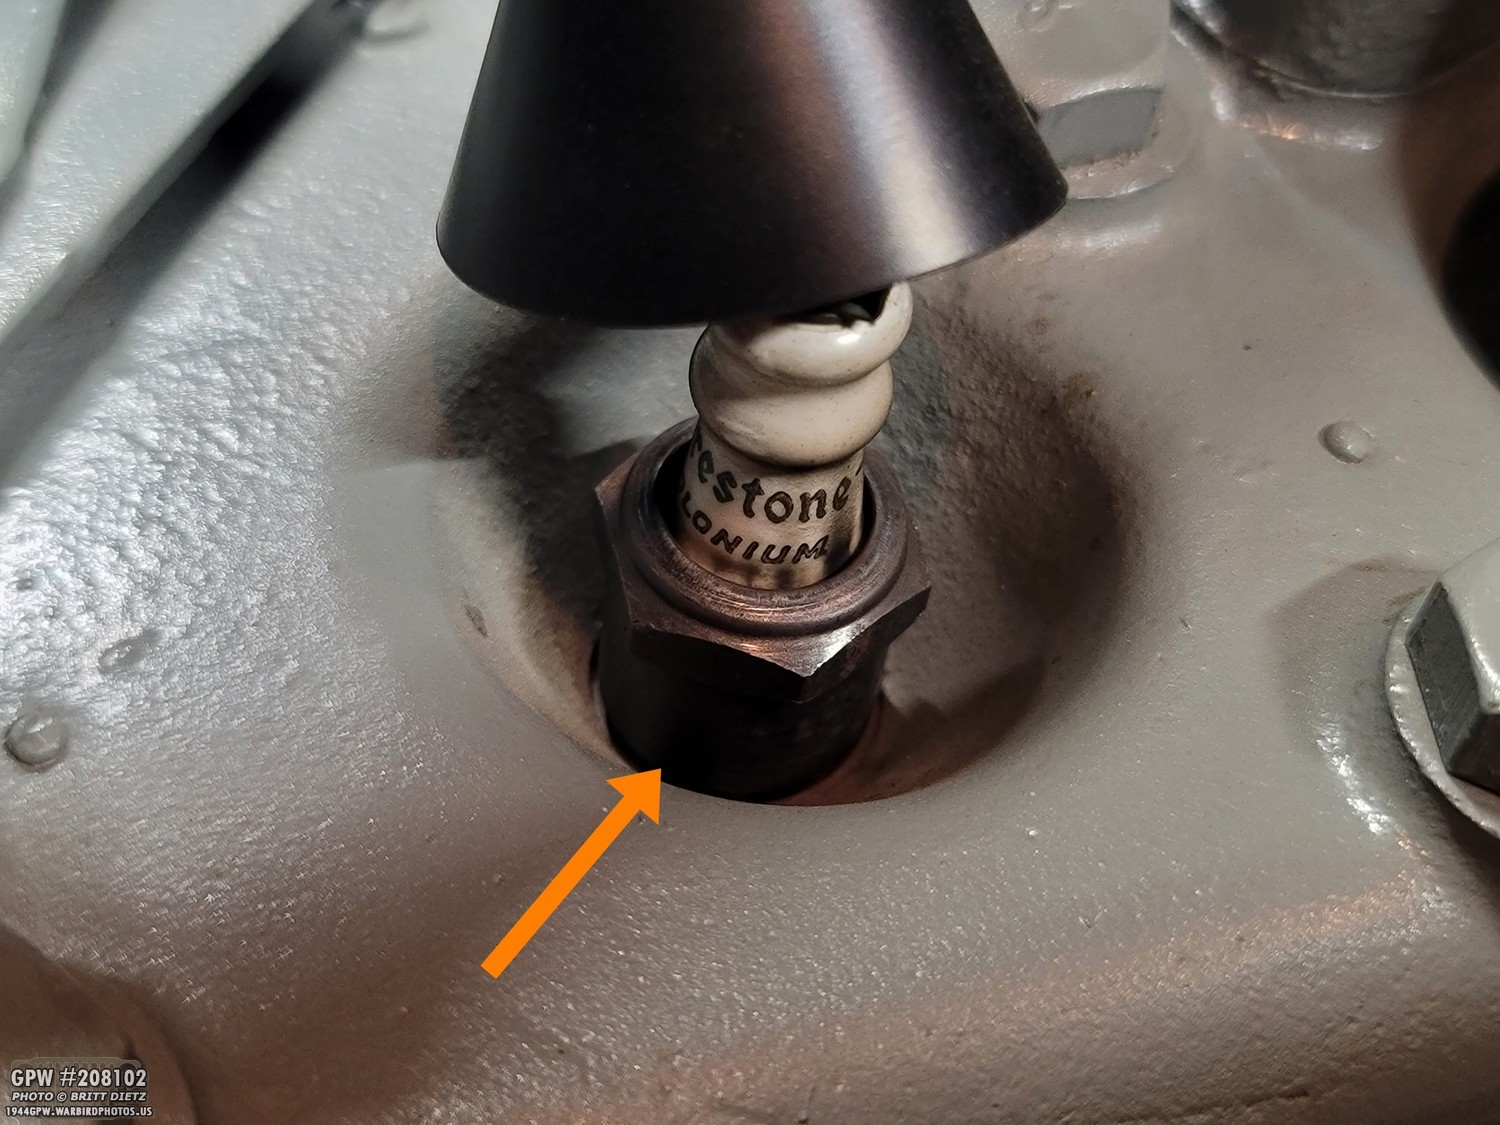
And it’s a good idea to check out your spark plugs. Check for rust or dirt/debris build-up in the spark plug well on the top head of the engine. If your Jeep is in the rain often or gets wet a lot, water can sit in this area and cause rusting. This could lead to issues later on in your Jeep’s life.
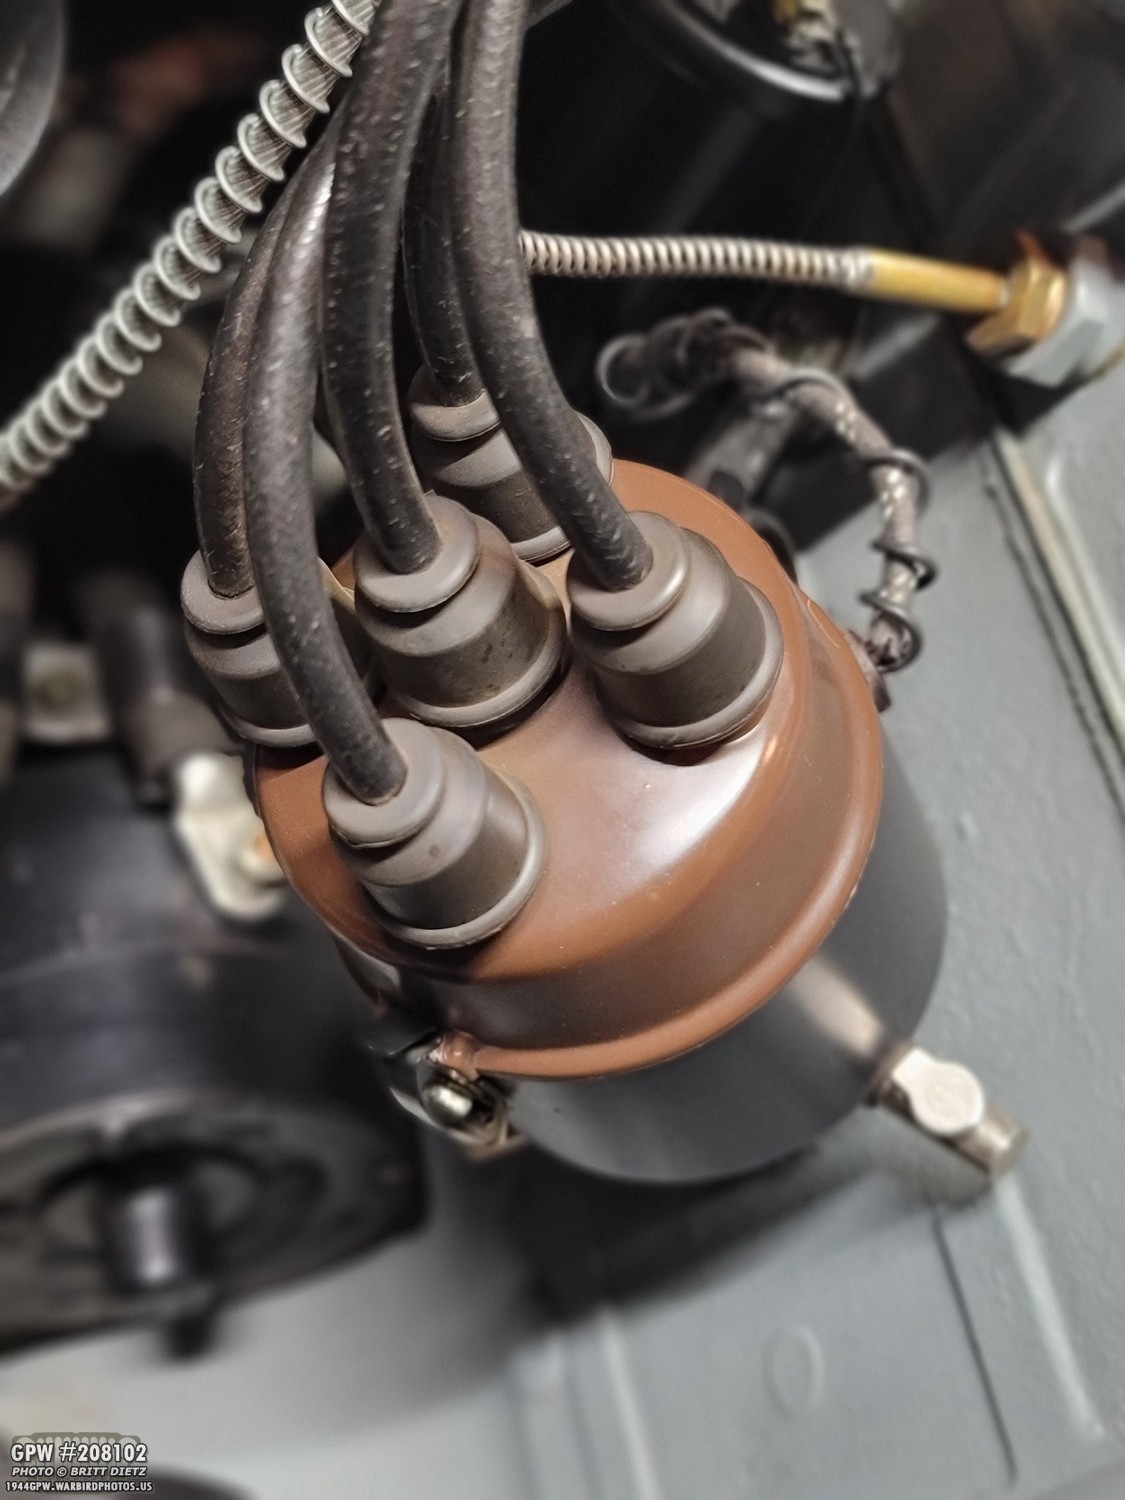
It’s also a good time to check your points in the distributor. My Jeep has an electric distributor, so I don’t need to worry about that (looks just like a normal one with only the addition of one wire!). And check the spark plug lines.

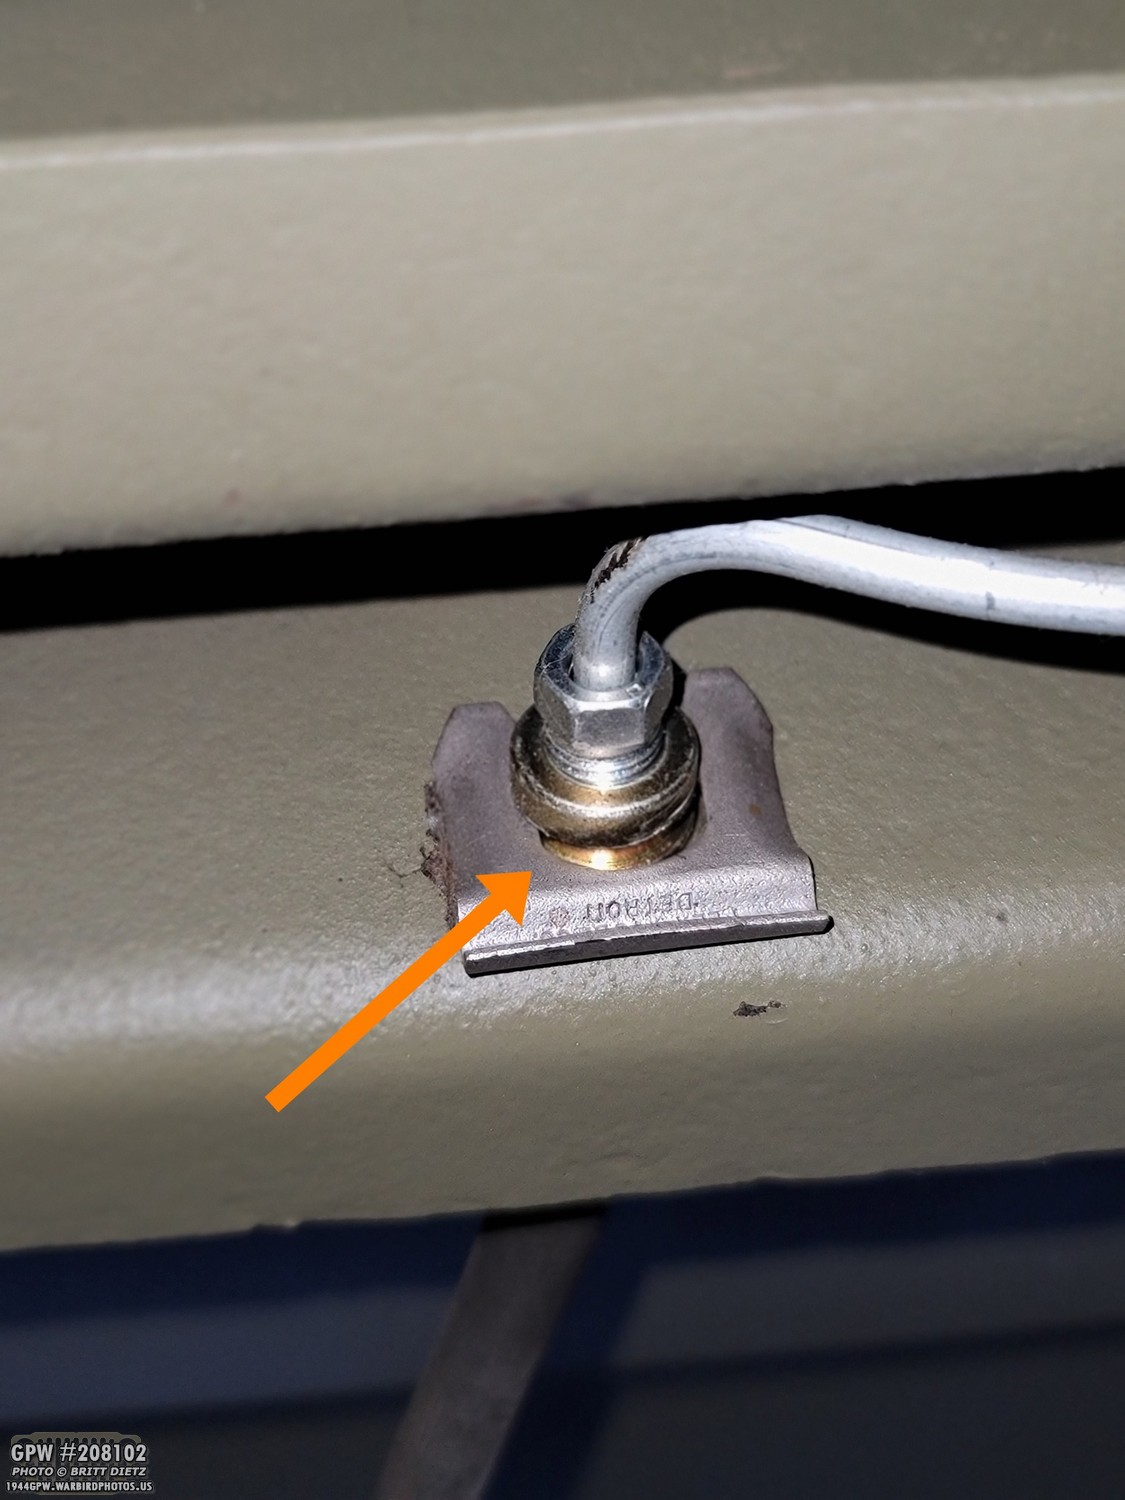
Continuing around the engine bay, check for any corrosion/battery acid on the two battery contacts.

As I was looking around the Jeep, I noticed one of the two muffler support insulators was beginning to crack and split in two spots. These rubber supports hold the muffler to the bottom of the body tub via a series of brackets, bolts, and L-shaped plates. Over time, this will wear out as the weight of the muffler pulls on it and it flexes. I’ve never thought this was the most efficient way to do this, and even with reinforced insulators, they can easily split over time. Time to replace this one!
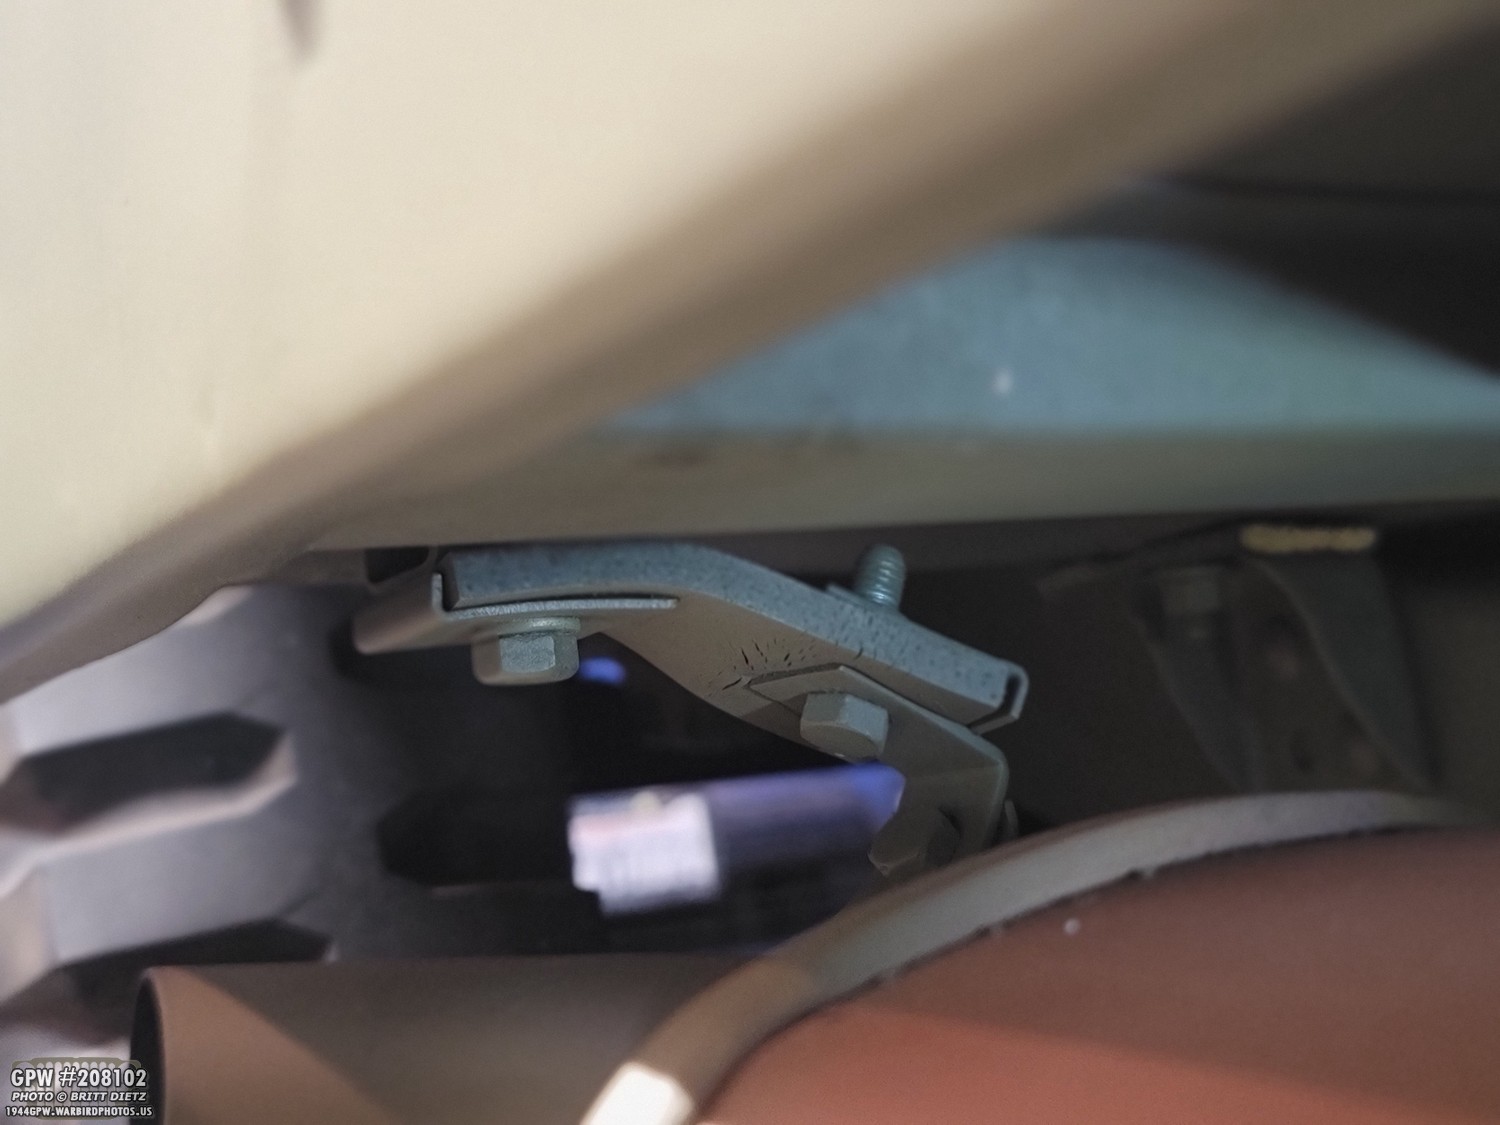
The other support insulator looks in pretty good shape. Some micro cracks, but nothing major and it’s still holding its rigid shape well.

Here’s how the cracked one looked once I took it off. It’s not bad, and probably had a little bit more life in it, but the cracks would have eventually caused it to slip, dropping the read of the muffler.

I got a brand new reinforced one from Ron Fitzpatrick Jeep Parts and replaced it. All good now for another few years! As you can see, for this rear support, the design with those L-shaped plates almost entices the rubber to break in time. But, that’s how it was designed… and I suppose they didn’t count on these Jeeps lasting more than a few years in war service.
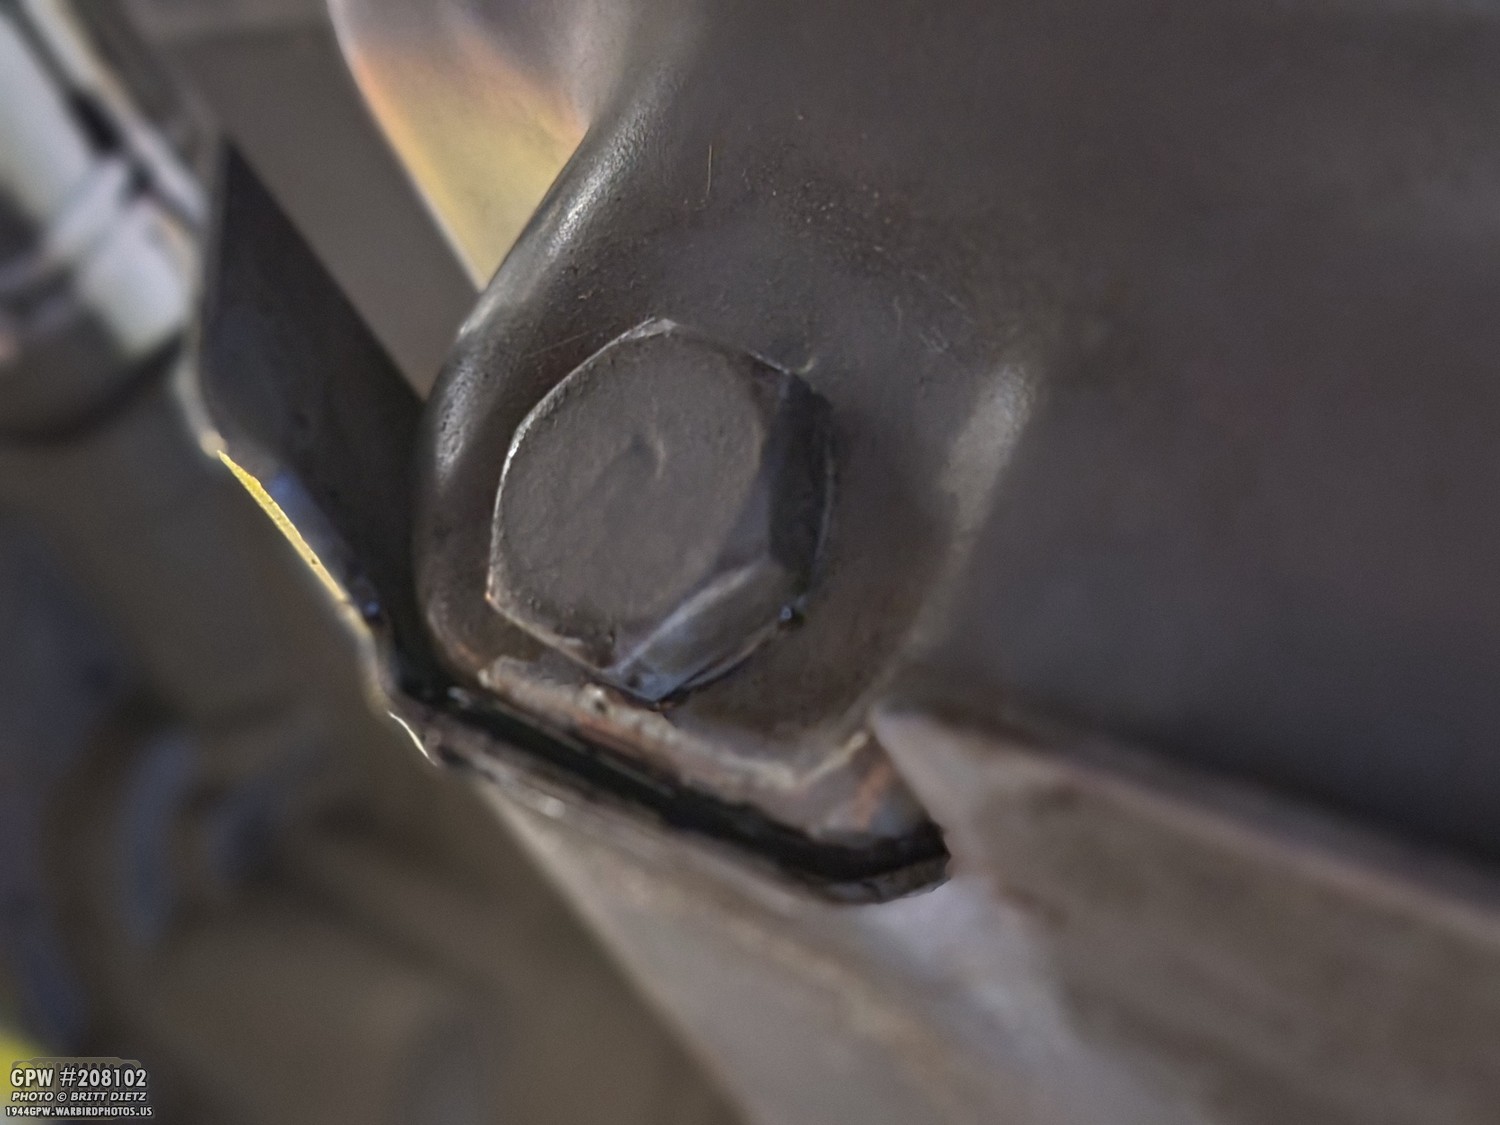
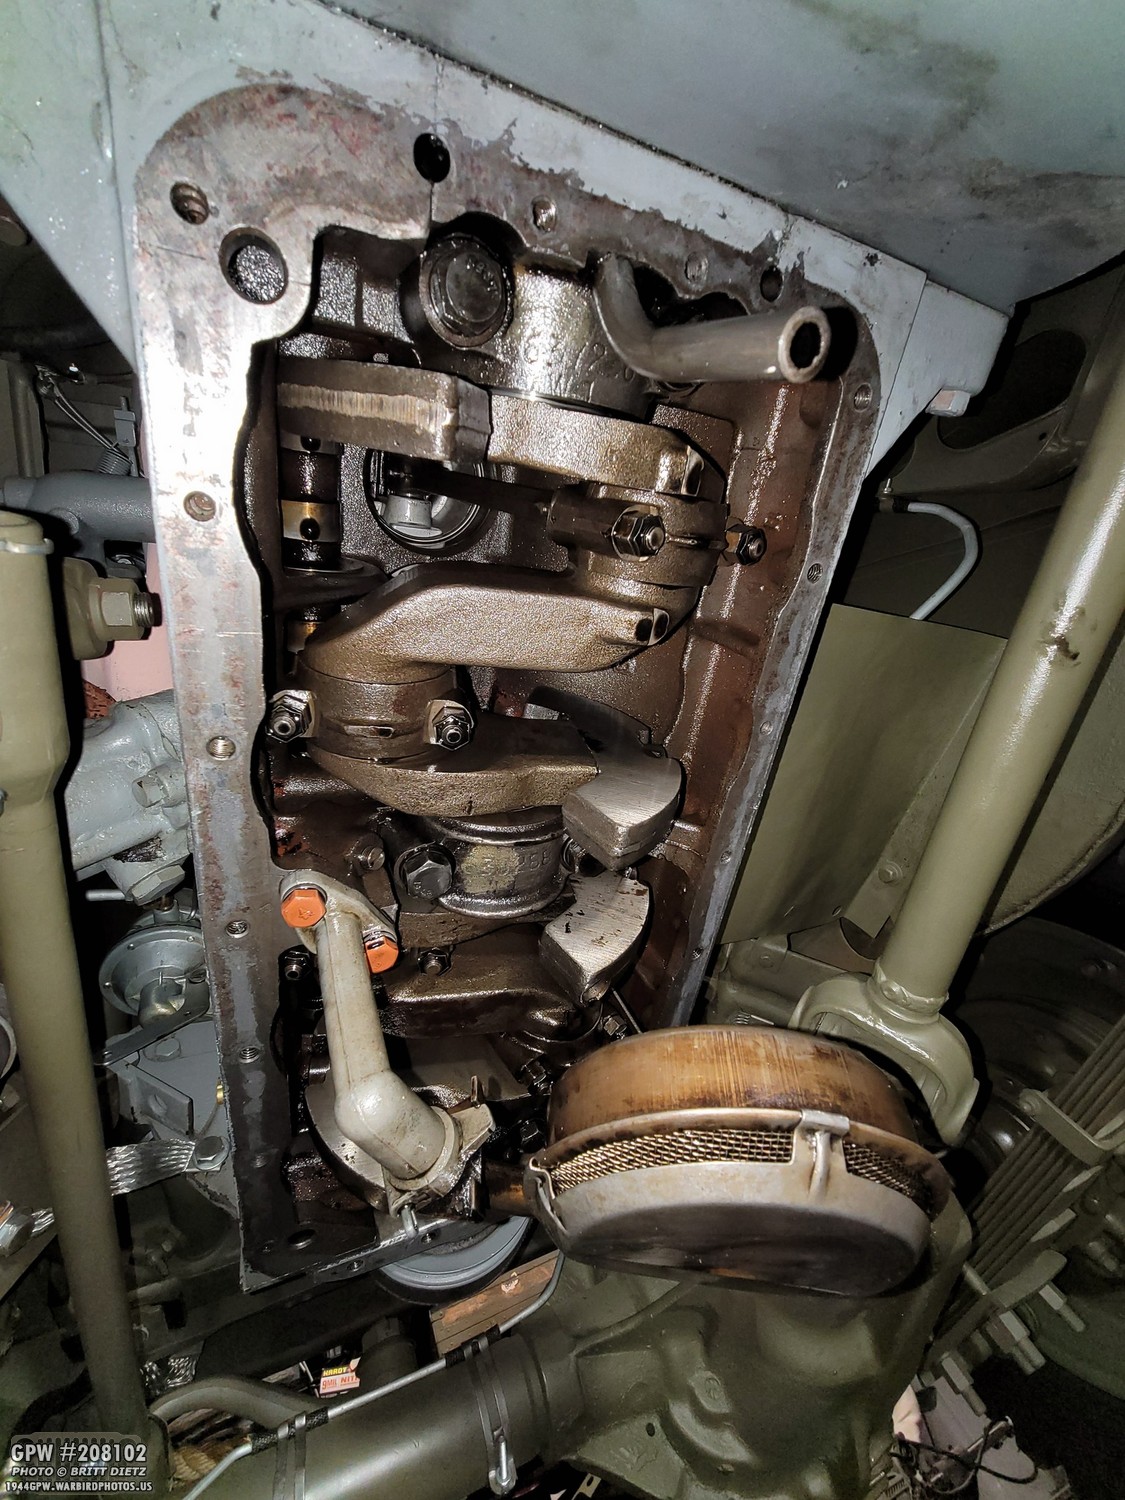
Now time to tackle an oil change! It’s been 1000 miles since I first fired up the engine after restoration, so it was time to do a full oil change. I’ve been battling a very slow oil leak on the oil pan for some time now. There were two main spots I’ve had issues with, one is the oil drain plug shown here. It just always seems to leak, even with the copper crush washer behind it. Mixed with dust/water as I’ve driven the past 1000 miles, and it just makes a mess. I’ll need to remove this plug to drain the oil out of the oil pan/engine, so I’m going to focus on a better way to seal it up this time.

The other areas for the oil leak, as I showed earlier, are small pools that form under the oil pan bolts. This can be a combination of things, a warped oil pan not mating well with the bottom of the engine block, bolts that were over-tightened causing the pan to warp or the gasket to warp (a big problem with a lot of Jeeps), and even the bolts not being tightened enough. Either way, thankfully it’s been a slow leak. Still, I would like to try and get these leaks less as they just make a mess on the engine. So, that, along with me wanting to see how the first 1000 miles of my restored Jeep are doing in the engine block, I decided that along with doing the oil change I would also pull off the oil pan to check for any metal shavings in the oil, put on a new oil pan gasket, and check for any issues with the oil pan itself which would cause these slow leaks.

I grabbed a few gaskets from Ron Fitzpatrick Jeep Parts including a new oil pan gasket. Last time I used a paper gasket with RTV gasket sealer, but I wasn’t happy with how that turned out. Ron sells only the cork ones, so I was curious to see if that would help make for a better seal, especially if my oil pan wasn’t as straight as I thought. I also got gaskets for the front timing plate and the valve cover for future projects.
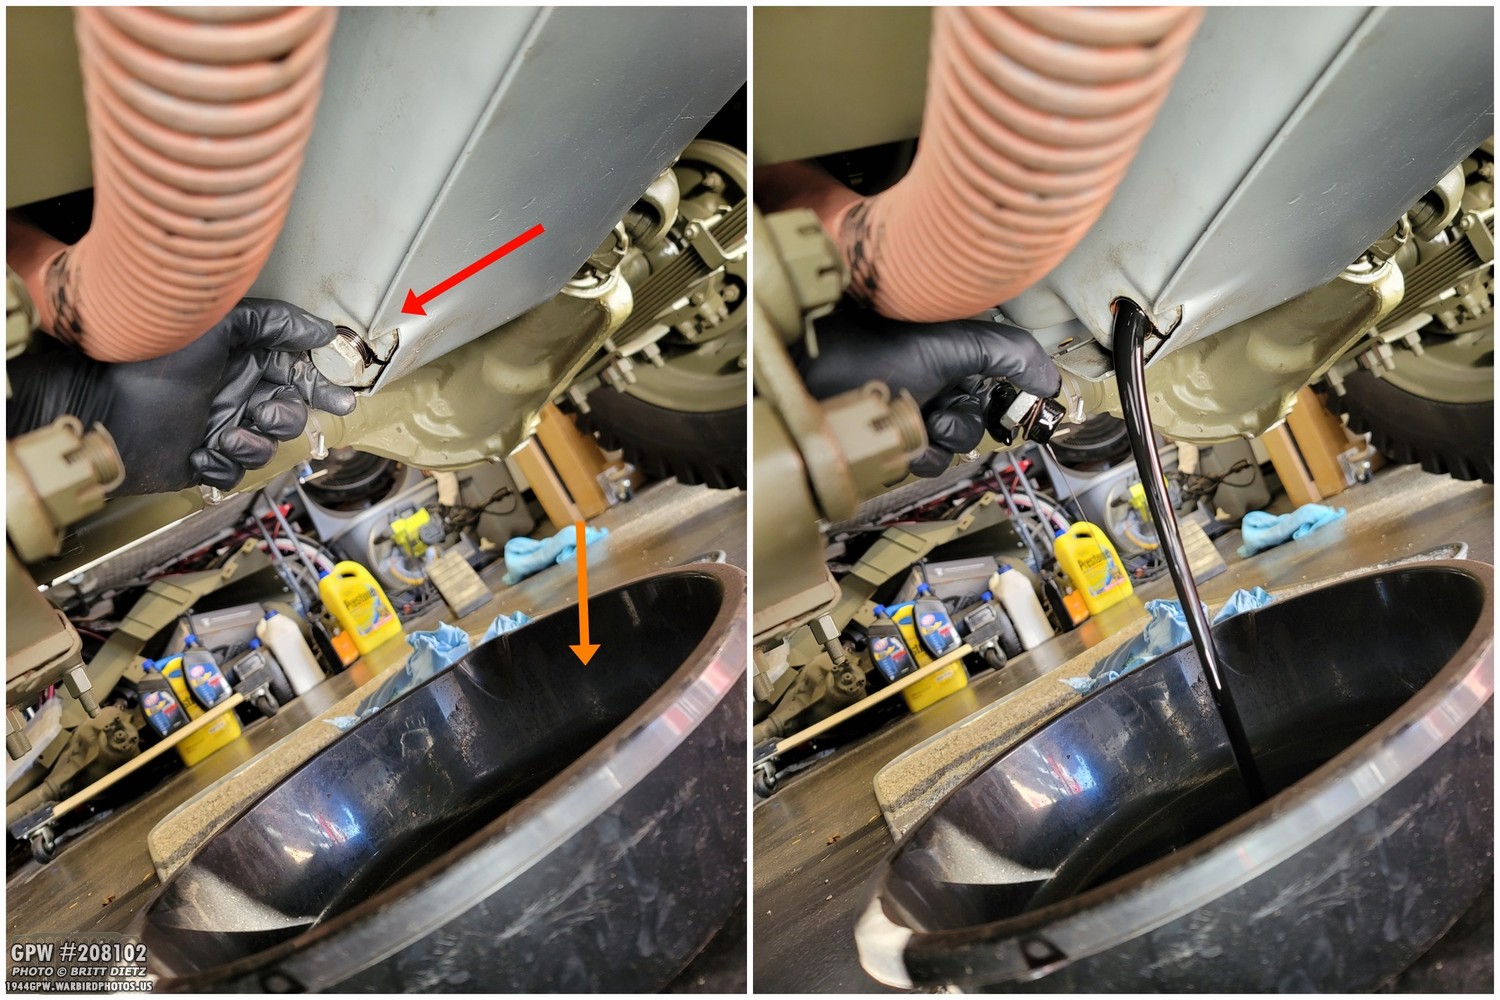
So, let’s get started! This is the not-so-fun part of draining out the oil. I put a large 7 quart oil pan underneath, as the engine probably had 4.5 QT in it, so the pan will be plenty. I used a wrench to get the drain plug started, then slowly unscrewed the rest by hand. Soon the oil started to stream out.
As the oil was draining, I looked around the oil pan to take note of the bolts that had any leaks. I would double check those areas on the pan to see if there were any irregularities.
It took a long while for the oil to finish draining, and it still had a small stream when I decided to get started on removing the bolts.
Unfortunately, because I had hands covered with oil and it was quite a process, I didn’t get any photos of the oil pan removal and cleanup other than this. Here’s what I did:
1) Got all the bolts out. The oil pan was stuck due to the RTV gasket sealer. I had used black oil-resistant sealer on the paper gasket, and it did its job. I had to use a tiny flat-head screwdriver to carefully (and gently) pry the oil pan off. It was a long slow process so I didn’t mar the oil pan metal.
2) After slowly using the small screwdriver to break up the paper gasket and the RTV, I was able to slowly peel away the oil pan. In the process, I hit the pan with all the drained over and made a mess on the garage floor. Sigh.
3) Used kitty litter to soak up the oil. Worked SUPER well, after a few hours all the oil was soaked into the litter.
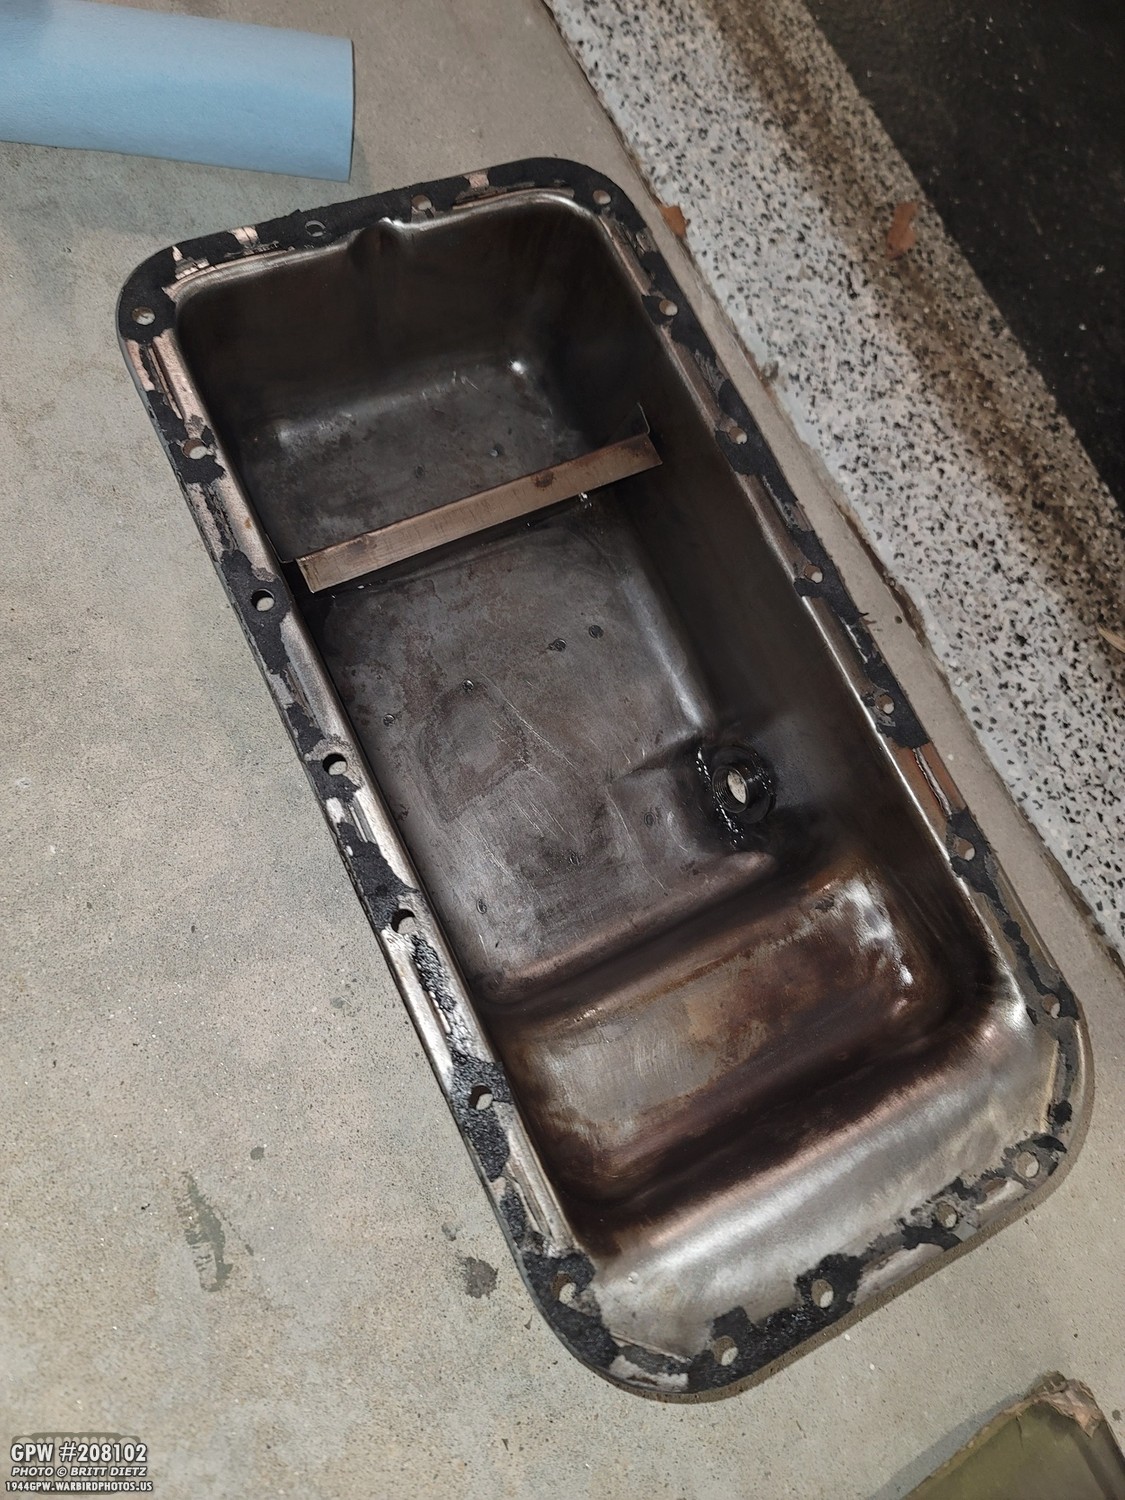
4) With the oil pan off, I used shop towels to clean up the oil still in the pan and check for any metal shavings. There were none, yay! The engine has worked great!
5) I then poured some gasoline into the oil pan and swished it around for a bit, then let it sit for 10 minutes. This broke up the rest of the oil and allowed me to clean it this far.

After I cleaned off the paper gasket and the RTV from the oil pan (using my drill and a non-abrasive nylon wire wheel), I started to check for any irregularities. I noticed some of the bolt holes had raised lips, possibly some of the slow leak causes.
Using a small file, I was able to file down the edges flat. I also checked to make sure the area around the holes wasn’t puckered up from over-tightening. I used a straight ruler to check that everything was as straight as possible. I did hammer some of the holes to get them slightly flatter.

After an hour of work, the oil pan was cleaned and ready for reinstall. I’m pretty confident the holes are straight and everything as level as I could get it.

While it was out, I decided to do some touch-ups on the pan with the Ford Gray paint. I just want to reiterate my love for this VHT paint. It’s amazing, goes on thick without ever running, dries super fast (no seriously, it was completely dry to handle in 10 minutes), is very durable, and fuel/oil wipes off easily when not dried with dust or dirt.

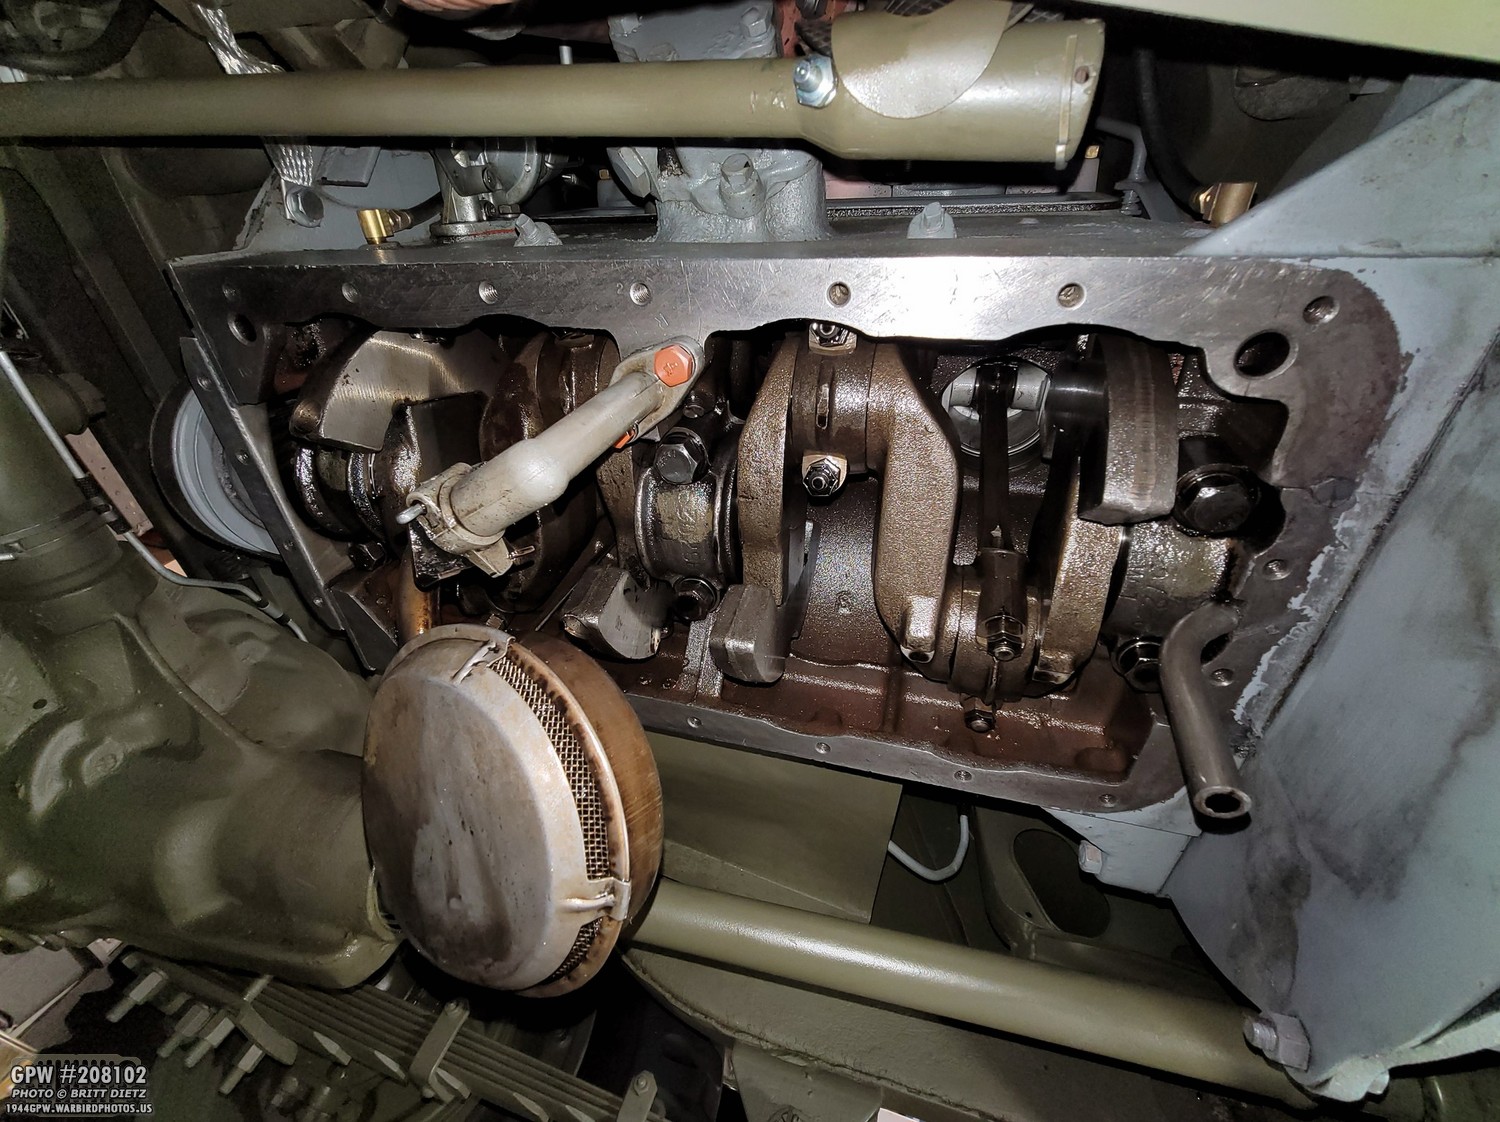
With the pan done, it was time to shift my focus to the bottom of the engine block. The other remnants of the paper gasket along with some RTV are still on the block, which needs to be removed.
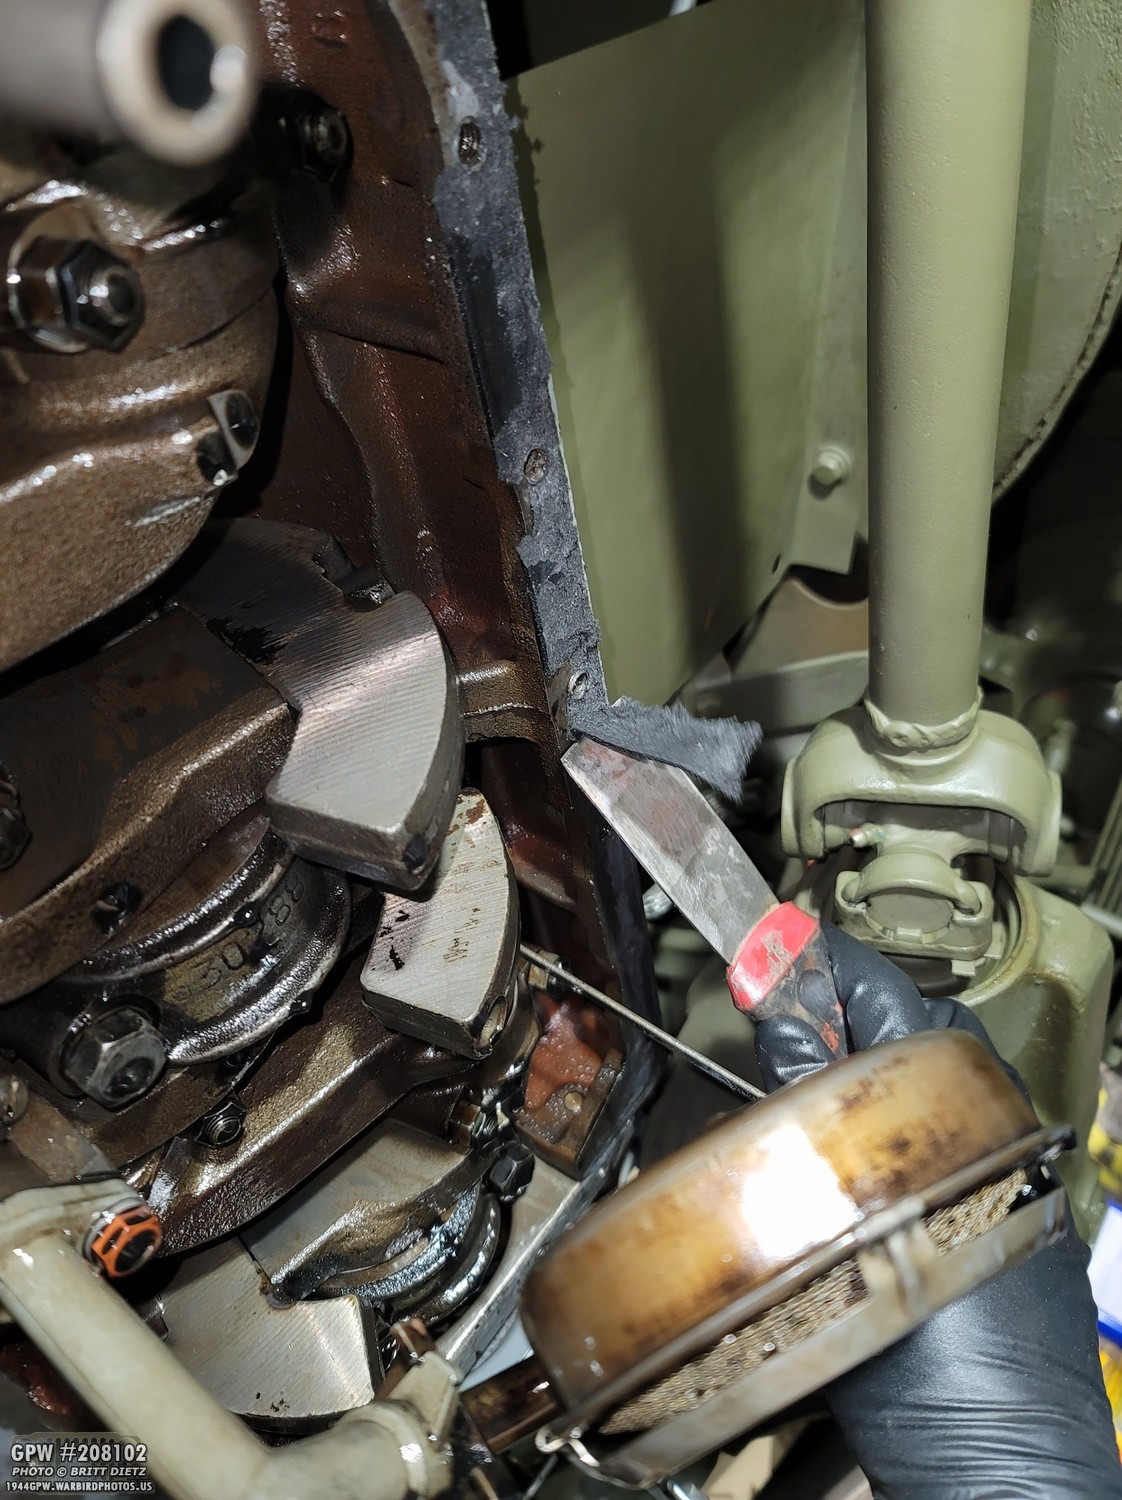
I took a sharp spackle spreader and carefully started to scrape off the paper gasket (while avoiding oil drips from the block).

Getting to the back of the block, you have to watch out for these two rubber packing dowels. They might fall out when taking the pan off, but if not, since they stick out a little, I wanted to make sure I didn’t damage them with the sharp spackle spreader.

In my case, they ended up falling out once I removed the gasket around them. It’s okay to take them out and put them aside, just DO NOT FORGET TO PUT THEM BACK IN! In my case, once I cleaned the block up, I put a little bit of RTV on the sides, then twisted them up into the holes on the block. This made them stay in position.
Gasket removed! Still need to clean up the surface with the residual RTV.
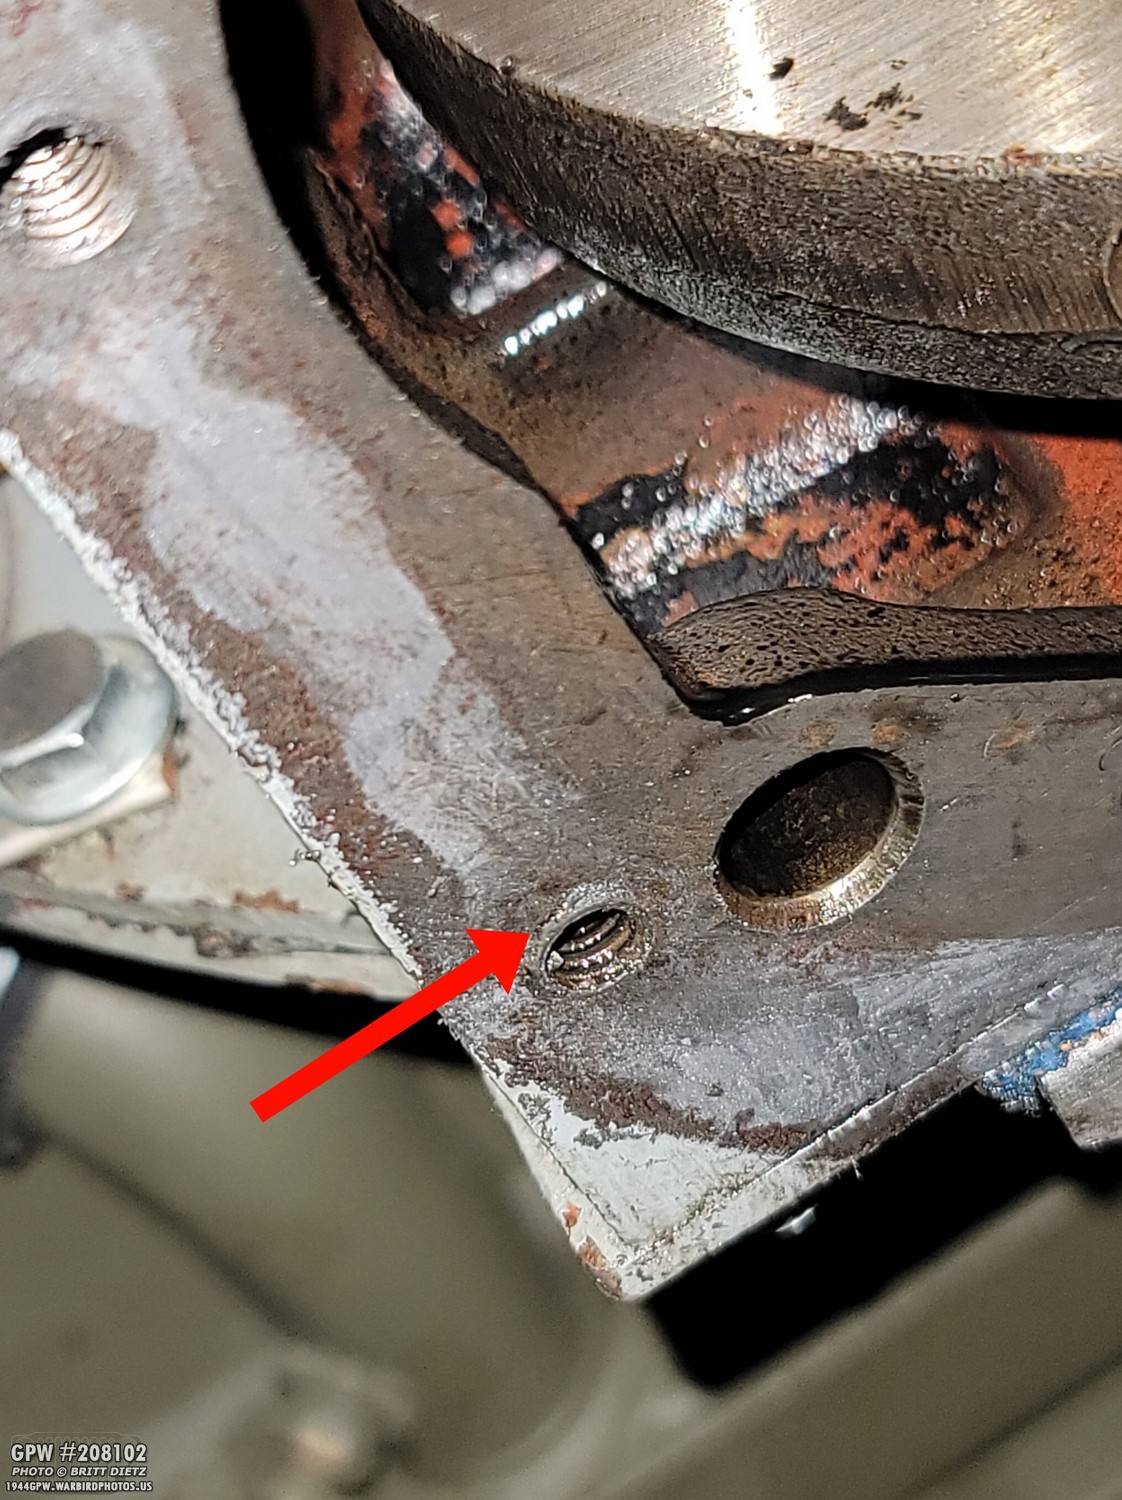
I did notice some puckering on one of the bolt holes on the block. I decided I’d use the same method as the pan and file that flat.
Using a sandpaper block, a wire brush, and the small file, here’s the now clean bottom of the block ready for the oil pan. I also used a small wire brush on my drill to clean out each of the bolt holes.

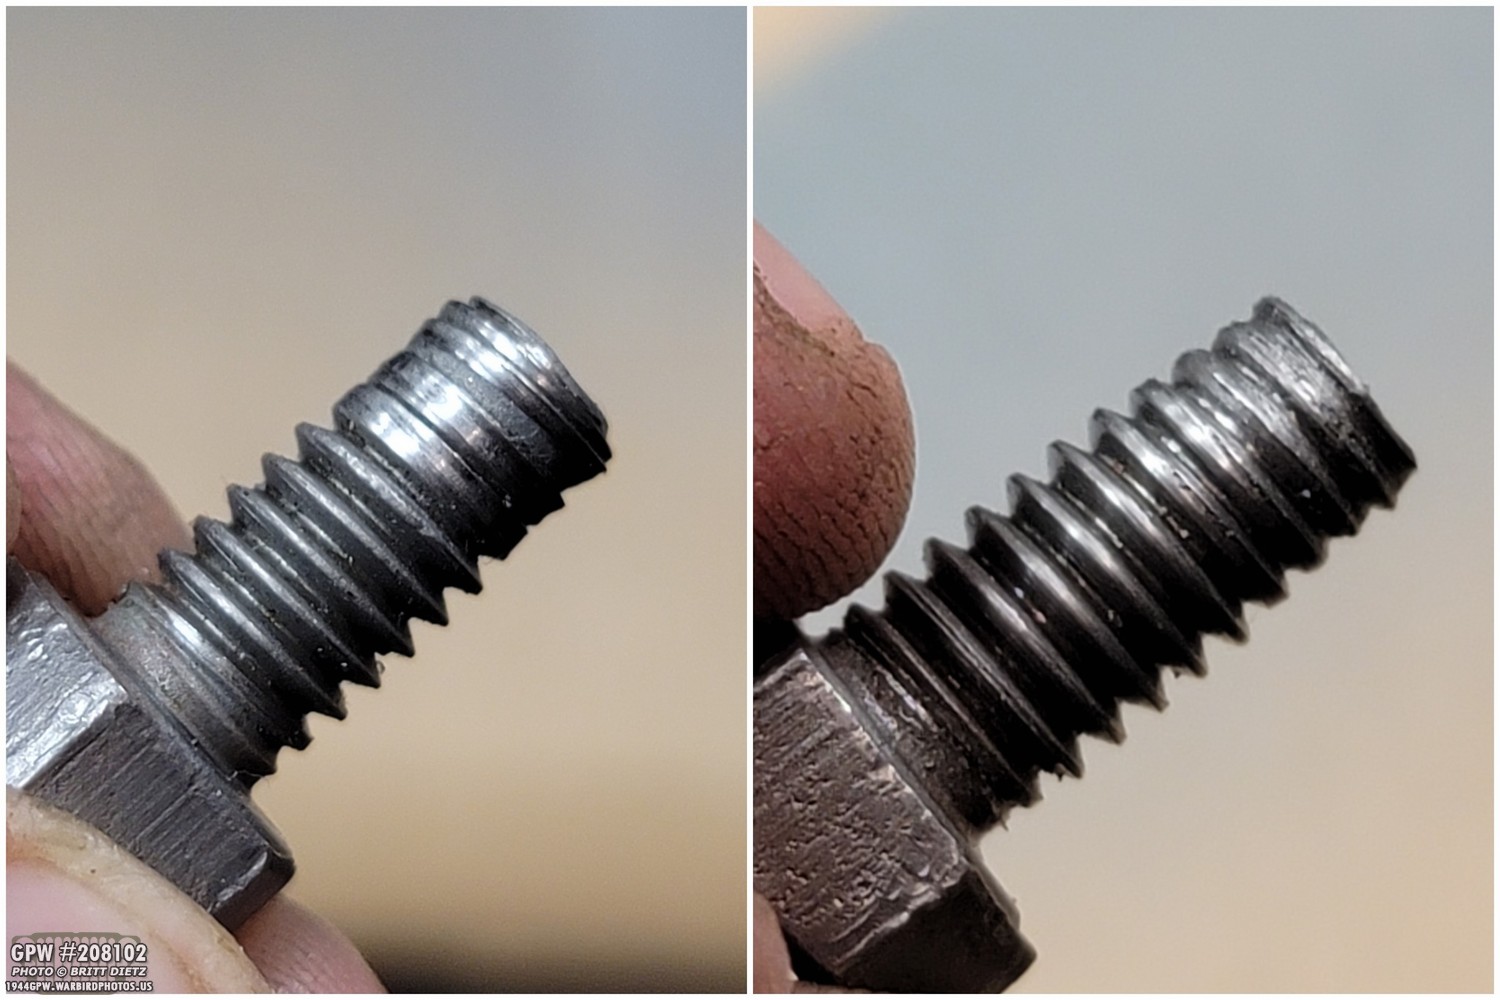
Speaking of the bolts, I went ahead and cleaned them up as well, putting them in my tub o’Gasoline for about an hour. Once out, I used a wire brush to clean them up. Each of the bolts have a small E on them, all but one of them. Can you spot the imposter? Technically, I should have self-locking recessed-head bolts on my oil pan since it’s a GPW. I thought about replacing them all, but I was crunched for time and it would take me a bit to track down/order the correct bolts to use. Next time!
I took some time to check each bolt as well, some had some pretty gnarly threads on them, so I used my tap and die set to clean up the threads.
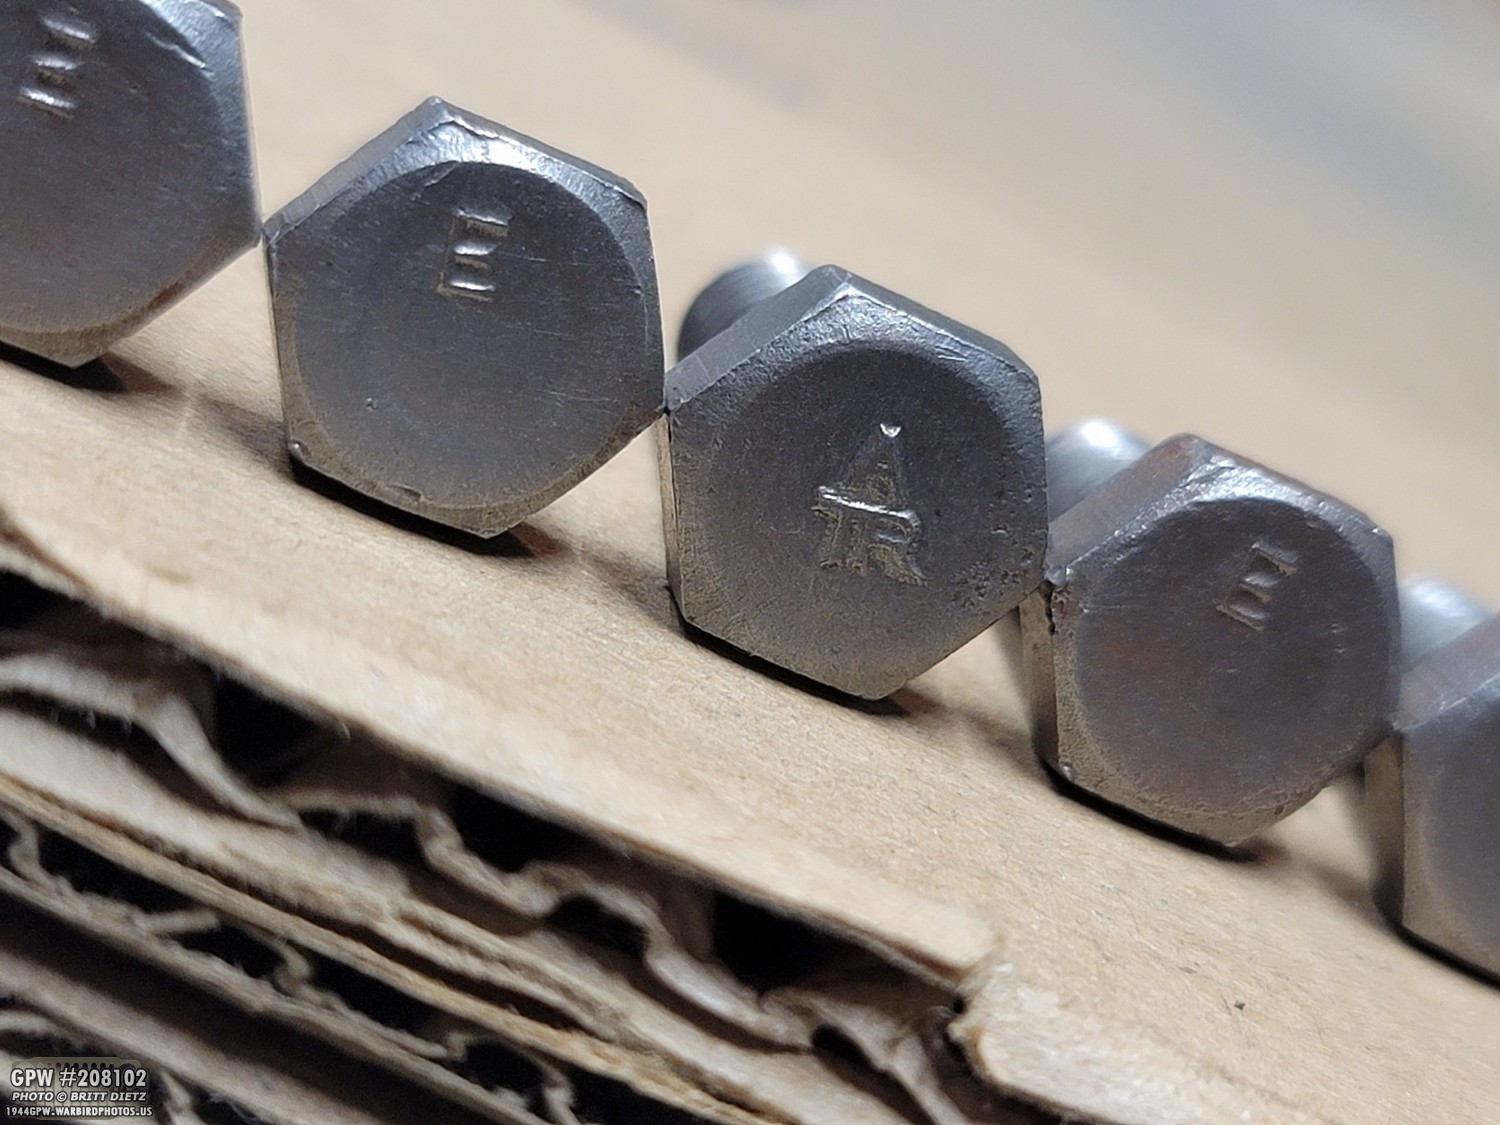
Did you spot that imposter bolt earlier? Yup, it’s a Willys MB A/TR bolt! How it got on there, I have no idea. When I initially was restoring the engine back in early 2019, I wasn’t as concerned about the correct bolts, so I just used what was there (like the E bolts, which I’ve heard are correct for CJ engines).
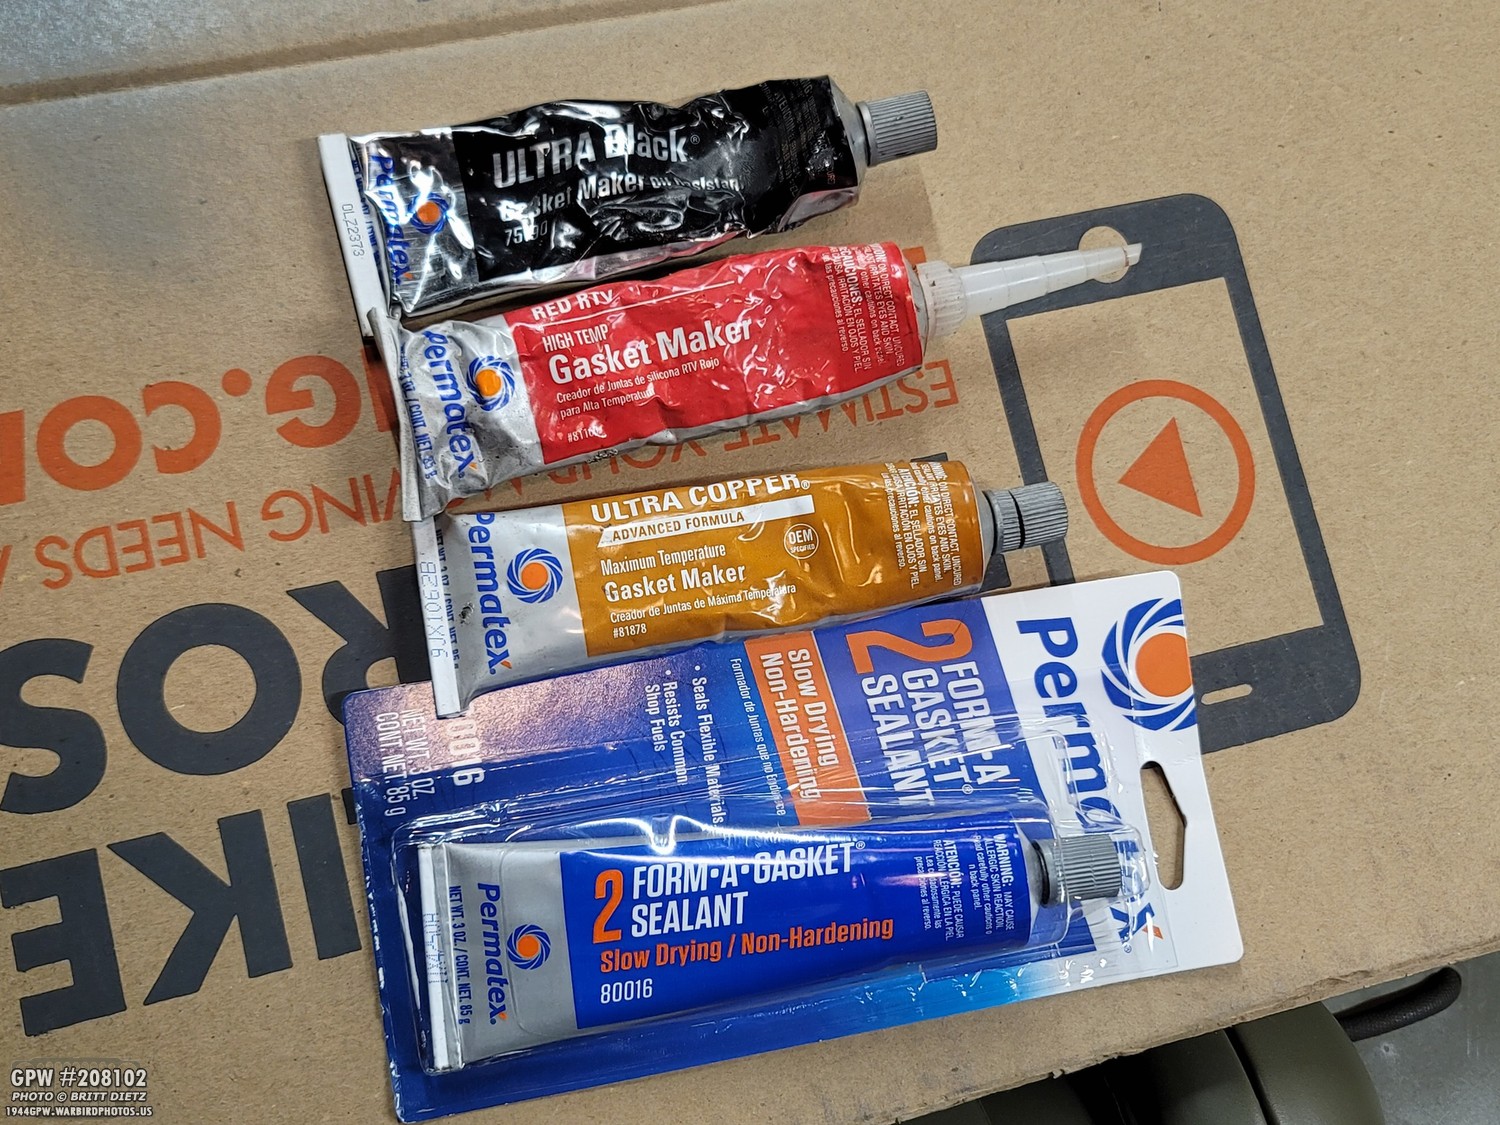
Next up comes another highly debated part of the process… to use RTV/Gasket Maker, or not to use. You’ll find this discussion is all over the place, with people fiercely defending each side of the spectrum. Cork gasket with no sealer, paper with sealer, cork with spray, no gasket and only sealer, etc etc. Then you have the debates on which sealer is best to use, red, black, #1, #2, etc. I used Ultra Black last time, which is oil resistant and for oil pans, but this time I went with Permatex #2, as recommended to me as it seems to be a popular choice recently. I decided to go with the cork gasket and sealer, instead of just the bare gasket as I wanted to ensure a good seal and possibly stop the leaks altogether. I was tempted to use only the cork this time, as it would be SO much easier when I next remove the oil pan, but something in the back of my mind kept urging me to use the sealer.

I put a thin layer of sealer around the top of the oil pan and let it sit for about 8 minutes till it was tacky. I then placed the cork gasket on top of the pan and lined up the holes.

I did the same thing with the Permatex #2 on the bottom of the block then waited a few minutes for it to get tacky before moving on to the next step.

Time to put the oil pan back on! Some might do this by hand (or chest), by having a transmission jack has yet, once again, come in handy! This thing has paid for itself several times now. Using the jack, I was able to slowly raise up the pan, get the bolt holes aligned, and start to screw them in by hand. Once three of them were in, I was able to lower the jack and move it out of the way. I then screwed all the bolts in (and the special spacers for the front pulley shield, which was also off with the pan) and got them hand-tight. Once hand tight, I turned them three more times till they were snug, but not super tight with a rachet.

I then put the drain plug back in, with some white non-permanent thread sealer on the threads. Hopefully, this will help seal this point of leakage.

And with that, it’s all over! I still need to clean up some of the areas, and do some paint touch up, but the oil pan is back on and ready for new oil!

To replace the oil, I’m going to pour it down the dip stick tube, seen here.

For the oil, I use straight SAE 30. It’s getting harder to find, but Autozone typically carries it. I decided to put in a tad over 4 QT of oil.
I should add that my oil filter is bypassed (another hotly debated subject), so those with filters will need to add 5qt: 1qt for the filter, and 4qt for the engine once the filter is replaced. That’s achieved by putting in 1qt, running the engine for a minute, then putting in the other 4qt.
Along with the oil, I’ll be putting in some Marvel Mystery Oil to improve performance.

Both the 4qt and some Marvel Mystery Oil were then put in. That’s it for me, the oil change is done!
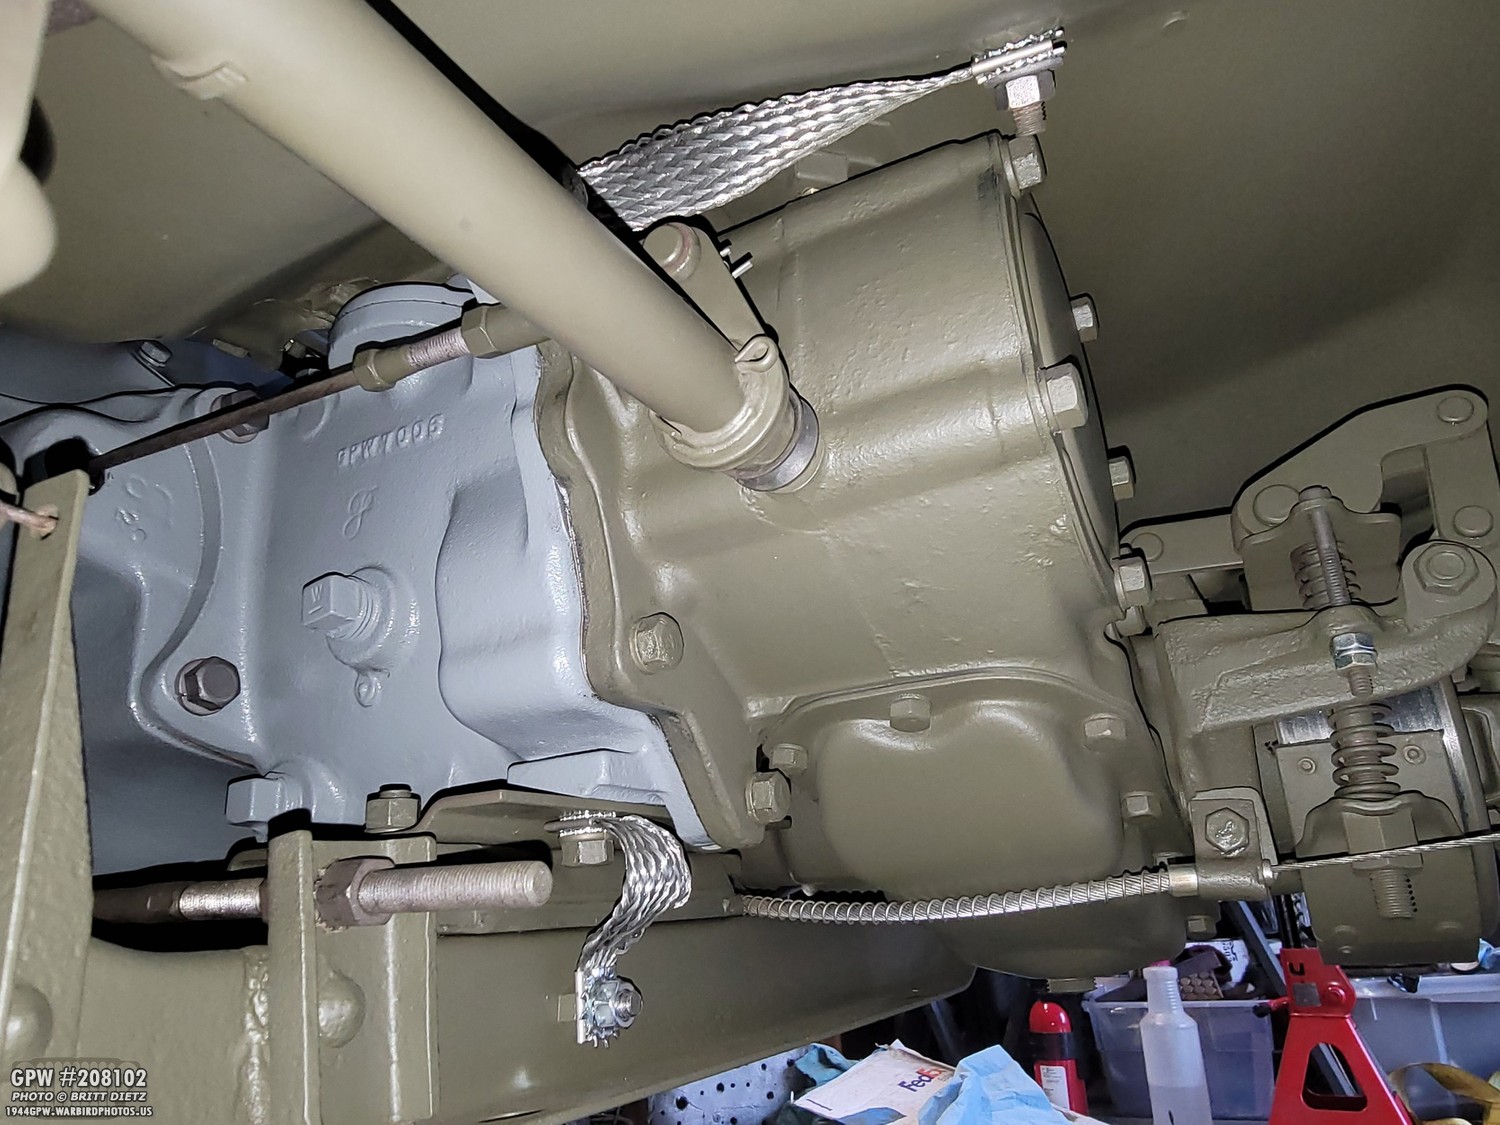
In the next update in two weeks, I’ll be covering part 2 where I check fluid levels in the transfer case, transmission, and both axles. I also plan to do a ‘flush’ of the transmission fluid to put in some better fluid type.

Moving on to some final smaller projects I’m working on and will showcase in the next update or two, I am finally bringing to realization an idea I’ve had for some time now and got this replica 1941 California plate made from Germany with my actual custom plate numbers on it. I have something special in mind which I will showcase sometime soon!
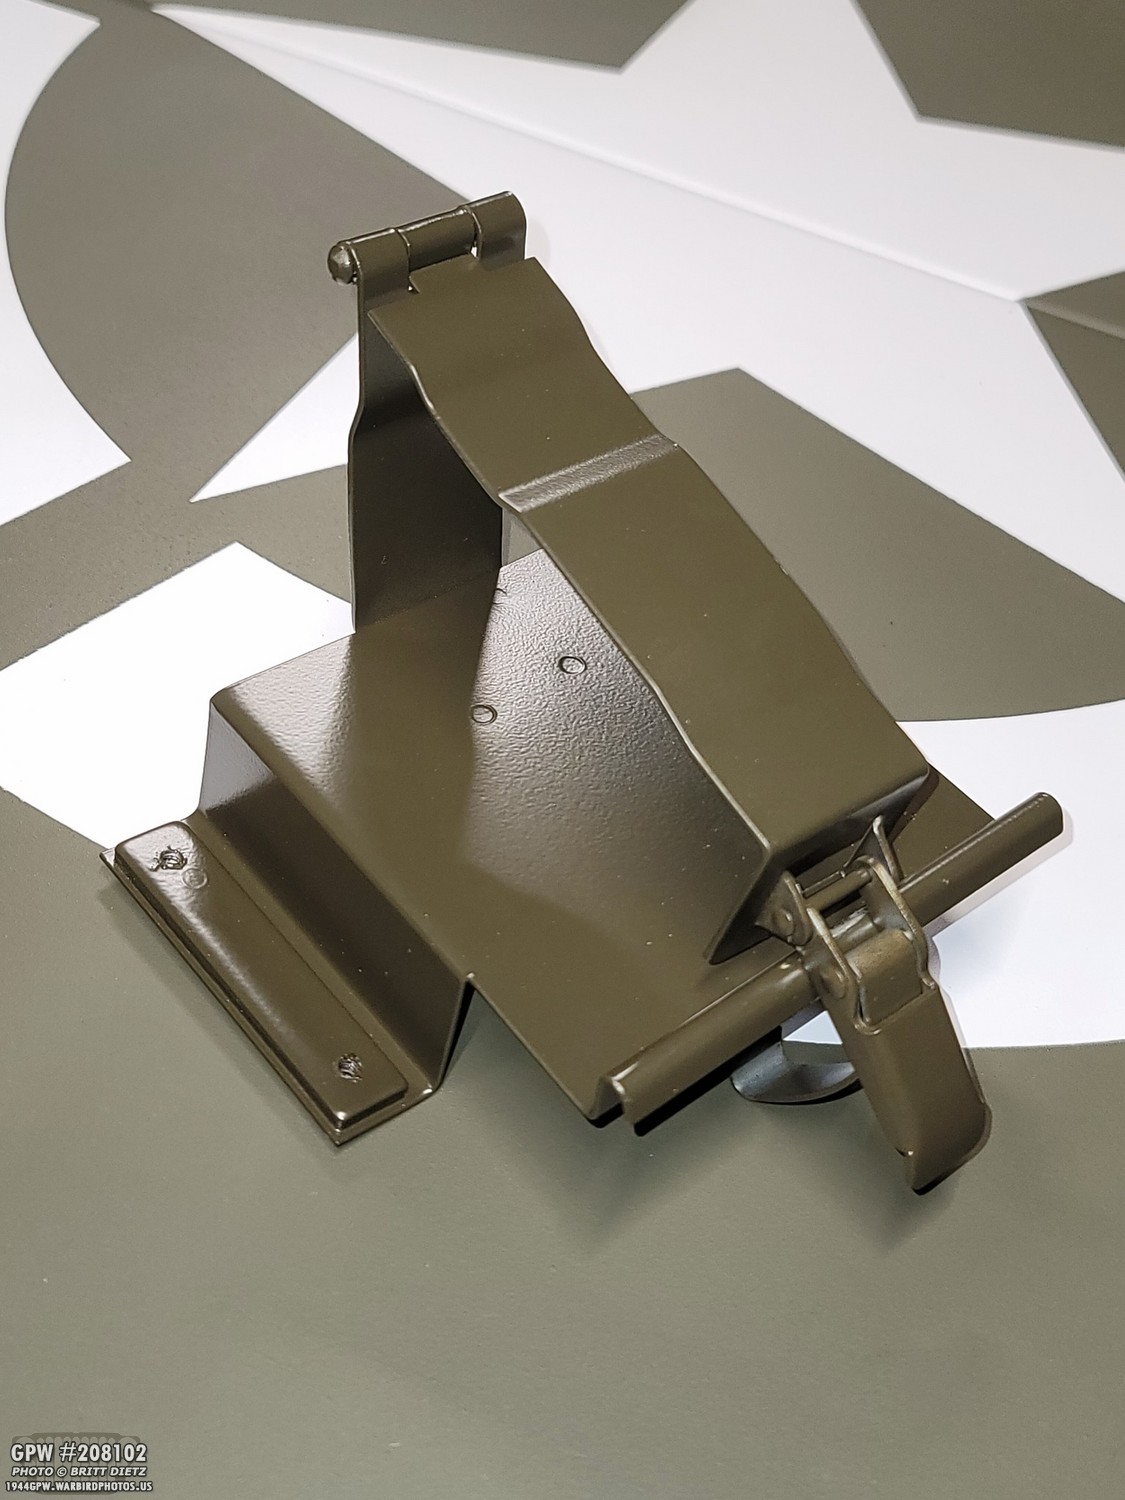
I also picked up one of these from Ron Fitzpatrick Jeep Parts, a first aid kit bracket. While my original tub did not have one of these installed (nor holes for them), I like the look of them and will be adding it to my Jeep in the coming months.
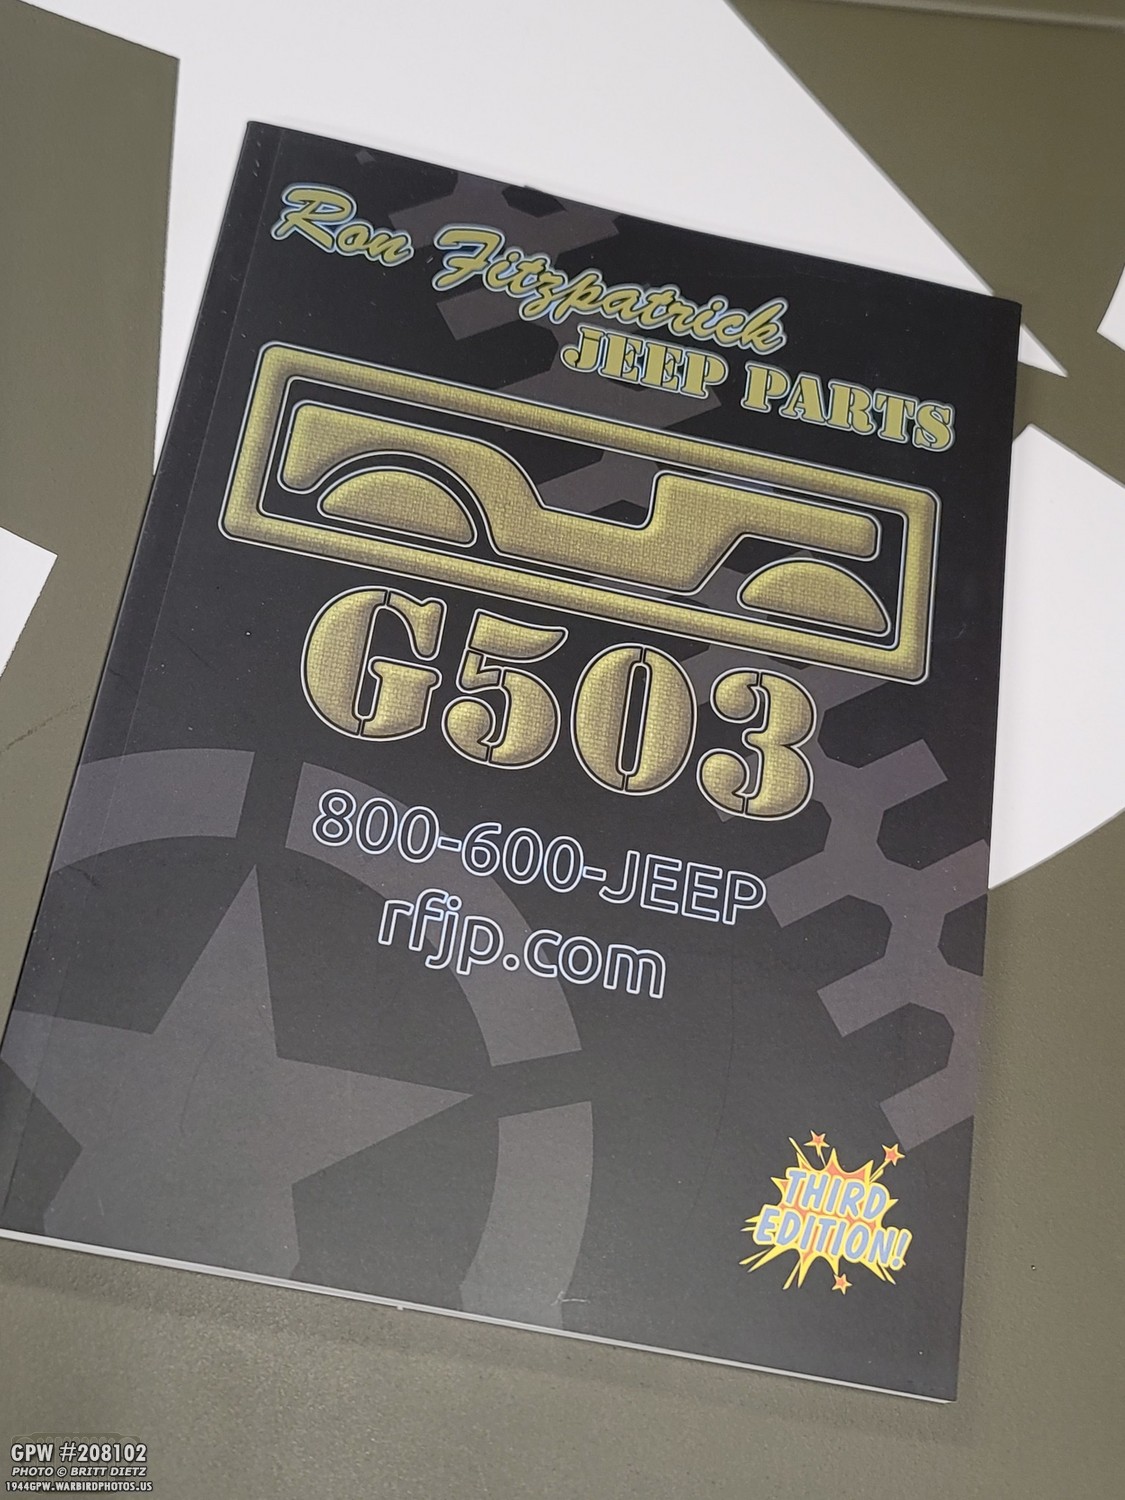
I also wanted to bring to attention the brand new awesome catalog from Ron Fitzpatrick Jeep Parts, which I got with a recent order. It’s the third edition of their wonderful catalog/bible of Jeep schematics.

As you can see, my second edition one I got way back when I started my restoration in late 2018 has been WELL used over the years. It was a key to the restoration of my Jeep that was invaluable. I feel this catalog, along with the new GPW Restoration Standards from the Military Vehicle Preservation Association – MVPA are literally the two main books to use for any GPW restorer.

So, what’s new in this third edition? Well aside from the more up-to-date info on every part of the Jeep with wonderful schematics, they’ve added great color wiring charts, expanded timeline information for Jeeps throughout the war, expanded lists and collections of parts including accessories like data plates, decals, etc. I believe there are 13 new pages to the catalog, which you get free when you order from Ron Fitzpatrick Jeep Parts for the first time! This a great update to an incredible resource that he gives out free with orders!
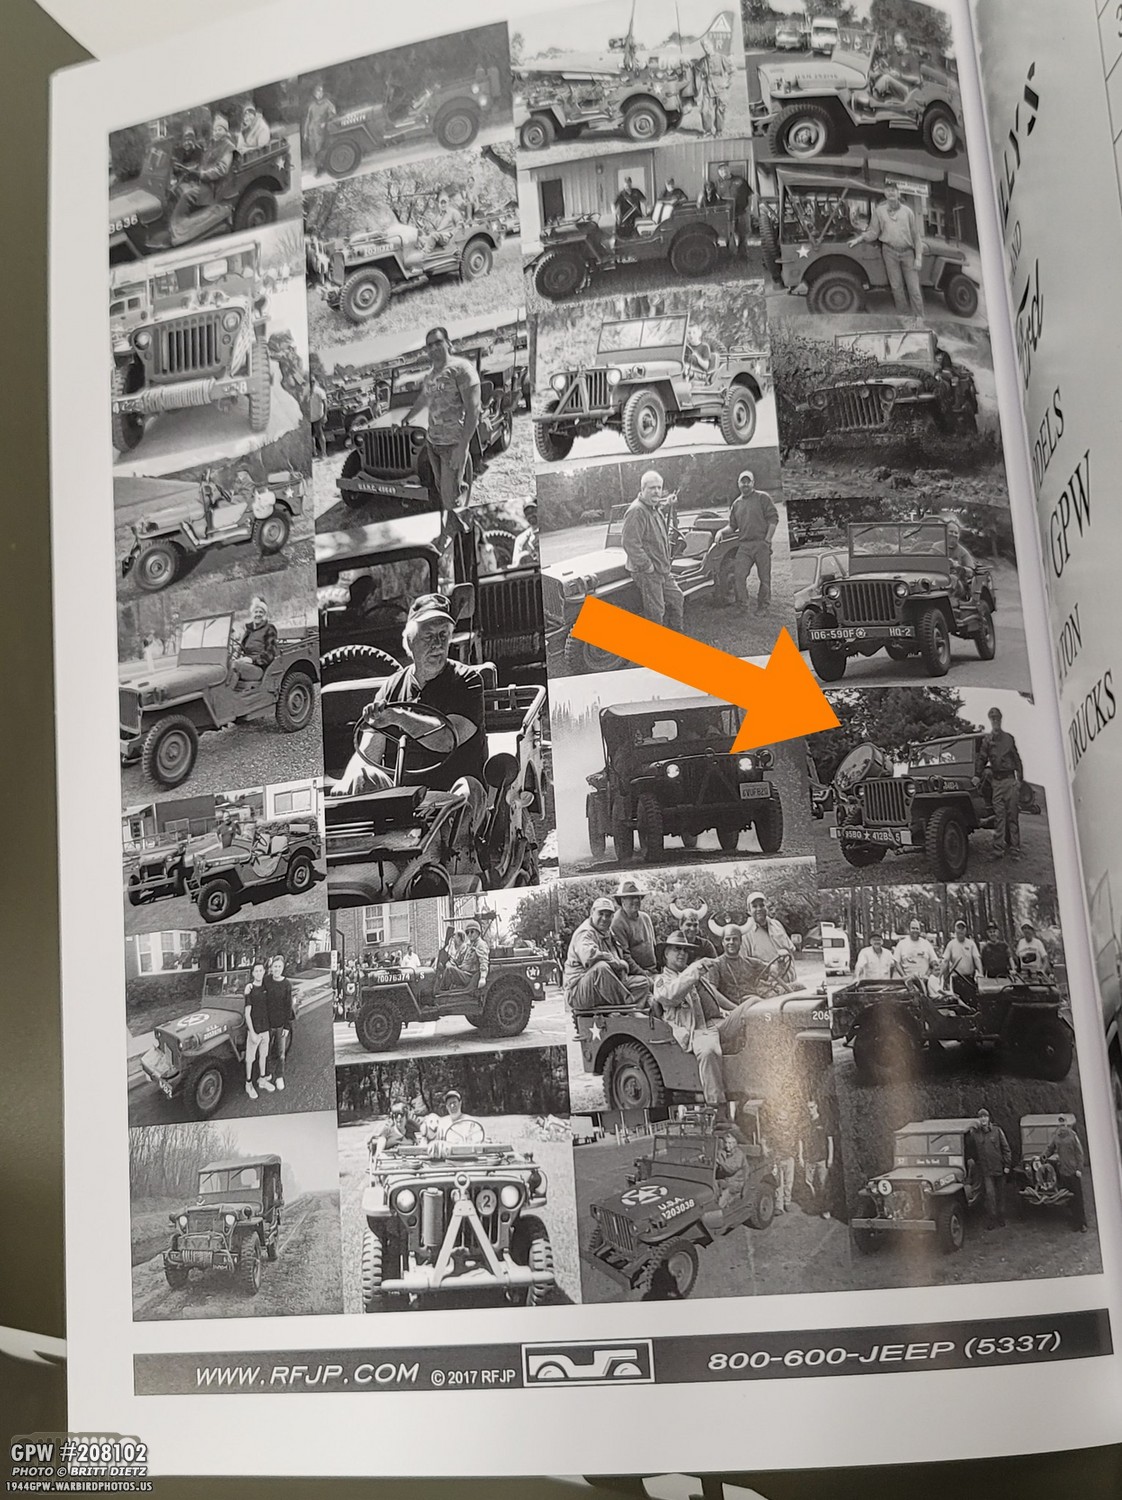
Also, a fun addition near the front of the catalog is a collection of customers with their Jeeps, and yours truly is among the list with the Jeep from early 2020 at the The Great Los Angeles Air Raid of 1942!

Speaking of which, as I wrap up this update, I’m excited to announce that the The Great Los Angeles Air Raid of 1942 is coming back to Fort MacArthur Museum this year after being gone for two years! I’m excited to take my Jeep out there to the event again (this shot is from the 2020 event), especially since the Jeep has undergone a ton of changes since then including the replacement of the CJ wheels/rims/axles with the wartime GPW ones and combat rims. So I’ll be prepping the Jeep for the over the next few weeks.
Till the next update….
1 thought on “Preventative Maintenance: Part 1”
Comments are closed.