 Windshield weatherseal, NOS Filterette, & more!
Finally, some more work on the Jeep! I finally got around to replacing the over sprayed with paint windshield weather seal, which ended up a bigger task than I thought! I also finally got a NOS Tobe Filterette to replace my home-made mini filterette bypass that I had on the Jeep. That project took several days after some setbacks. During the process, I also fixed the annoying air filter wing screws that always seem to break. And lastly, I got another piece to the First Aid kit!

A phone outake from last weekend’s 4th of July photoshoot with the Jeep out front. I haven’t been updating with new posts much lately because, well, there’s not much to post! Most of the work is done on the Jeep, it’s just smaller projects here and there as I get to them. But thankfully, this week had a few!

One thing that’s bothered me for a while (aesthetically) is right here on the windshield. Can you see it?

It’s the weather seal from the windshield to the cowl. Somewhere in the last two years of restoration, I accidentally hit it with awkward overspray with the OD Green. I’m usually really careful of that, but this one instance, I messed up. You can see the overspray in three spots on it, probably where I had some painter’s tape but the spray paint traveled a bit beyond it. Doh!

Two ‘presents’ for the Jeep’s recent 77th birthday (June 26, 1944) came in last week including a new weatherseal, and a NOS Filterette! We’ll get to the Filterette later in the post.

The first step was taking the canvas top off the windshield, pulling the windshield down, and removing the old weather seal (which I forgot to photograph). Here’s the new one laid out so I could gauge how long it is.

One interesting thing with this repro weather seal is that it had little knobs on it, probably from the rubber molding, which I had to cut off (shown here cut). These would have prevented the seal from being flush against the cowl. Strange!

The end of the weather seal you can see the shape. The two important parts are the curved U shaped top, which will rest against the bottom of the windshield, and the ‘flap’ on one side, which will be facing towards the FONT of the Jeep.

As with most of these new repro weather seals, you will need to trim them. They come a bit longer than they should be. I’m not exactly sure the reasoning behind this, as all Jeeps should be the same windshield width-wise, but it is what it is. Here I’ve made a little mark on where I initially was going to cut it to.

I actually decided to extend them a little longer, about 1/2 inch. So the second smaller mark would be where I cut them. That’s a bit above 1 inch from the last hole.

And again, here’s the orientation of how it should go while the windshield is down on the hood, with the flap facing down (or forward if the windshield was up).

To help me cut them with the chop saw, I used a piece of blue painter’s tape on my line. Using the chop saw wasn’t the best idea, it cut it, but not a smooth nice cut. I ended up having to take them to my belt sander to make it a nice flat cut.

The screws for attaching the weather seal to the bottom of the windshield are these wood screws, which are #10 and 1/2inch length with a slotted pan head. You’ll need 15 total.

When putting on the weather seal, I found starting at each end then doing the middle was the easiest way to get it started. Excuse the mess on the table in front of the Jeep, lots of projects lately mean unorganization!

You want to make sure you get those screws pretty snug so that the weather seal is tight against the bottom of the windshield, as shown.

I found that I had to sometimes pull on the seal to stretch is in order to line up some of the holes.

In fact, some of the outer holes I needed a second person to screw in the screws as I held the rubber into position.

And finally, it’s all done!

One thing I noticed is that the area where the seal rides on the cowl it’s discolored the paint a bit, as shown. After I snapped this photo I hit that area with some 33070 OD Green spray paint to touch it up.

Once the paint had dried, I went ahead and put the windshield up! It works and looks SO much better! But, there was a problem. As what often happens when changing out the weather seals, it can also change how high/low the windshield sits on the cowl.

And when I went to lock it down with the latches, it was WAY too loose. So, how do you fix that? There’s actually a way built into the Jeep’s design! These J hooks mounted to the dash have little teeth on them and allow you to move them up or down to tighten with the latches on the windshield. As you can see, mine were set to the #4 notch.

After unscrewing it and moving it down, I found one more notch down (the #3 notch) was perfect. Nice and snug!

So there you go, the windshield has a new weather seal! Looks so much better without those paint over sprays!

After a certain point during the early part of the war, Jeeps (And many military vehicles) were fitted with special radio suppression equipment. The idea was that certain electrical components can cause interference with radios. So things like Bond Straps were added along with filters throughout the Jeep in various spots. One item that was added was a large Filterette that filtered the main power for the Jeep coming from the battery and going to other vital areas. When I restored my Jeep, I didn’t have a filterette (most restored Jeeps don’t) and it was too expensive and low priority to get one. So, I made a ‘mini’ version myself.

Looking underneath my mini version, it was basically a bypass with a three-post junction. I bent some metal (crudely) and bolted it to one of the holes for a real filterette.

An in true ‘MacGuyver’ fashion, the cover I used was actually a Tupperware bin from a dollar store. Two holes drilled for the bolts and painted OD Green. Not bad for me never having seen a filterette in person at the time. Just realllly underscaled.

Flash forward to last week when I bought a NOS Tobe Filterette on eBay. I’ve had it in my cart for about a year, but finally got around to pulling the trigger. Here’s how it arrived (in an original wax-sealed box). This is a later model Tobe filter without the large TOBE logo on the front cover, correct for my June 1944 GPW Jeep.

Taking the cover off, we can see the main filter box cluster and the main bracket they are soldered to. Each side has three terminals, three for inputs, three for outputs. Inside are 75+ year-old condensers. Now, this filterette is technically for 6v Jeeps, and since mine is 12v I’ll be bypassing the filterette, but still trying to make it look like it’s hooked up. Plus, I don’t know the true condition of these filters, and there’s plenty of stories of people having major issues with their electrical system having this actually plugged into everything.

Here’s a look inside the cover showing the main bolt (that has a snap ring like lock on it so it can’t fall out). On either side are a non-conductive material so that if the wires or the terminals make contact, they won’t short out the electrical system.

Lots of wiring on the insides, but they were hard to read. 75 years of sitting there and it’s slightly rusted/patinaed over the years.

Looking at the side, we can see each individual filter box and its markings with the TOBE company name.

Now, some people would say to just leave everything as is, but I like cleaning things up (especially with the amount I paid of this). So I took a wire brush and carefully leaned up all the markings, rust, etc. Looks beautiful now.

I did take a moment and check the continuity between the posts and found they all seemed to work. But, I still didn’t know what the condition of the condensers were inside, and if they were broken, they could easily short out… even if I bypassed the filter screwing both wires on one terminal on one side.

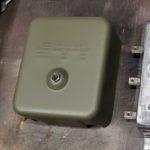
Moving on to the cover, I gave it a light sanding with a scotch pad and masked the bolt head for painting. It was already a perfect 33070 match to my Jeep, but I wanted to touch up that paint anyway. There were a few scuffs and scratches.

Freshly painted cover with cleaned up bolt, and nicely cleaned insides. It’s ready for installation!

Before I do that, I wanted to get a ‘passing of the torch’ shot of my homemade bypassed mini filterette and the NOS filterette. Had I known at the time they were so big, I might have actually tried to make my homemade one that large. Oh well!

Knowing I was going to be working with live wires, I first unplugged the battery. I don’t need any ‘shocking’ moments with the Jeep!

Now, I want to remind those of you reading that my body tub is an MD Juan tub. My original tub is going to be undergoing a multi-year long restoration as it needs a lot of work. I wanted to have fun with my Jeep, so I invested in an MD Juan tub until I can get the original fixed in a few years. Then I’ll swap the tubs. Anyway, looking inside the tub under the dash, here we can see the three holes I drilled for the filterette (you need 4, but since I didn’t have one I just did 3). Also, I realized that the two bolts for the junction block (red arrows) were going to be a problem as the filterette sits on at least one of them.

After removing the air filter from the engine bay, we can look on the firewall side of the dash. Here you can see those same three bolts. One bolt is correctly holding onto the fuel line bond strap. I have the bottom bolt holding my solenoid which allows me to either push-button start my Jeep from a secret button under the dash, or use the foot starter button with my custom wiring.

First, I needed to know where the filterette would need to be positioned and mark the hole(s) I’d need to drill. I held up the filterette insides and immediately noticed an issue. First, if I lined up one of the holes I had drilled, the other hole didn’t line up. DOH. Also, I was limited on how high I could put the filterette because of the capture nut welded at the top.

But here’s where the main issue came in. The bottom of the filterette was hanging over the line where to parts of of the firewall/tub come together.

Let’s compare to my original tub! If I line up the original holes (sorry, was a little off when I shot this, but I swear they perfectly line up). Notice the distance between that same capture nut at the top of the filterette. There’s at least a quarter of an inch space.

Now look below… About a half-inch or more of space between the bottom of the filterette and that same line of the two different firewall/tub parts. UGH. What does that mean? MD Juan strikes again… something is not right with their tubs and causing another headache for me.

Without much choice, I had to just go ahead and drill where I could. So here you can see the two new holes I drilled. The hole with the paint disruption remnants of a star washer was where I originally thought the filterette would go. I think the original tub threw me off, because that’s how high it should be.

To fix the issue with those two screws holding the two post junction box, I took a small 1/4 hex bolt and grounded down the head with my belt sander until only a little bit remained and put the bolts through the inside of the tub to the outside rather than vice versa. This way the filterette can sit on top of them without any issue.

I then went and hit them with 33070 OD Green.

It was time to test the fit… here’s a look from the engine bay with all four of the holes bolted. Nice the two bottom bolts are much longer than the top two. I only had two shorter F marked bolts at the time and one long one.

Here’s a look at the filterette insides bolted down. It works and sits almost completely flat against the tub, but still would have liked it to have been higher. At least when I put it on my original tub when it’s all done someday in the future, it’ll perfectly line up.

Now came the part of the wiring. How can I bypass it while still making it look like the wiring goes into the filterette? First first ‘clever’ thought was to reuse the three-post junction that I had been using, screw it into one of the filterette terminal posts, and group the wire pairs together. Nice, clean, and efficient! BUT, I then realized I couldn’t get the cover on. Sigh.

So, what I ended up doing was just bolting the wires together like so. After I took this photo, I wrapped them individually with electrical tape (two layers both going in different directions). I then tucked them carefully next to the filter boxes above the terminals on one side.

Cover fit that time! Finally, it’s getting closer to being installed!

To complete the install, I ordered some F bolts from Ron Fitzpatrick Jeep Parts which arrived yesterday (Thursday). I also got some other items which I’ll cover later.

I was then able to replace the two bottom bolts with F marked ones. Now all four bolts are F marked. I opted to leave the filterette bracket unpainted along with the bolts. I haven’t seen any proof yet that these were painted after installation.

It’s hard to get a camera in there, but here’s a look at the top. You can see how the wires go into the filterette through one of the cutouts on the top. Happy to have another correct item on the Jeep! It’s about all the little details now!

Looking on the otherside, here’s the final look at the bolts. When the air filter goes back on, you won’t be able to see any of this, including the Solenoid.

Anyone who’s taken off or put on an air cleaner and have the original bolts were know what these are. They are the air cleaner wing bolts. Mine were missing these, so I got a set of repros, which are expensive no matter where you go.

The problem I have with them is that they are almost always super cheaply made. While the metal is good, they are essentially two parts put together… a wing head, and a flat top screw. They are glued together. Why is this a problem?

Because on more than one occasion, I’ve had the wing heads snap off when trying to screw them in or unscrew them. UGH. Usually, I’ll have to use JB Weld Kwik glue (rated to 3,000+ PSI) and wait several hours to dry if one breaks when I’m trying to unscrew it. I finally had enough.

I decided they needed a more *permanent* solution. I decided to weld them together. What I’d do, is for the ones that were broken (two were), I’d drill a hole in the center of the wing tops. On the ones that were not broken (the other two, as pictured), I’ll drill a hole through the top until I got down to the top of the bolt head.

I quick could of zaps with the welder, and they are solid bolts now! Not the prettiest, but honestly, you can’t see the welding while they are in the Jeep. I went ahead and painted them black again.

And then a satin gloss clear spray cover to give them a shine. All good now.

And even better, it worked! No snapping when screwing them in to put the air cleaner back on! Again, it’ll be so hard to see the welds I did, no one will know but now I can feel confident when taking the screws off and on that they won’t break at the worst time!

Last update I talked about how I found an original WW2 Jeep FIrst Aid kit at a flea market for only $20, and it had all the original boxes (filled) except three!

I’m happy to report, I’ve found one item that should be in there, a Defender No 2 safety pin backing with safety pins! This one is slightly longer than some of the originals included in this kit, but it’s otherwise a perfect match and will do nicely! Now to just find the three boxes I’m missing (Burn Injury Set 2x, and the Touniquet-Scissors-Forceps Set x1).

As you may have saw earlier, in the shipment I got from Ron Fitzpatrick Jeep Parts, I got a new water pump. The water pump on my Jeep was given to me when I got the Jeep. It is a Kaiser Willys Auto Supply post-war water pump to replace the broken leaking one that was on there. So I installed that as I couldn’t justify shelling out more money for another one. Well, I wanted to eventually replace it with a GPW one, so I finally pulled the trigger and got one from Ron.

It’s an exact wartime GPW replica with the correct GPW number and F stamp. Why not get an original? There are some things on the Jeep that I feel are not work the hassle of getting originals. Original water pumps are unpredictable, you never know what you’re getting and how close they are to failing. In situations like this with important items, I feel it’s always a better choice to go repro, especially if it’s an exact copy. I will install this sometime next week, and then I won’t have to worry about it again for maybe my lifetime.

And that’s it for this week! It was nice to put some work into the Jeep, makes me realize how much I miss the long days/nights neck-deep into Jeep work. Makes me almost want to start another project! But, she still has some things here and there to be done, so she’s not all done yet!
Till the next update…