 Major work done this week!
In a quest to stop the coolant leaks, I took apart the engine head to replace a gasket, quite the ordeal! Plus, restoration work was finished on the replacement Jerry Can, and the accelerator linkage was adjusted. Felt like back a few months ago during the heart of the restoration with all the work!
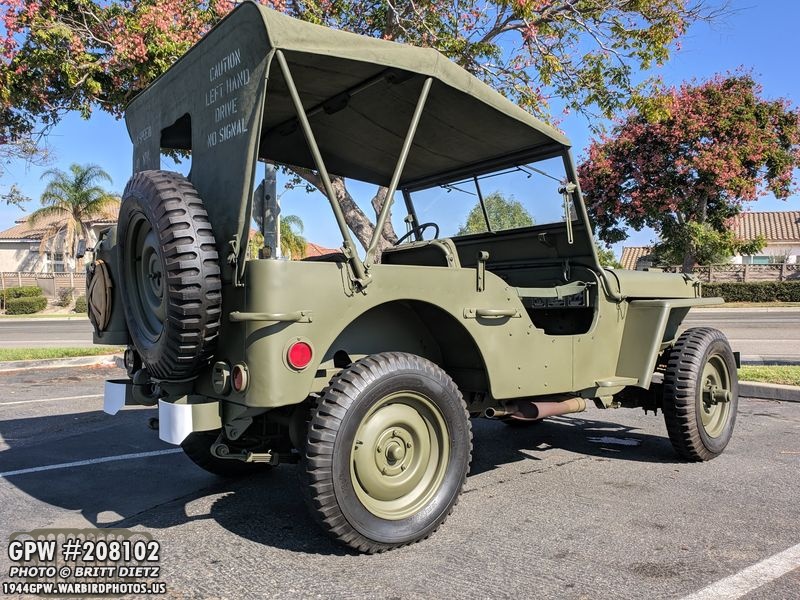
Out for a drive with the Jeep last weekend… you can see some of the coolant leak under the Jeep. More on that in a bit…
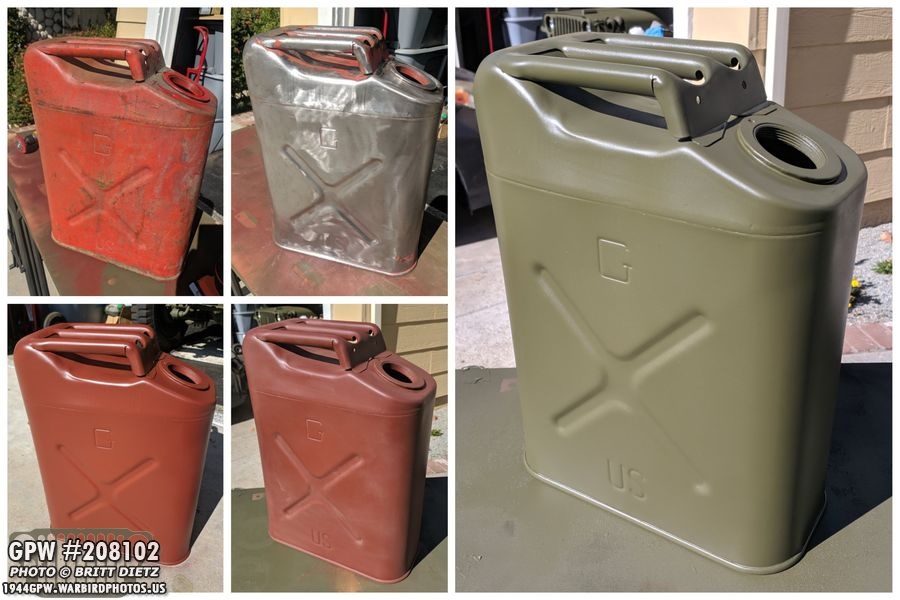
As mentioned in the previous update, I decided to swap out jerry cans on the back of my Jeep with one I got that is closer to the WW2 style. It was in pretty good shape, but was very dirty and needed a complete restoration. Here’s the whole process… it started as the bright red. From there I sanded/wire wheeled what I could to remove the paint and dirt. I then hit it with red oxide primer paint. After that, I gave it a good sanding before finally painting it 33070 OD Green.

Same process showing the top of the jerry can. It had a lot of caked-on dirt and grime.

This particular jerry can is dated May 20, 1984. And while yes, it’s not WW2 (they are not super easy to find for good prices), this will do until I can find a 1943/1944 jerry can which I’ll do this entire process again.

This is the key difference between the jerry can I had on the Jeep and the new one. I’ll compare the two caps in the next photo, but here’s the new cap all painted with OD Green.

Here’s a look at the two jerry cans. The left is the new one, the right is the old one. The main difference is the cap. The WW2 style had the curled grips. The design continued for some companies that produced jerry cans into the 80s. Other companies opted for the simple straight edge caps after the war. Because the curled grips are further out than the straight edge ones, that meant the actual opening for the can was moved down, so I can’t just swap caps and call it a day.

All painted and added to the back of the Jeep! Looks good. There’s one more really awesome detail that I’ll be adding to this… but it’s coming from Australia and will take a few days. Should add an extra WW2 touch to it!

So the big project for this weekend was replacing the head gasket on the engine. I’d been getting quite the coolant leak from the head gasket, and after a month of having to clean the engine after each run, I had been getting tired of it. So I purchased a higher-end copper head gasket from Ron Fitzpatrick Jeep Parts and on Saturday morning, went to work.

I would need to take apart quite a bit of the various items that attach to the top of the engine or get in the way. I’ve already started taking things apart with the air horn going to the carburetor removed. I’ve also taken out the spark plugs.

Next step was to drain the coolant out of the radiator, as I’d be disconnecting the top cross over tube. This would lower the coolant levels so I can work on everything. I used a funnel with a tube and opened the radiator drain valve.
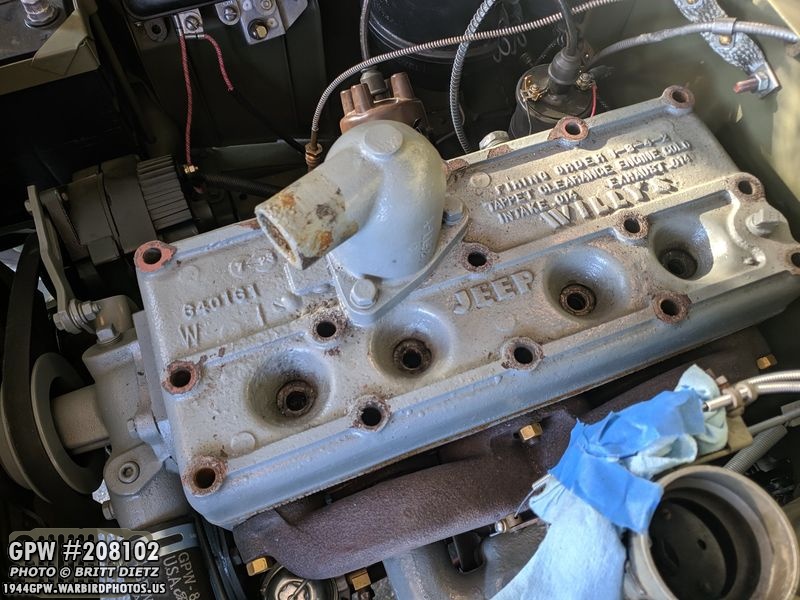
After the radiator was drained, I went to work removing the air cross over tube that’s attached to the head and started to break free the 15 bolts holding the head on. This was not an easy task as some of the bolts haven’t been removed in a long time.

I carefully disconnected the cross over tube going from the thermostat to the radiator. I used some shop towels to soak up any left over coolant in the tubes.
Finally, I removed all the bolts and the cross over tube from the thermostat. The head is ready to come off for the first time in many years!

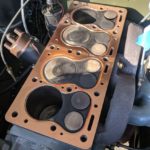
The top image is a first look inside the engine. You can see all the areas the coolant was weeping out and leaking off the side of the head. The bottom is after I took a rag and cleaned everything. It will need to be cleaned even further. Since I had this open, I decided to inspect everything and what all is in the engine.

It looks like, at some point, the engine mating surface was machined. The valves were re-sleeved and new pistons were put in. They were labeled ‘STD’ (standard) on all four pistons. Note – It’s hard to make out the D on this piston head, but it’s there.

And here’s a look at the head after I separated the head gasket. Some things to note, there were four BLOCKED coolant passages going to the head. No wonder I was getting hotter than normal temperatures. In one area on the head, I was getting heat bubbles on the heat-resistant paint! This should greatly reduce the heat in the engine once all these passageways are clear.

I took the time to sand down some of the chipped/scuffed areas on the paint to repaint the entire head. that includes some of the areas that had the bubbles from overheating.

Taking 120 grit sandpaper, I carefully sanded the mating surface of the head as flat as I could get it. there’s some black staining, but the surface is very very flat now. There were some areas with build-up, which attributed to the original gasket failure.

And now repainted looking nice a neat with the Ford Engine Gray!

Next step was to clean up and restore the 15 head bolts. Here’s the before and after sandblasting. I also took all the bolts and ran them through a tap and die set to clean up the threads. I did the same with the bolt holes on the block. These bolts will be a TON easier screwing back in now!

The next step was to paint them! Using my handy bolt painting box, I carefully cleaned all the heads in prep for paint.

I decided to only paint it with the red oxide primer, as I knew the bolts would get messed up a bit after I screw them back on the head and torque them. I’ll paint them Ford engine Gray after.
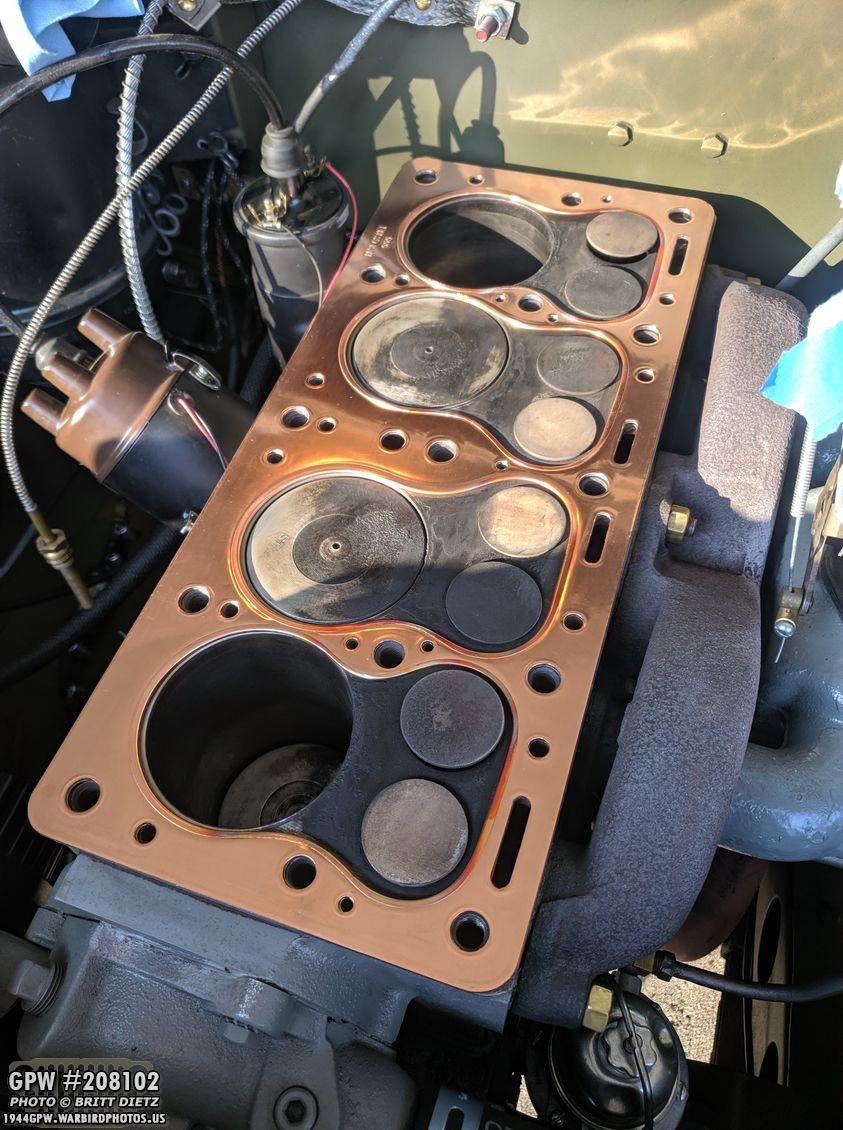
With the block mating surface all sanded and as flat and clean as I could get it, it was time to start putting it all back together! First up, putting the new copper head gasket back on!

Now the head it back on and I’ve started to reattach some of the items that need to be reattached back on, such as the oil filter bracket, since those use the head bolts. I’m only hand tightening these for now.
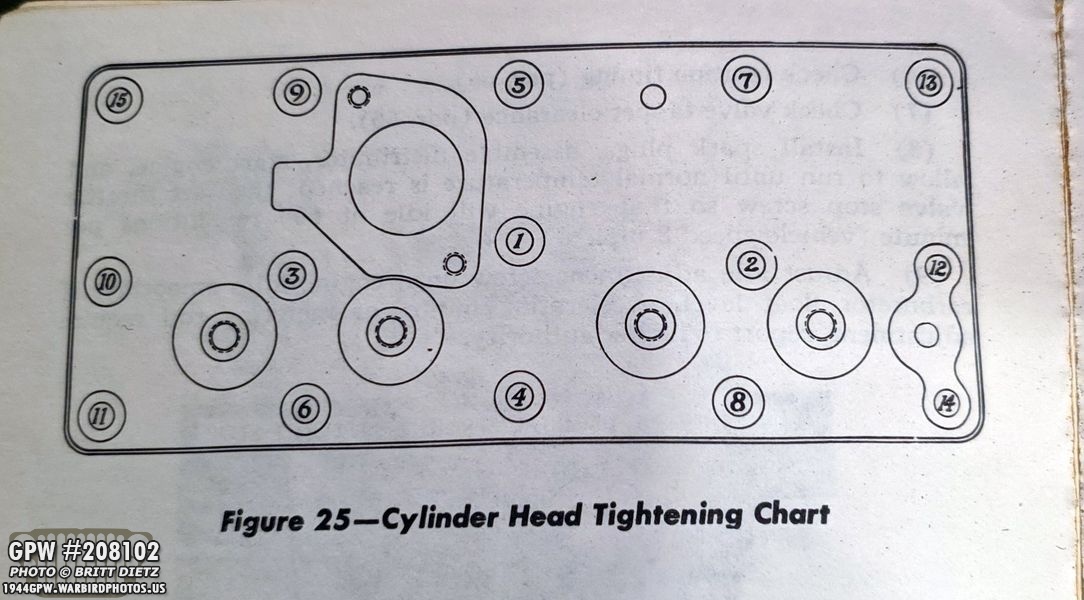
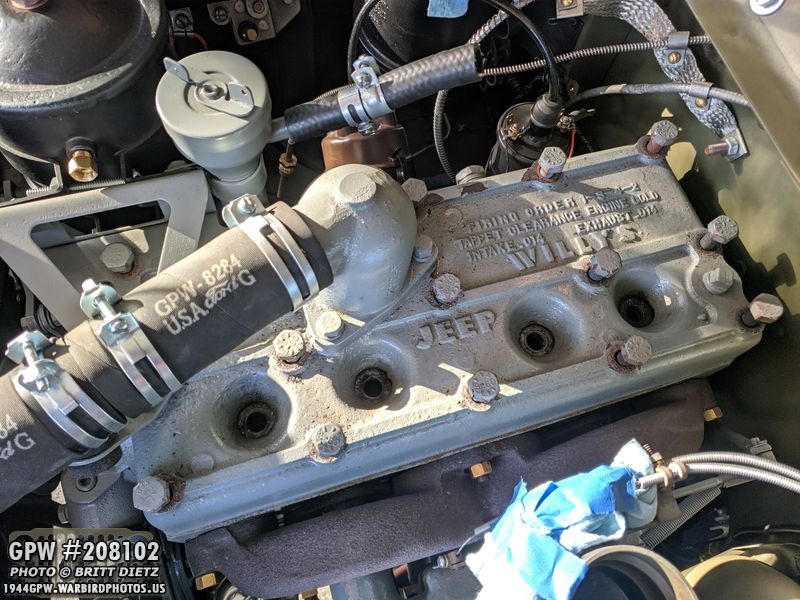
There is a specific order you should tighten (torque) the head bolts. Starting with the center one, you alternated between different sides to make sure it’s tightened evenly. I used the diagram from a WW2 TM (technical manual) for the Jeep that shows this order. Each bolt was torqued to about 65 foot-pounds, and they were torqued in steps… starting with 35, 45, then 50 foot-pounds in this order.

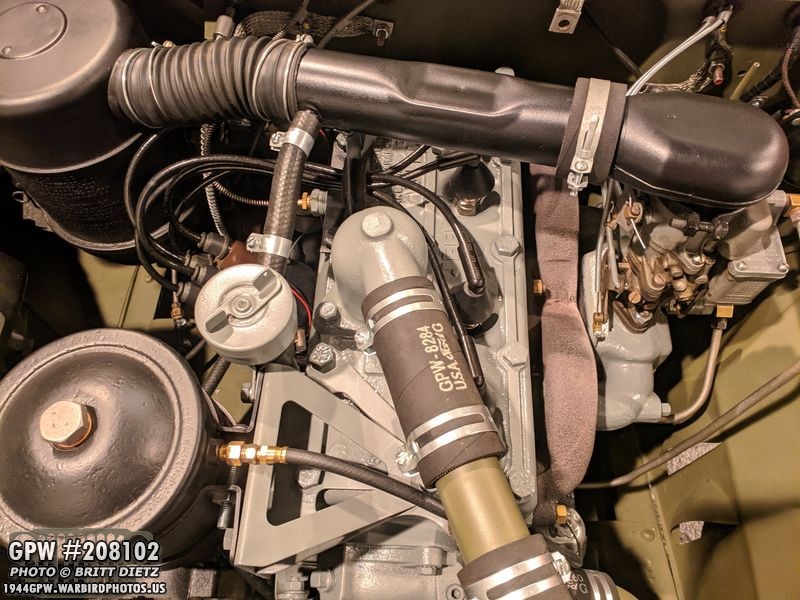
Here’s a look after the bolts were all torqued. It’s not easy getting my large torque wrench in there, but I managed to make it work. As you can see, the black cross over tube was added back on as it uses two head bolts. I had repainted it black after it had been scratched up while taking the bolts out at the beginning of this project.

Speaking of that cross over tube, one of the last O-rings that needed to be changed out from rubber to felt is the ring on the cross over tube where the spark plug wires went through. I’d been waiting on changing it as it would have been super hard to do while the tub was still on the engine. Since I had to take it out, it was a perfect time to do so. On the left image, you can see the old rubber o-ring and the new felt one. On the right, after a lot of work squeezing it in there, it’s now installed. Looks great!

With the head all torqued, I went ahead and painted the bolt heads Ford Engine Gray, while still a lot of things weren’t reinstalled giving me easier access. I know I’ll have to re-torque the bolts again after I take it for a drive, but this will help since some of the bolts are hard to reach when everything is back on the engine. I re-added the radiator cross over tube and started to put the air cross over tube connectors back together.

Spark plugs cleaned and put back on the engine.

The air cross over tube has been all put back together including the air horn that goes into the carburetor.
I readded coolant to the radiator (which I added a little too much, whoops! So I had to re-drain it slightly) And with the spark plug wires/rain shields reattached to the spark plugs, the engine is back together and ready for a test drive. I was up till 3am on Monday morning getting this all back together and painted. The real test comes from the next day, Veterans Day when I see if the leaks are gone…

I took the Jeep on a 15 minute drive through the area to make sure the engine had a chance to real full operating temperature and make sure the coolant had a chance to permeate. I then stopped at the park to check for any leaks… and SUCCESS! No more leaks from the head! I had a slight leak from one of the head bolts, but after I retorqued everything once I got back to the house and, after a few hours, re-drove the Jeep that leak was gone as well! So the head gasket replacement was a success! So happy not to have to constantly be cleaning the sides of the engine!

While I don’t have a photo of it (my bad), another issue came up. The new rebuilt starter was acting up. It would only start after the second time you push the starter. So, Ron Fitzpatrick Jeep Parts asked me to send it back so they could look at it. While the Jeep is down, I decided to adjust the accelerator linkage (the parts that connect the gas pedal to the carburetor) as I would, at times, find myself almost pedal to the metal to get it to go. There’s a screw thread adjustment on the linkage to adjust for that. Here’s the linkage took apart.

First step was to repaint it Ford Engine Gray, since before I had just painted it when it was all together.
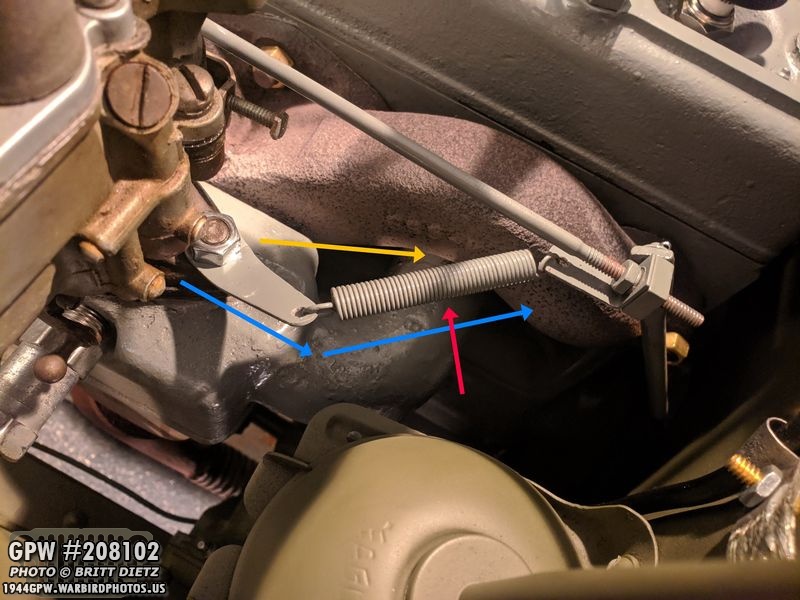
Here I’ve adjusted the rod so it’s screwed more in (before it was at the very end of the thread, it’s so much better now)… but then I realized there’s a problem. Adjusting the rod meant that the spring and carb spring attachment had to be at a weird angle to make to tight. It should be a straight line (yellow arrow), but instead, it has to be crooked (blue arrow) in order to be tight. I went to my WW2 manuals and noticed the spring (red arrow) I have is WAY too long. The correct spring should be a short stubby spring. So I ordered one of the correct springs which will fix this problem. Once I get my starter back and I attach the new spring on here, it should be a lot better driving the Jeep!
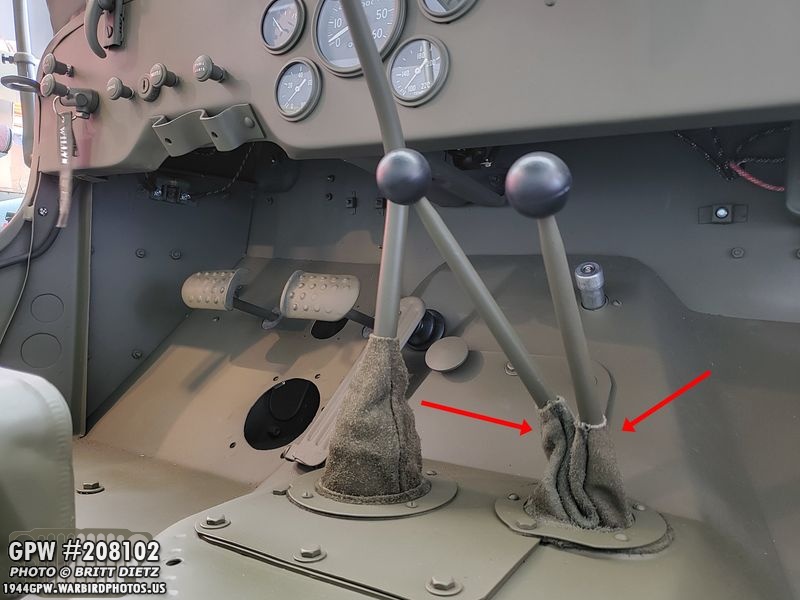
Another thing I’ve noticed when driving the Jeep has been this rattling ‘tinging’ sound. I accidentally discovered that it was the two transfer case shifters (red arrows) that are the cause. They rattle when the jeep vibrates. It can get very loud when driving and has been annoying the heck out of me. Turns out, there’s supposed to be two anti-rattle shift lever springs, one attached to each of the two shifters. Mine is missing those. So I went online…

… and I found two of them from Quadratec Jeep parts. Now, normally, the springs have a circle in them instead of a fork-like groove. You’re supposed to take apart the shifter levers and, with the hole ones, slide them on. That’s very hard to do with the body tub on the Jeep, thus why they are often left off because people forget to put them on. But, they make ones that have a groove instead so you can just slide them down on the shaft and connect them to the shifters. That’s what I end up getting.

They were covered in some oil-like substance, probably from manufacturing them, so I soaked them in parts cleaner for a few hours. After that I sanded them, painted them with red oxide primer, and yesterday I hit them with OD Green. After they dry, I’ll install them on the two shifters (look for photos next week) and hopefully, that rattle will be gone!
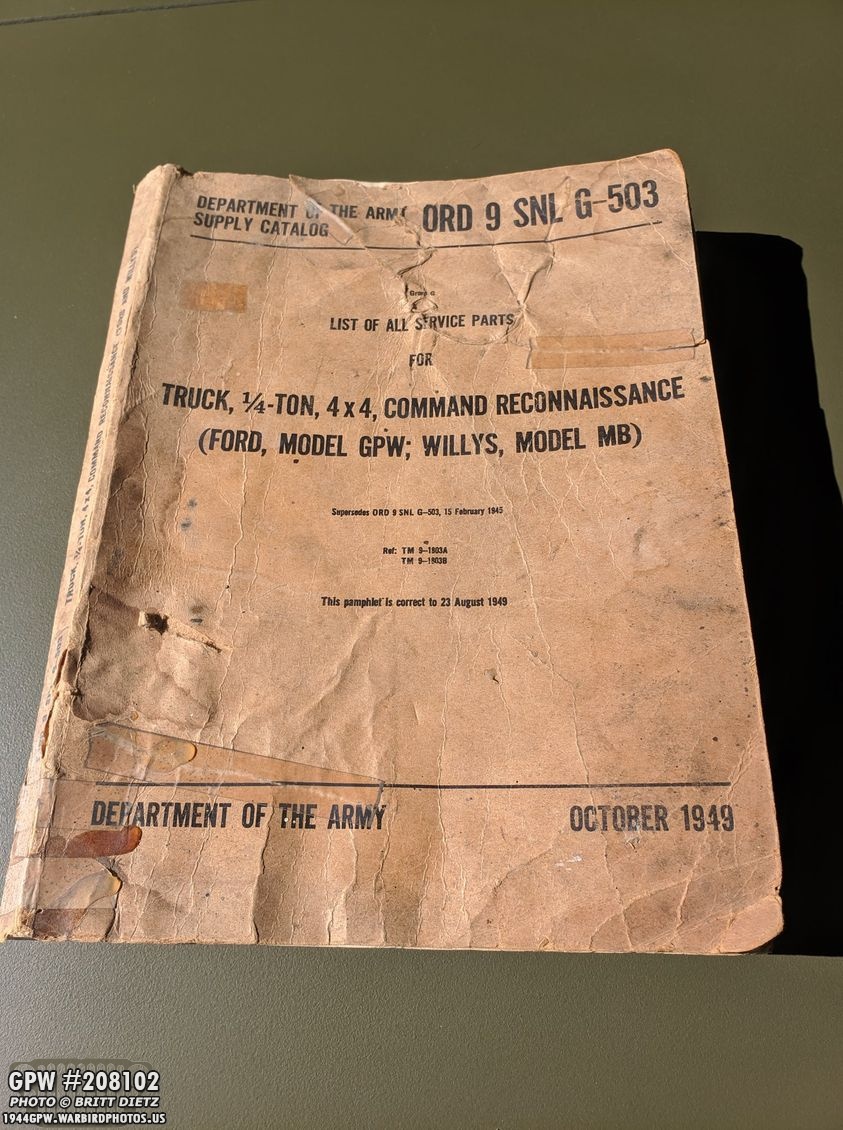
One thing I was also excited to get this week was an actual original copy of a 1949 ORD 9 catalog! The outside cover is beat up, but the inside is in great shape! What is an ORD 9? Well, for those that don’t own a Jeep it is probably the most boring book ever. But for those that do, it’s a bible of every bracket, gasket, bolt, nut, washer, wire, part, etc that is on a WW2 Jeep. I’m serious, click to the next image…

Here’s just two pages of the ORD 9 to give you an idea. The top is cutaways of the headlights, blackout drive light, marker lights, and tail lights showing all the parts, part numbers, etc. Every part of the Jeep is diagramed this way. Then you have the lists that list in incredible detail every part that is on one of these Jeeps. I got the 1949 version as 1) it covers all the changes on jeeps throughout the war, and 2) it’s the most common. That being said, originals are hard to find, and often very expensive. I got this for a steal. I have a searchable digital PDF of this catalog that I keep (with many other jeep manuals) on my phone all the time, but it’s nice to have an original copy to keep with the Jeep!
That’s it for this week! Look for lots more on next week’s update!