 Clackity Saga update and new tests
This is a short update for this week as I only worked on the Jeep a little bit getting back to trying to figure out the clackity issue on the rear axle. Next week will be a bit more busy as I work on some new tests to, hopefully, solve this ongoing issue!

This week went by quickly, and with the lack of work to do on my Jeep as I wait for some items to arrive in the mail to continue the testing on the rear axle clackity issue, it makes me miss the days when I was constantly busy with projects on the Jeep.

But, I’m thankful that I have a driveable Jeep for sure, and I still try to get her out there on the road as much as I can, even if it’s just a little joy ride around the neighborhood!

As most of you are probably sick of hearing about and has been usual for most of the updates for the past year… I focused back on the axles and the rear axle in particular. The short story… I had post-war CJ axles on my Jeep when I got it. I restored two wartime GPW axles and put them on the Jeep. The rear axle made a ‘clackity’ sound when driving. I got a second GPW wartime rear axle, the sound didn’t go away. You can read about the entire saga start to finish (so far) here: https://www.1944gpw.warbirdphotos.us/blog/the-complete-clackity-axle-saga/

I haven’t checked inside the second rear GPW axle since putting it together last month. I decided now would be a good time to open it up and look inside for anything wrong. First step, as always, drain the oil!

Taking the oil drain plug out, you can see there are signs of metal shavings.

After wiping the bottom of the differential where the shavings would collect, here you can see them a bit better. I’ve been told that this is normal for axles once you set them with new items.

Here’s the oil pan showing the metal shavings. I will say, it’s MUCH less shavings than the first GPW axle had. The first one had at least 4-5 times this much just after only about 5 miles. This amount of shavings are from over 30 miles. I’ll drain and inspect the oil again after another 30 miles and see if there are any metal shavings. Thankfully, these shavings are very small.

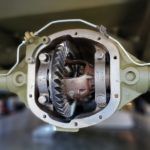
With the oil drained, time to take a look inside to see what’s been going on.

Checking the ring gear, no damage that I could see or fresh wear.

The spider gears in the carrier looked perfect. No wear that I could see in there.

One spot people theorized was causing the clackity sound was the bolts or lock straps on the back of the carrier holding the ring gear striking the housing. I see no evidence of that on any of the bolts or lock straps. Nor do I see any evidence of it on the housing itself.

Taking a look at the pinion, I don’t see anything changed in it. Yes, there’s some pitting on it (this is now the NOS ring and pinion set from the first GPW axle, this set came with this second set and are perfectly usable). Thankfully, I took really good reference photos when I first restored/installed everything, so I was able to easily compare any nicks/marks to see if they are new or not.

I did go ahead and use the Cricuit machine to cut out a new differential cover gasket. So I’ll probably re-fill up the differential with oil this weekend and seal it up for now.

Since at this point the only items both axles share with eachother are the drums and the yoke, I thought about taking one of the original drums that I couldn’t use (because they were out of spec) and putting them on just to see if the sound went away.

So, I started the process… I labeled all the parts I took off the axles, so I knew which races/bearings went where. I cleaned up and decided to use the original bearings that I took off since this was only a test and I wouldn’t be driving it much during the tests. I knew the brakes for whatever side I put this drum on wouldn’t work either since the inner wall is worn away too much. But that would be all right, I have three other wheels with good brakes!

I then went about ‘packing’ the old bearings with grease. They were still very useable, but I wouldn’t want these on a Jeep for longer than a few tests. They spun all right, but weren’t as smooth as new ones are.

And here’s the drum, ready to go with the races and bearings installed. It was at this point I talked with Roger Smith about my idea to test this. He suggested it wasn’t worth the hassle, as he had a new idea for me to test that could be the answer to this half-year long battle.

After watching my GoPro videos I’ve done the past few months (especially the newest one here: https://www.youtube.com/watch?v=xyI7YOXoLvY ) he thinks the problem might be my original springs. They might be too ‘soft’ and not as arched as they should be. This could cause move movement of the axle rotating downward during deceleration, in turn causing the driveshaft to really strain and, in turn, cause the pinion to shift.

Aside from just going out and replacing the springs (expensive, and hard to find GPW ones), there’s another solution. So, in this photo you are seeing the rear axle and how the ‘foot’ is sitting on top of the spring leaves. Two U bolts are bolted to a thick leaf plate under the springs which lock the axle down onto the springs. When a Jeep decelerates, the axle wants to roll forward causing the angle to change on the springs and that foot, which in turn makes the axle point downward.

So, the trick with springs like this is to get a pair of these… axle wedges. They sit between the foot of the axle and the spring. This will angle the axle more upwards, changing the angle the axle moves downward to when decelerating.

And here’s a look at where the wedges will go, between the axle foot and the top of the spring. One wedge on each part. The thicker side of the wedge will be on this side.

And that should change the angle like this. The red arrow is the current axle angle at rest. With the wedge, the green arrow will be the new resting angle. So, that means when I decelerate, the axle dipping downwards won’t be as much and, perhaps, not put stress on the driveshaft causing it to tweak the pinion. This is all a theory right now, and with these wedges arriving this weekend, I hope to test it out by Monday. That means having to undo a lot of things and lifting up the axle to get it to sit on the wedges.

So, what happens if the clackity sound goes away? Well, I first throw a party since we finally know what’s causing the sound after all this time. Then, I have a decision to make. This will mean that my original GPW springs are wearing out. So…
1) I could replace the springs with other original GPW ones (getting hard to find, and very expensive) with no promise that they won’t have this issue as well…
2) I could get brand new repro springs, but I’m having trouble finding repro GPW style rear springs at the moment anywhere online. I would prefer not to have MB repro springs on my Jeep.
3) I paint the axle wedges 33070 OD Green like the rest of the Jeep and leave them there, problem solved.
4) I could take my original springs and have them ‘re-arched’ back to their original shape making them tighter. But this would be VERY expensive and not worth it.
So, which one will I choose? Not sure yet. I think getting another set of original GPW springs is out, and I won’t be re-arching my ones. So, if I can find repro GPW rear springs, I might spring for those as they will be strong. Or, I just learn to live with two axle wedges in between the axle and the springs. Heck, you might not even notice it’s there. So we’ll see!

And that’s it for this week (See, quick update!) Wish me luck that we might finally test something that gives results on this ongoing clackity headache!
Till next week…