 Spark Plug woes, Oil Bracket Replacement, and fixing a seat!
Finally, a proper LARGE update with three big projects as I gear up the Jeep for the upcoming Wings, Tracks, and Wheels event at Chino Airport, CA (May 2-3, 2026). From a sudden issue with the Firestone spark plugs, to an oil leak and crack in the oil filter bracket, finally fixing my passenger seat, and more!
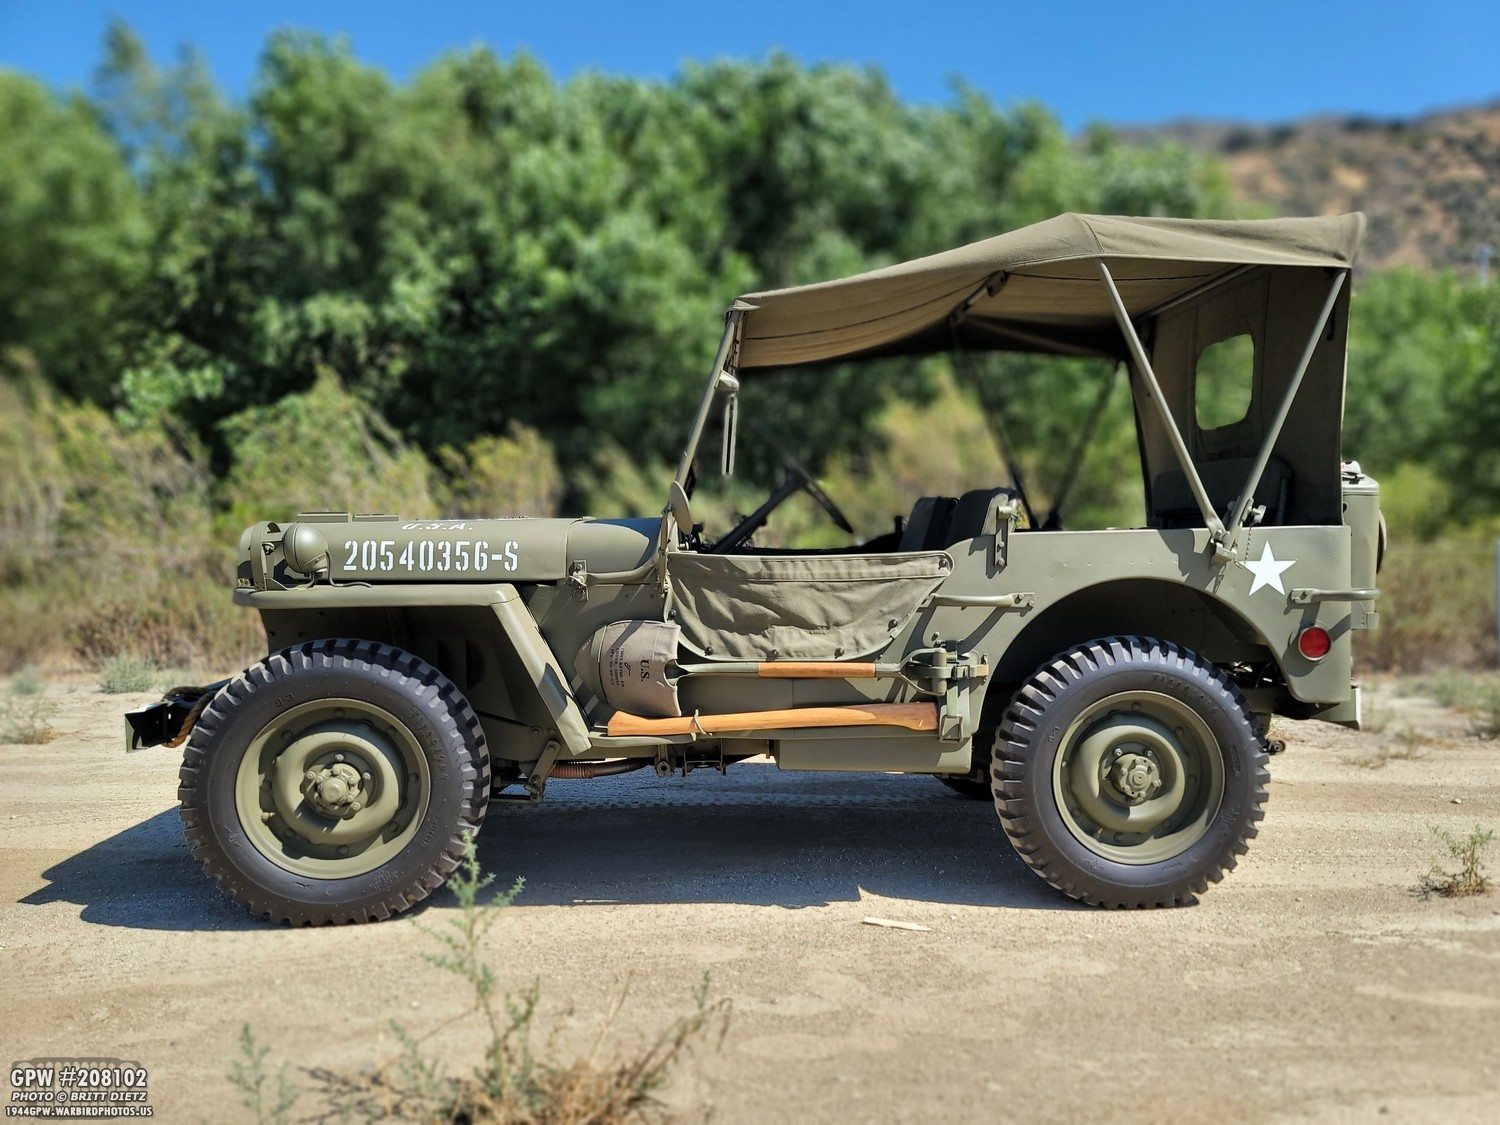
The life of having a Jeep restoration project consists of three things… the initial restoration, then the occasional event/drive, and the ongoing maintenance. Long spells will pass where you just get to enjoy it. For me, it’s my fun vehicle to drive, and to keep it up to shape, I try to drive her once a week, if not once every other week, for a few miles. Just through the neighborhood, but it keeps the fluids flowing and the bearings turning!
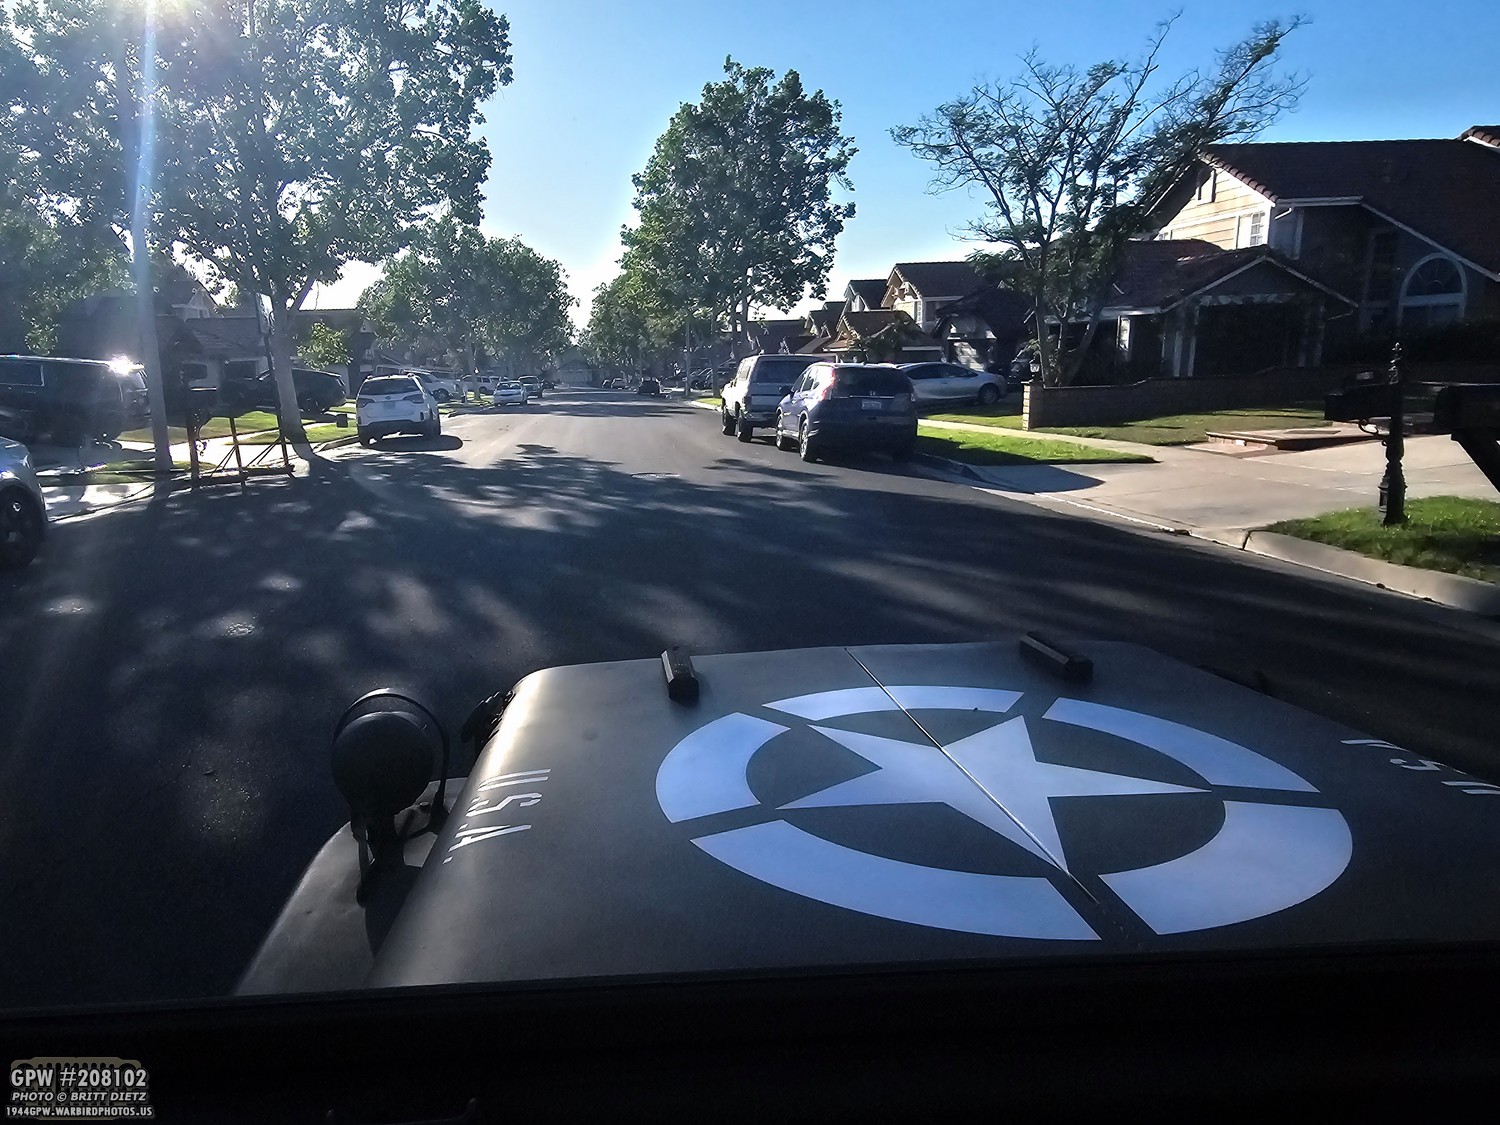
And on one of those drives, something finally did happen. As I was cruising along, enjoying an early April afternoon, I suddenly felt the Jeep start to struggle. The last few months, I’ve noticed that she was giving me more coughs than usual on the hills. I re-timed the distributor and found it had shifted, probably from vibrations, or the tightening bolt wasn’t tight enough. Either way, I thought that would fix the problem: it didn’t. Things came to a head when, on another drive, I lost oil pressure, and the Jeep was losing compression power fast. I had to pull over and slowly nurse her back to the house. Not good!
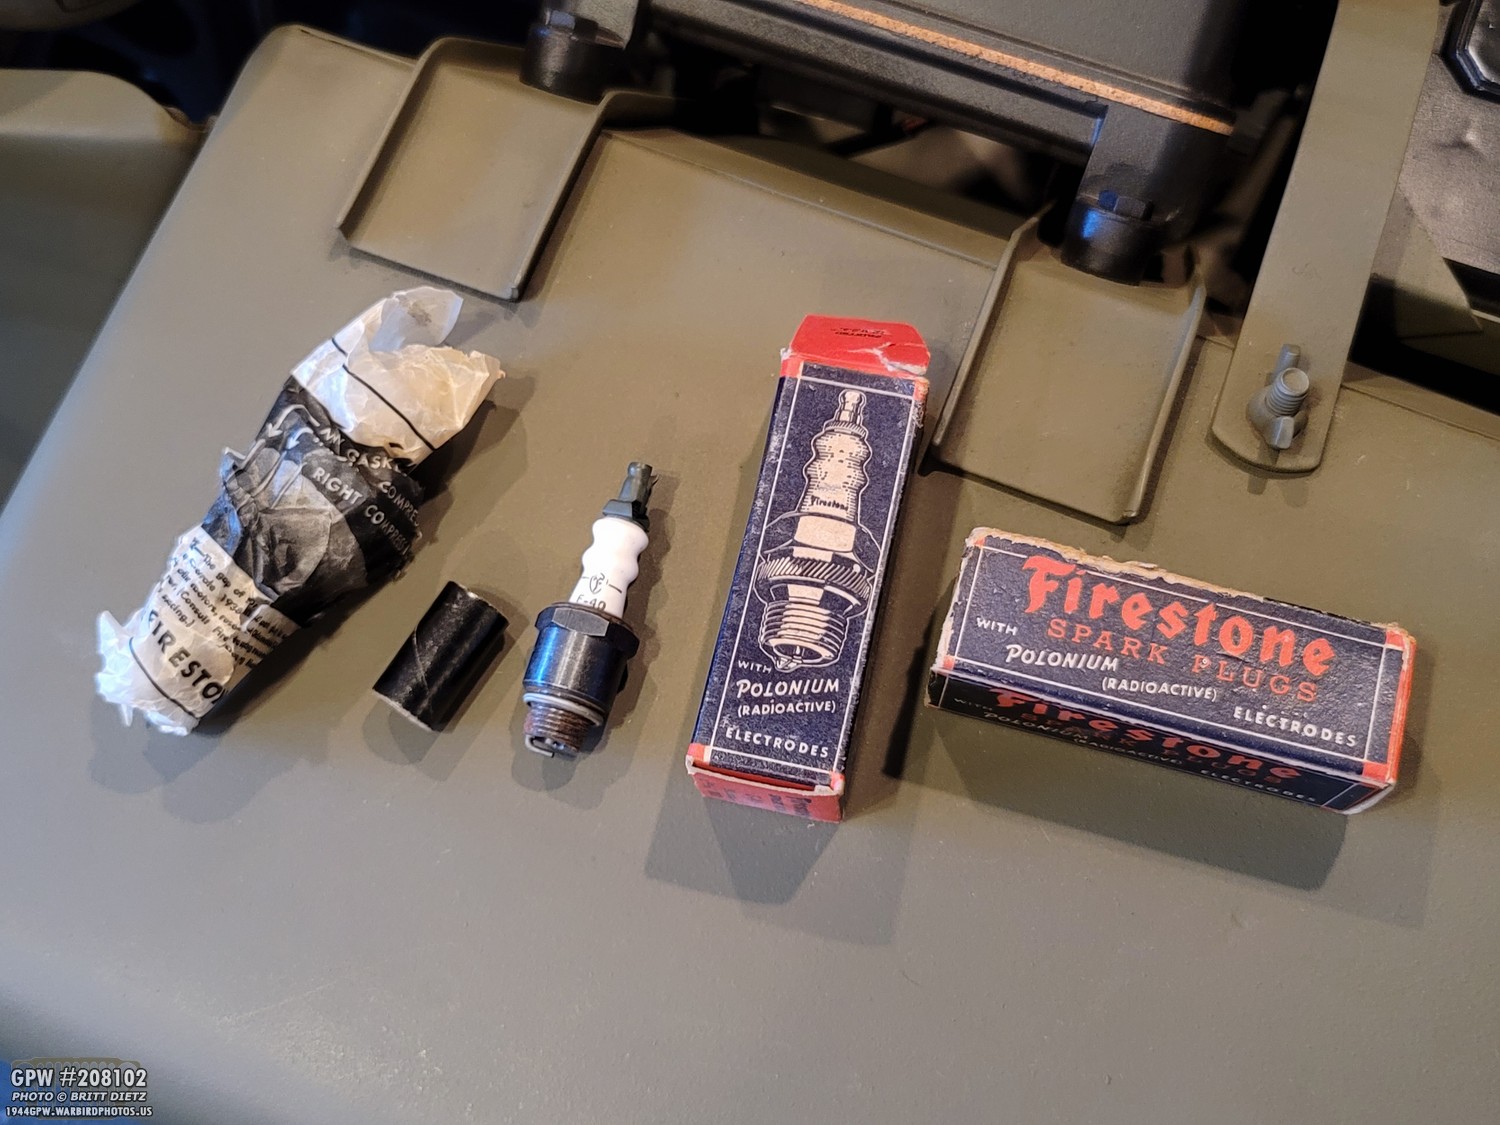
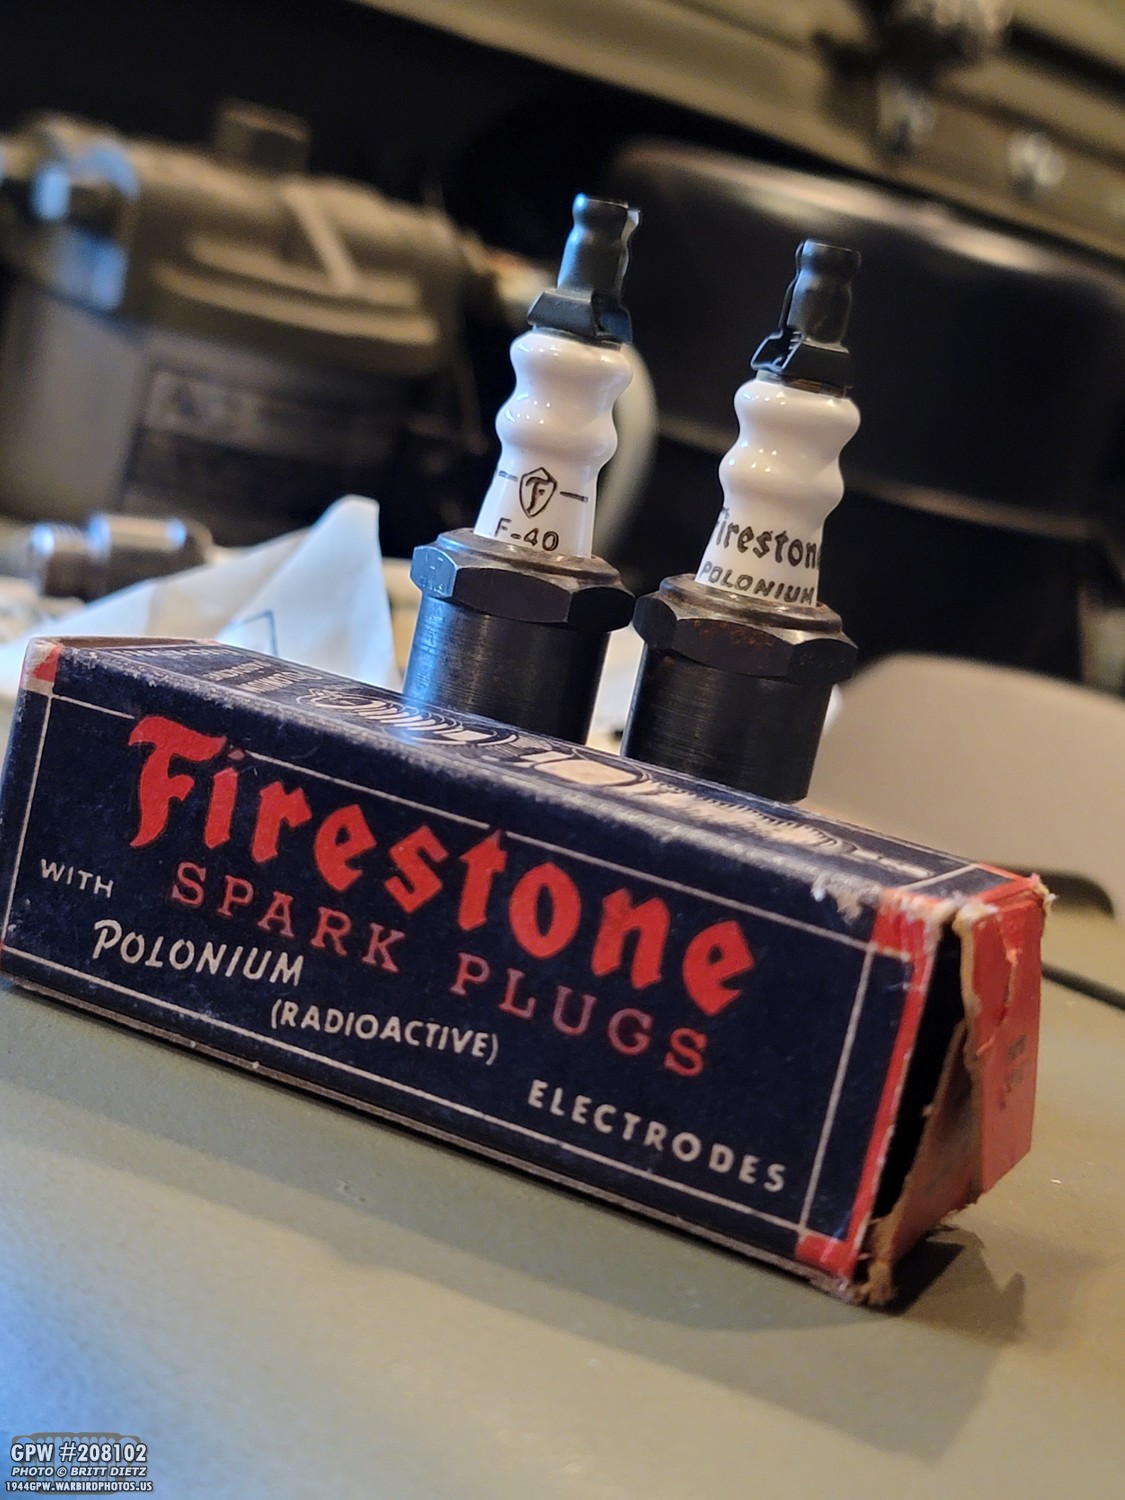
So, my initial thought was that something was wrong with the engine, perhaps related to the spark plugs. Let’s rewind a bit. So, back in 2020, I had found a pair of original Firestone F-40 spark plugs at a local Flea Market. This was exciting, as the F-40 was an original WW2 era spark plug that was used on GPWs. These formerly radioactive plugs are hard to find.
Both of them were in great condition, brand new, and I knew right away that I had to try to find more. If I could find an entire set, I would have to have them installed on my Jeep! But I had to wait until the next Flea Market (which happens once a month).
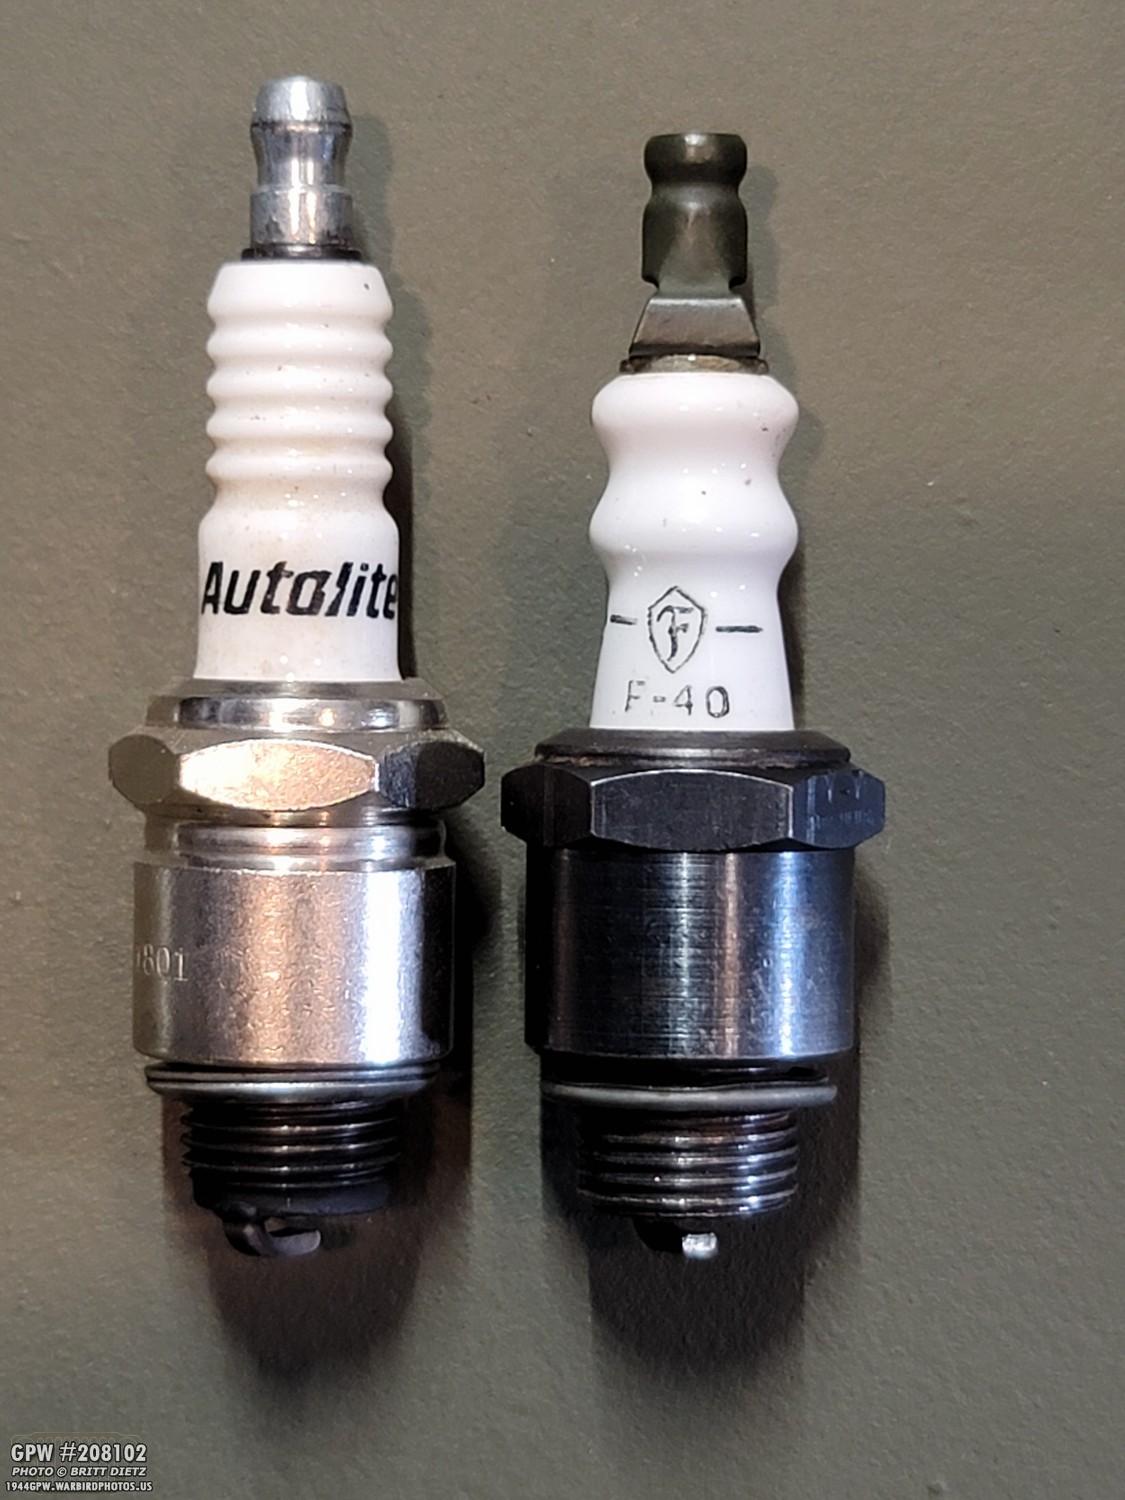
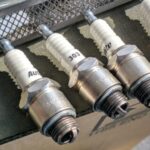
At the time, I was running your run-of-the-mill store-bought AutoLite R45 spark plugs. They did the job, but obviously looked modern. Here’s a look at an R45 and an F-40 next to each other.
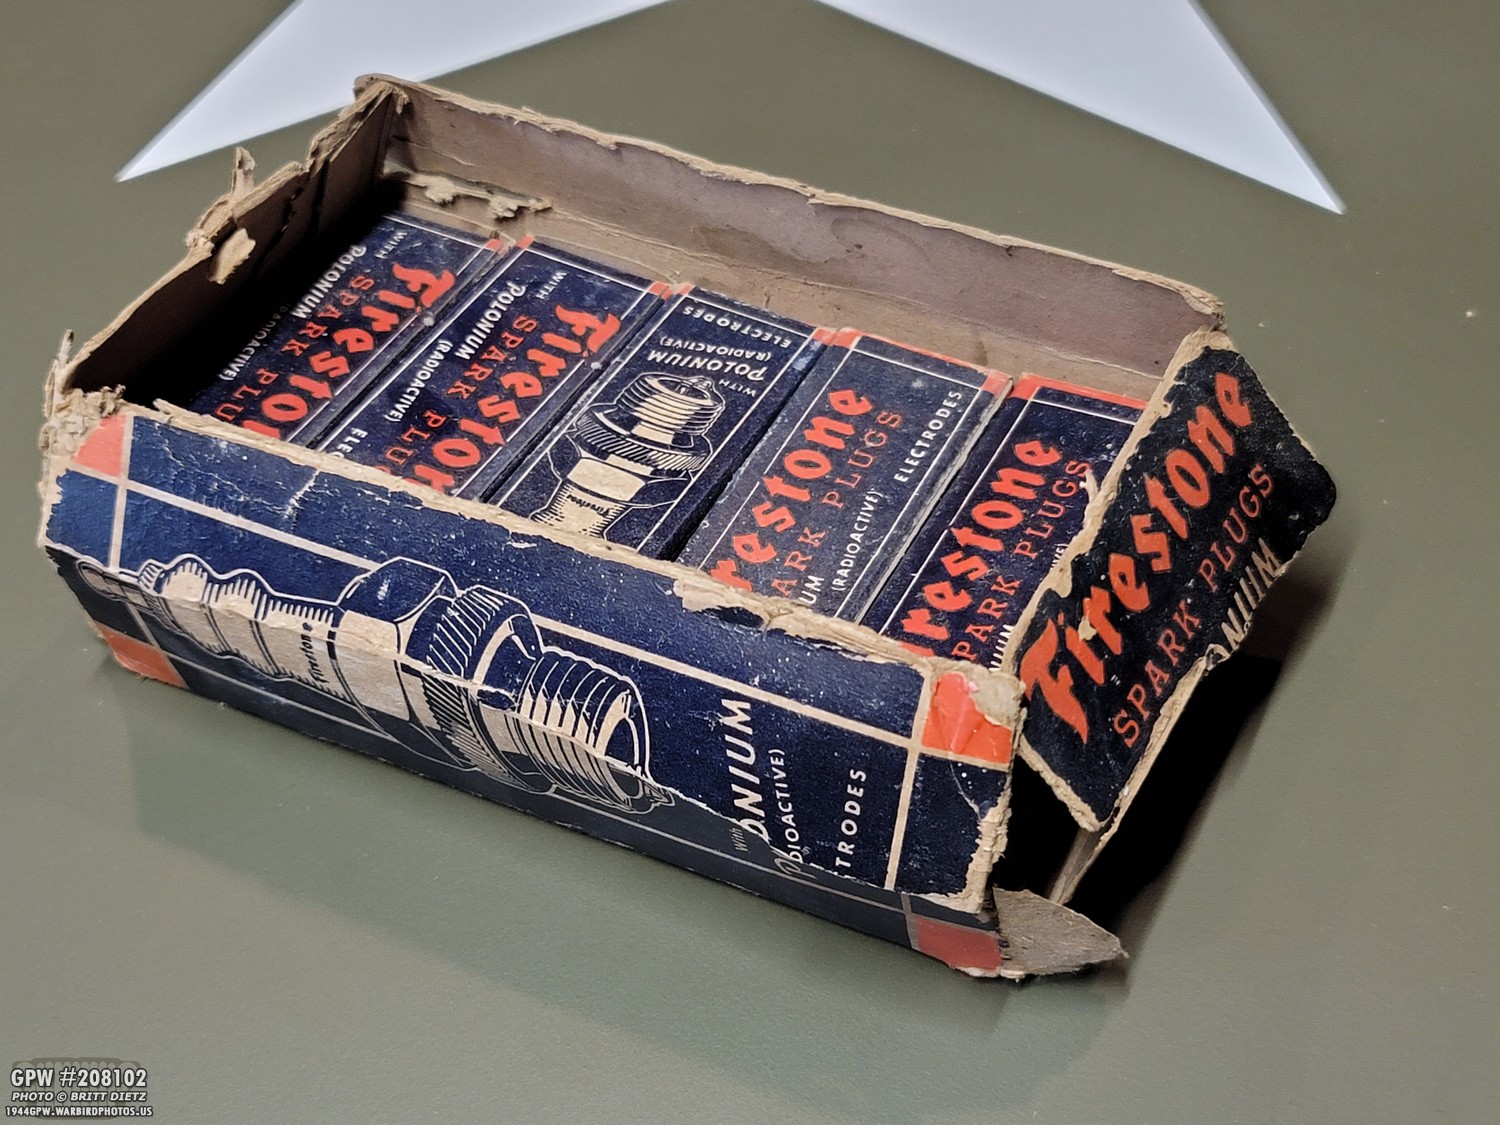
As luck would have it, at the next Flea Market, the same seller was there. Even though he did not have any more, he said he did at home and would email me if he found them. He did, and I was able to buy what he had left (half a box) to give me a total of six plugs! They were not cheap, that’s for sure, but so awesome to have.
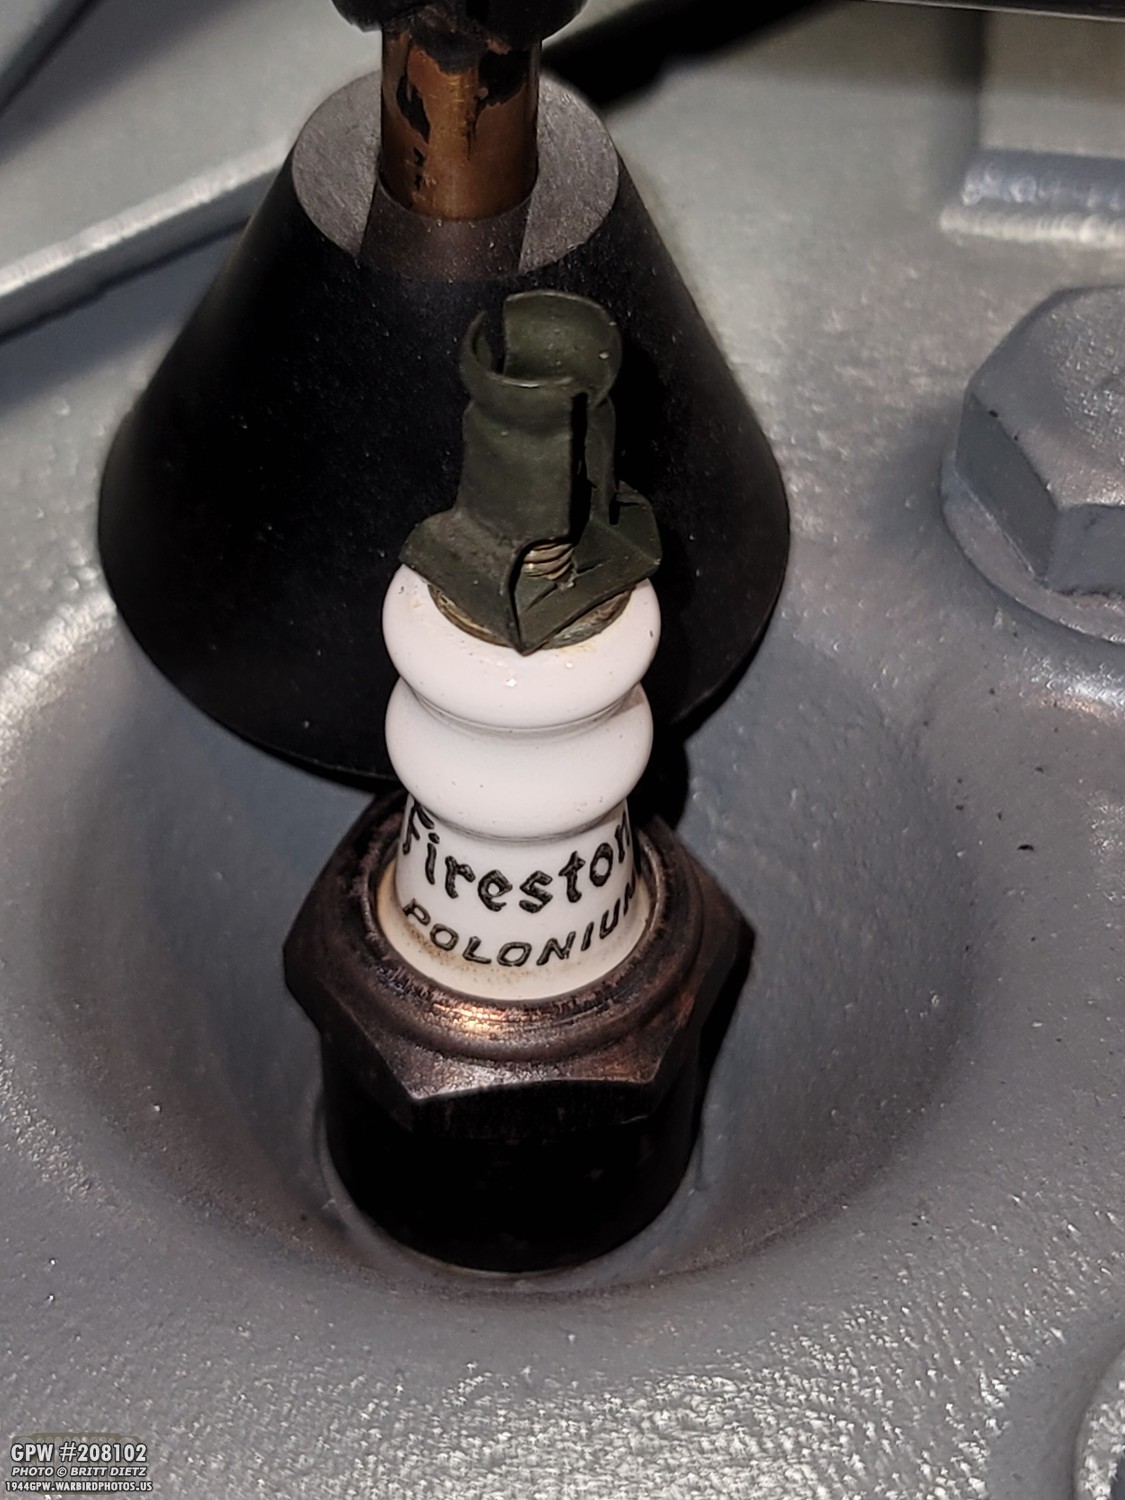
I installed those the next day, and I swear that my Jeep sounded a bit better when running with these original spark plugs. I ran them for nearly four years until the first sign of trouble showed up.
As I was driving at the 2024 Wings, Tracks, and Wheels event at the Planes of Fame Air Museum, disaster struck. As the vehicle and reenactor coordinator, I drive my Jeep a lot during the event. It’s like my golf cart as I travel around. At some point, I hopped in my Jeep, fired her up (after being off for an hour or so), and started driving. Almost immediately, I started to hear a loud and strange hissing noise. I pulled to the side and popped the hood… to find one of them had blown in half! The top part of the ceramic white body and the entire electrode center was missing. The spark plug wire was just dangling free there. I assume it was a microcrack in the ceramic that eventually gave way to the pressure. This would end up happening a second time in early 2025, though not as dramatically, leaving me with four spark plugs left (all in the Jeep).
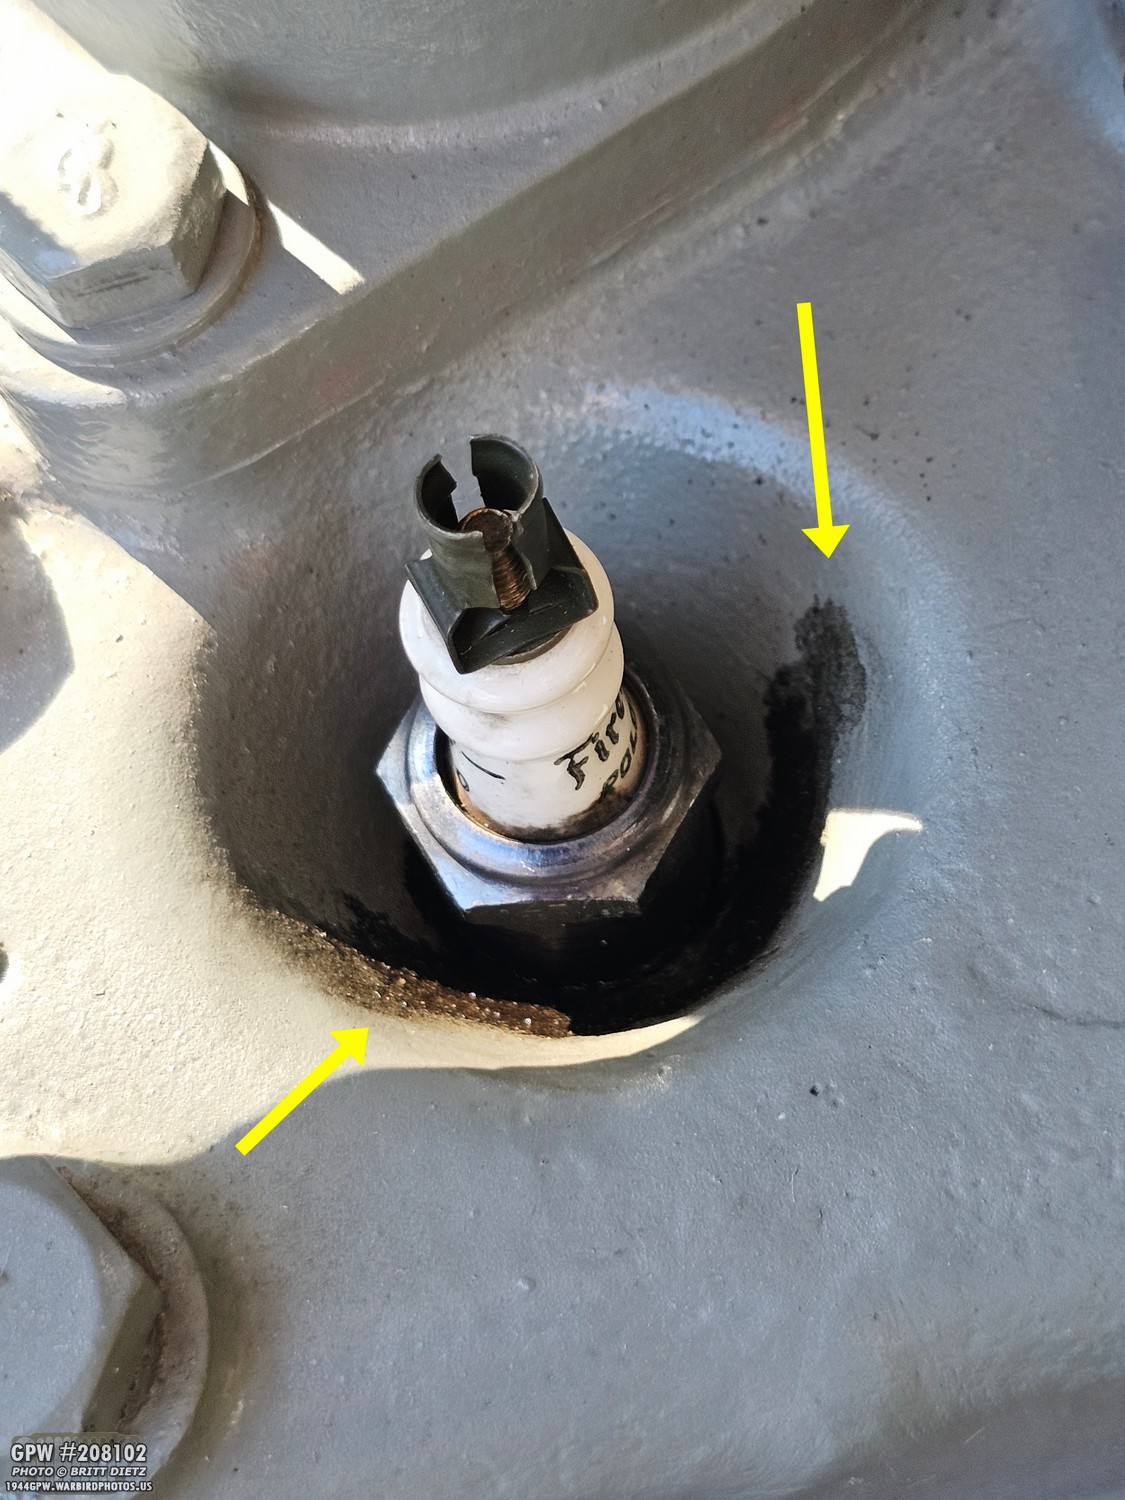
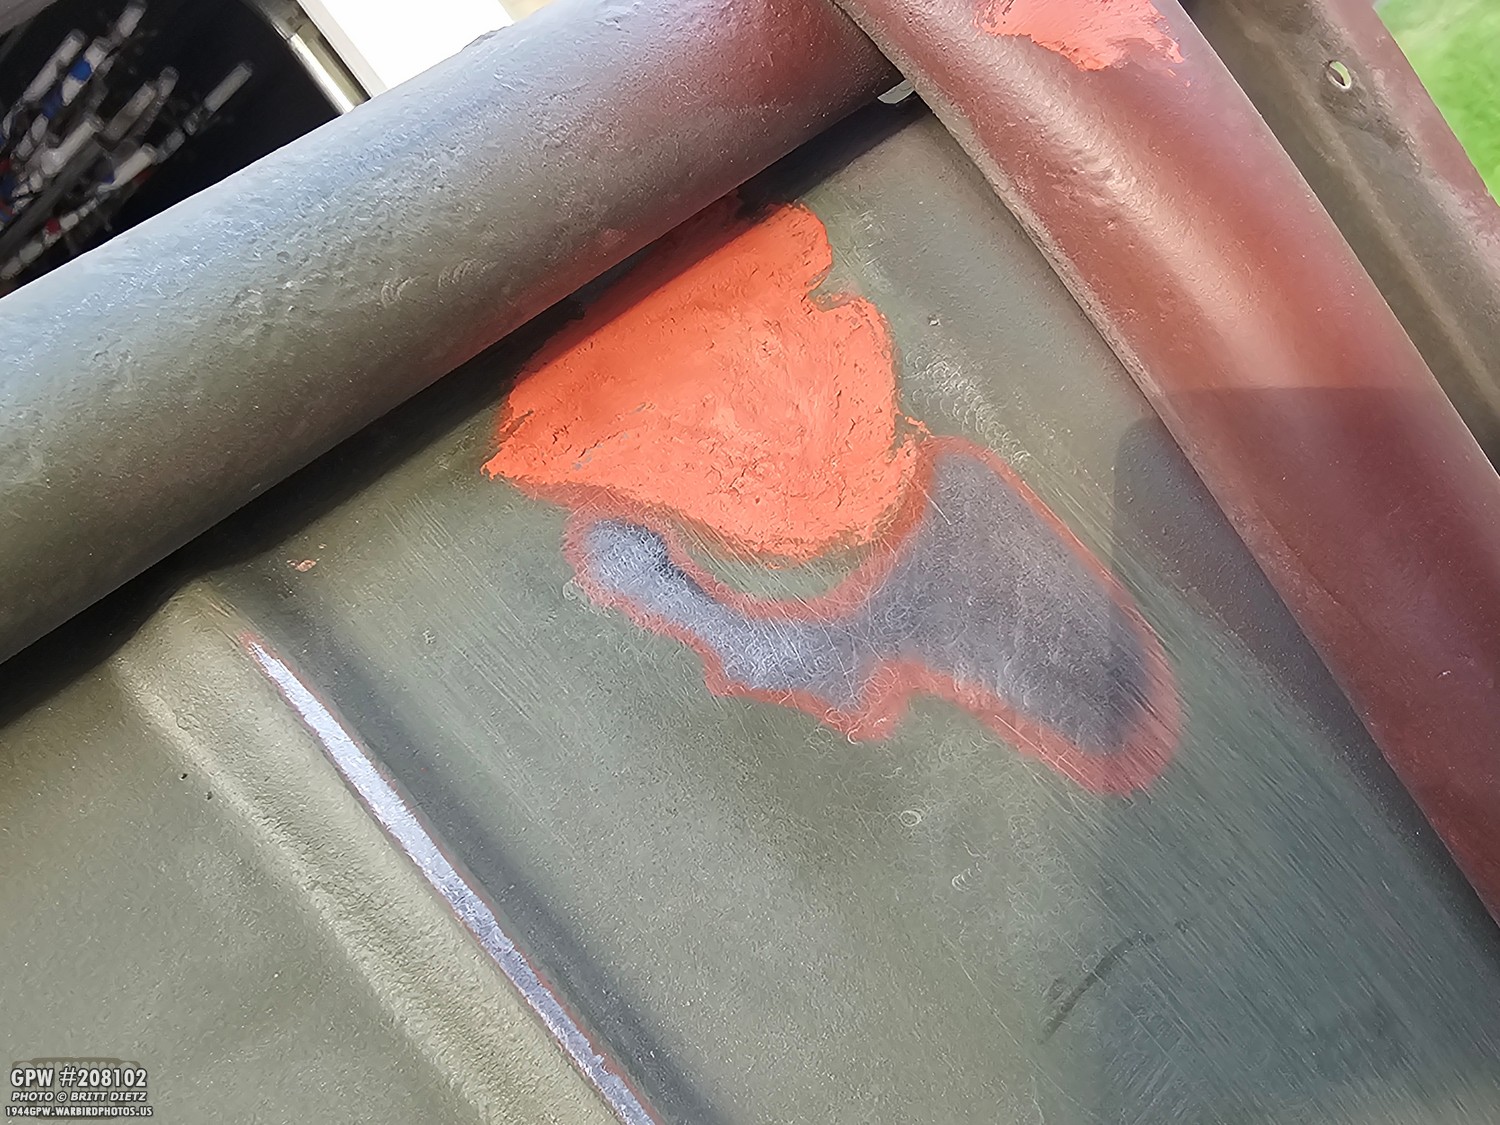
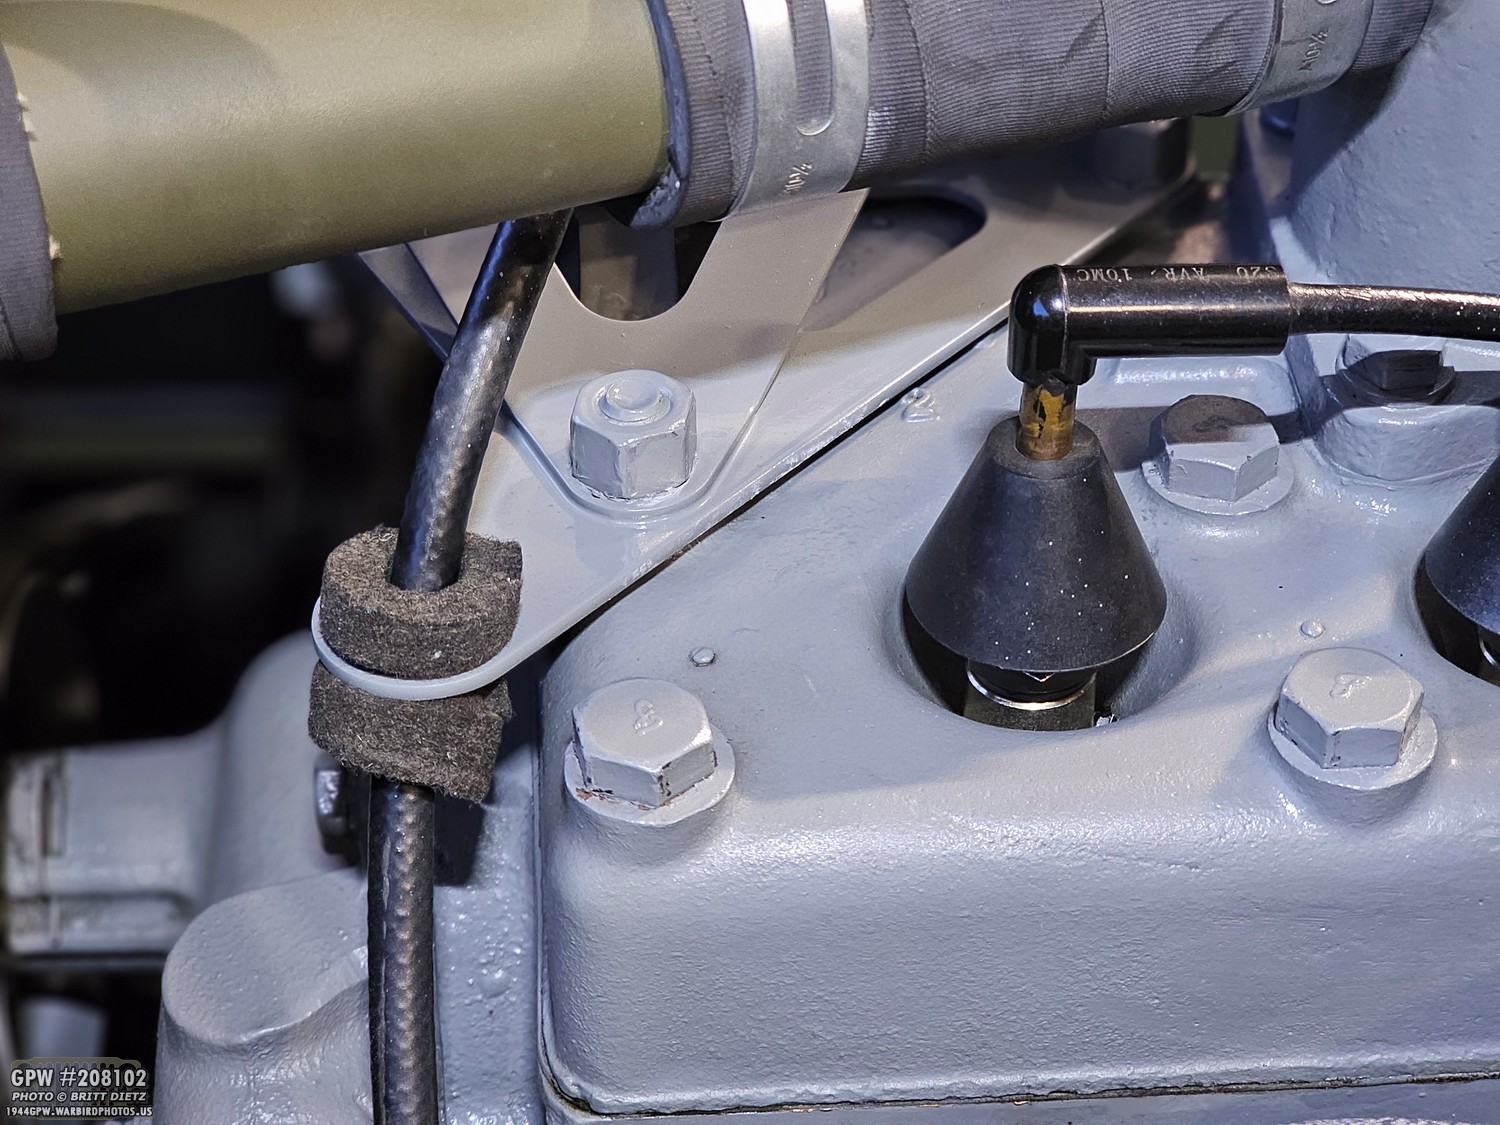
Since then, they’ve been doing fine. I did notice this pool of dark fluid around the #2 plug, but I’d eventually find out what that was (it’ll be covered later in this post). So that brings us to the issue I had when the Jeep lost compression and nearly came to a stop. It didn’t sound like the usual hissing, though, and I checked the engine to see that all the spark plugs were fine…. Or so I thought.
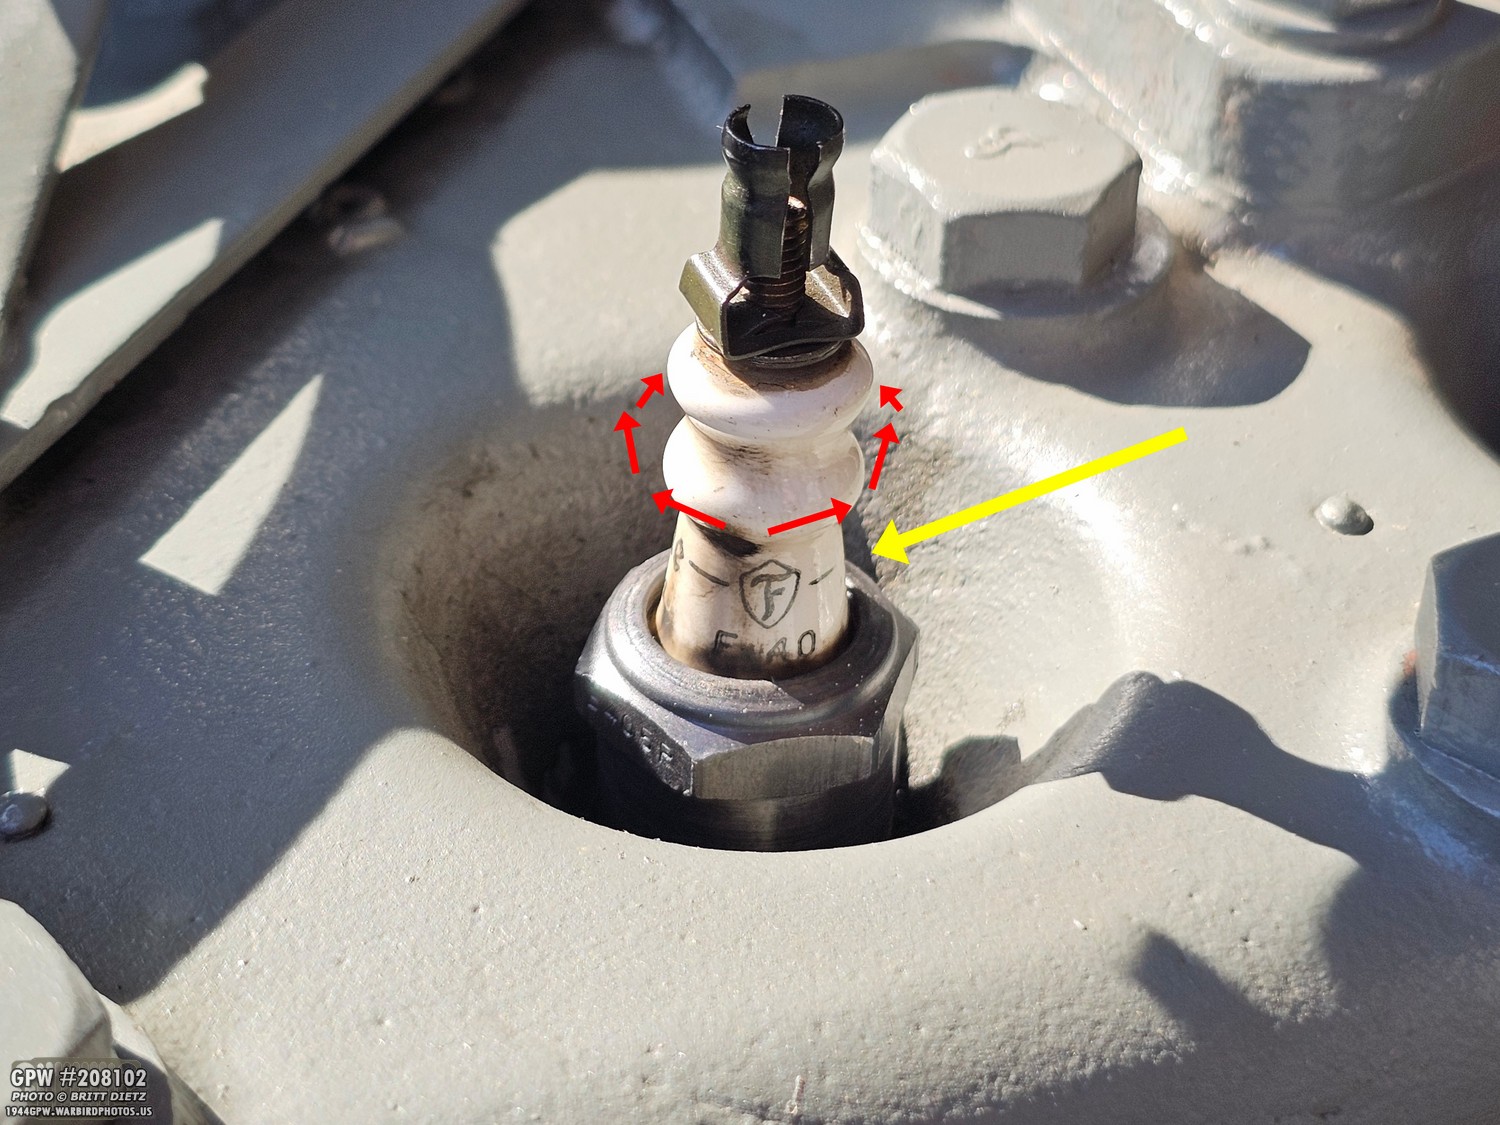
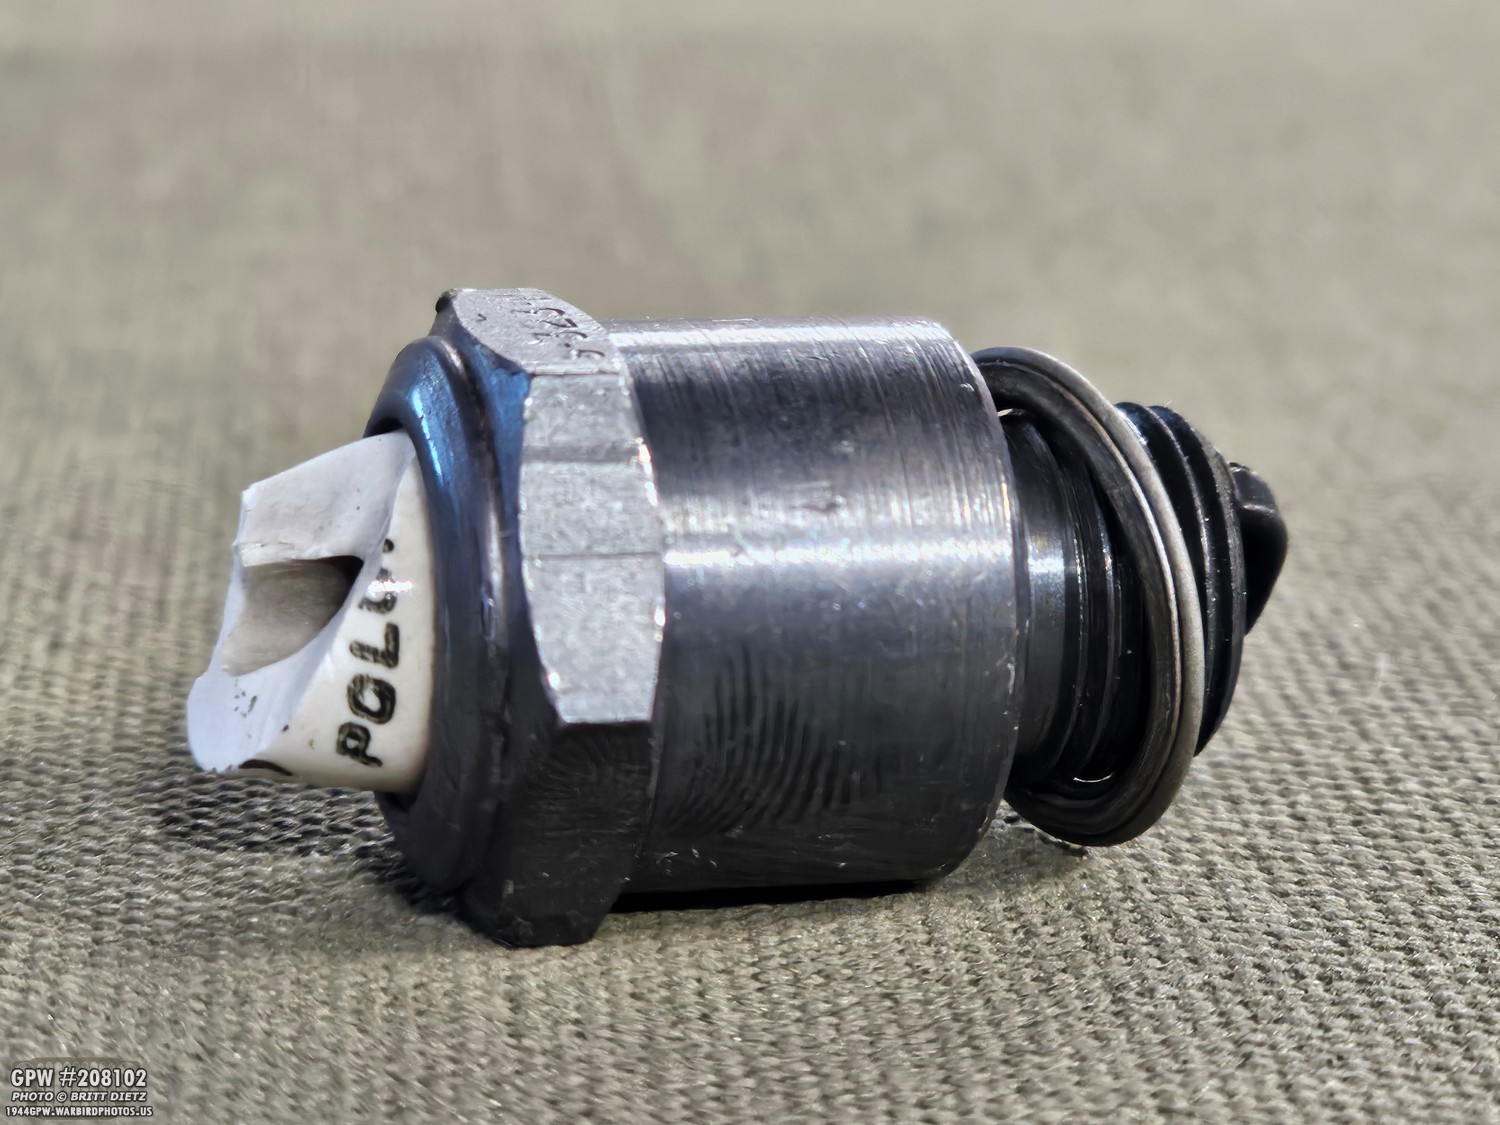
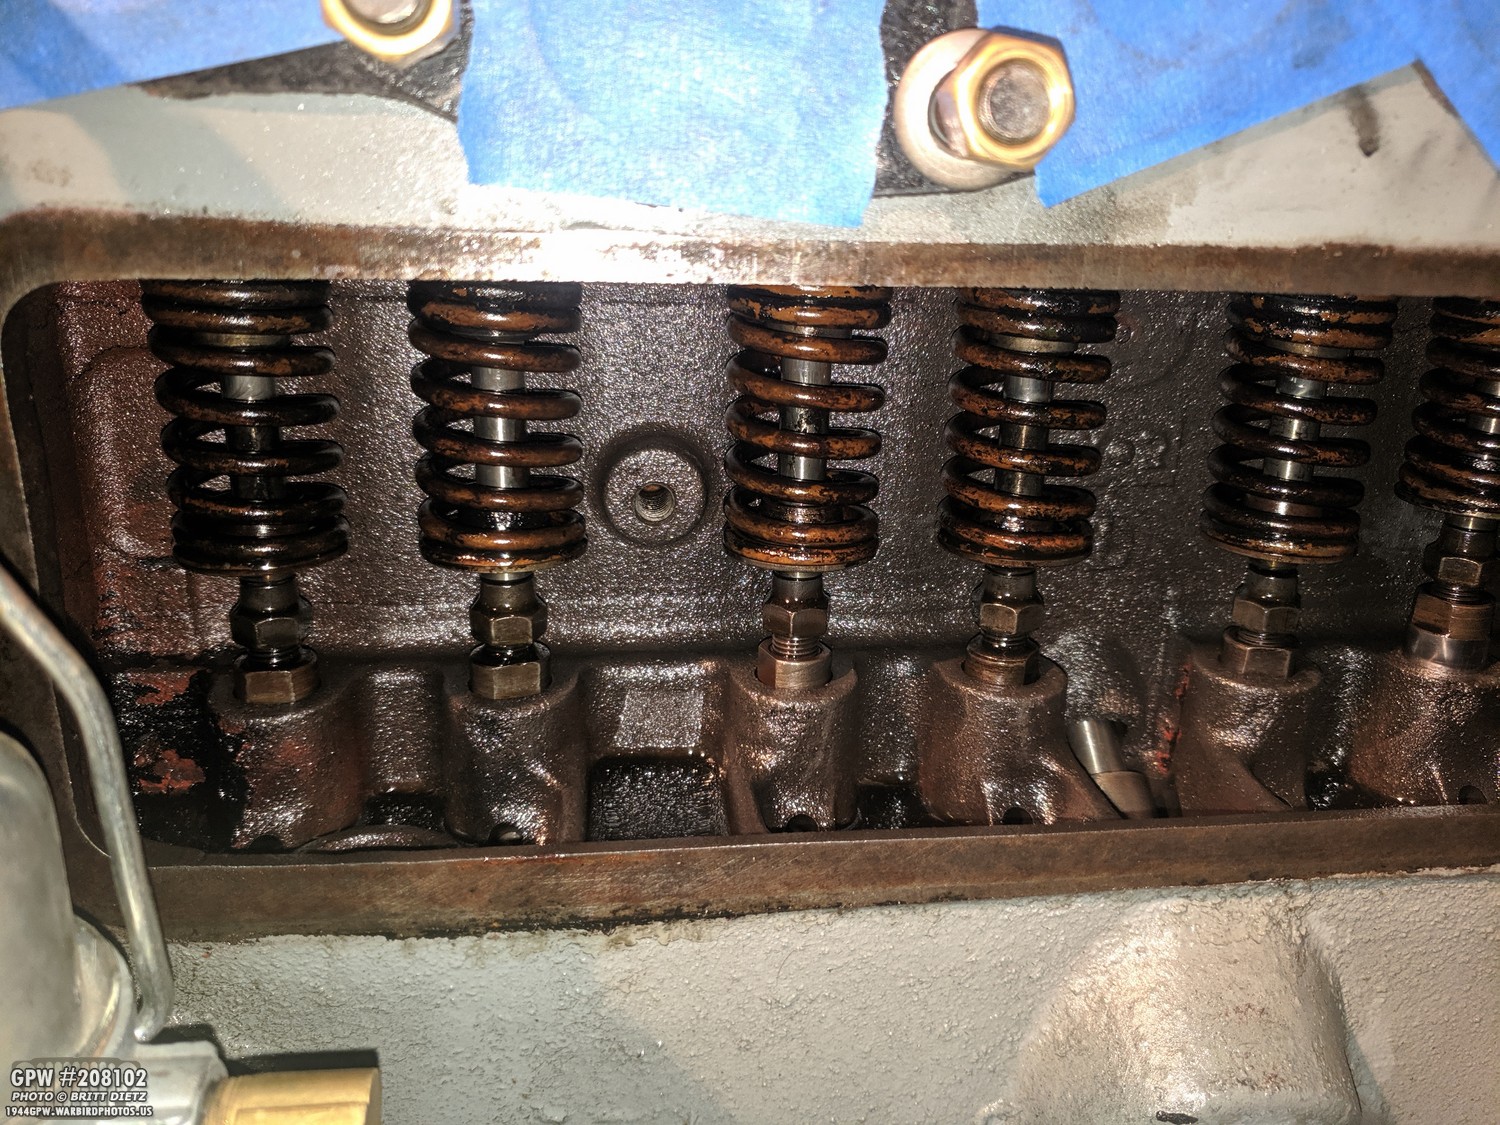
The next day, I started to do a deep dive into the problem. There was an initial fear that it might be a blown valve and not the spark plugs, but I wanted to make sure, since I had lost two of them. Removing the spark plug wires, I started to check for any loose plugs, and I immediately spotted a problem with the first spark plug. When trying to unscrew it by hand, I noticed that I could spin the ceramic top freely! It wasn’t connected to the base anymore, so it could rotate freely, but it couldn’t come out. That might be the problem right there! This was the only spark plug that did this. So, I got the spark plug socket out and removed all of them to check what the electrodes looked like.

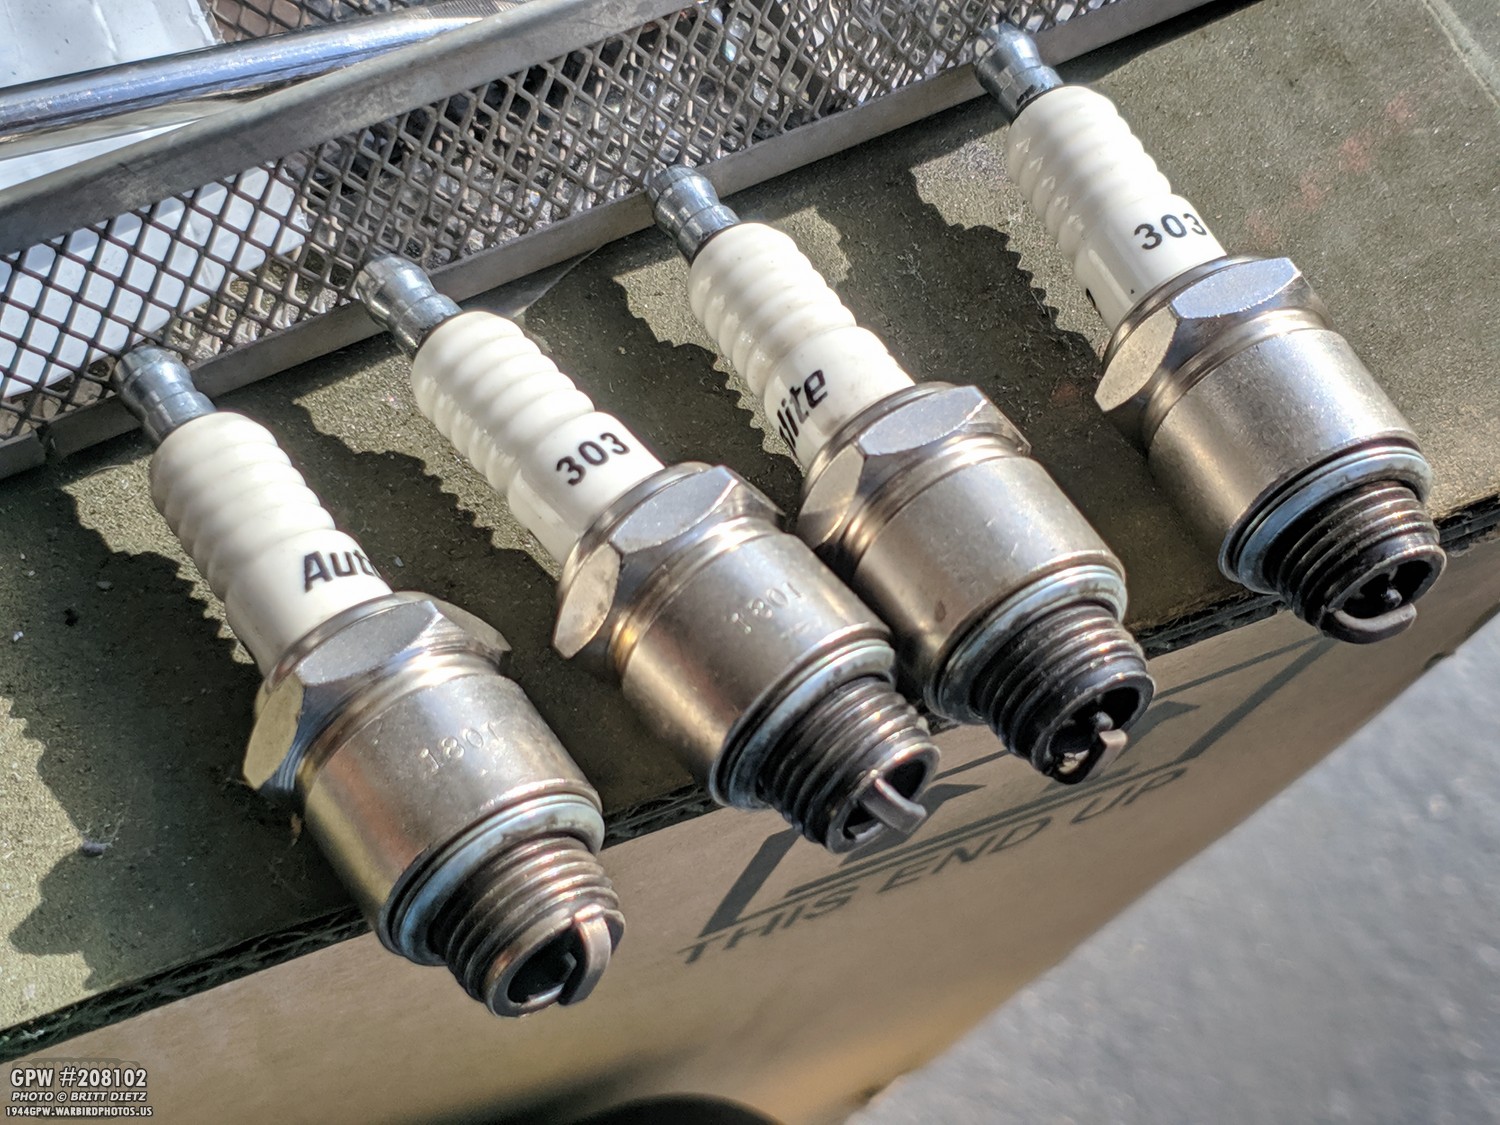
Here’s a look at all four of the electrodes. Overall, they don’t look too bad. A little bit of either carbon fouling or running a bit rich on the fourth one, but overall, they are very close to each other. But, if you look closely at #1, you can see there is something wrong… Aside from the fact that the center electrode stud does not have the burn markings like the rest, it might seem a bit different.
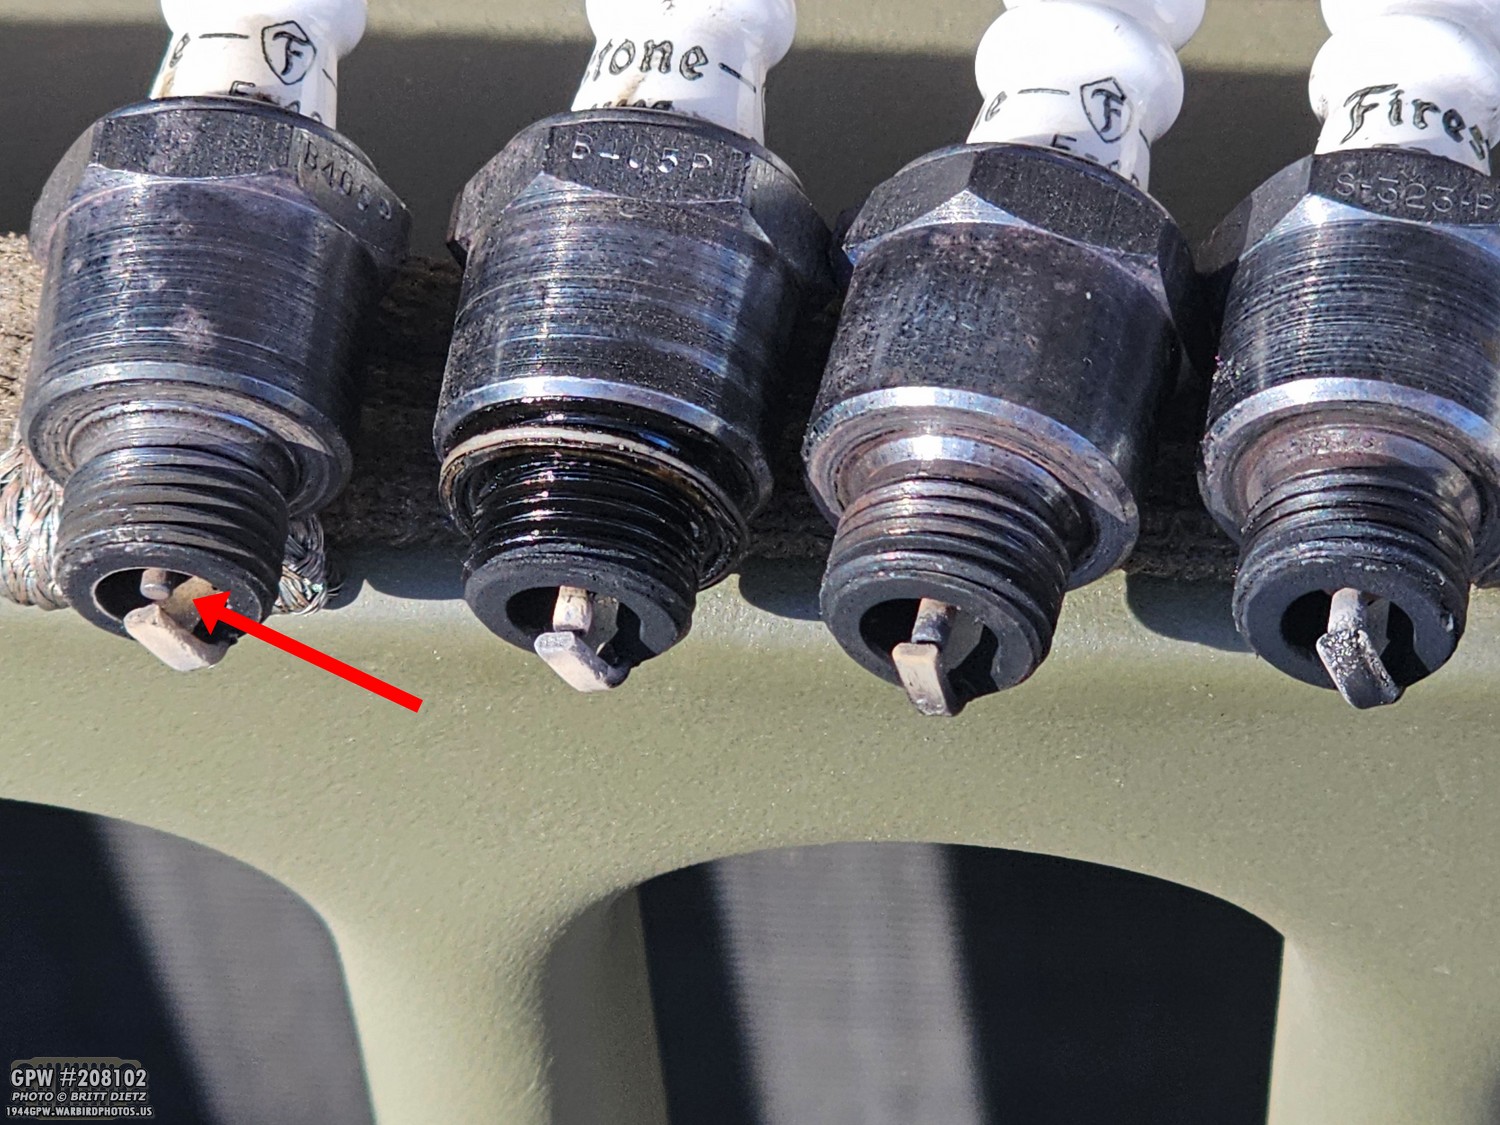
This side angle should REALLY show the problem. Look at the gap in the first spark plug. It’s MASSIVE! So, you might say, ‘Why didn’t you check the gap before you put it in?’ I did; I made sure they all had a .30 gap when I got them. I even posted about it, like this, you’re reading on my restoration blog. So, what happened?
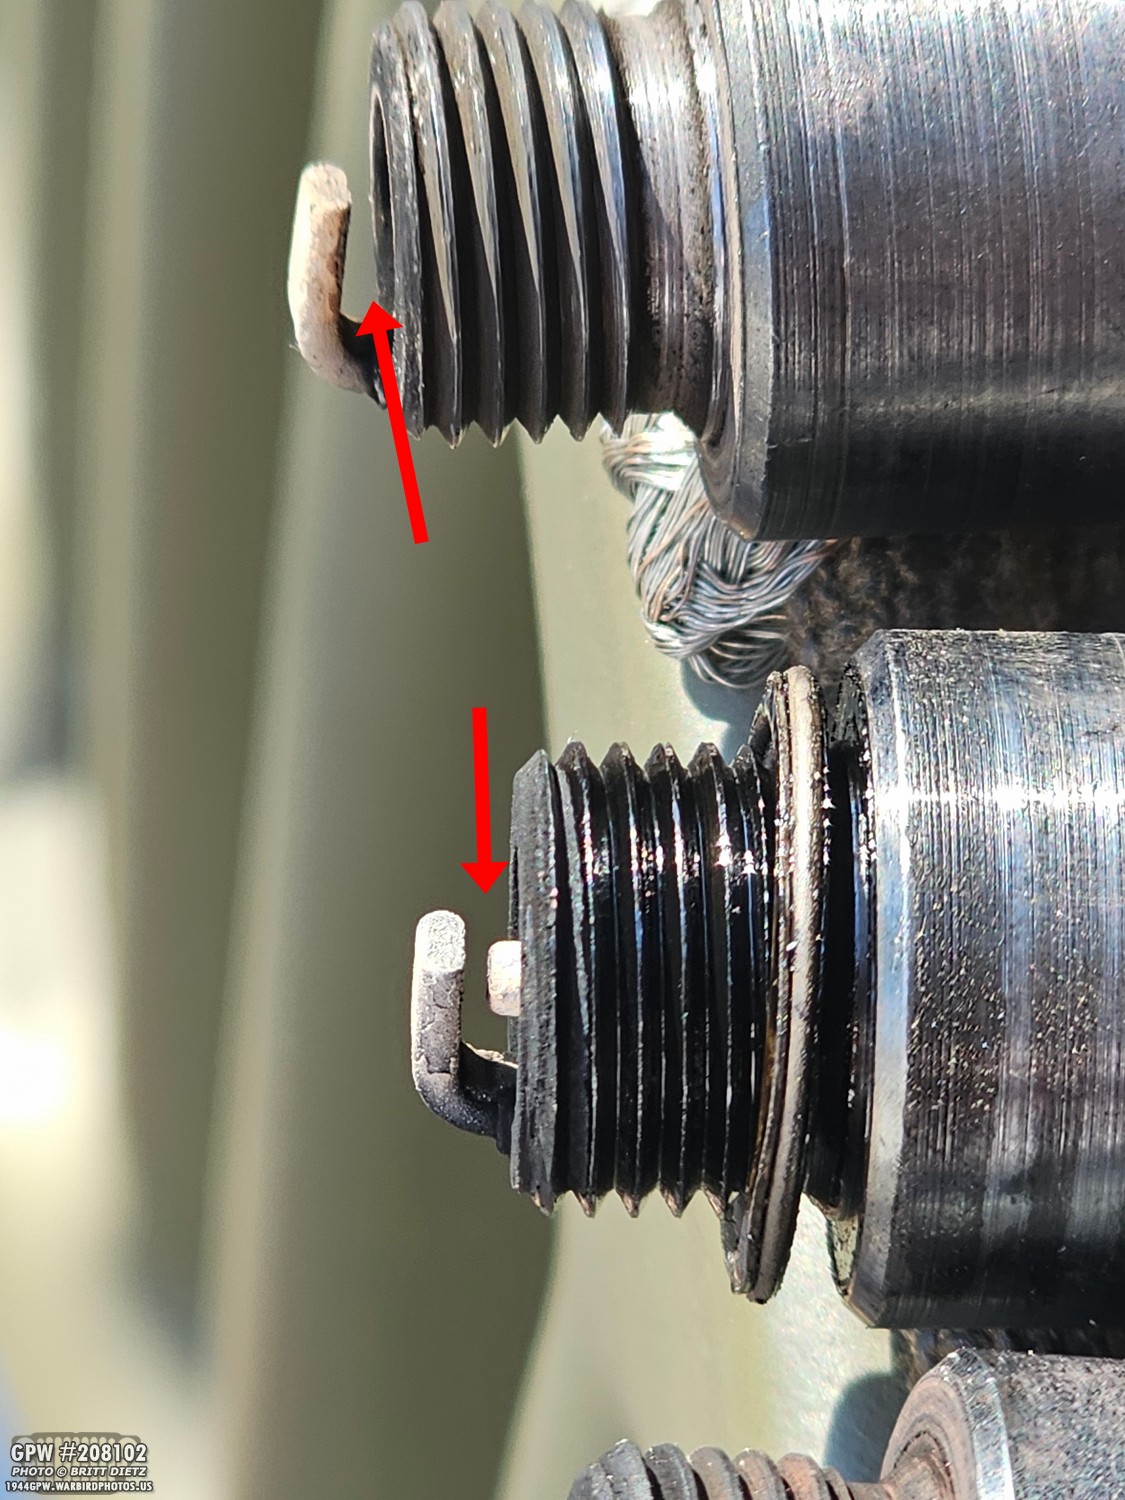
This view REALLY shows the problem. Notice how that center electrode shaft is just gone in this angle. It’s recessed deeper inside the base of the plug. My theory is that when the ceramic top came loose, it pulled up the stud with vibrations of the engine, giving me a massive gap in the spark plug electrodes. That alone could be the entire problem I’ve been having, and could be the start of another plug about to break apart.
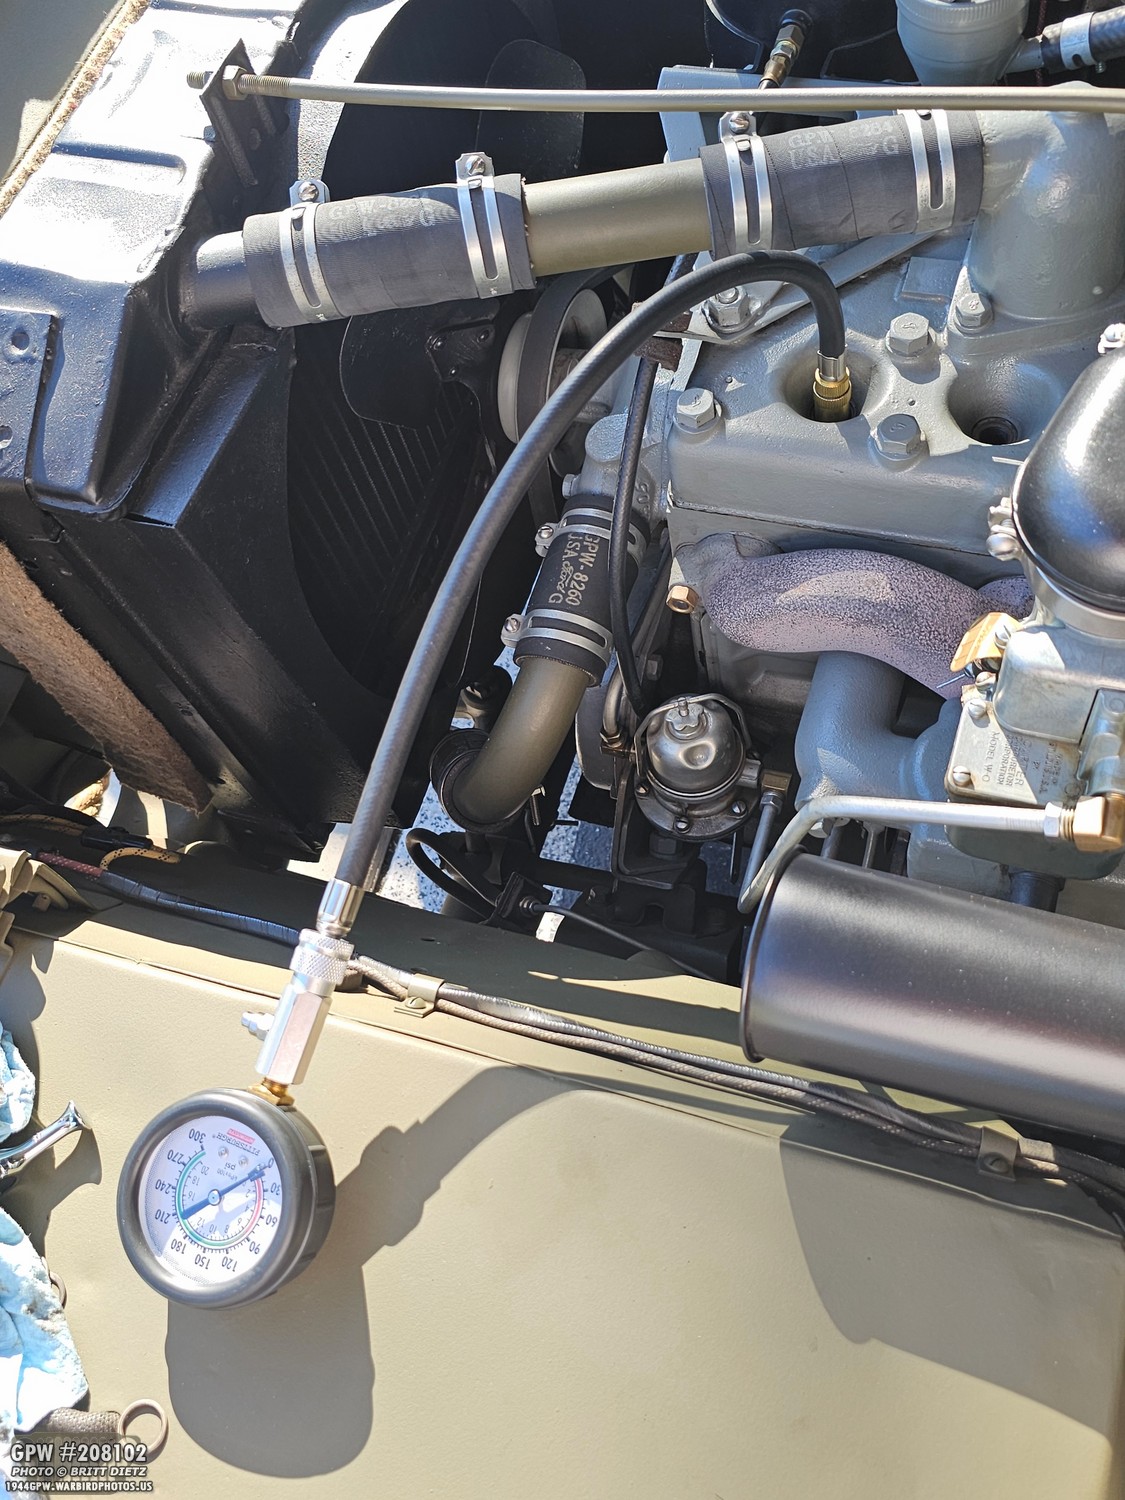
But to make SURE that it wasn’t two issues in one, with a bad valve, I decided to do a compression test on each cylinder. I’ve covered this before, but you get yourself a compression test kit, like this one here. You remove all the spark plugs and keep them out. Disconnect the coil or disconnect the distributor head cap. Start with the first valve, and hit the Jeep starter. The gauge will then read the compression after 3-4 revolutions of the engine. For my Jeep, I had (in order) 115psi, 113psi, 109psi, and 110psi. Typically, 90-110psi is considered really good compression, so at least it’s not a valve issue! WHEW!
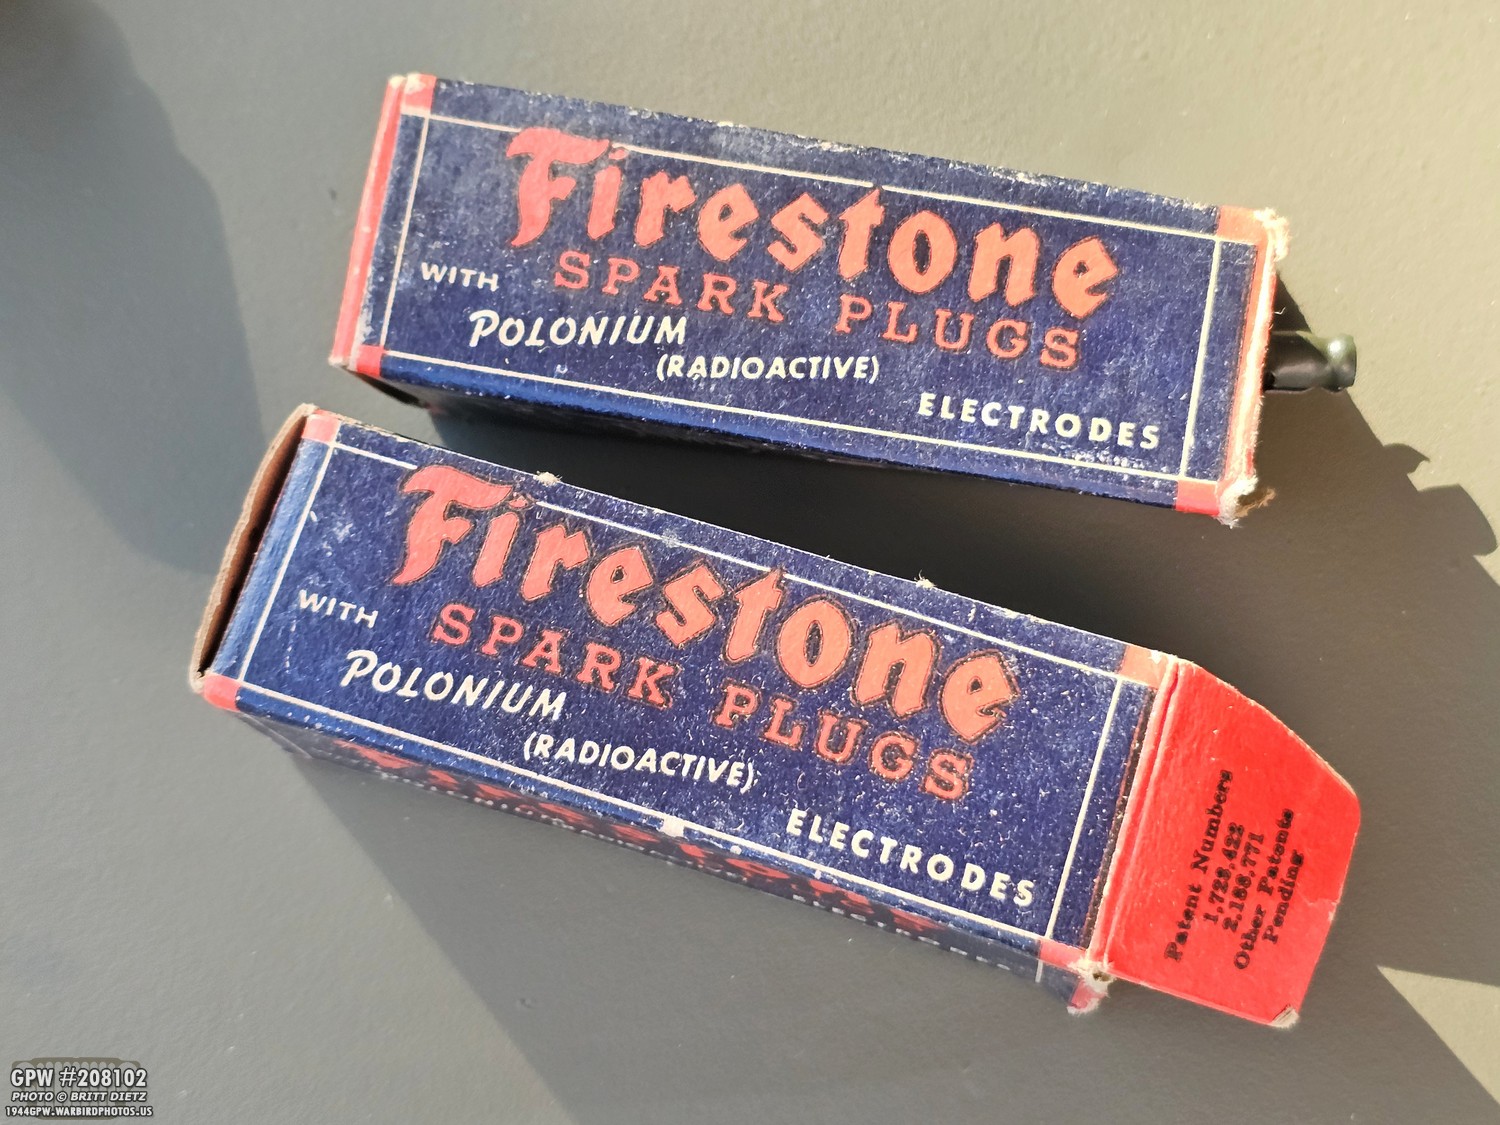
So, with a heavy heart, I decided to retire the rest of the Firestone F-40s. These 80-year-old spark plugs, in this case, are just not reliable. Having 3 fails gives me no confidence in the others. So, out they go. They will now be museum pieces.
Thankfully, I still had those AutoLite R45s that I was able to put back in.

I had a feeling, once I got the modern R45s all installed back on the engine, that my problem was going to be fixed.
So, I took the Jeep on a drive. Success! She sounded better than she has in a few months. She didn’t even break a sweat during the same hill she struggled to a stop at just a few days before. Oil pressure didn’t drop at all, and I even tried to make her work for it by slowing down in second gear before taking the hill. No problems at all!
But I didn’t want to keep the R45s in my Jeep because they were modern-looking. So, I made an order from Ron Fitzpatrick Jeep Parts of the new Joe’s Motor Pool QM-2 plugs that are marked with QM-2 to mimic the Champion QM-2s that were standard on new Jeeps. Note: I’ll talk about that repro oil bracket a bit later in this update. Ignore that for now!
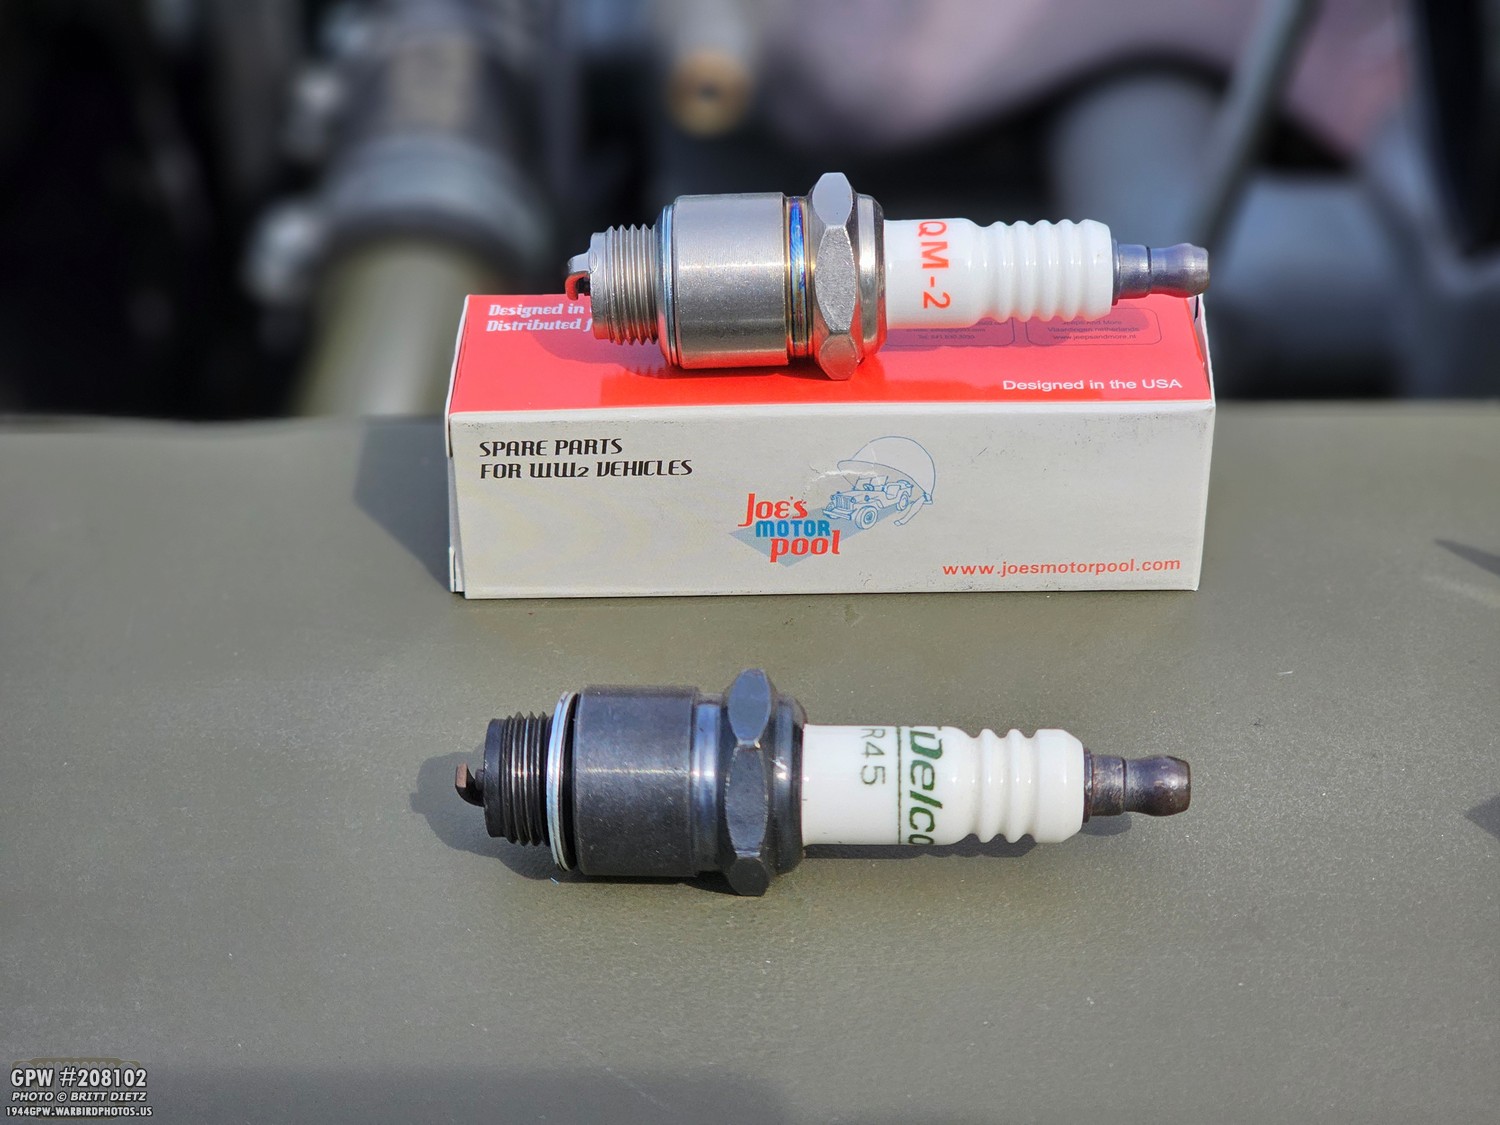
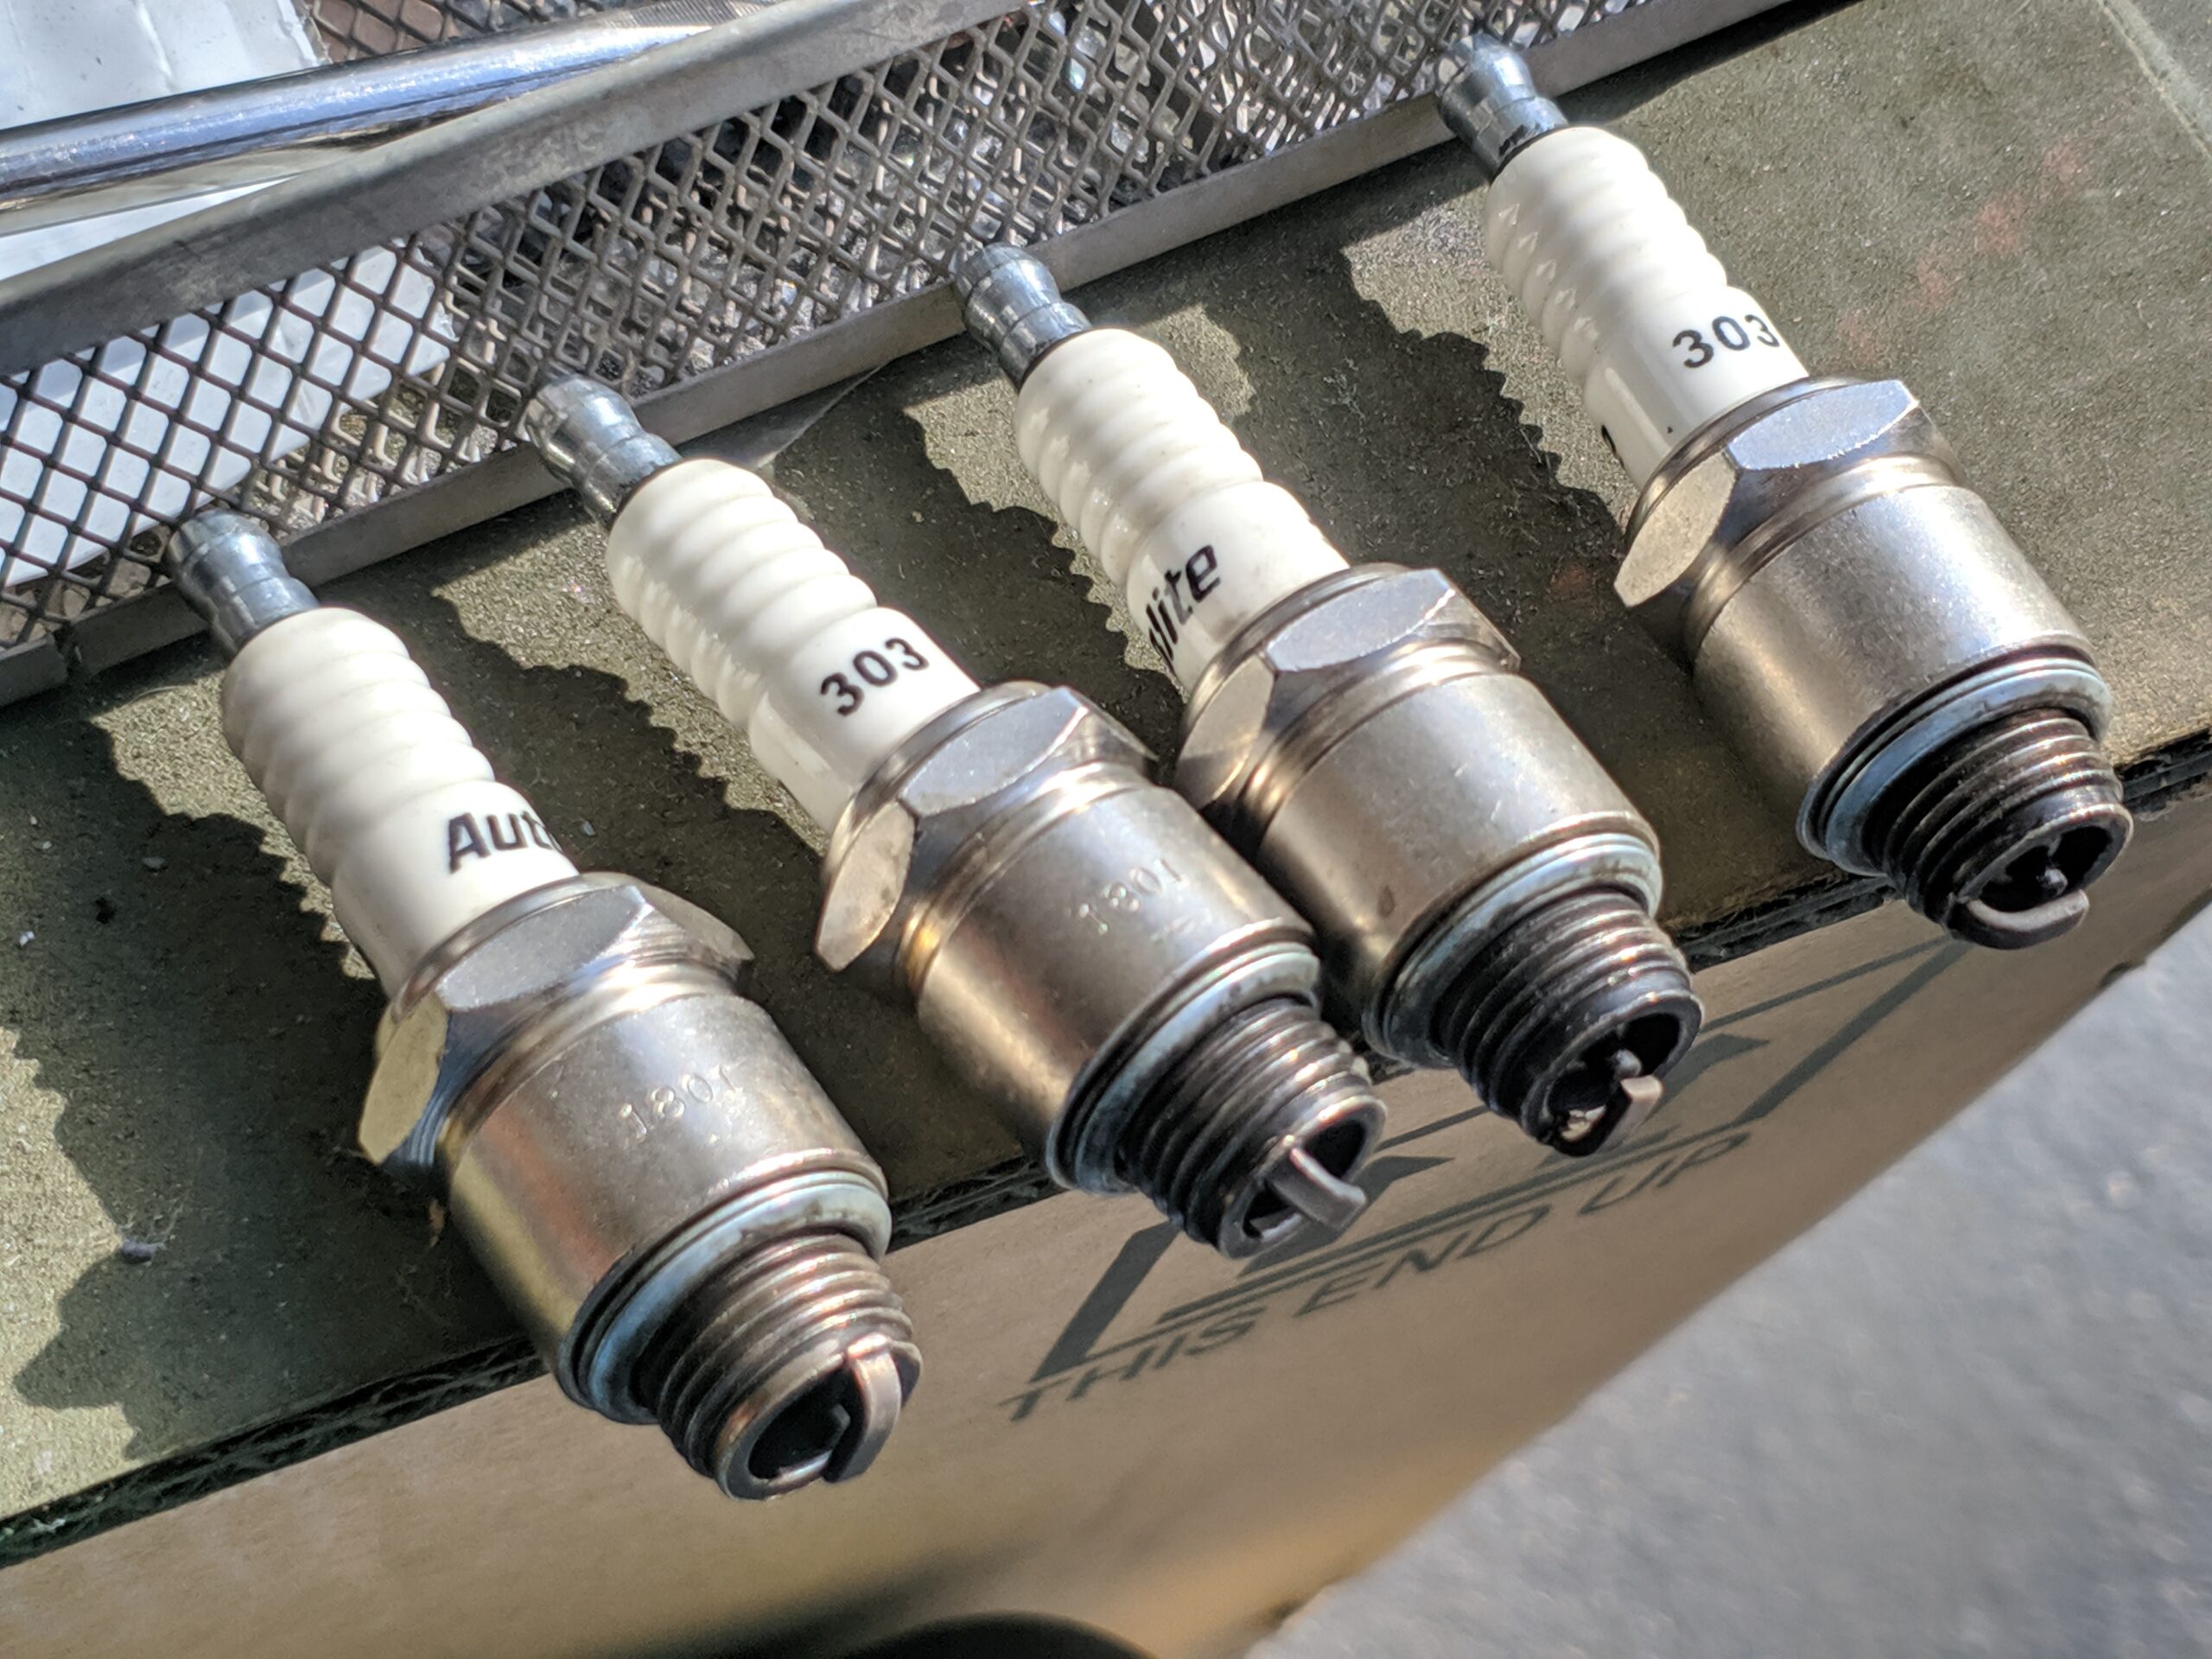
Here’s a look at the difference between the modern R45s and the Joe’s Motor Pool QM-2. The original Champion QM-2s do look a bit different than these repros (the ribbing is different, and the base is black-coated rather than metal), but at least they are marked QM-2 and will look the part better than the R45s.
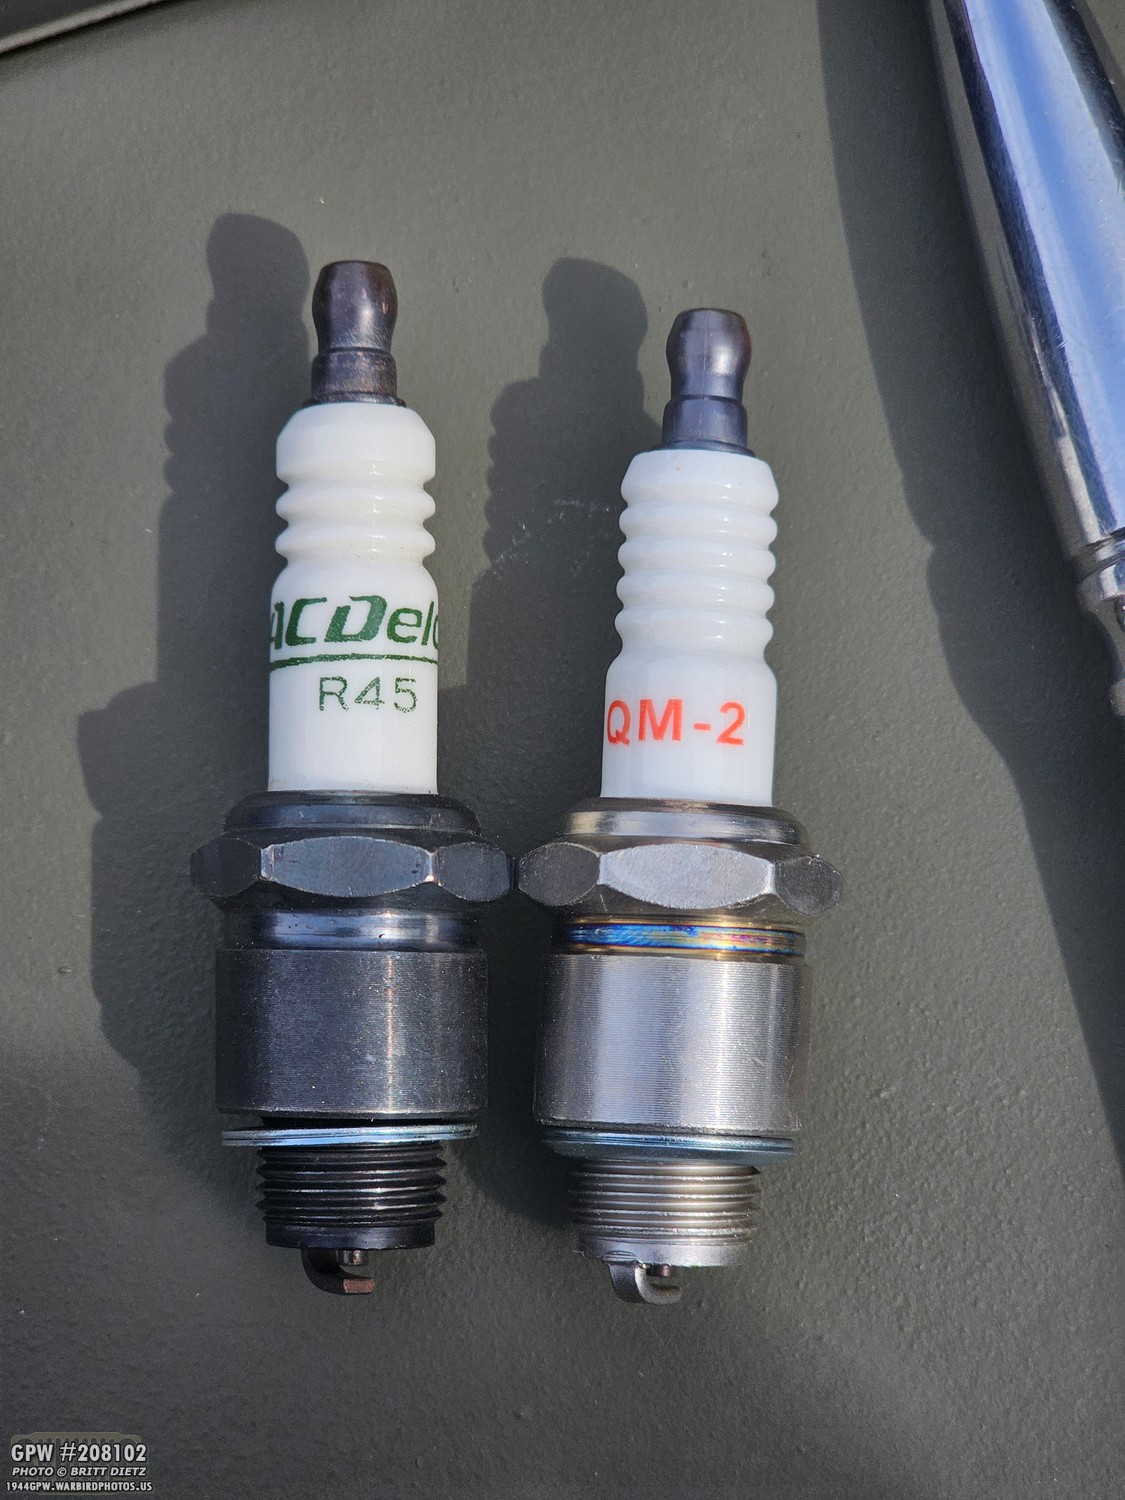
Here’s a look at the two side by side. The QM-2 is a bit shorter, which is more correct for the Jeep spark plugs.
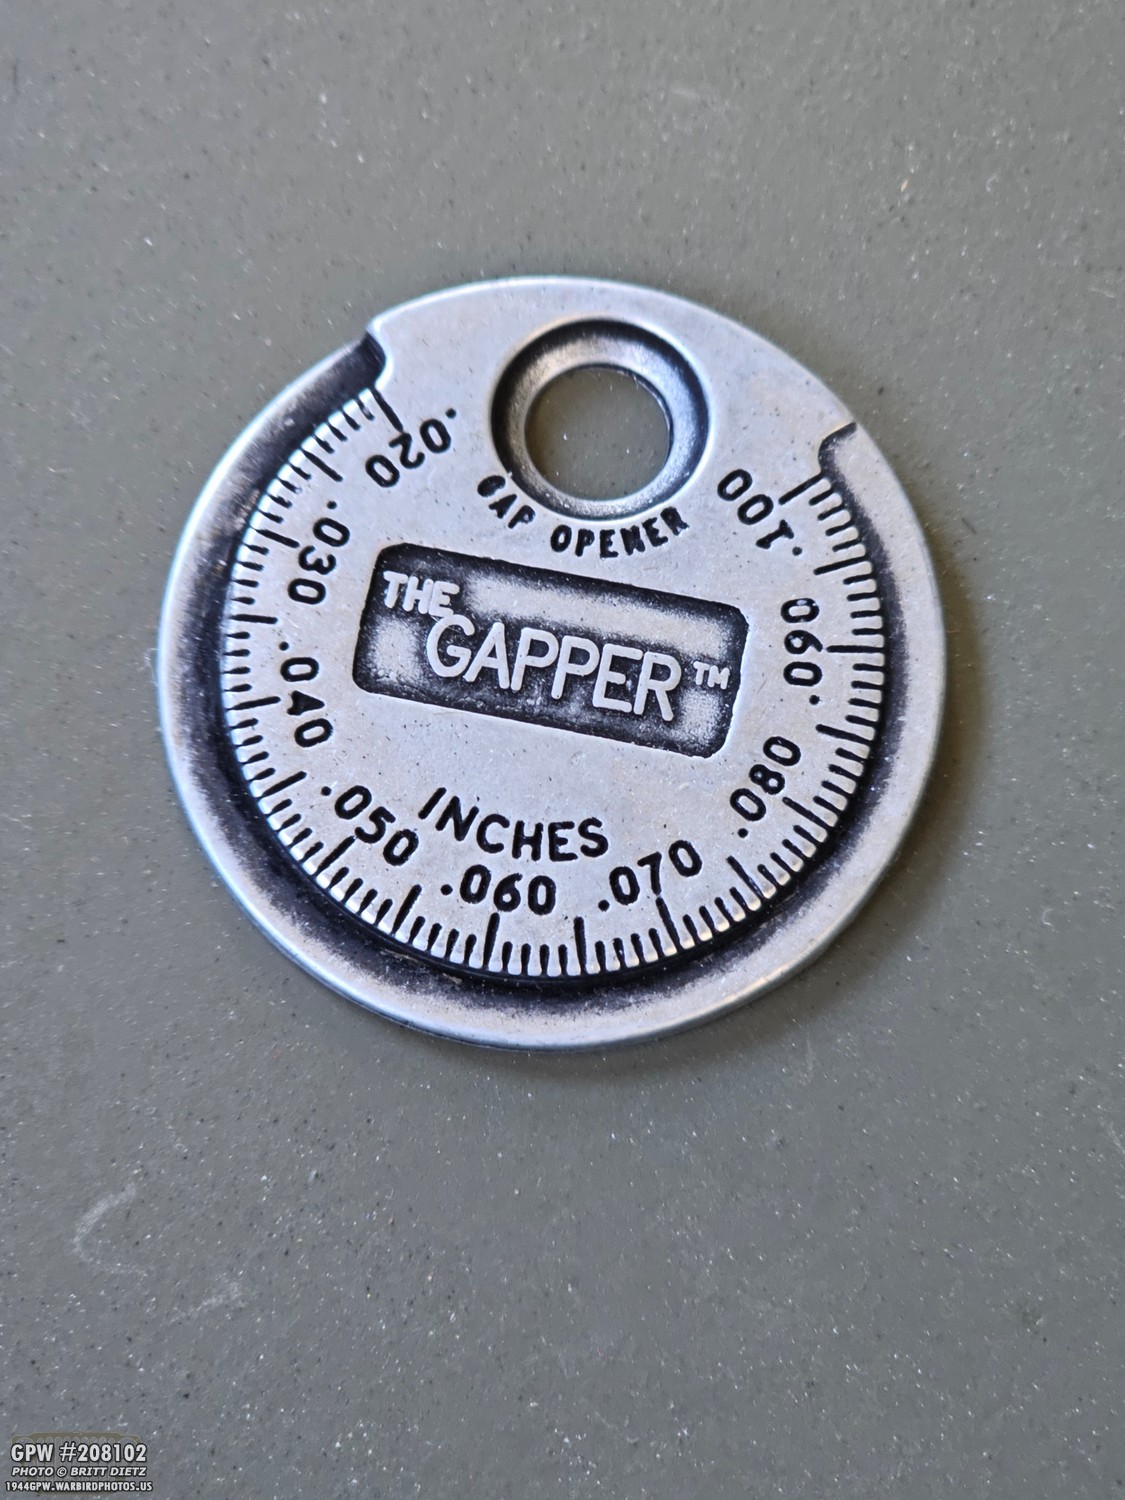
As always, I wanted to make sure they were .30 gapped. They said they were pre-gapped by Joe’s Motor Pool, but you should always check to be sure. This handy little tool makes it fast and easy!
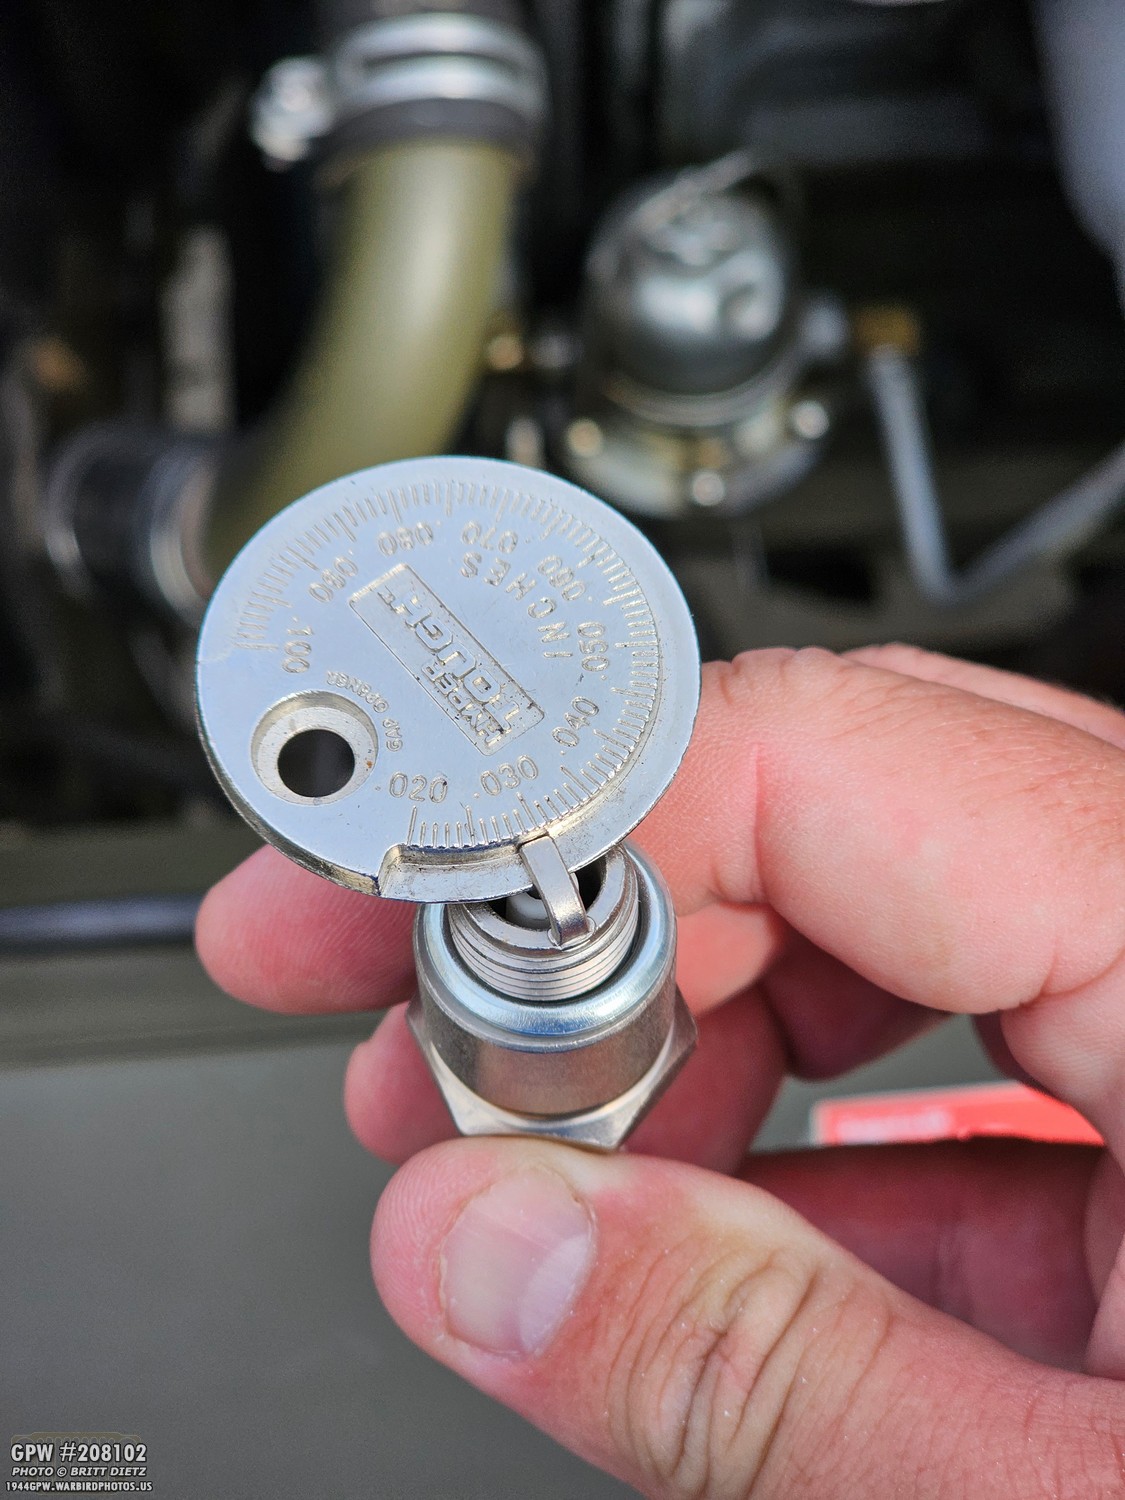
You just insert the thin end starting at the .20 between the two electrodes, and start to turn it until it reaches .30. If it starts to get tight and stops at .30, then it’s correctly gapped. If not, it’ll gap it to that side by bending the arm out as you turn it. If it’s gapped too much, then it’ll go past the .30, and you’ll need to bend down the electrode arm and start over at .20 till it is tight at .30.
With all four new spark plugs in the Jeep, I took her for a run through the neighborhood. Success! They worked great and sounded good. So, crisis averted. Unfortunate to have to take out the Firestones, but for the best. Let’s move on to the next thing!
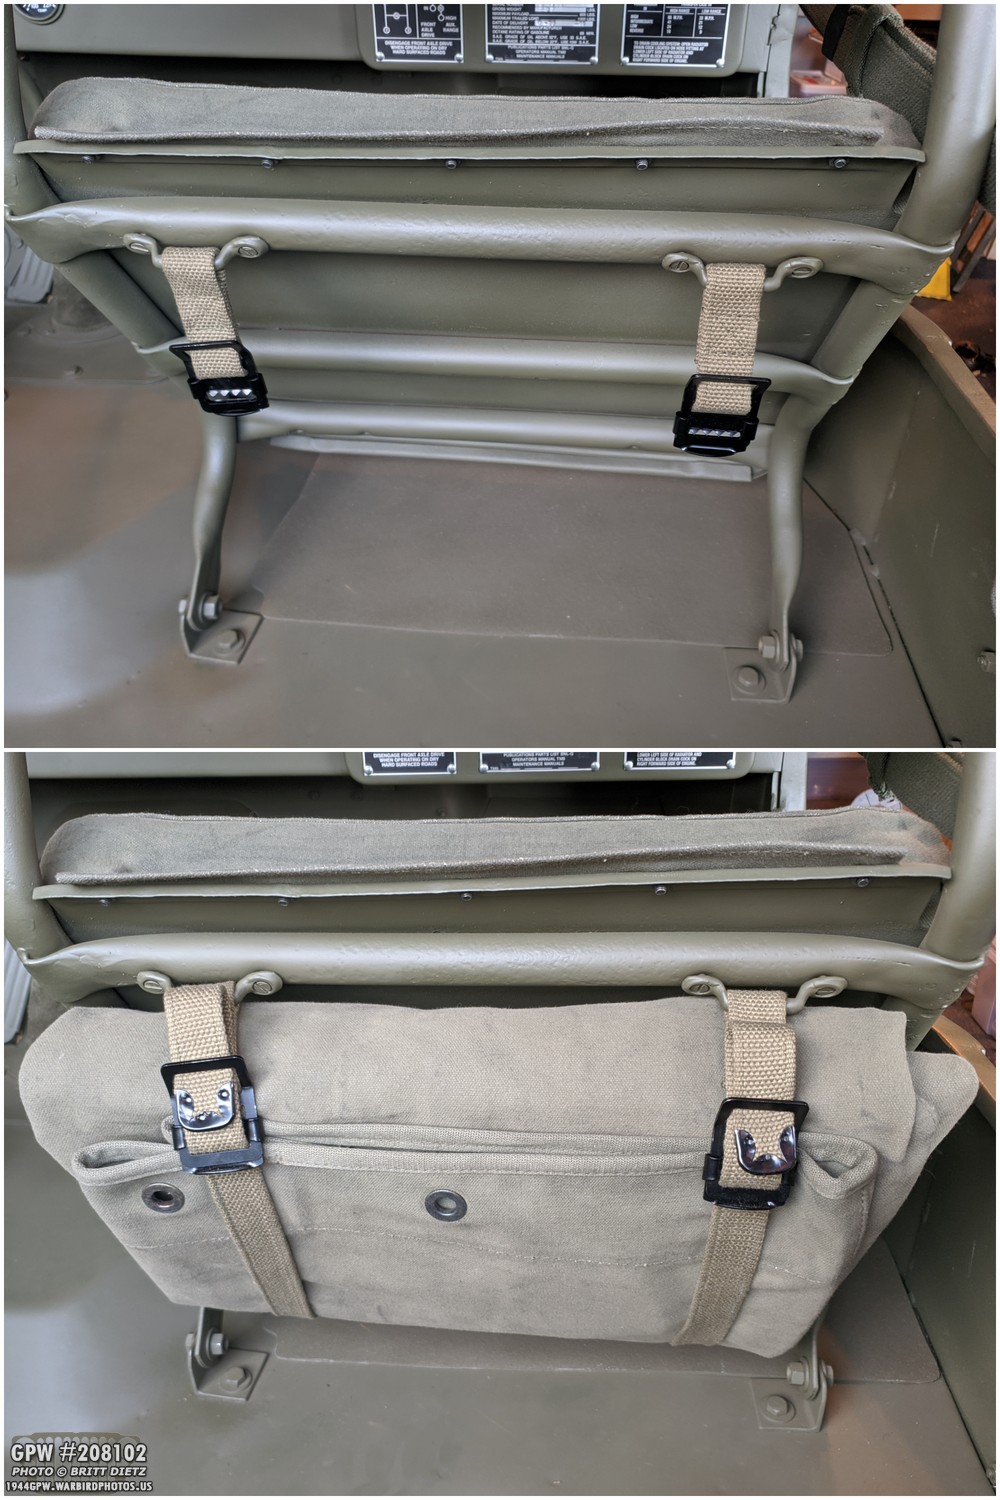
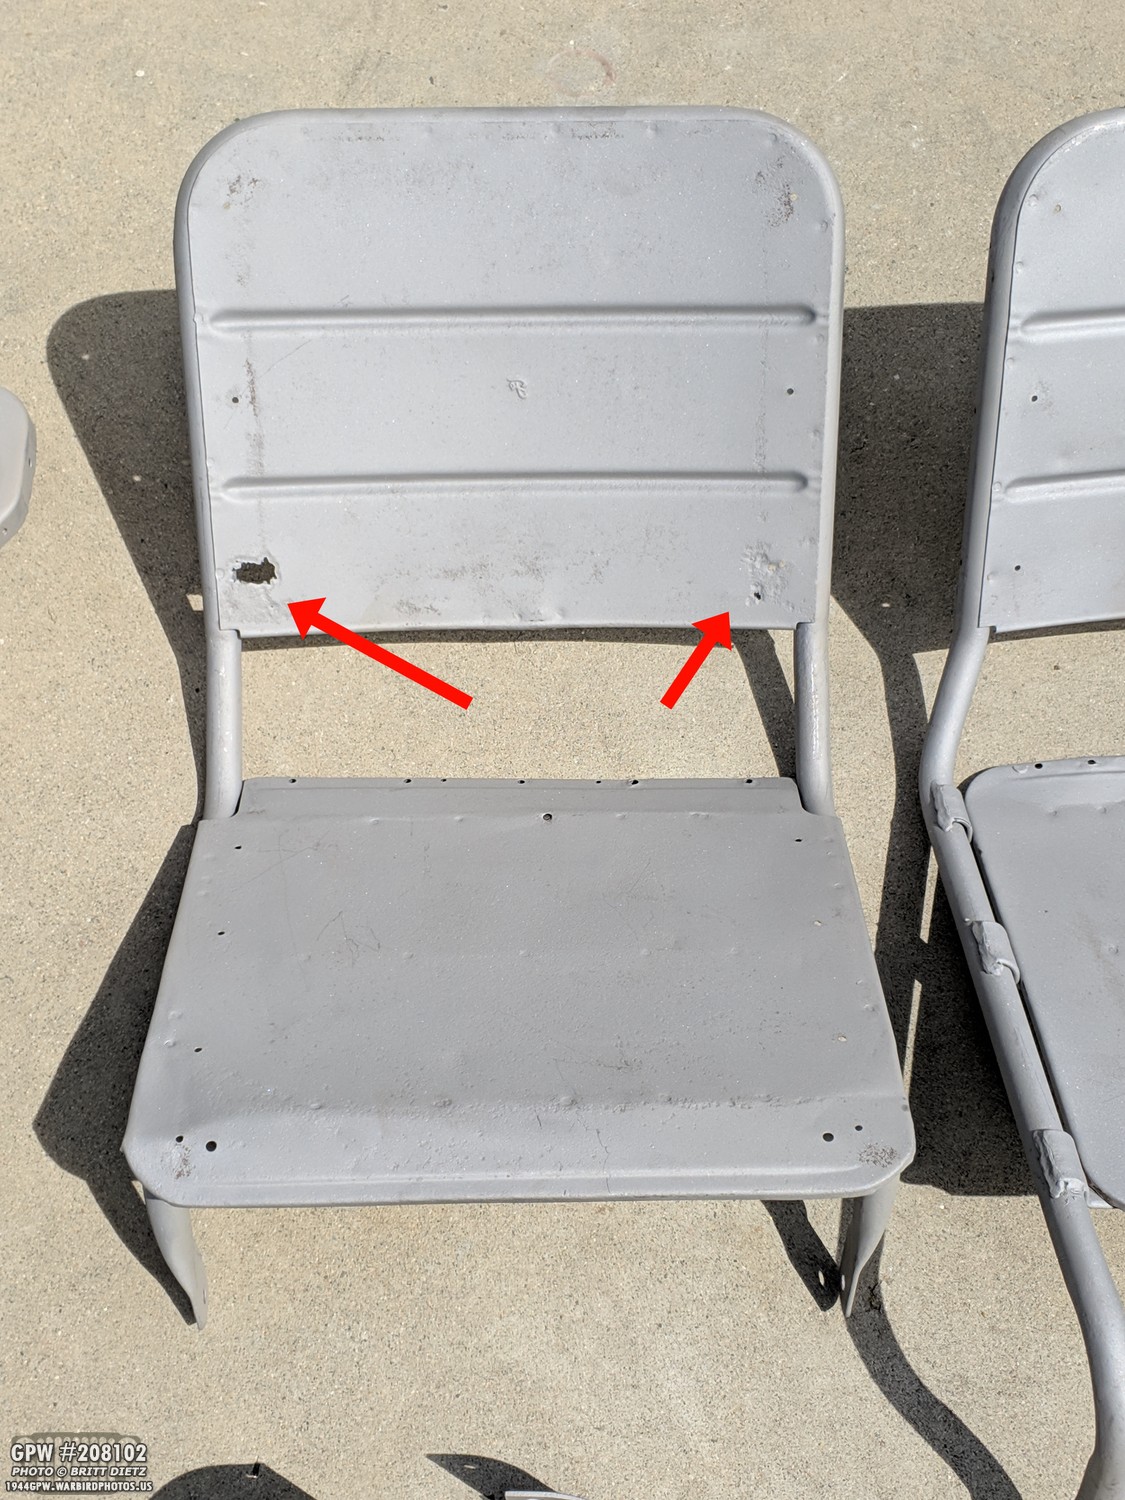
So, I haven’t had my canvas top on my Jeep since December. I know, incredible! The top has been stowed underneath the passenger seat, as it should be, with the under-seat straps. But, I noticed something weird the other day, that my canvas top wasn’t sitting perfectly under the seat. Upon further inspection, I saw that two of the footman loops had ripped out of the bottom of the seat, and the straps had come undone! Sadly, I didn’t get a video of the damage, but here’s what it looked like before they ripped out.
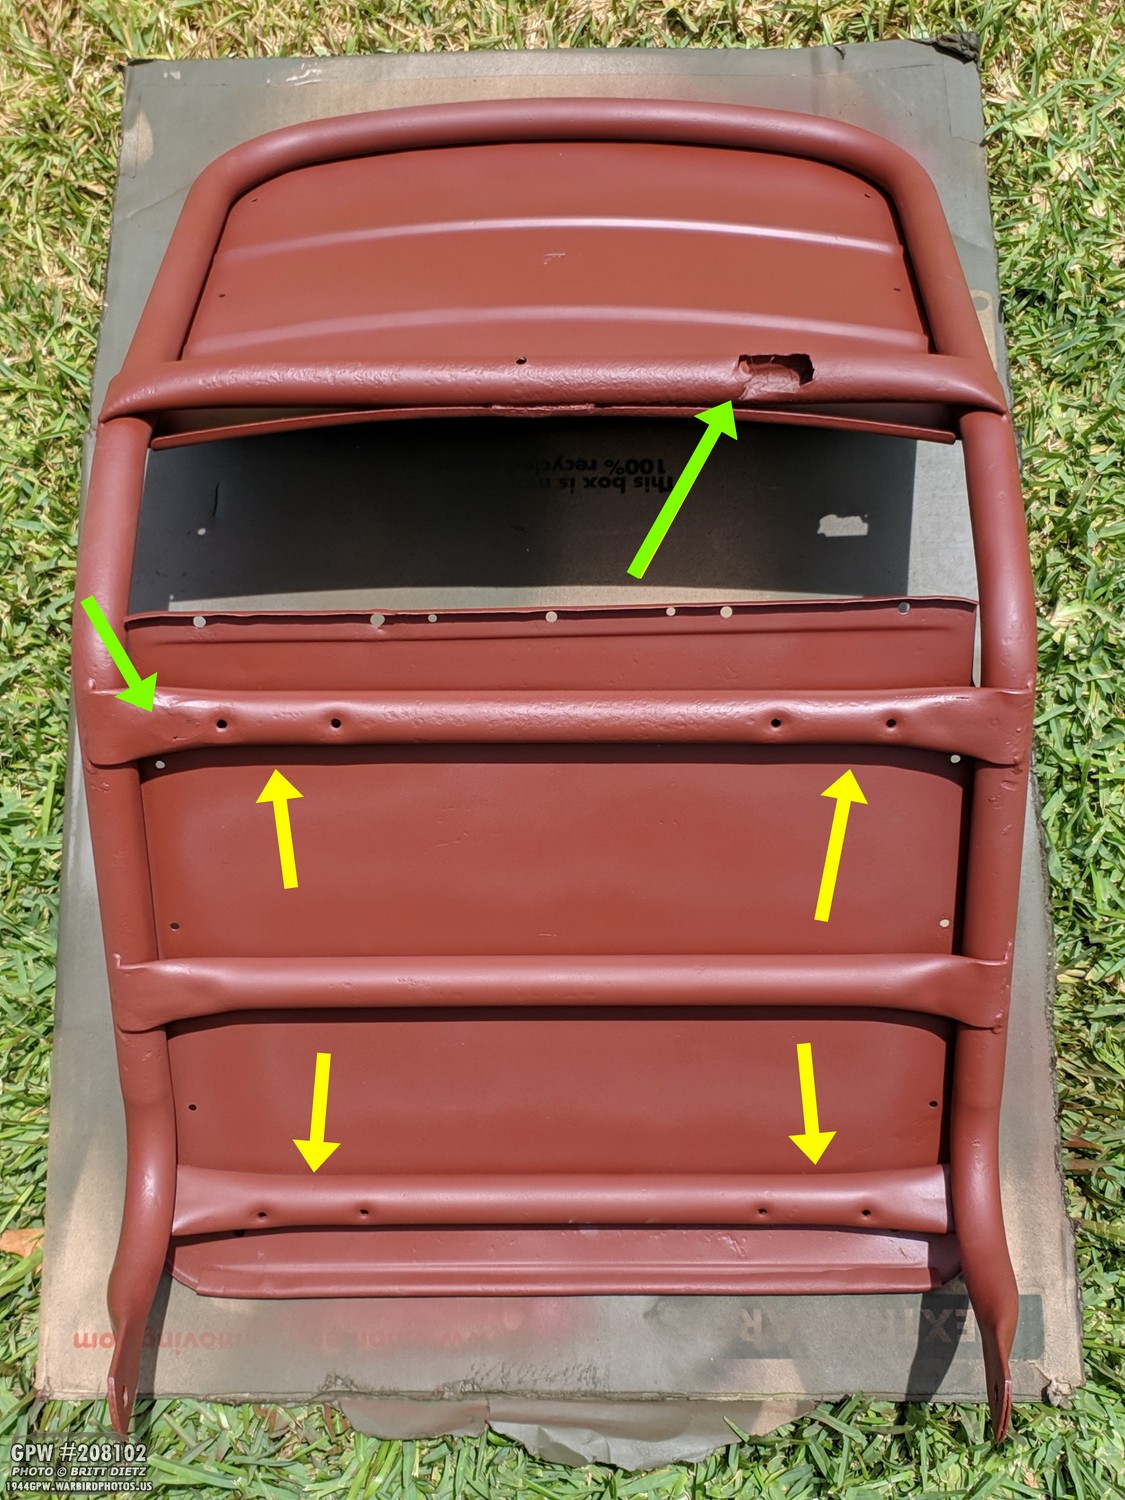
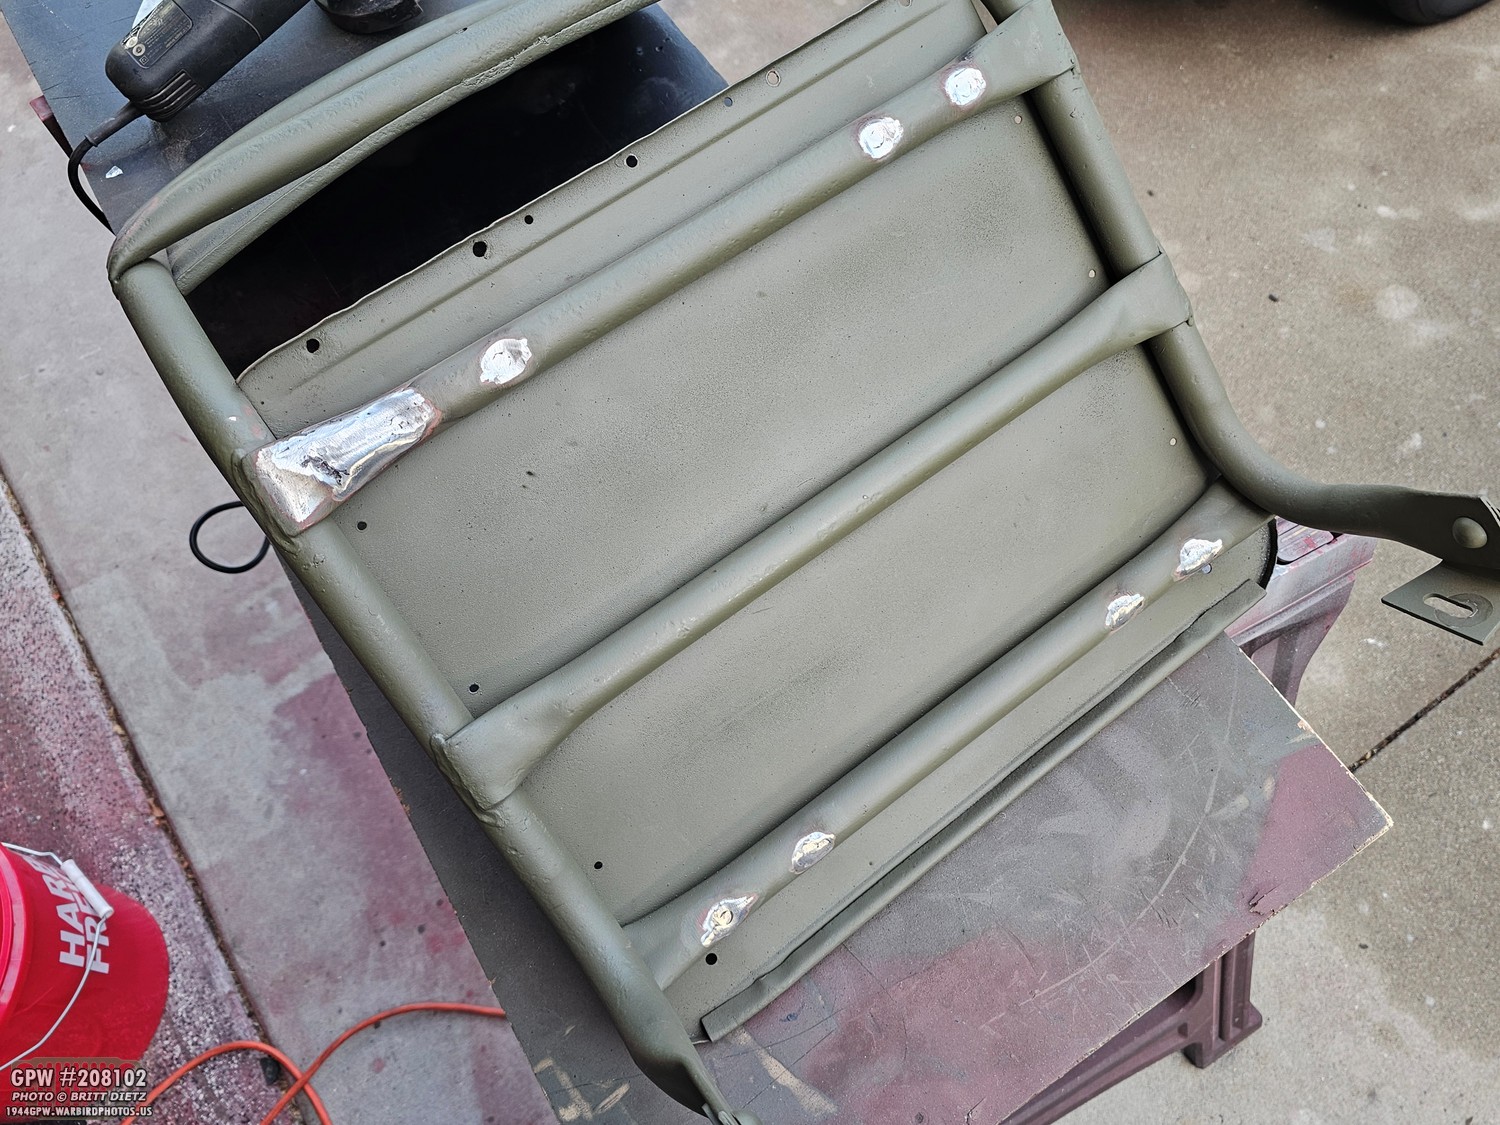
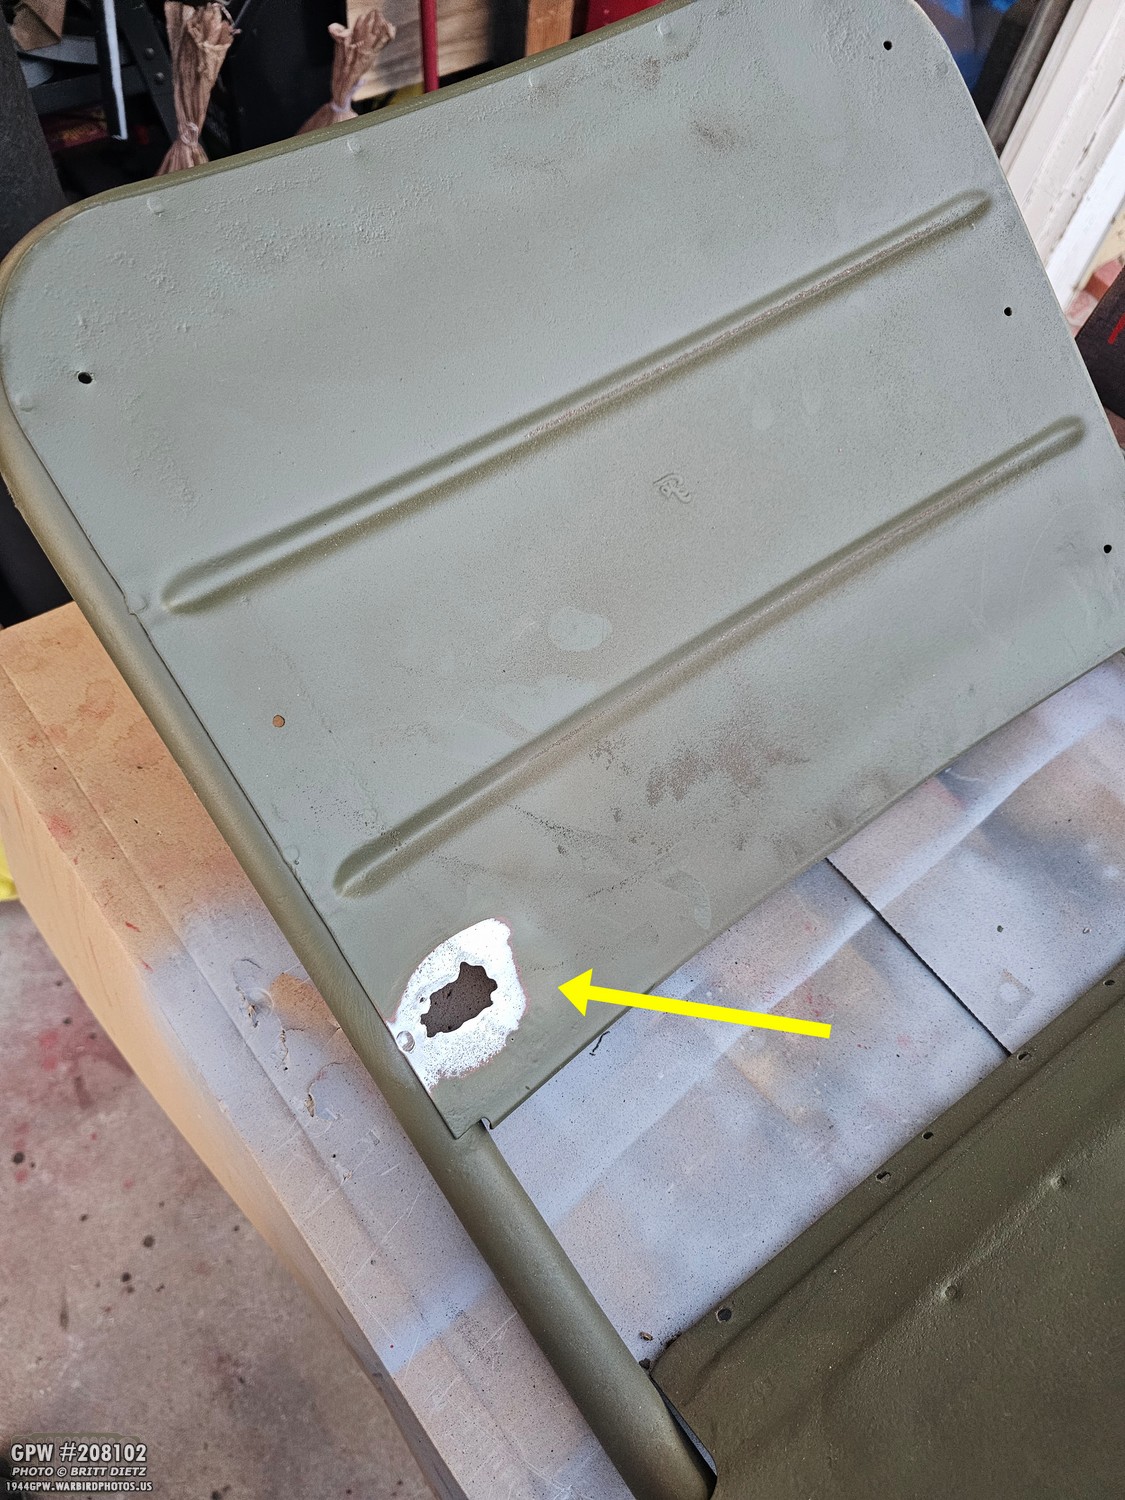
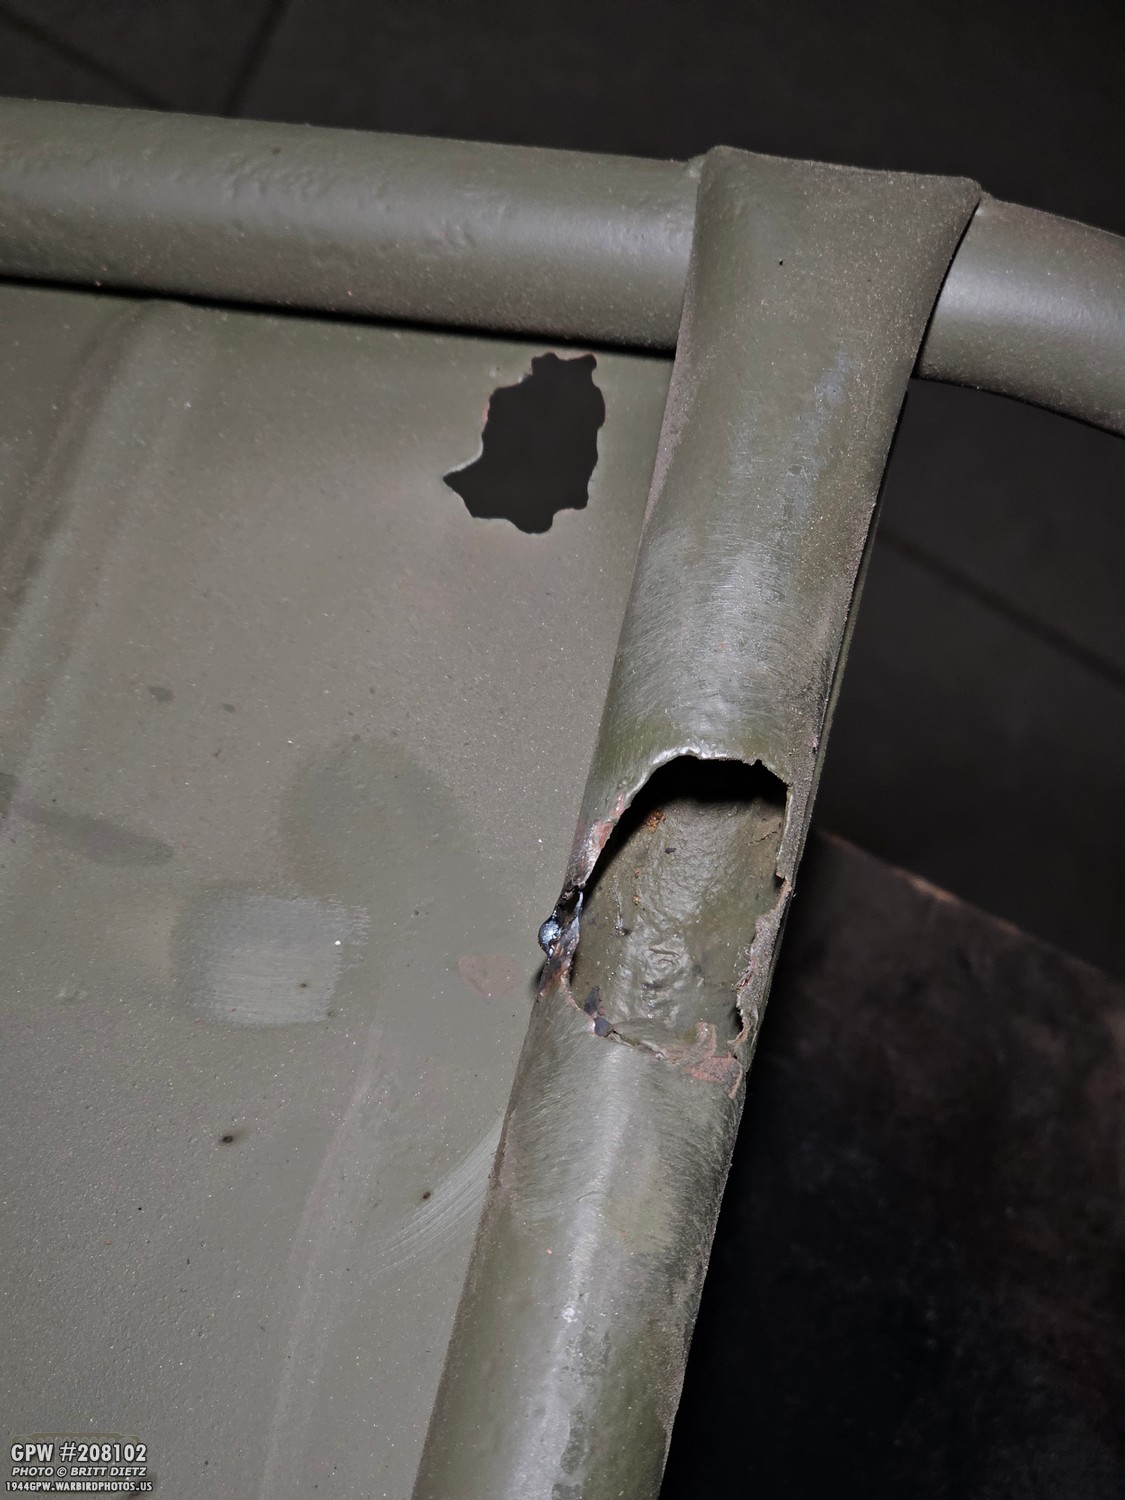
Now, let’s go back in time. My passenger seat has had issues since I got the Jeep. As you can see here, there’s a gaping hole in one of the backrest tubes (green arrow). The other green arrow shows another area with a gaping hole, but I filled this one with JB Weld. The footman loops are attached to the eight holes. Sometime in this Jeep’s life, those holes were enlarged or stripped. In order to get them to work, I filled them with JB Weld Steel and re-tapped the holes. That worked for many years, but it appears the JB Weld Steel finally gave way, and the screws ripped out. This photo was taken back when I was restoring the Jeep.
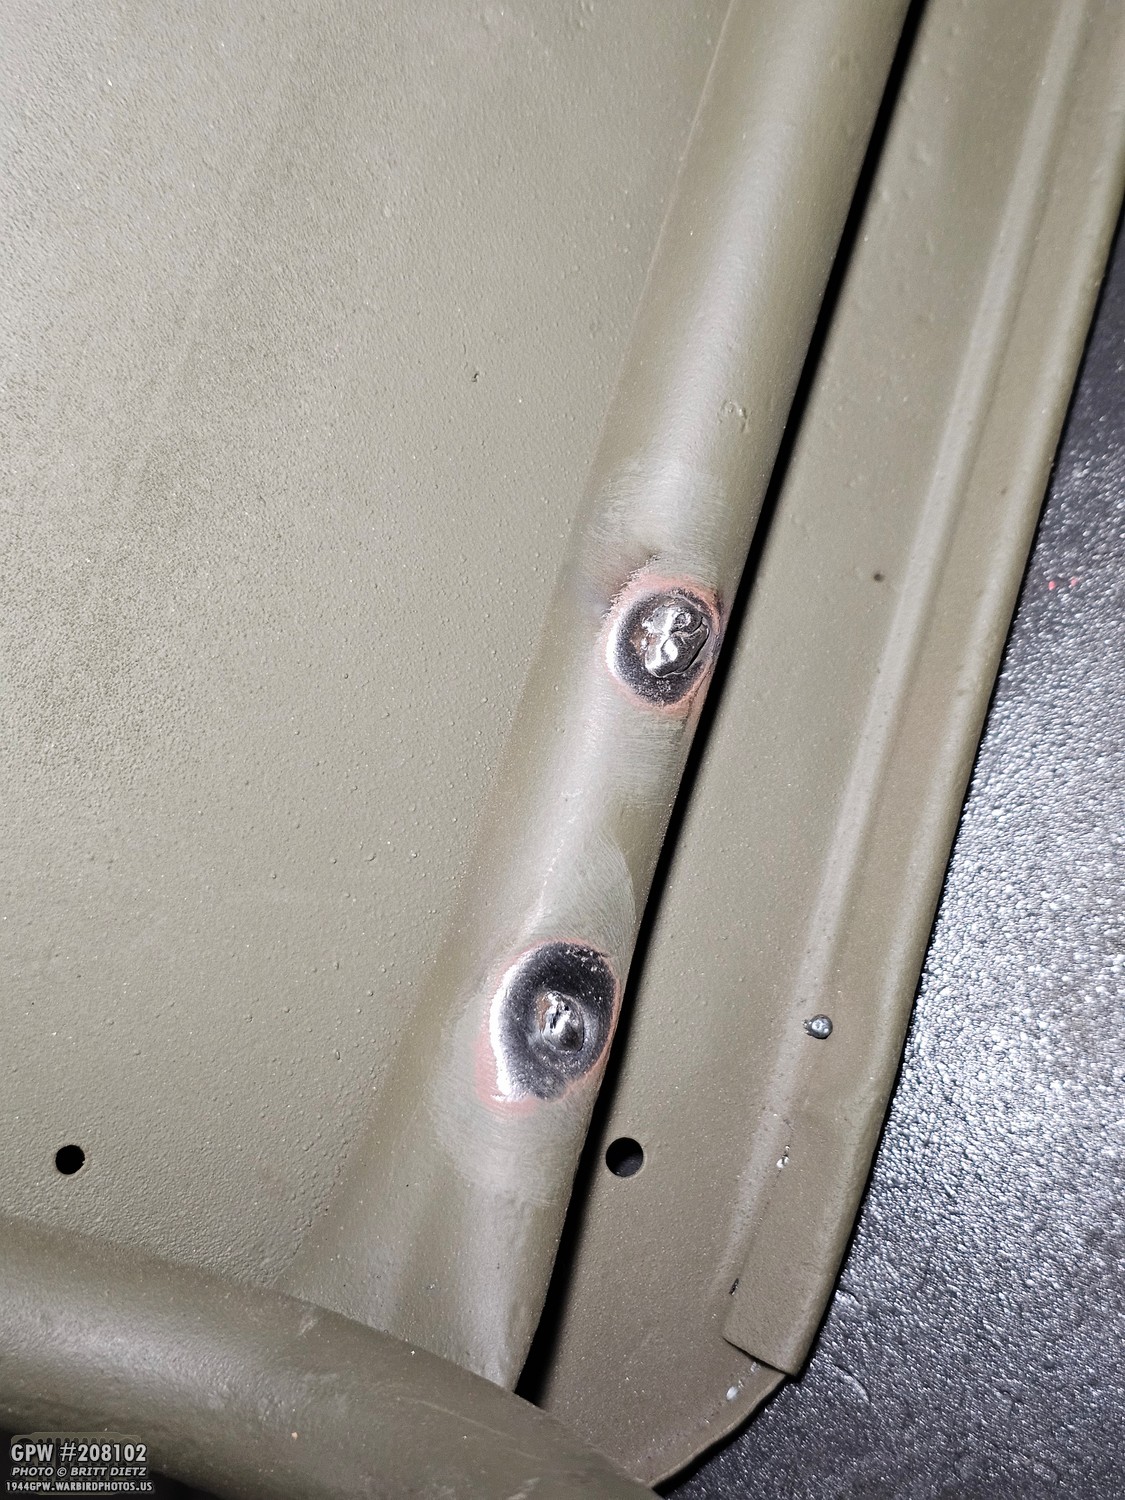
I decided that it was time to properly fix the passenger seat. So, I took the seat out, and the first task was to redo the footman loop holes. This time, I welded them shut. The idea was to weld them, smooth the welds, drill holes, and properly re-tap the threads so it’s in metal. Here are two of the holes after welding shut.
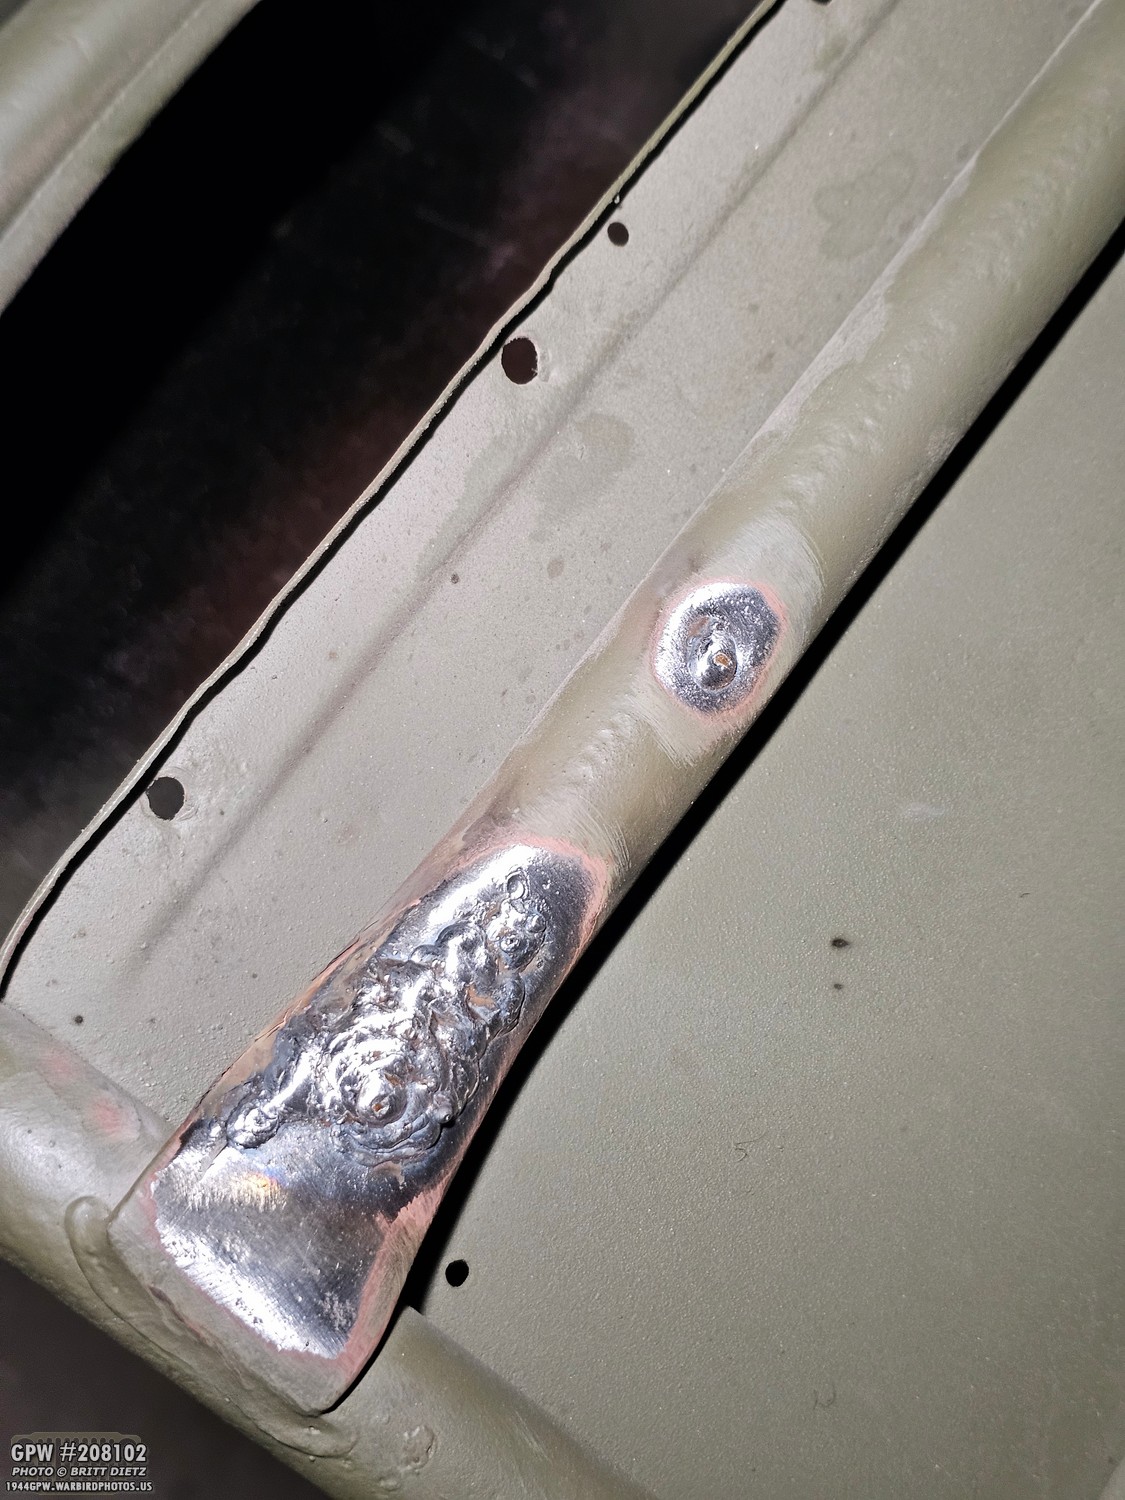
Now, remember that one area that I said had a gaping hole that I had filled with JB Weld Steel? I decided to fill that in as well. I removed all the JB Weld Steel, then welded the hole up. It isn’t pretty, but I wanted to make sure the metal was thick.
Here’s after the flap-wheel sanding of all the welds (and the first pass of smoothing the gaping hole area).
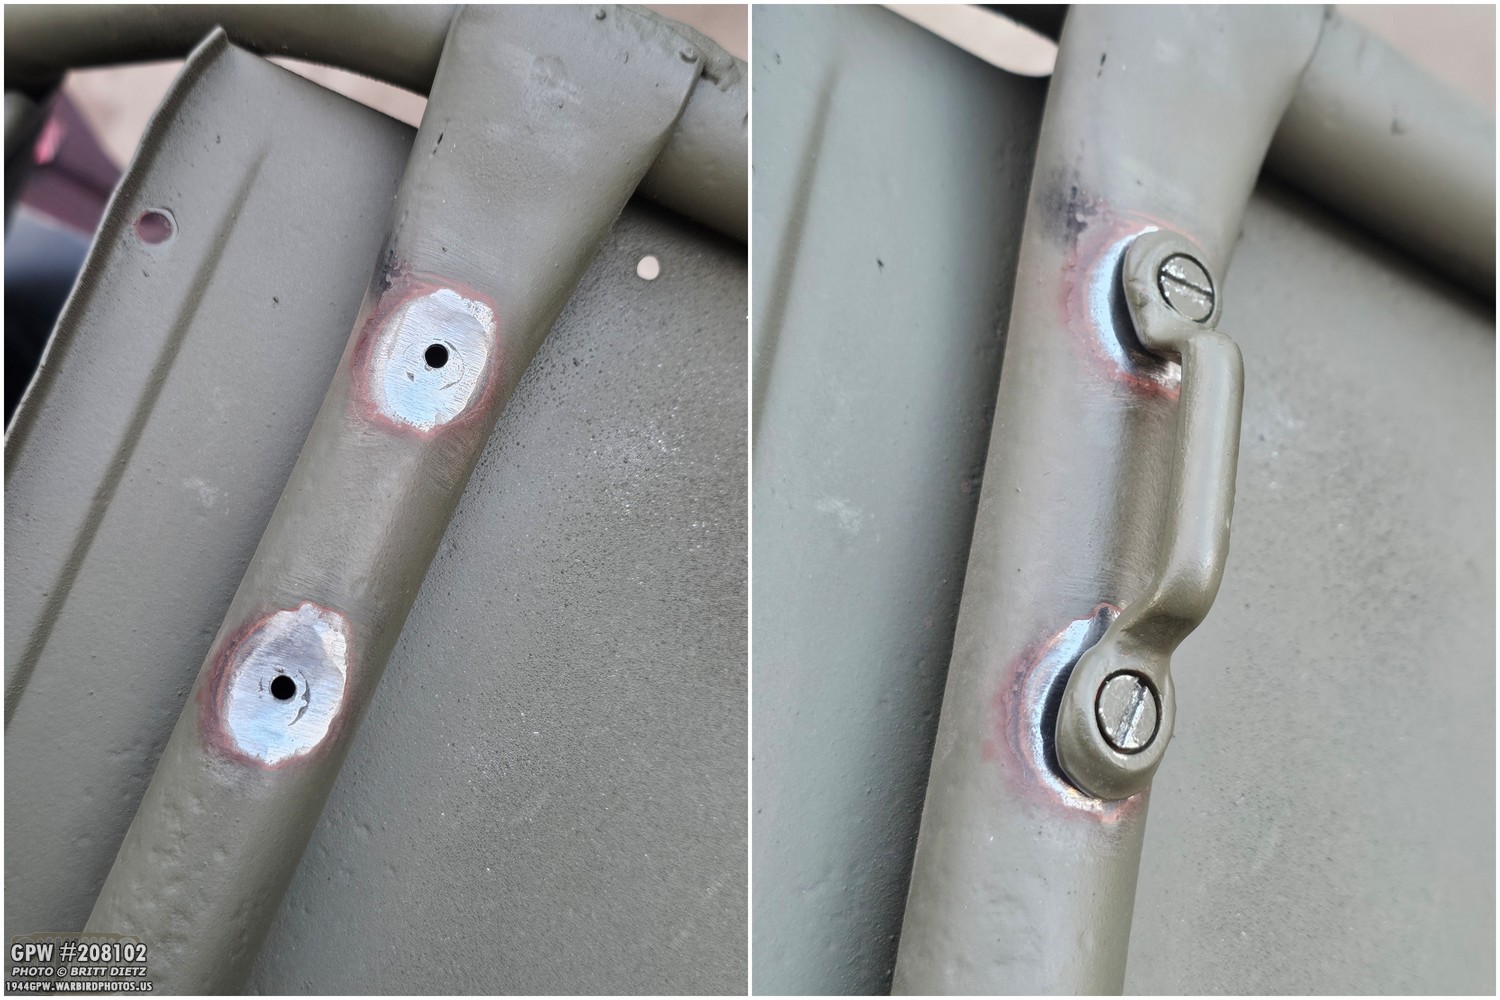
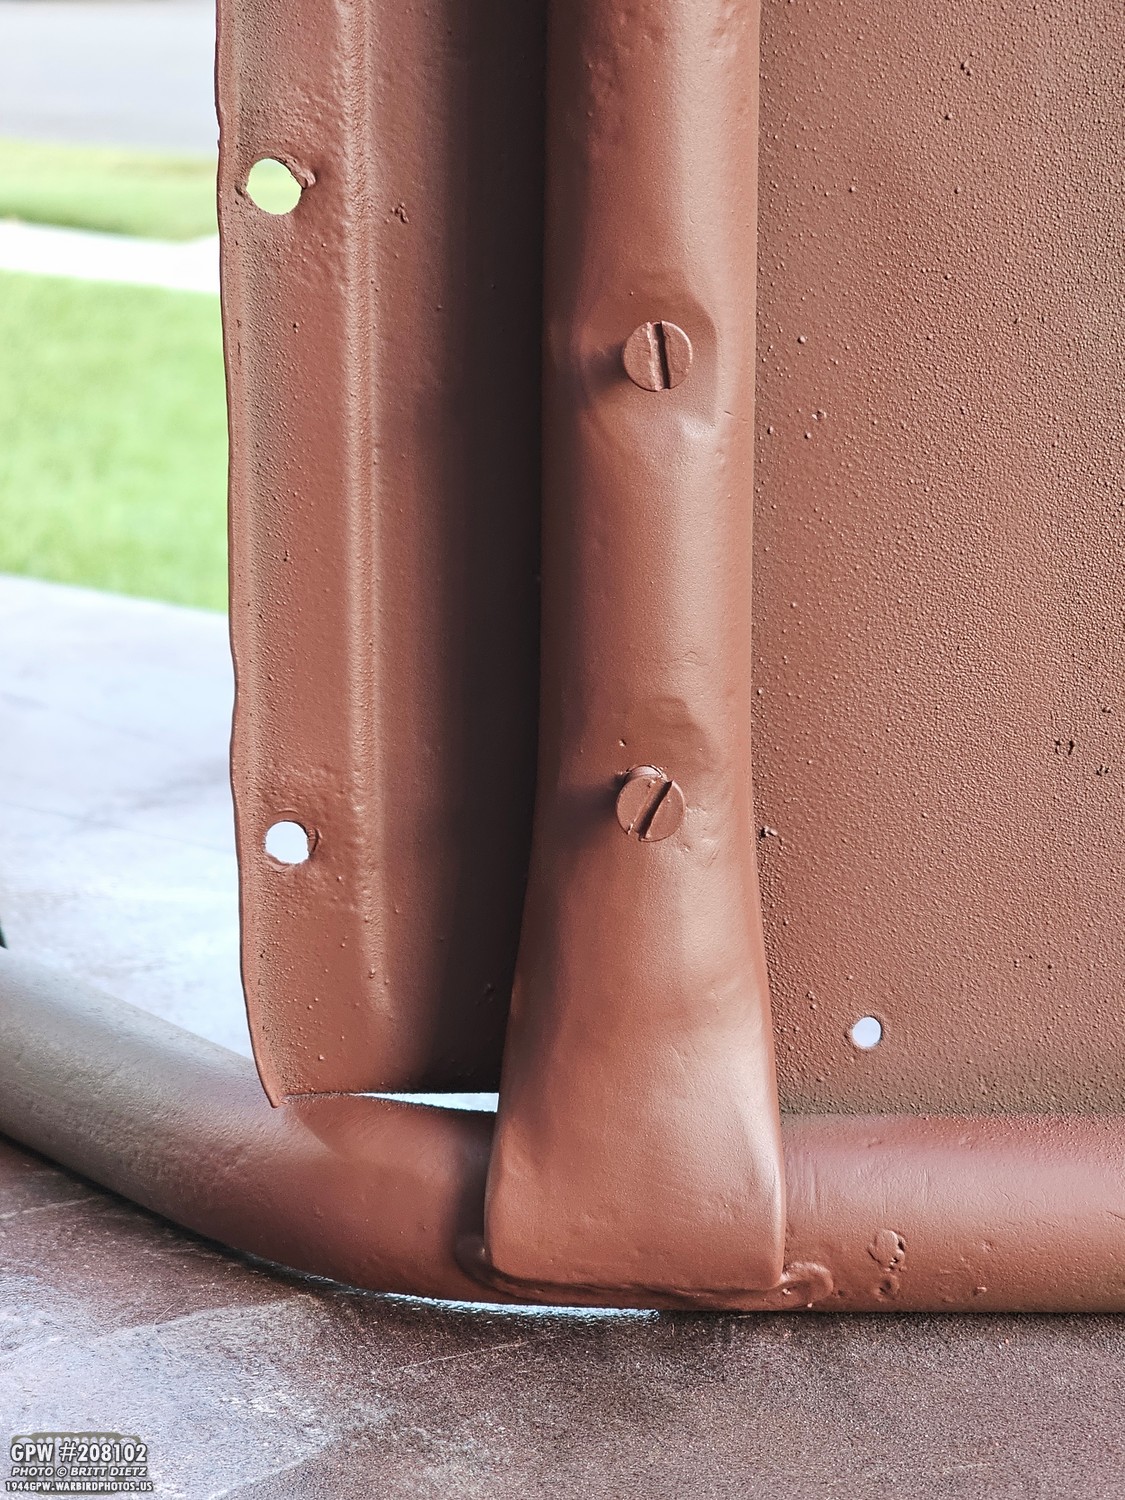
I then drilled the nearest hole to the footman loop bolt size (#10-24), and then tapped the threads. Success! The footman loops were tight as can be. No way those will pull out now. You can see in the left photo that there’s some more smoothing I could have done to the weld, but I wanted to leave the metal thick.
I did the same thing to the other six holes. It took a while as the welded steel was thick, but at least all four footman loops are repaired!
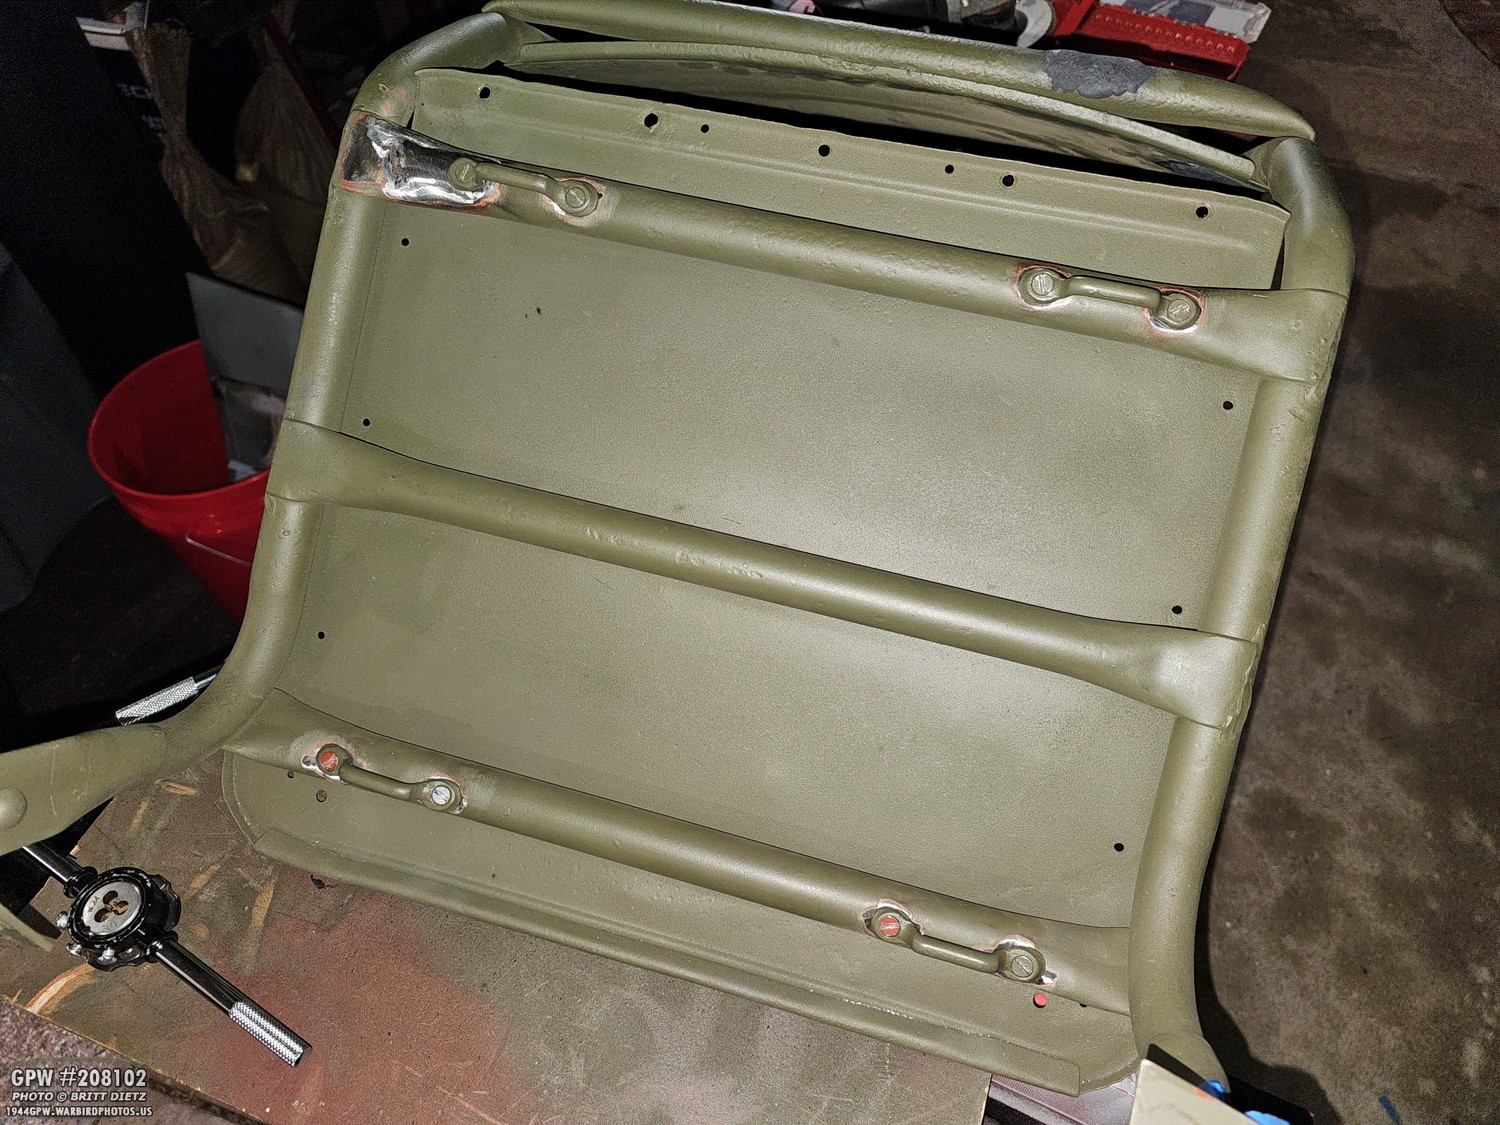
I then used a little bit of Bondo to smooth out some micro holes and welding imperfections.
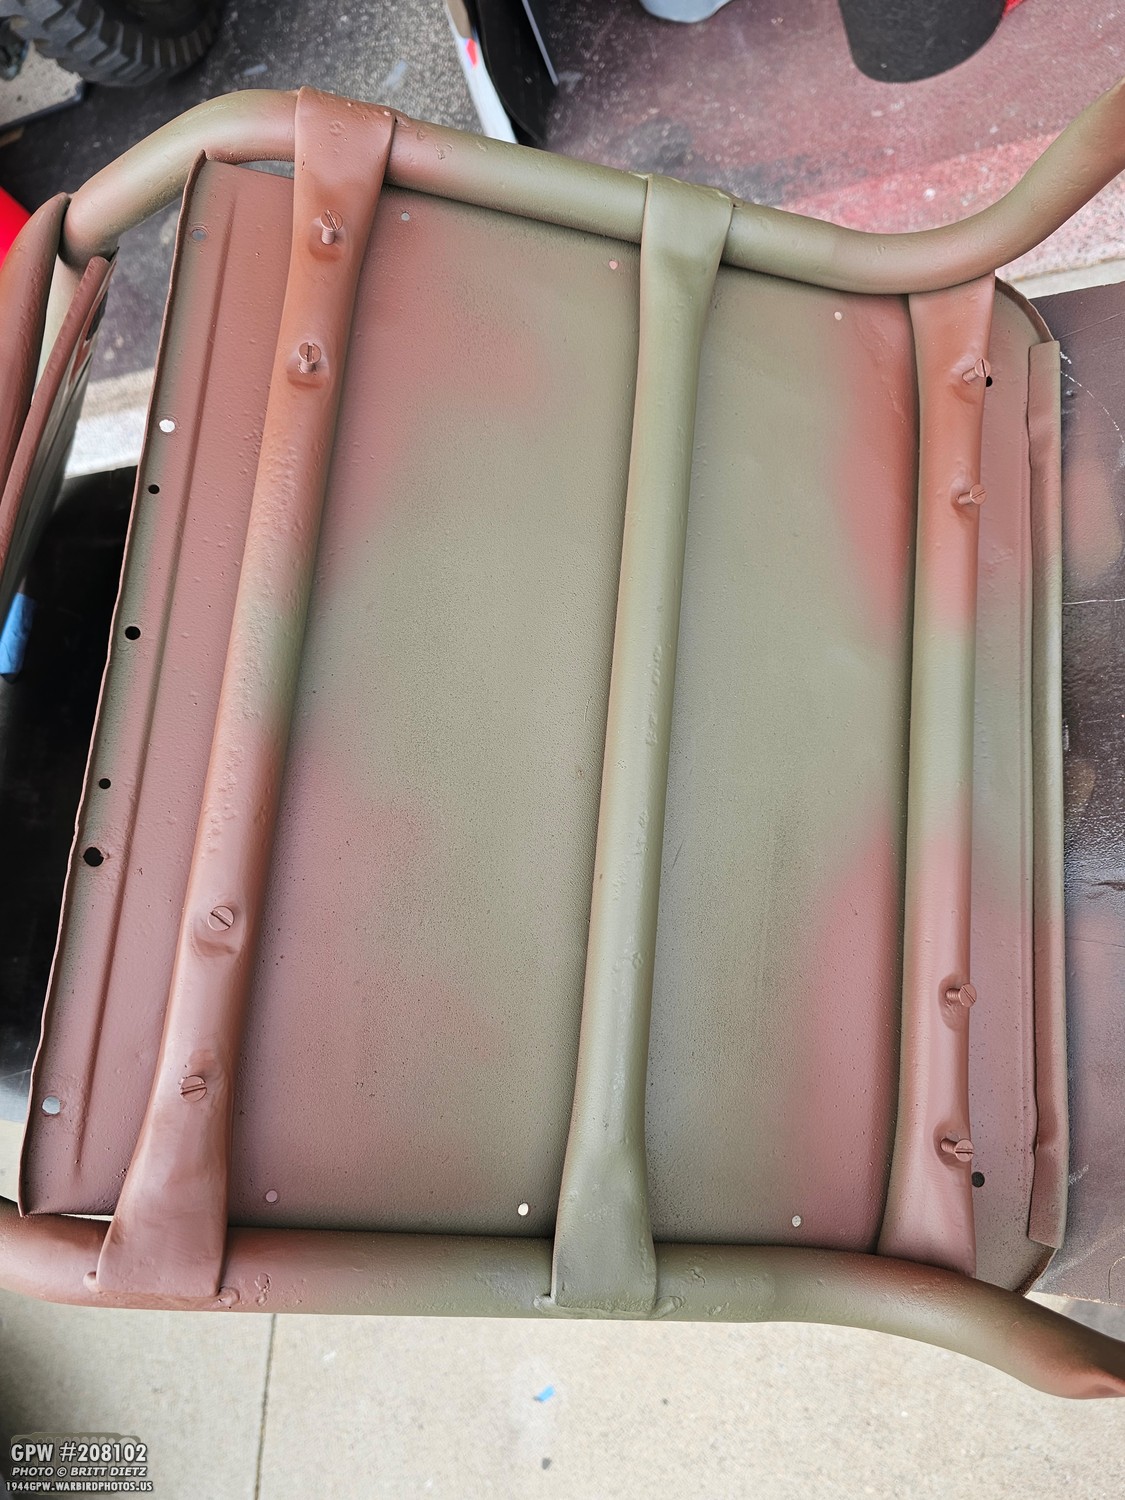
After some red oxide primer, the seat is ready for 33070 OD Green paint!
And here’s a look at the section that had the gaping hole. You wouldn’t know it now! I think it came out pretty nice.
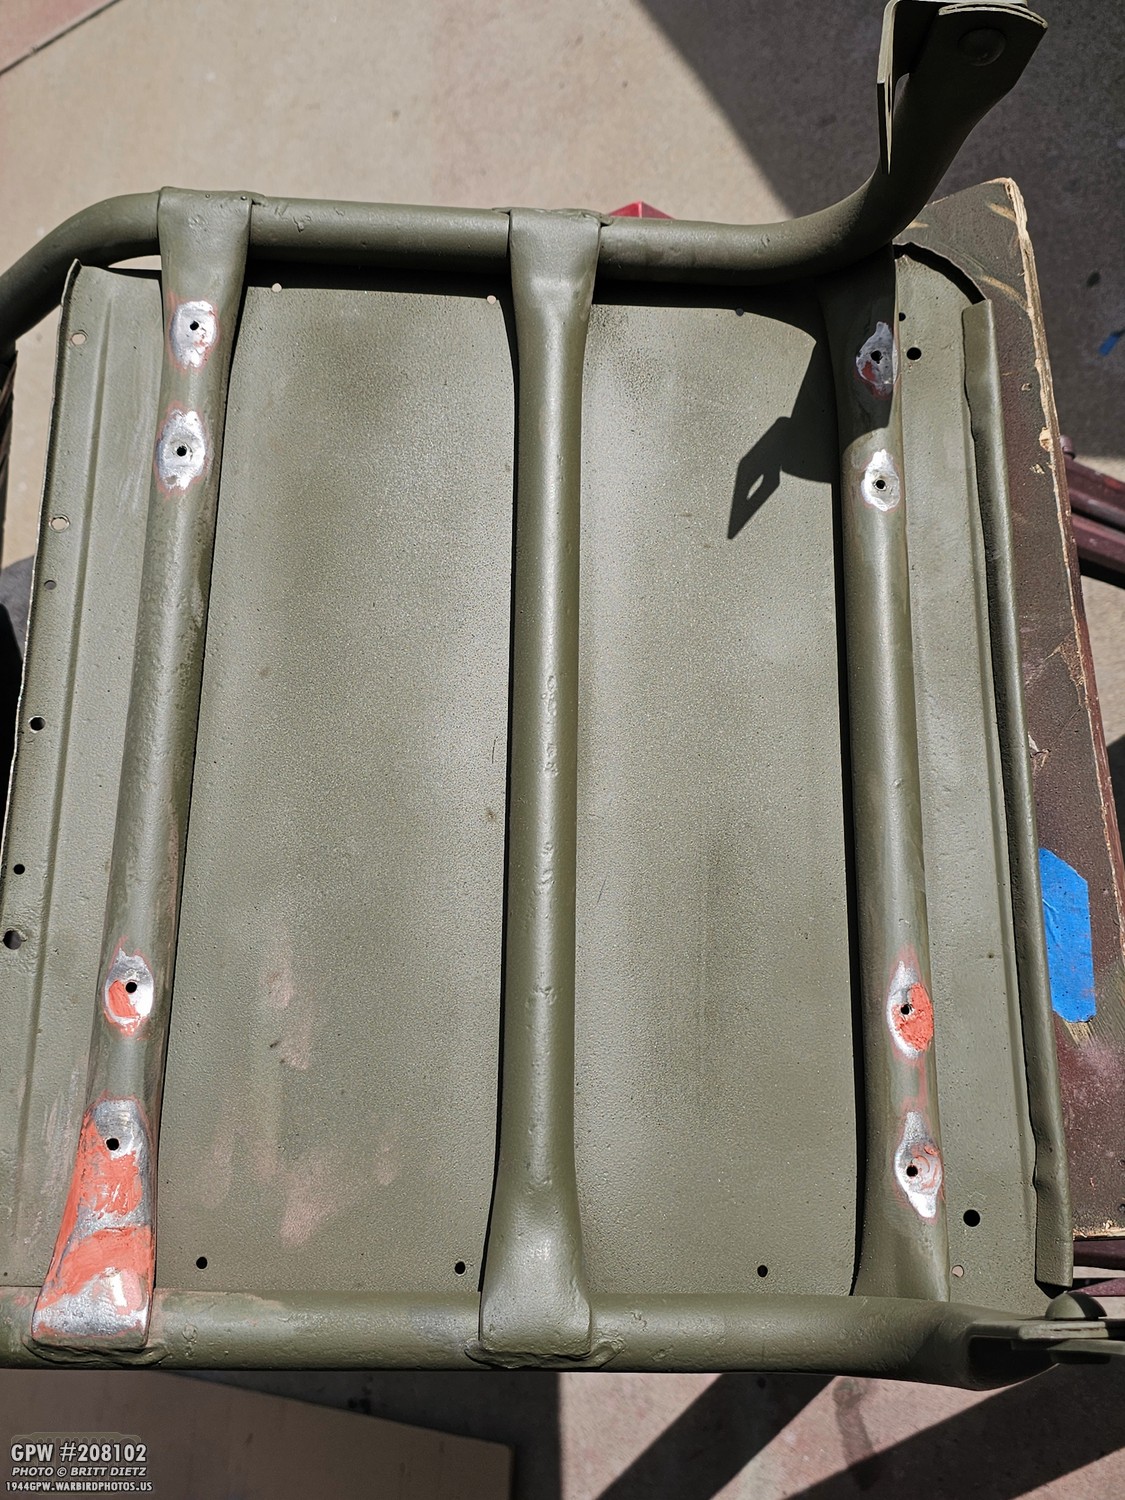
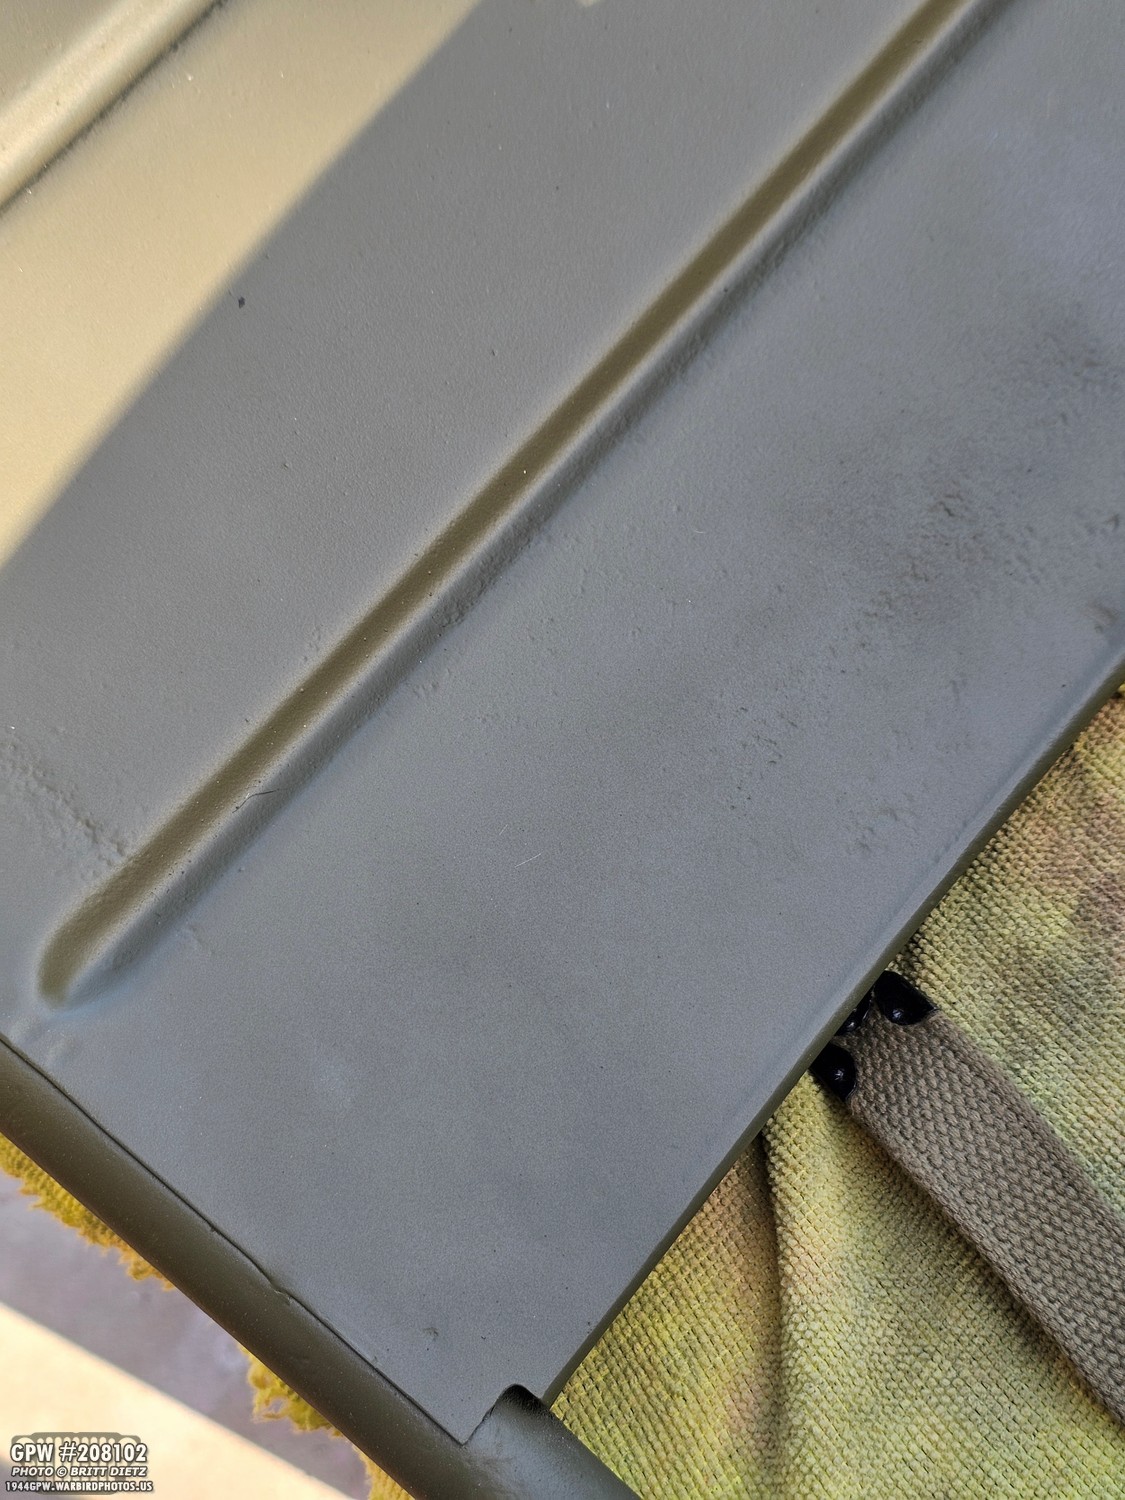
Now, moving on to the rest of the issue on the passenger seat. Here’s a look at the top side when I got the seat back from the sand blaster. You can see, there is a gaping hole in the back pan, and a smaller hole (and rust damage) on the other side.
On the back side, you can see that hole in the back pan, and there’s the other gaping hole I mentioned earlier in the back rest tube. I had just put some tape over the hole and painted it 33070, and didn’t even bother fixing the hole on the back pan (since the seat cushion was against it, there was no rush). But I felt that, since I’m already working on the seat, it’s time to finally fix it.
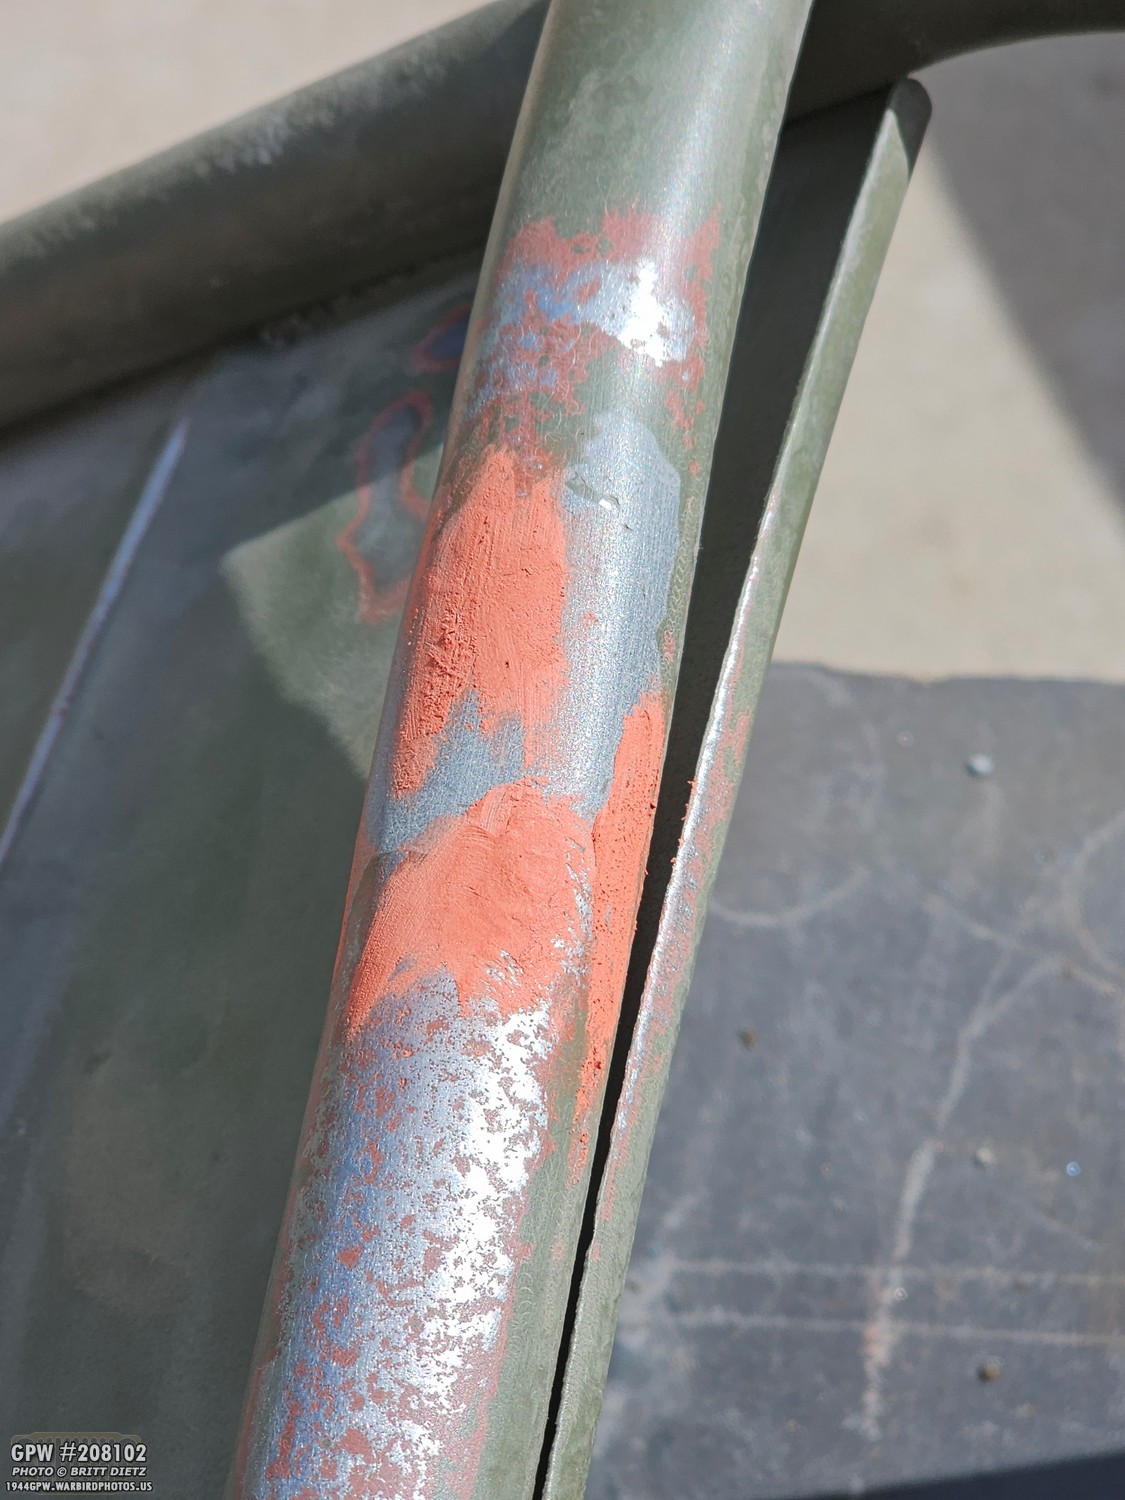
Now, I’d used JB Weld Steel on the other side with the smaller hole. That was still holding up great, so I didn’t see a need to do anything to that. But I went ahead and prepped the back pan hole for what was originally going to be welding.
Flipping the seat over, here’s a good view of both the holes. As I just mentioned, I was going to weld it. In fact, you can see the starting bead of a weld I did on the tube. But I ran out of welding wire, which was actually a good thing. It made me realize that welding these sections is going to be a big pain. JB Weld Steel would work perfectly here for these two holes.

So, over the course of two days, I built up JB Weld Steel on both the back pan and the tube. It was a slow process, as I wanted to make sure it was thick and strong. The newer JB Weld Steel seems to be much stronger than what I used many years ago.
After it had fully cured, I spent a few hours sanding it flush and flat. I was starting to look really good and was strong as can be. I used some Bondo to fill in any small imperfections.
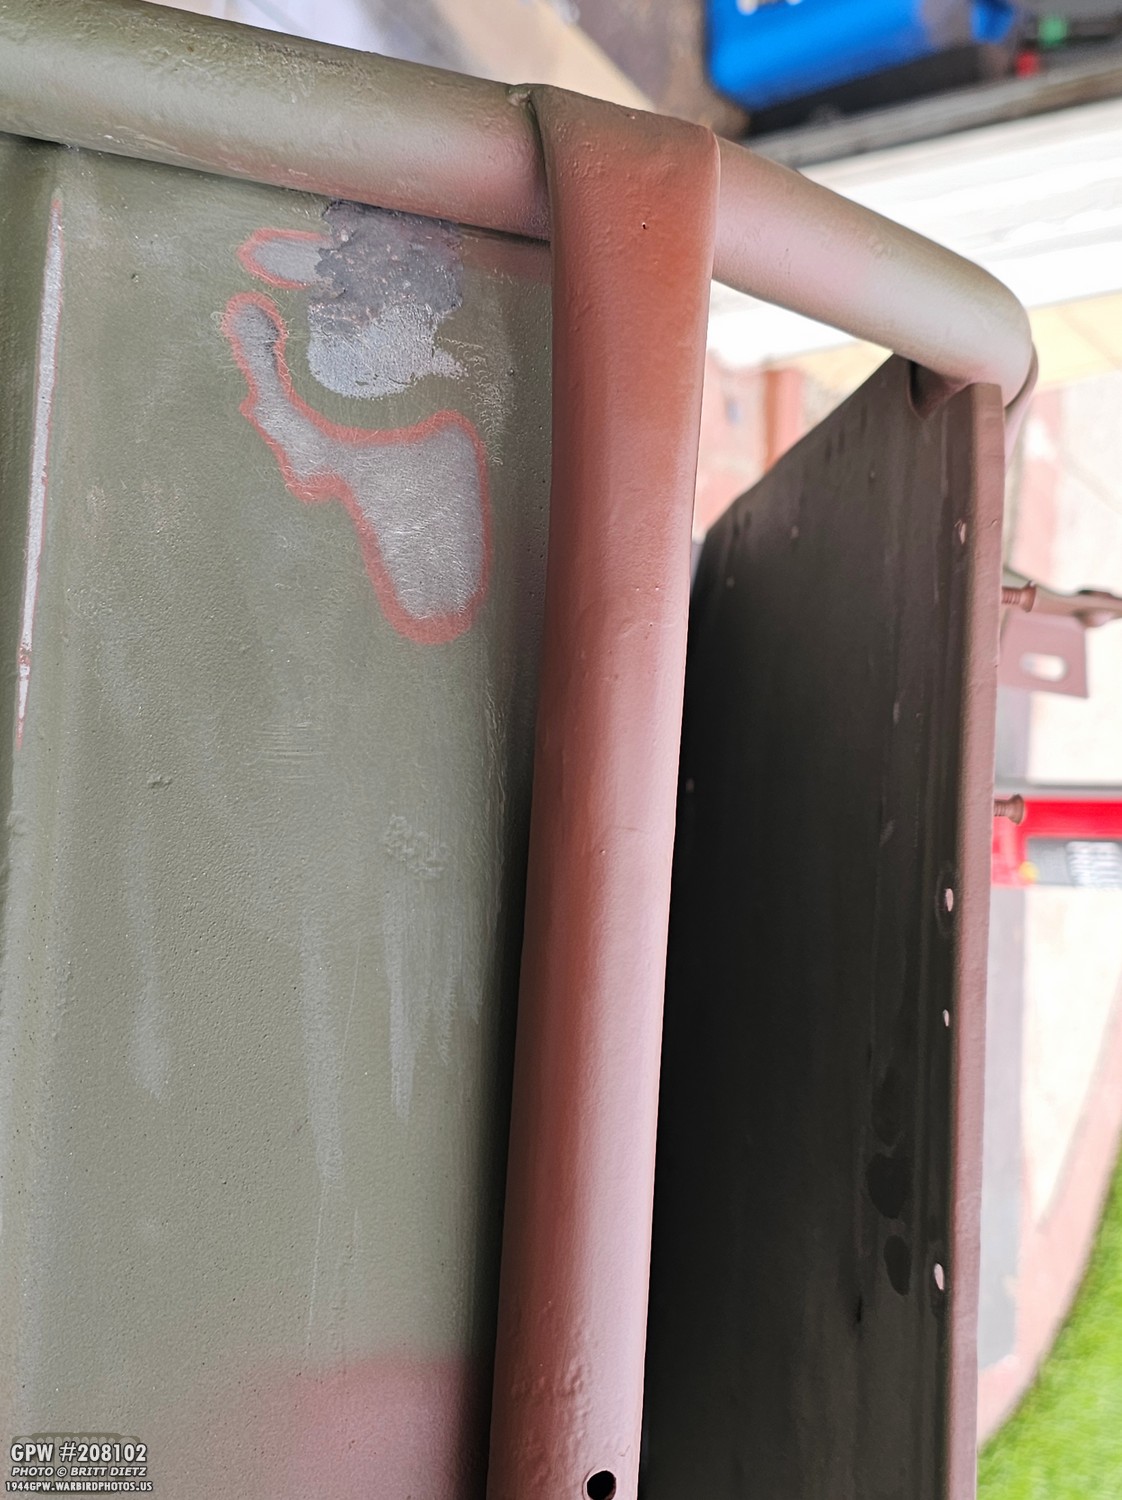
Once the Bondo had cured, I hit the tube with red oxide primer paint. I thought it came out perfect; you’d never know there was a large hole there on the tube. And the hole in the back pan was starting to look really good as well. Interestingly enough, unlike Bondo, the JB Weld Steel sounds like the steel surrounding it when you tap on it with your knuckle.
The back pan took a bit more time, as I made it a bit too thin at first. So, I added more JB Weld Steel, then sanded it, and some Bondo to smooth out the texture.
Here’s a look at the other side (the top) after smoothing and adding some Bondo.
With the Bondo sanded smooth, the back pan is looking really good!
I also took the time to fill in some other small pin holes. I could have used Bondo to fill all the cancerous rust texture (the rust has been stopped years ago, but the damage is still there), but since the seat cushion covers this, I decided to leave it.
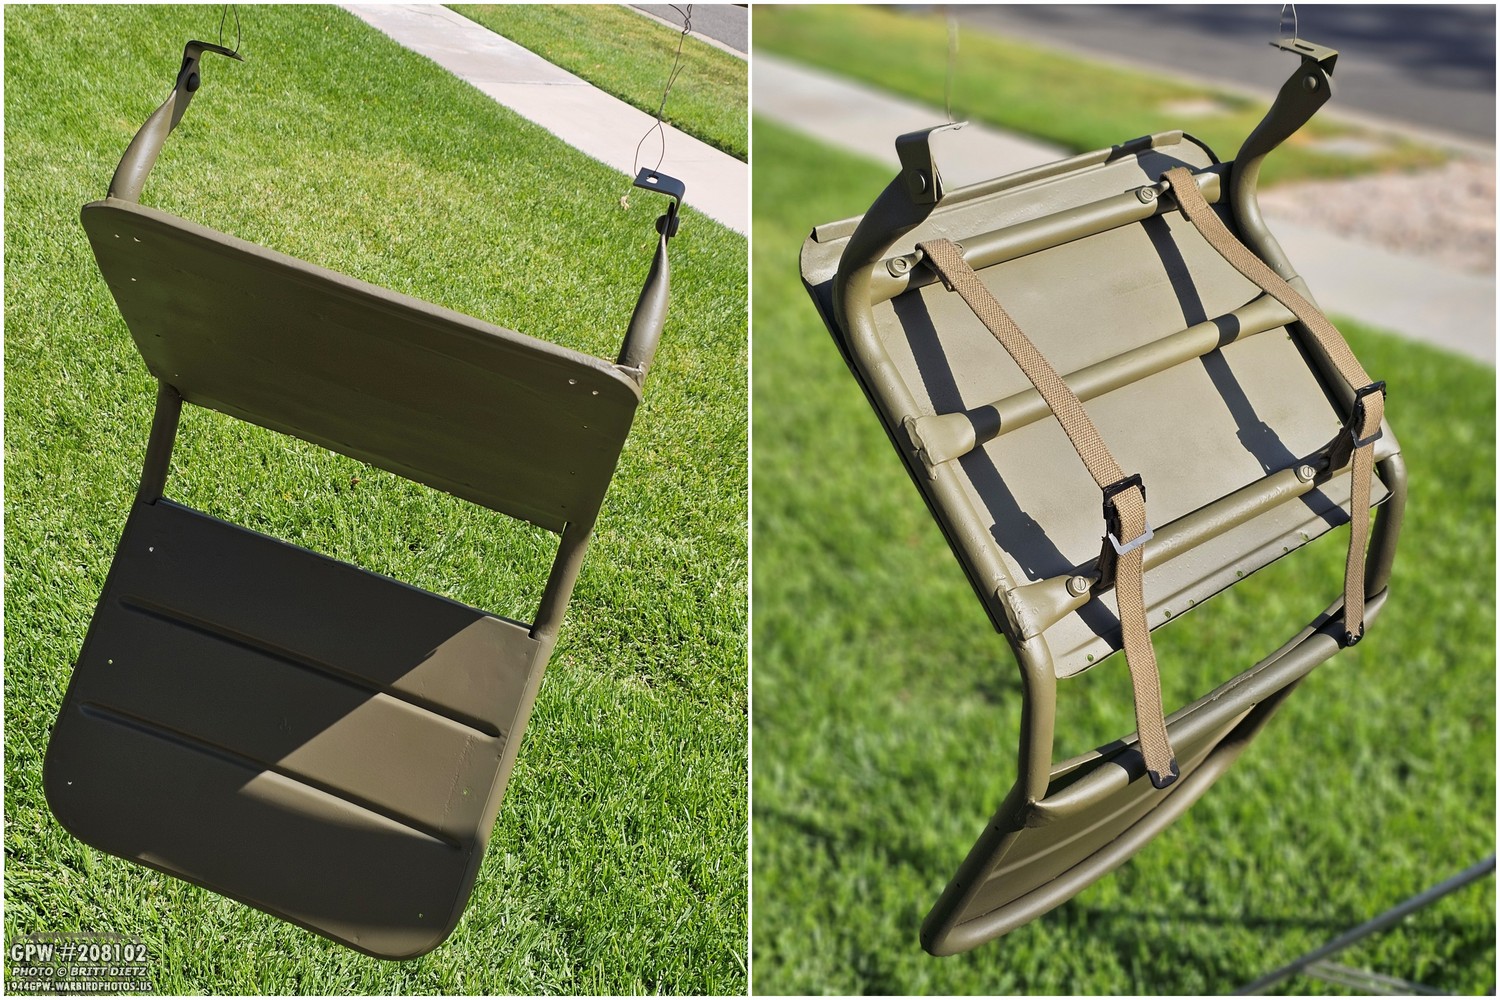
Finally, after a sunny day, I was able to hang the seat upside down and hit it with OD Green 33070 paint. One of the many things I love about Ron Fitzpatrick’s 33070 paint is how quickly it dries. In just a few hours in the hot sun, I was able to affix the footman loops and the canvas top stowage straps!
Looking at the seat pan, you’d never know there was a large hole rusted through! It’s good for another 80+ years!
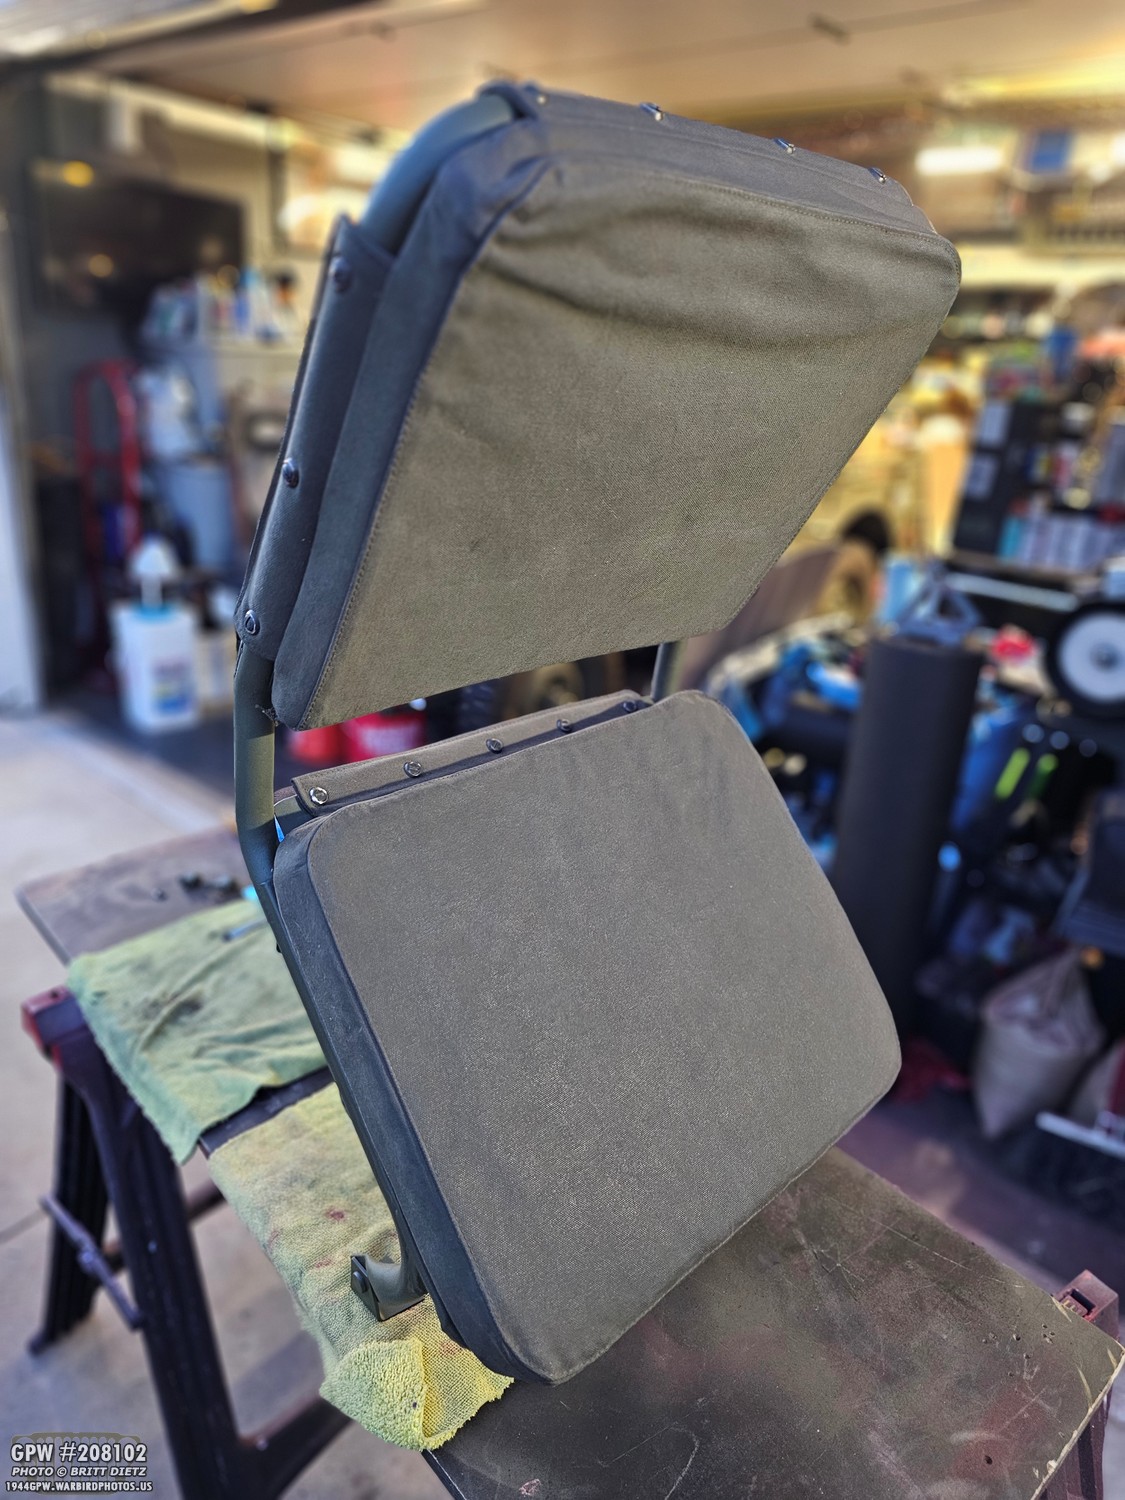
Later in the evening, I was able to reattach the canvas seats.
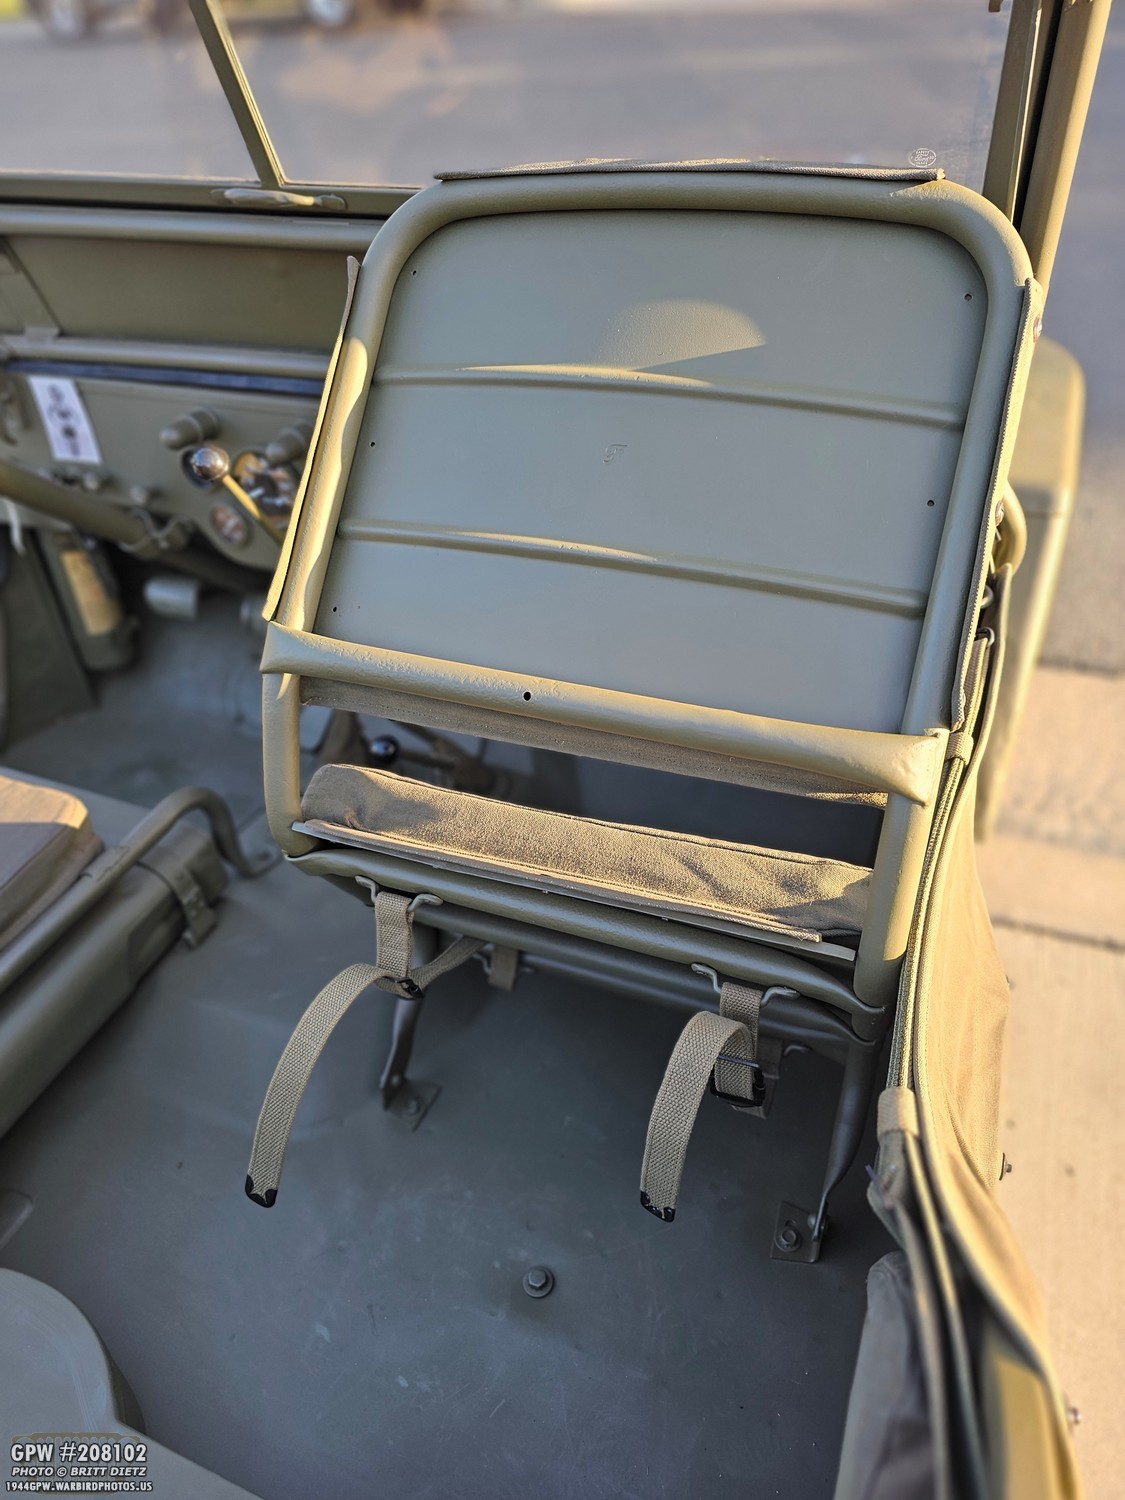
And finally, the passenger seat went back in the Jeep! All finished! I’m super happy how it turned out, and I’m glad to finally have it just about fixed. Let’s move on to the next project…
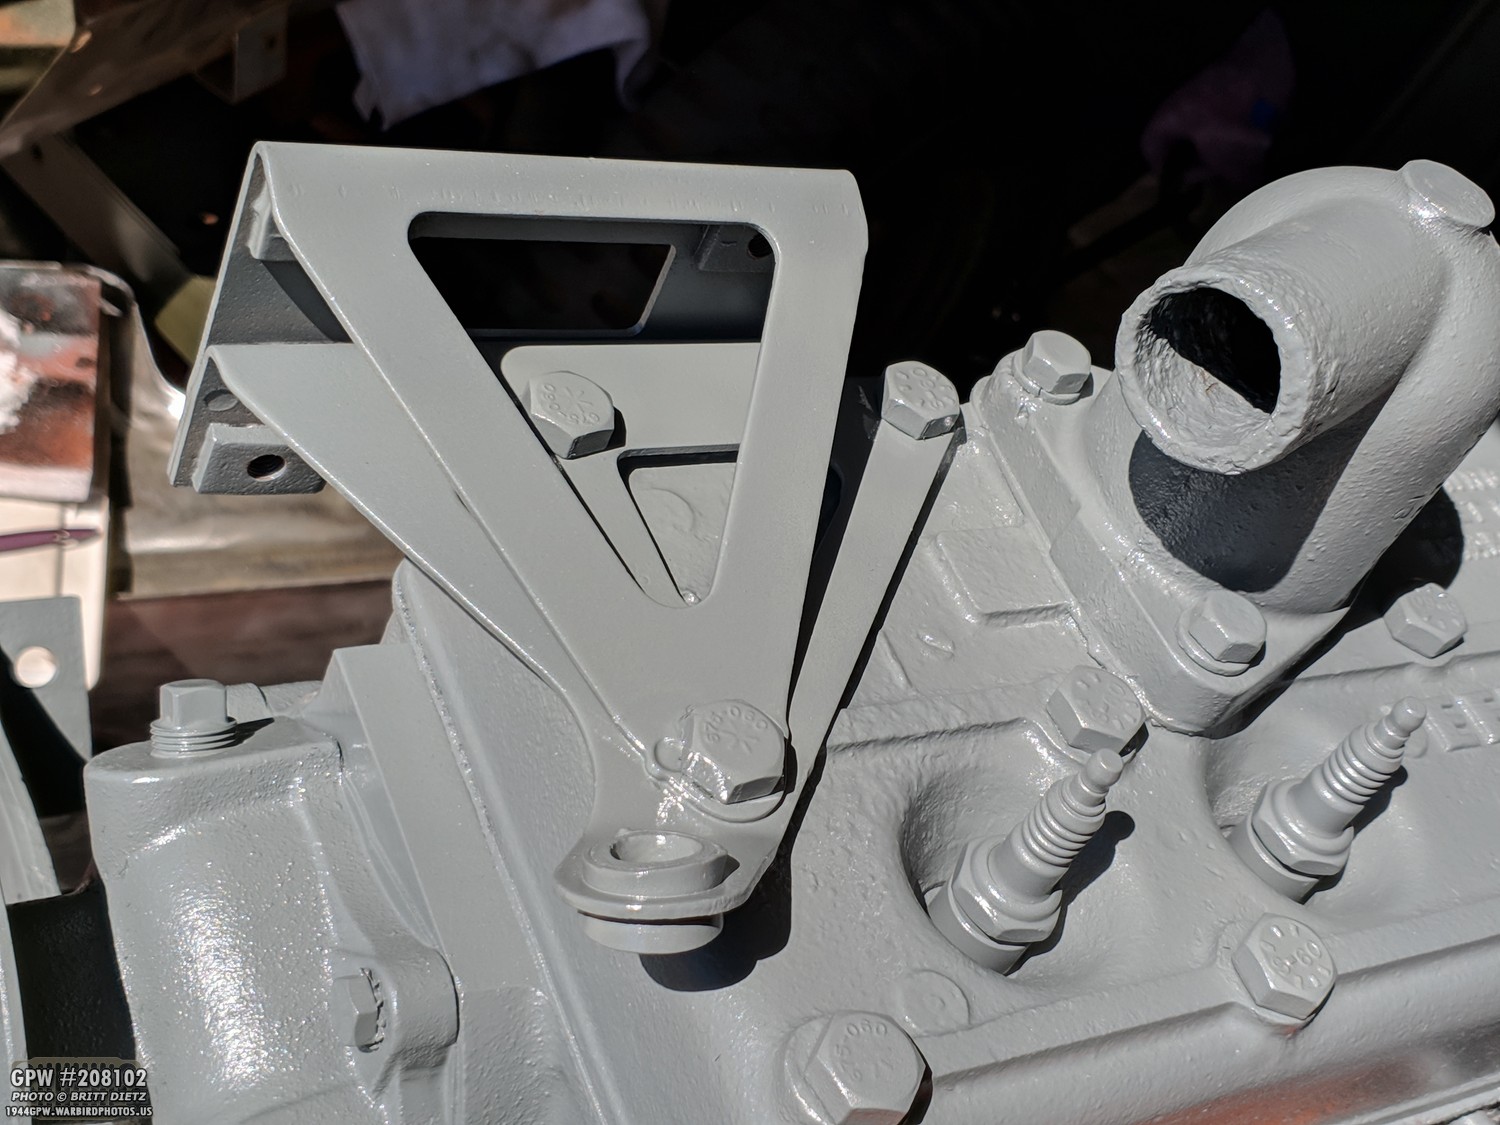
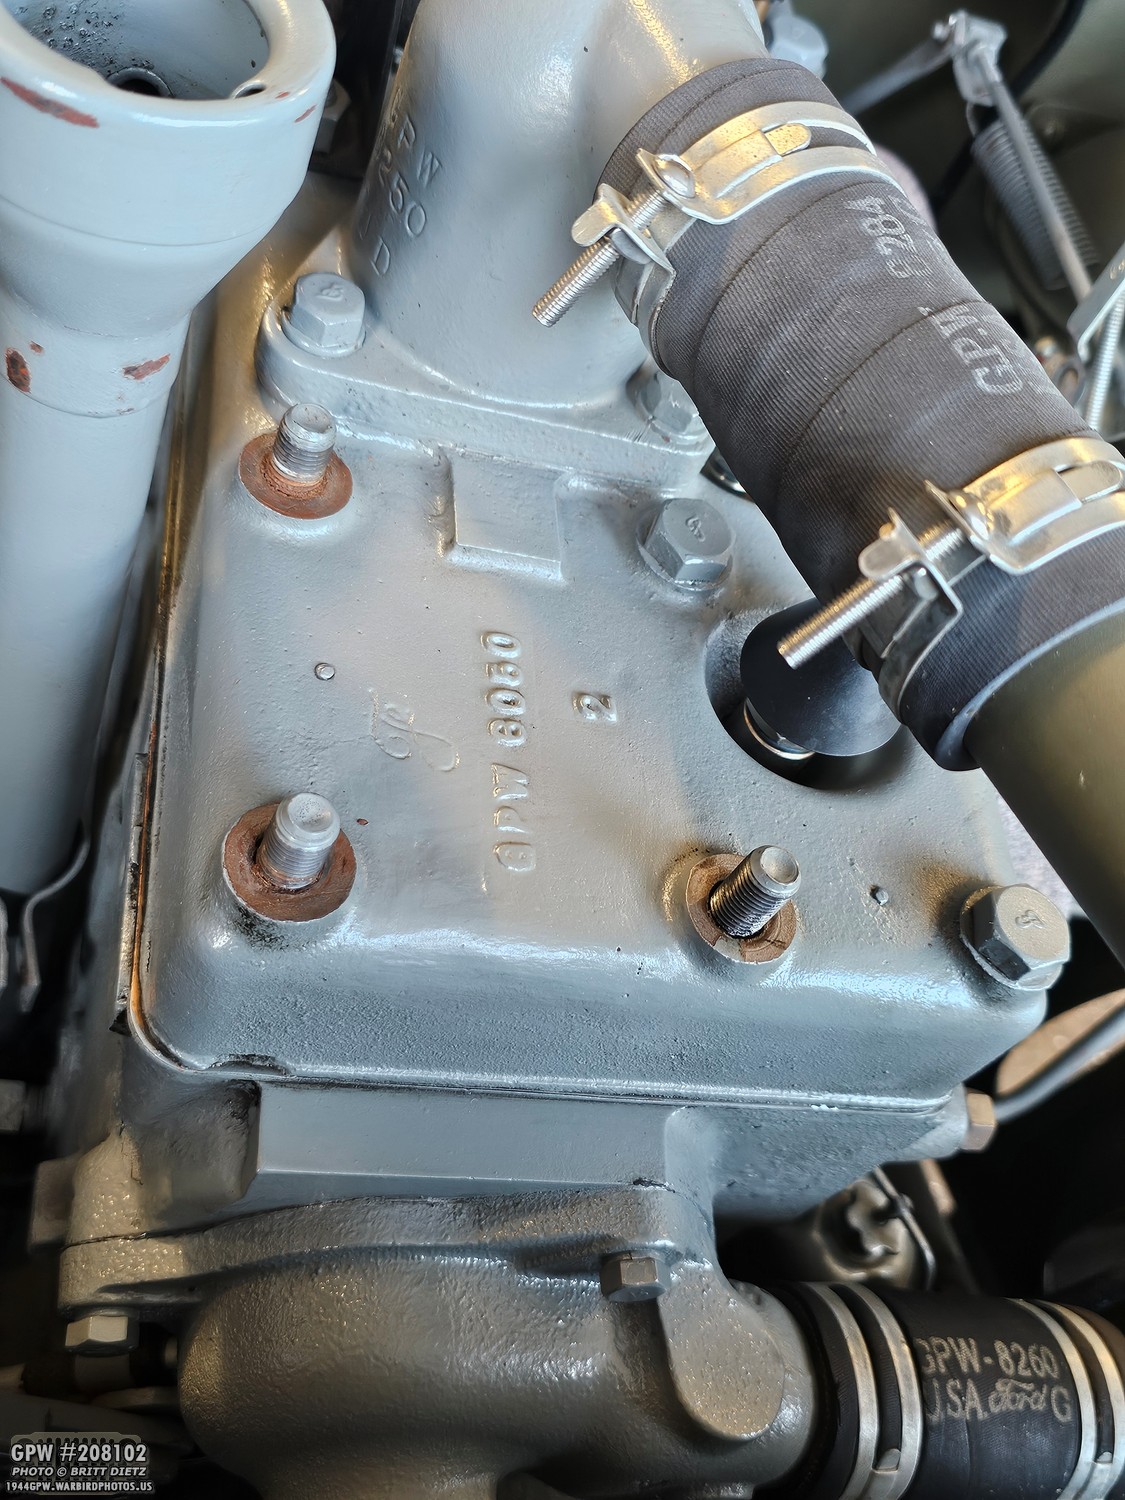
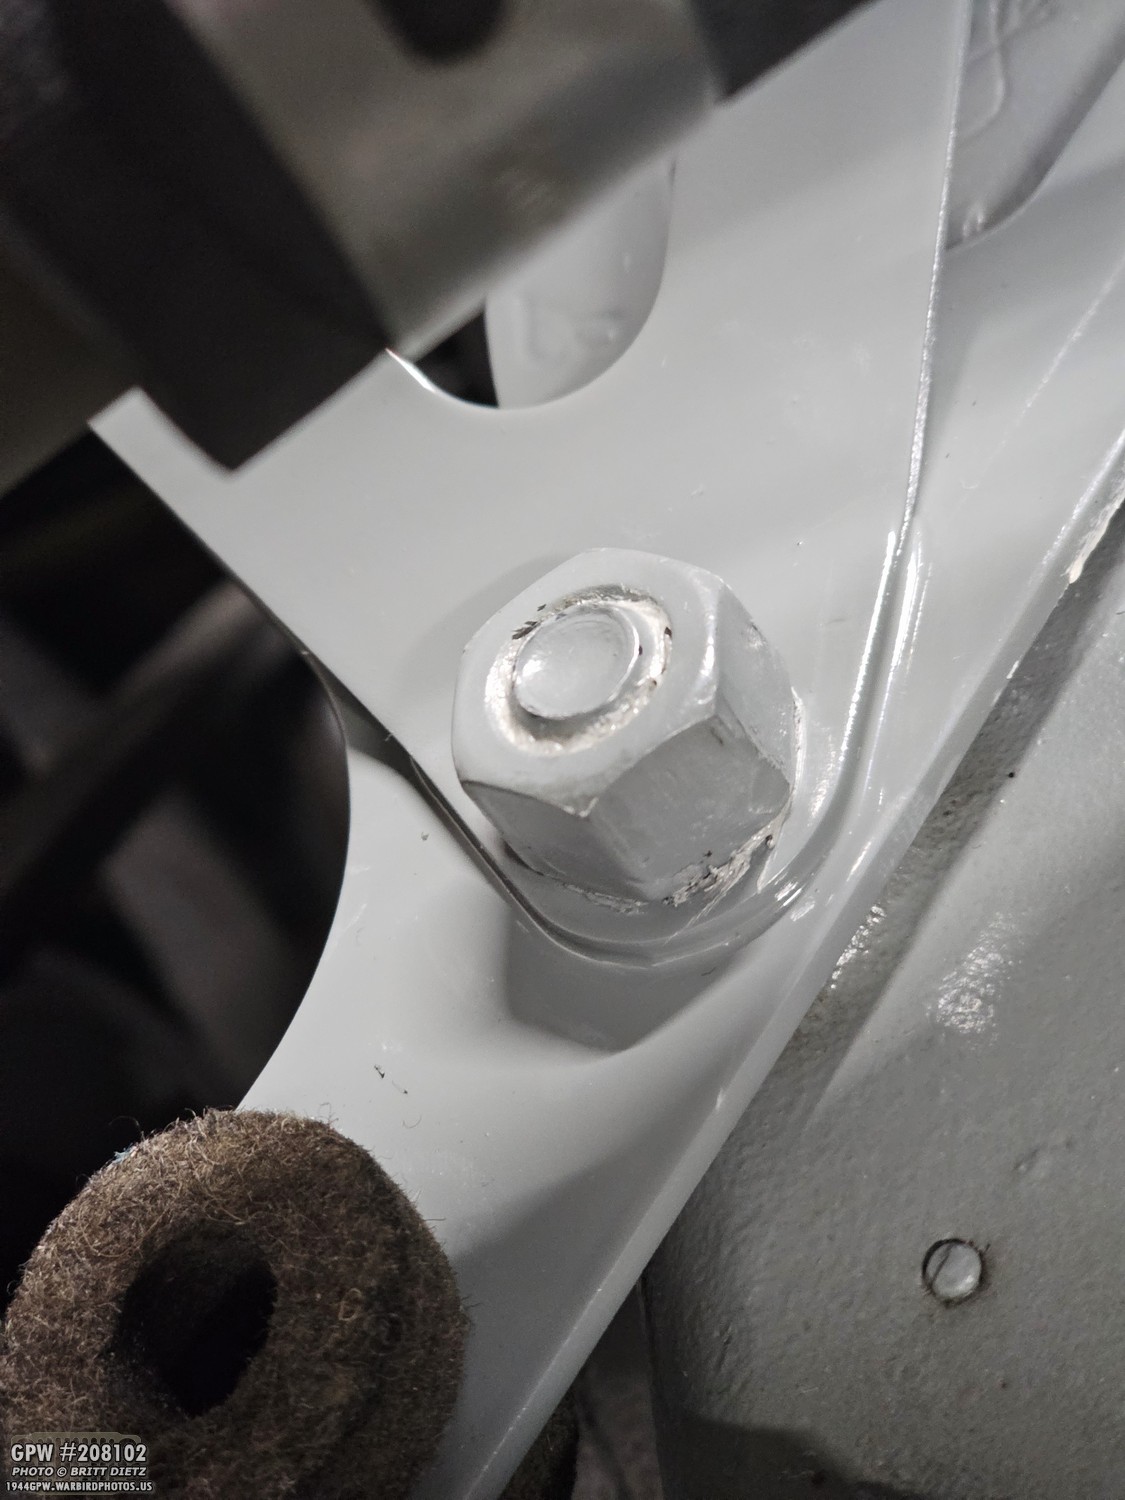
This is the oil filter bracket that sits on top of my engine. This photo was taken back in 2019 when I was restoring the Jeep. Note the post-war replacement CJ engine head that was on the Jeep at the time and the modern bolts. The oil filter bracket, however, was original to my Jeep. For those who know their brackets, you’ll instantly see something that’s wrong… the ‘point’ of the triangle shape where the oil line passes through is bent upwards at a 45-degree angle… it should be flat.
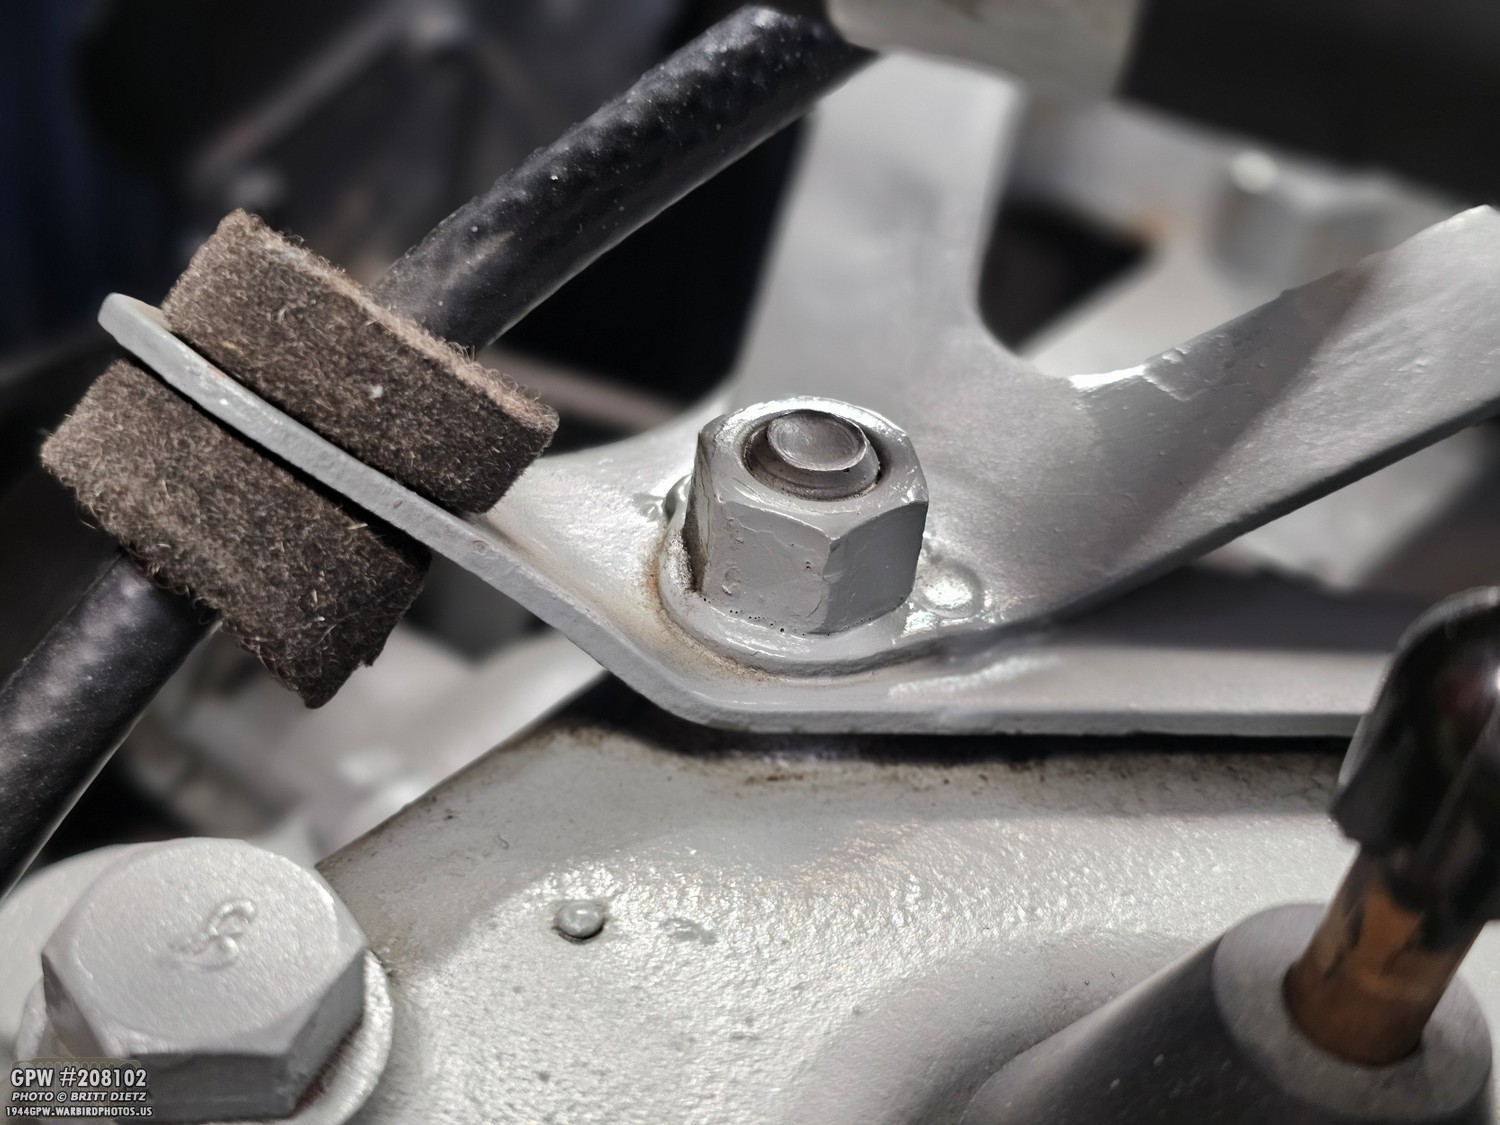
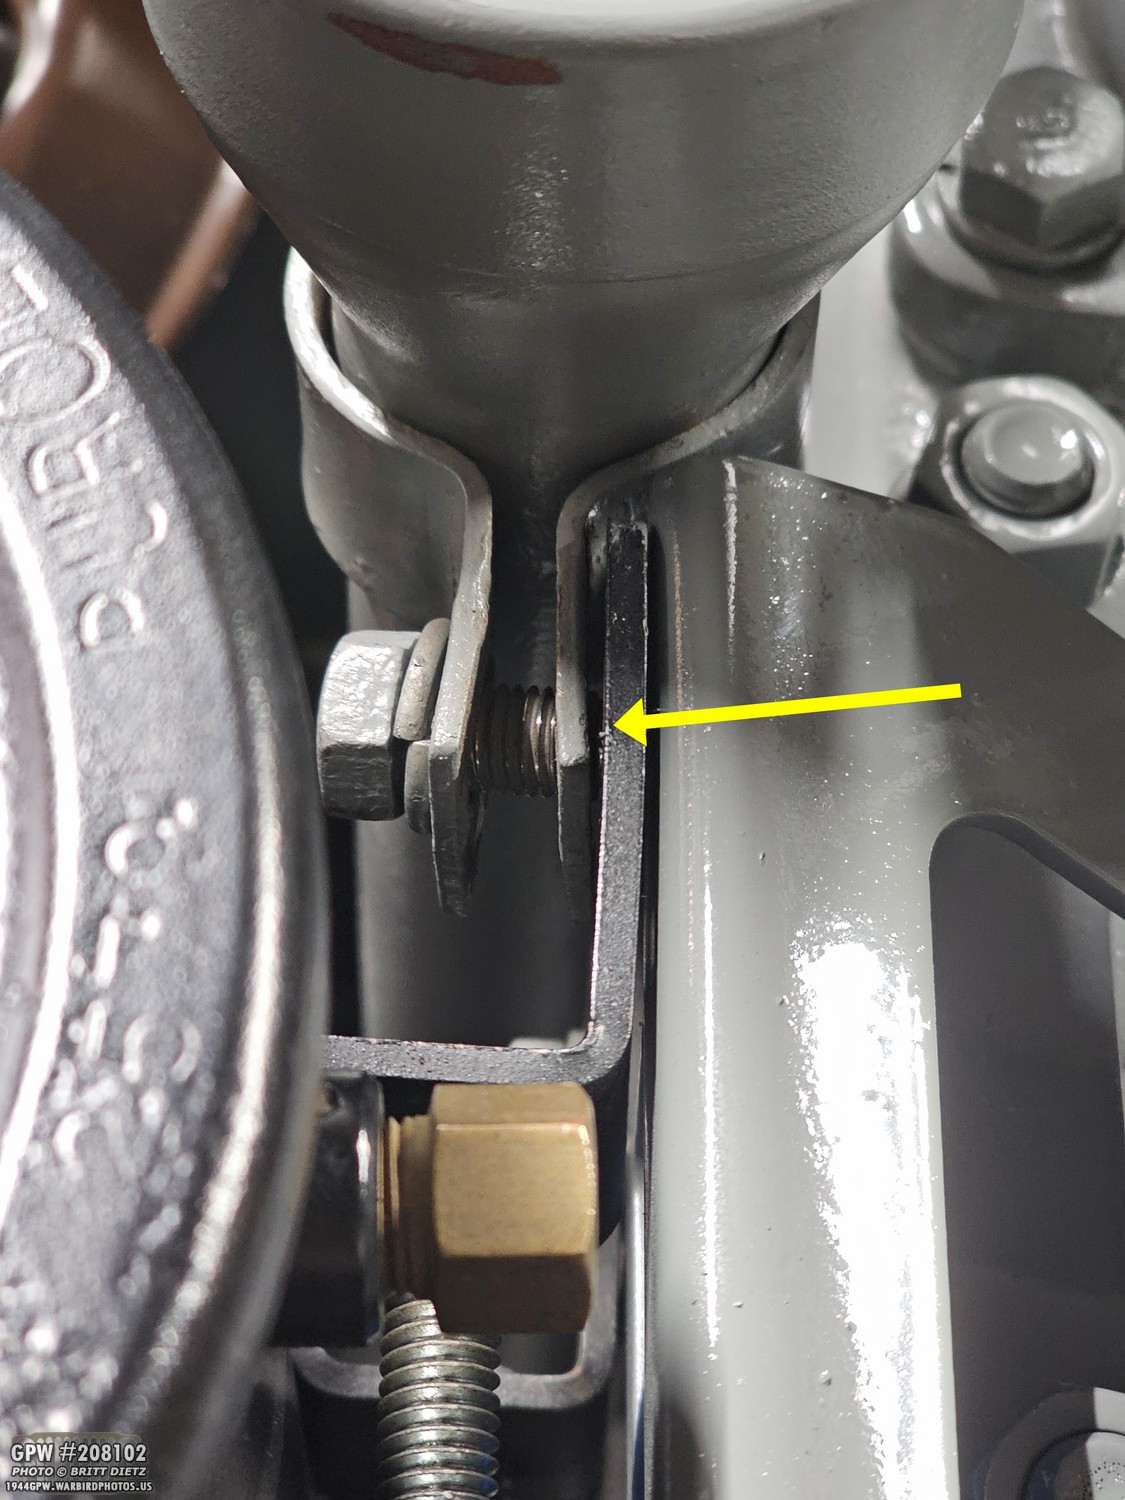
Here’s a better, more recent view, with the felt grommet and the oil line passing through. It shouldn’t bend up like that. At the time when I was doing my engine restoration in 2019, it did not occur to me that this was incorrect. Especially since my bracket was an original one (with a Ford F Stamp), I just thought it was correct. It’s ALWAYS bothered me, but I’ve been too lazy to take it off to fix it. It’s probably a good thing I never tried…
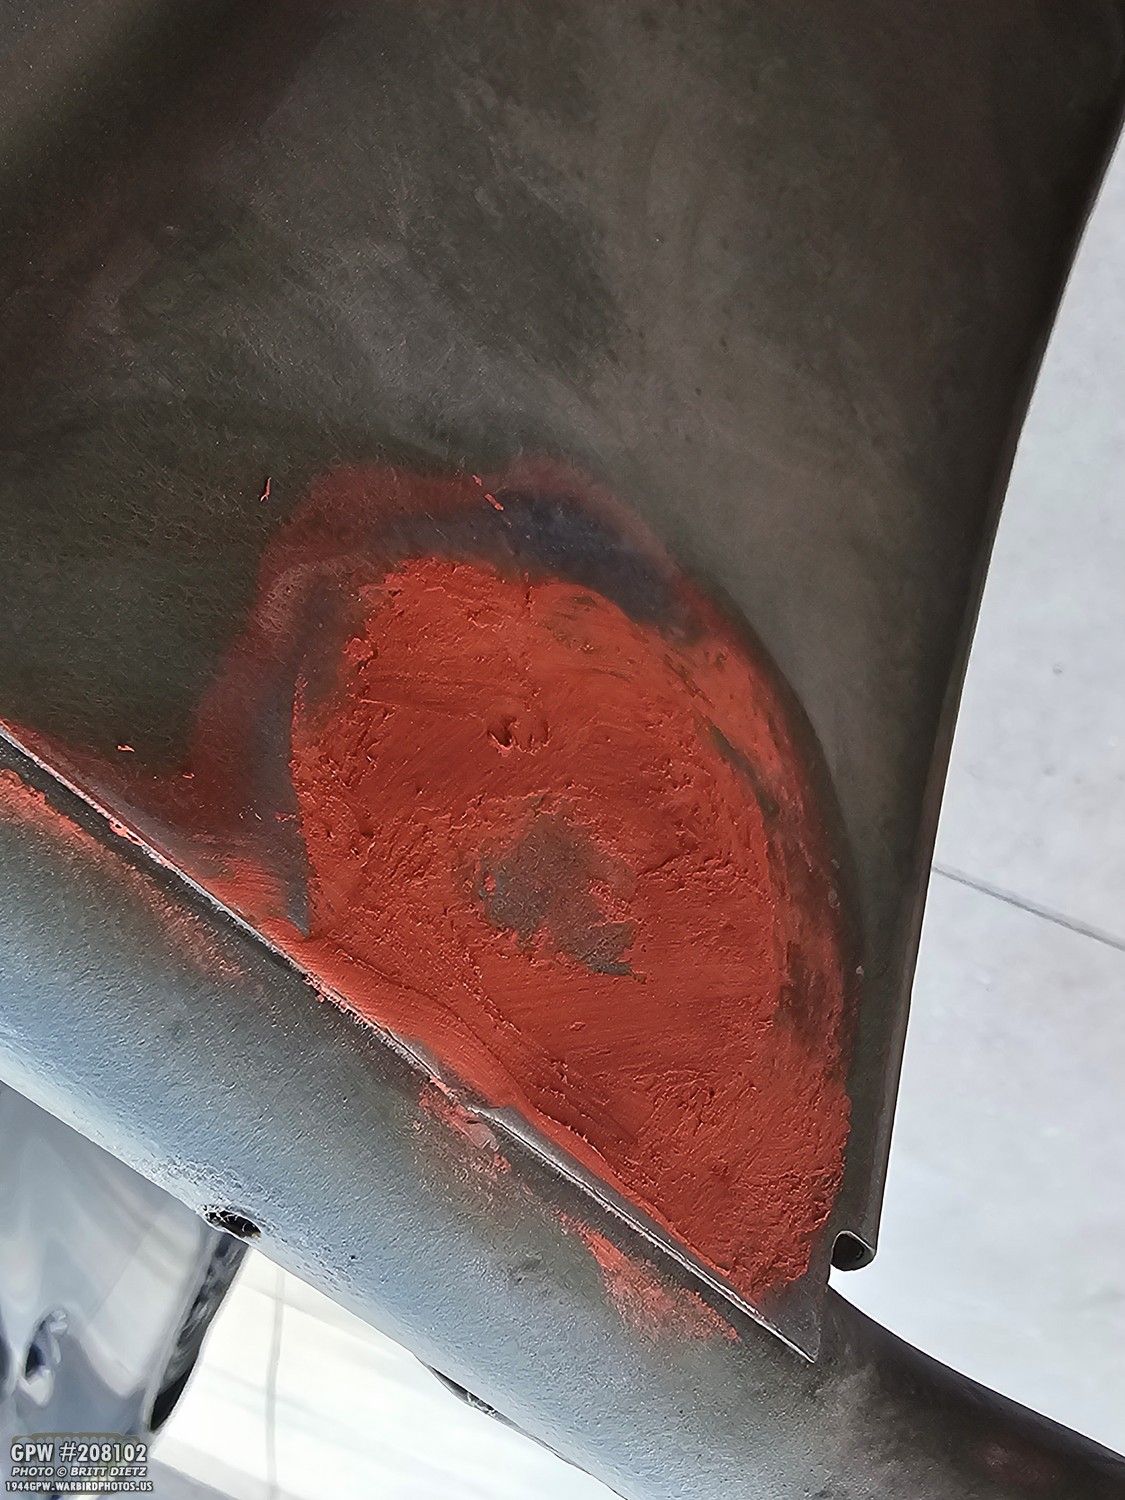
Because the dreaded crack started to appear about a year and a half ago. At first, it was small, but it’s been slowly expanding, and oil has been seeping out of it. This crack is incredibly common for these brackets. I’ve heard people say that it’s a question of when, not if, on these original brackets.
But I’ve also noticed an oil leak from under the bracket that has been steadily getting worse over the last year. Thankfully, the VHT Ford Grey paint that I use is fluid-resistant, so it’s easy to clean off. But it’s been on my to-do list to figure out where and why it’s leaking.
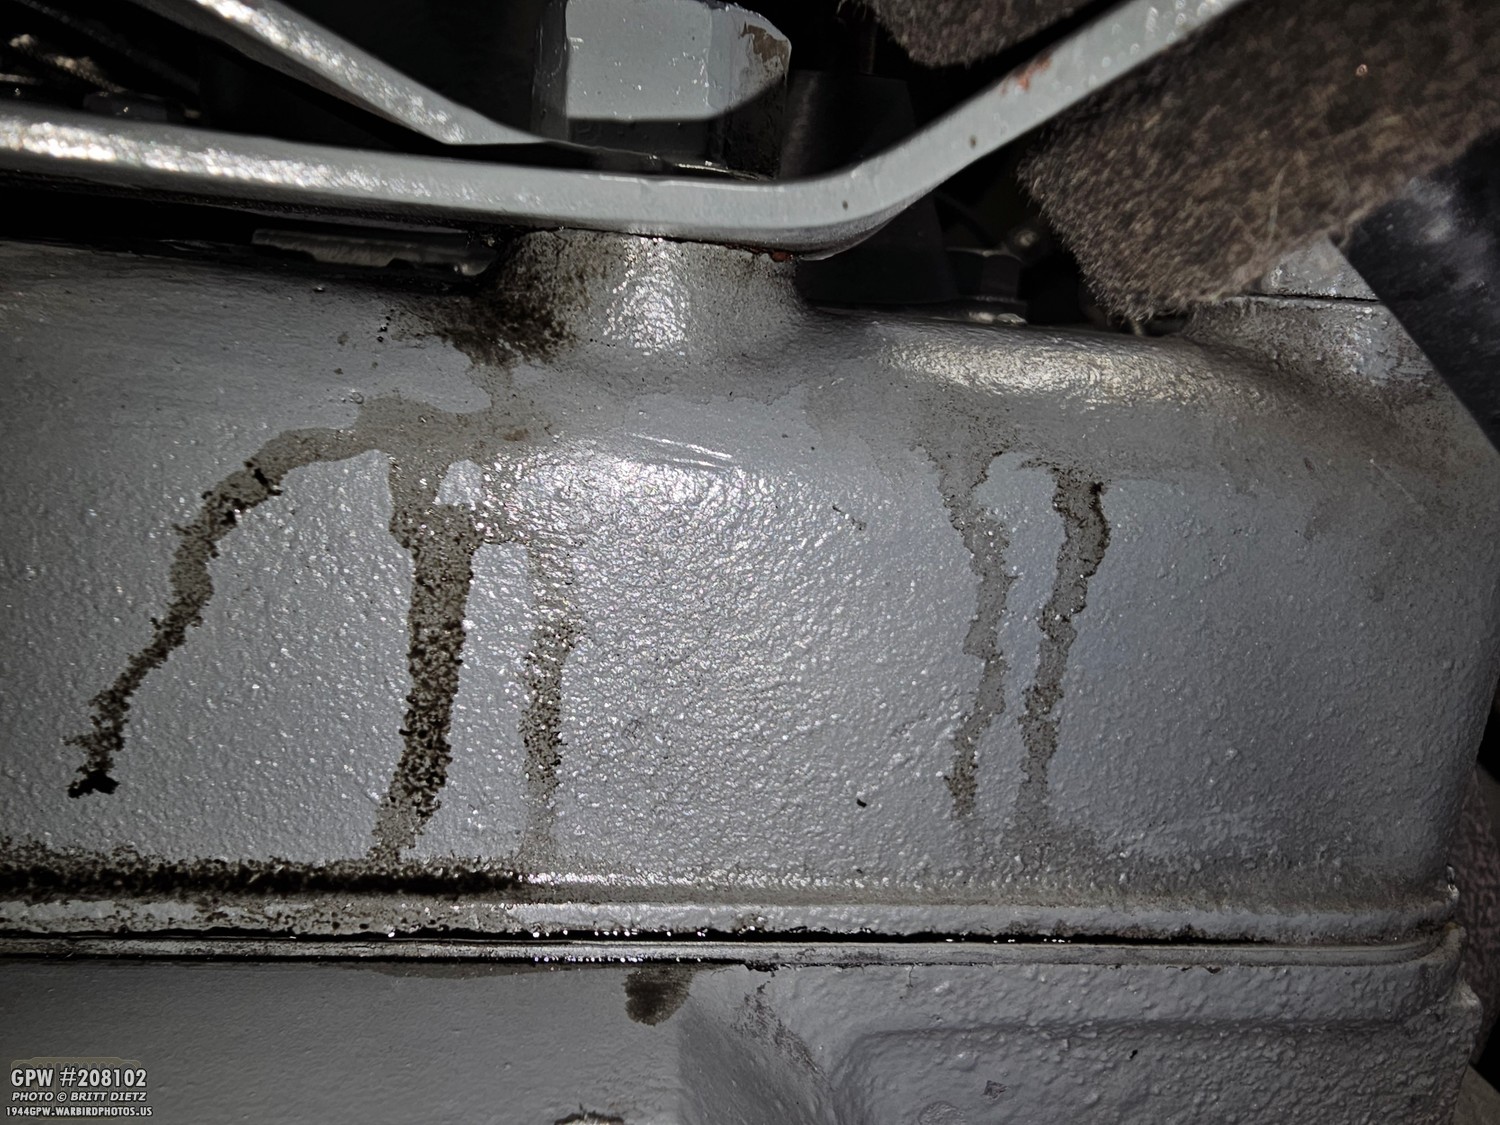
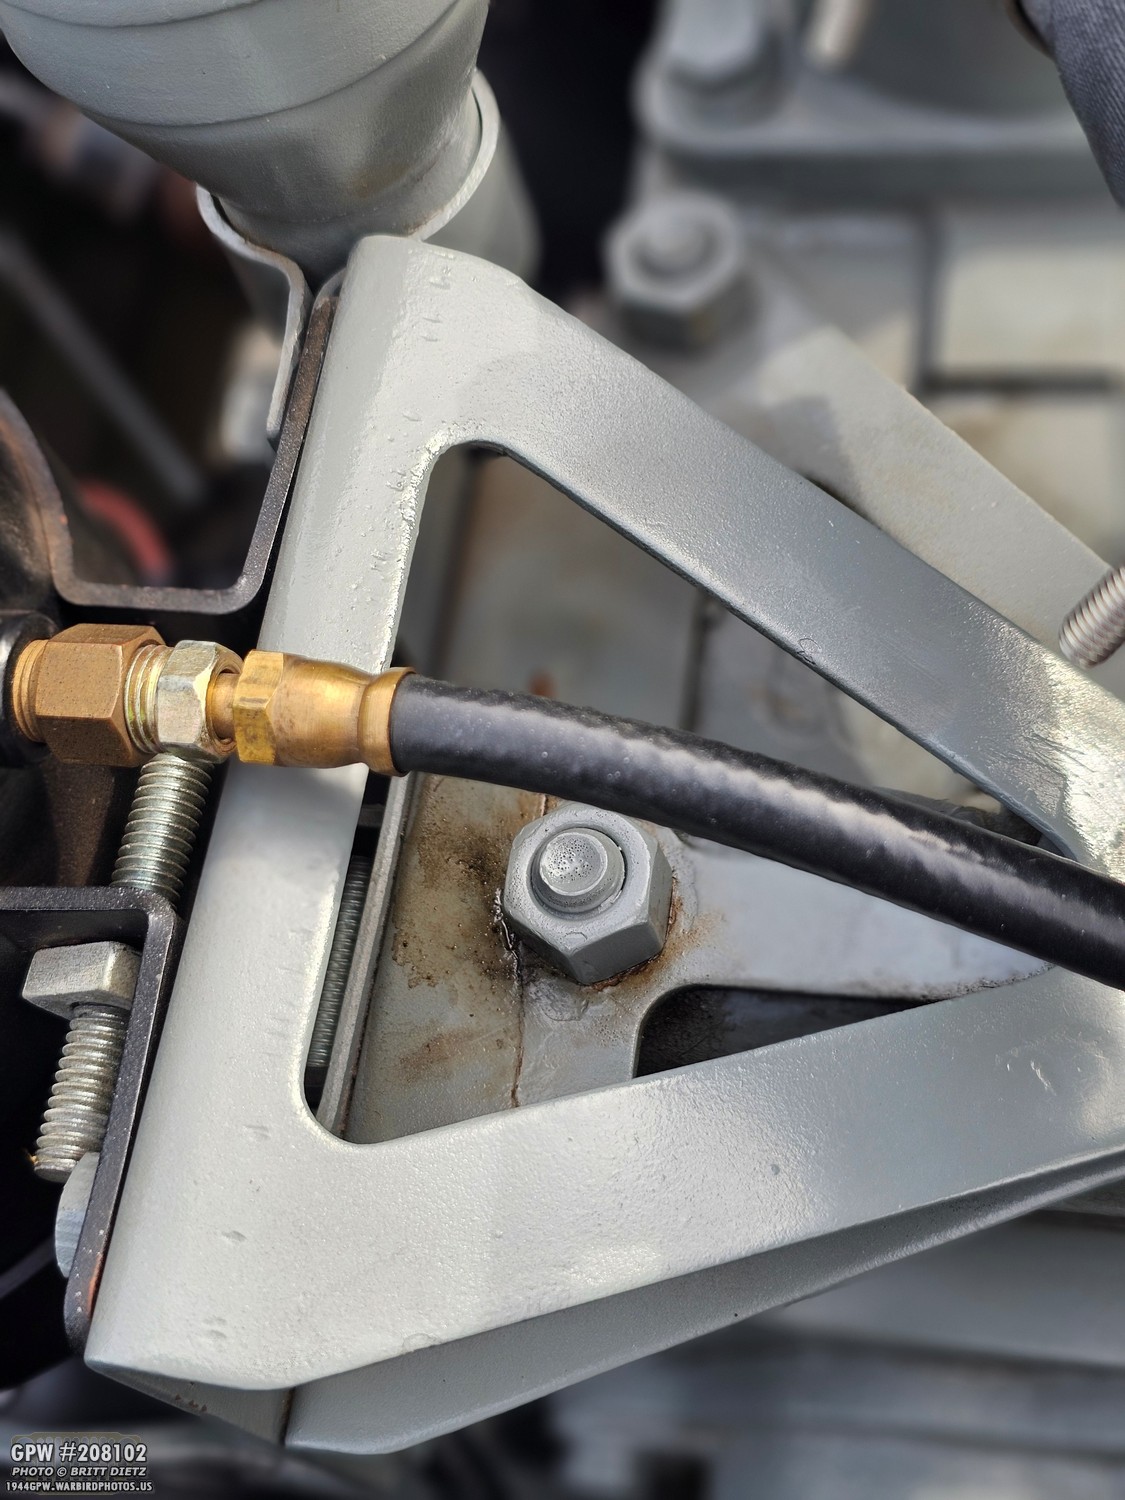
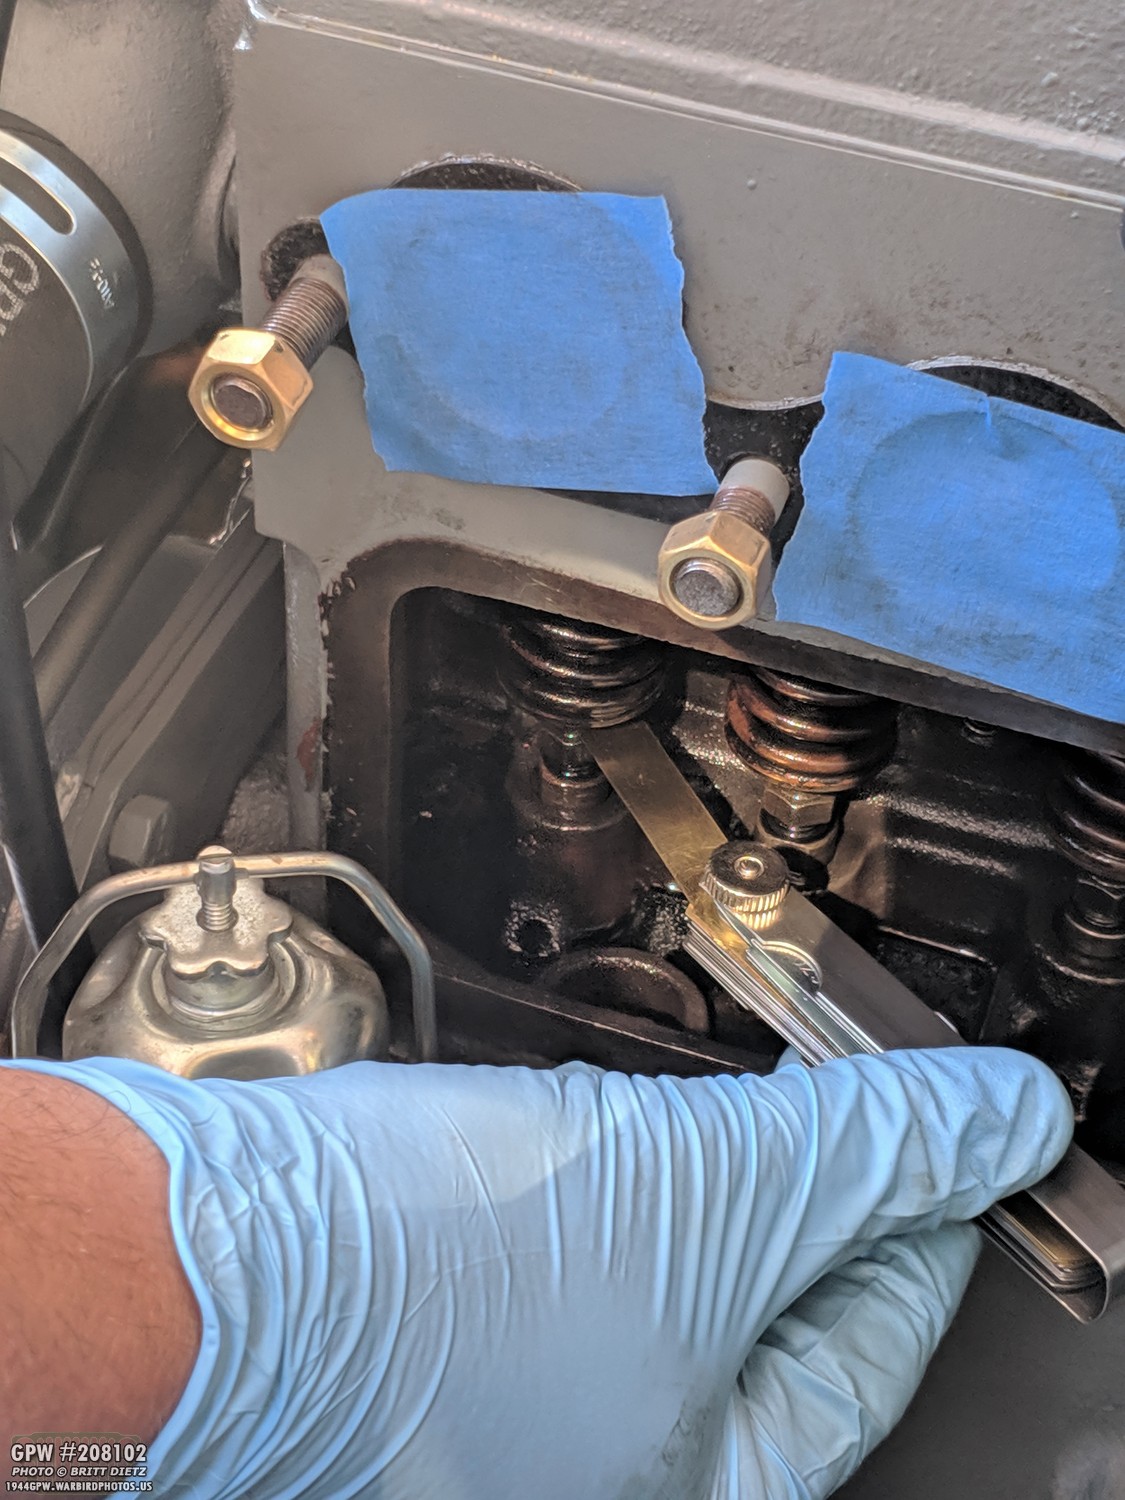
I was able to trace the leak to the forward nut, not the nut with the crack. So, that means technically I had two oil leaks… both with the oil filter. And no, that’s not another leak with the head gasket; that’s the leak from above pooling around the gasket. So, I decided to FINALLY nip this issue. First step: remove the oil filter bracket.
With the bracket off, we can clearly see there are two distinct leaks of oil. The worst being, as observed, the forward (right) stud/nut.
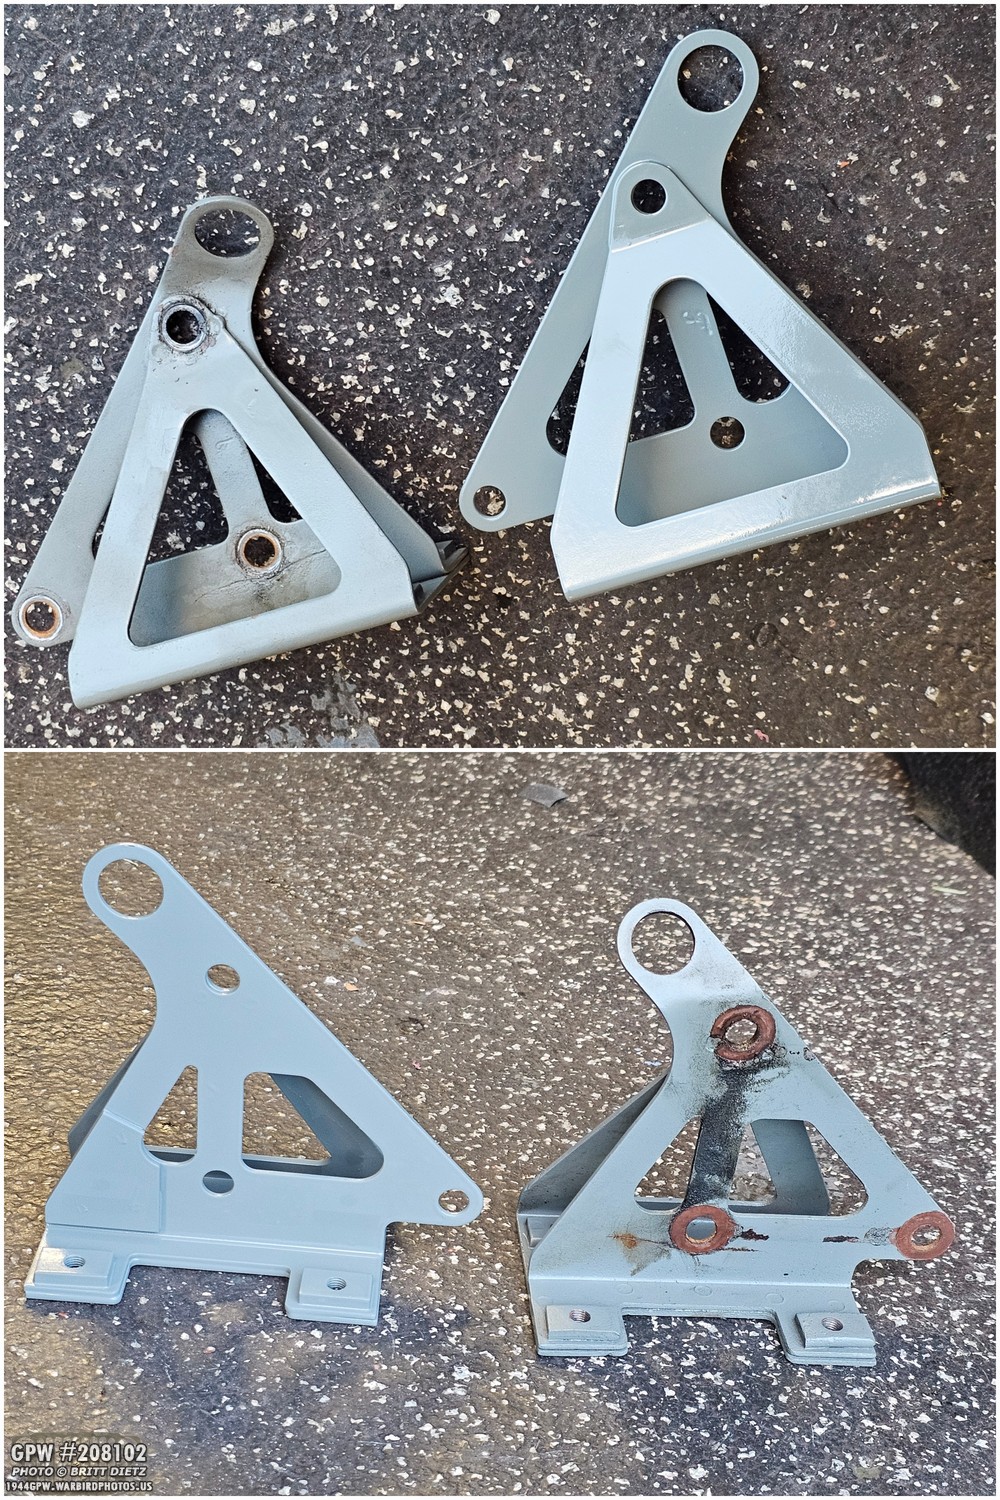
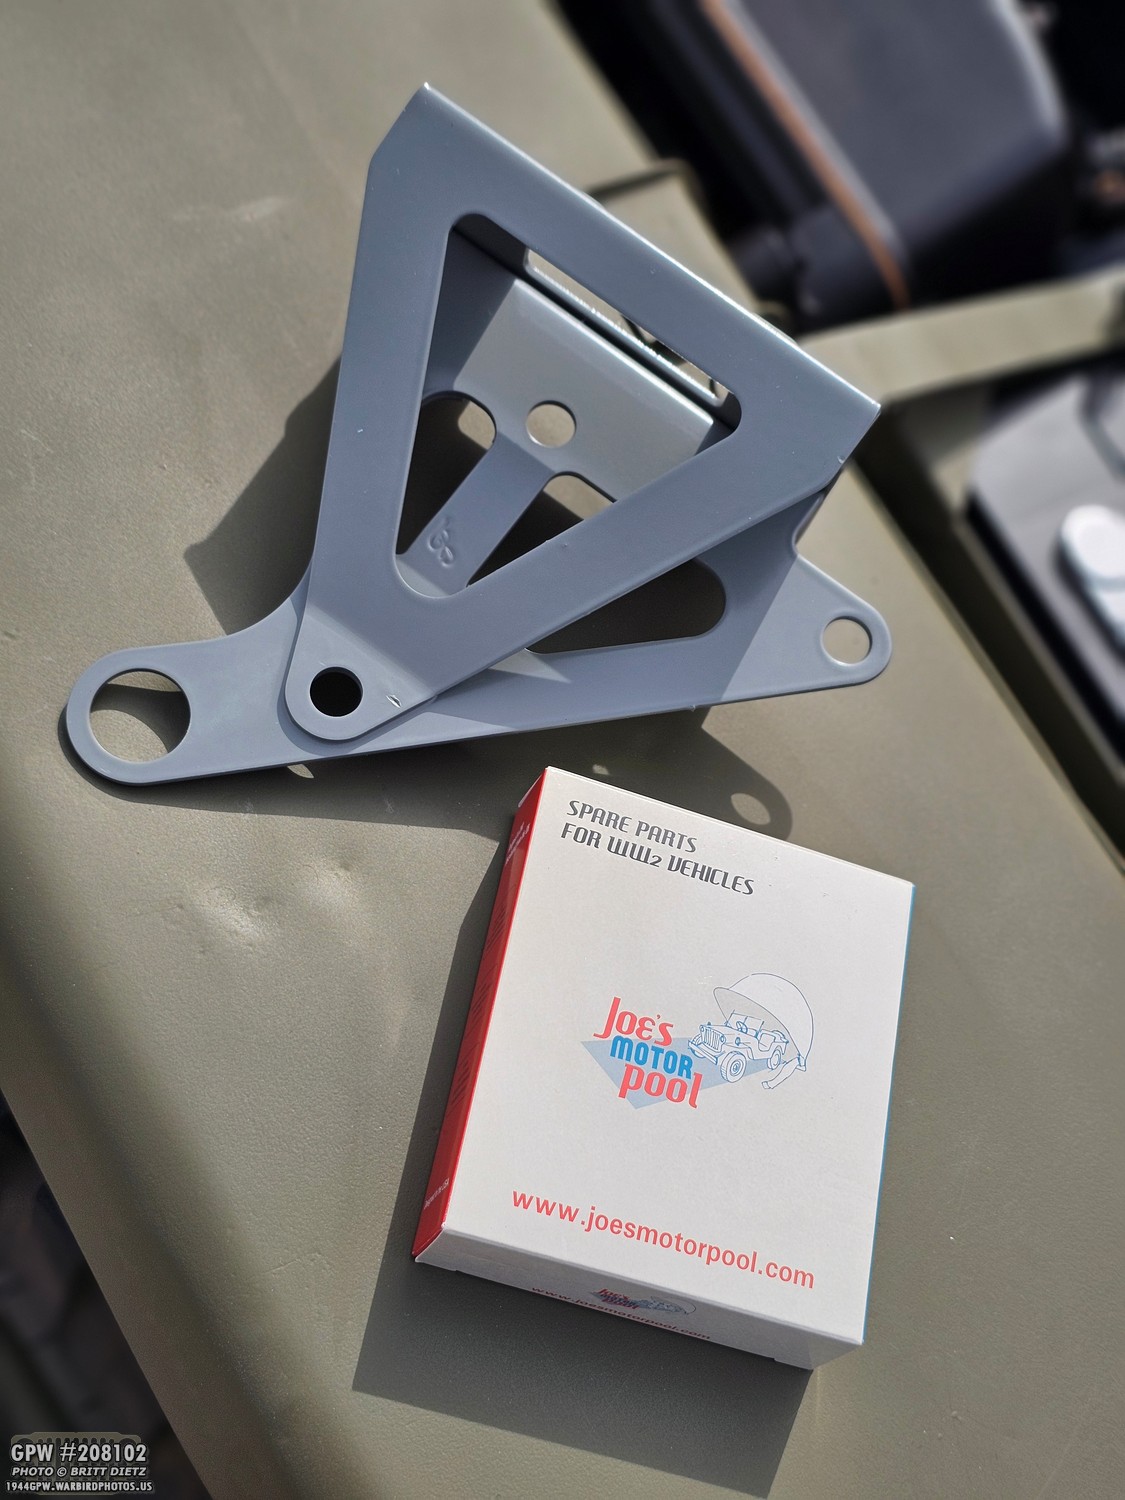
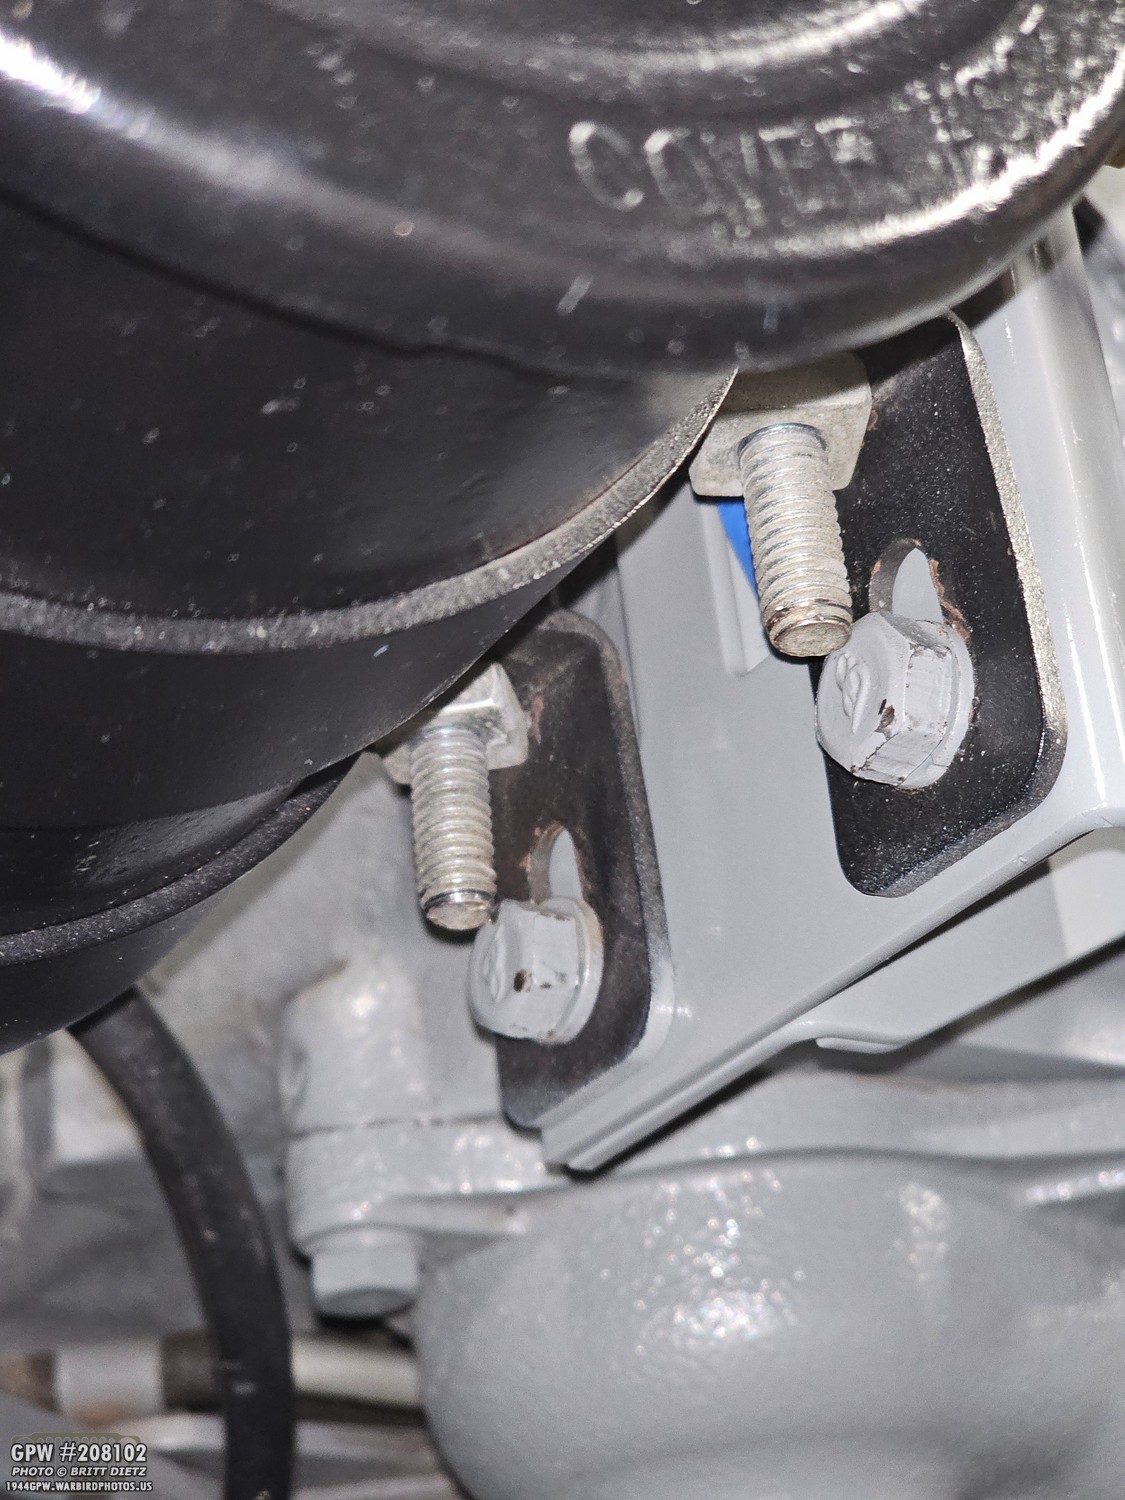
If you remember from the spark plug section of this update, I had gotten a new repro oil filter bracket from Ron Fitzpatrick Jeep parts. This Joe’s Motor Pool oil filter bracket is actually reinforced on the bottom to help prevent cracking. I made sure to get a GPW F-marked repro to match the original! It’s pretty obvious to tell which is which in these photos.
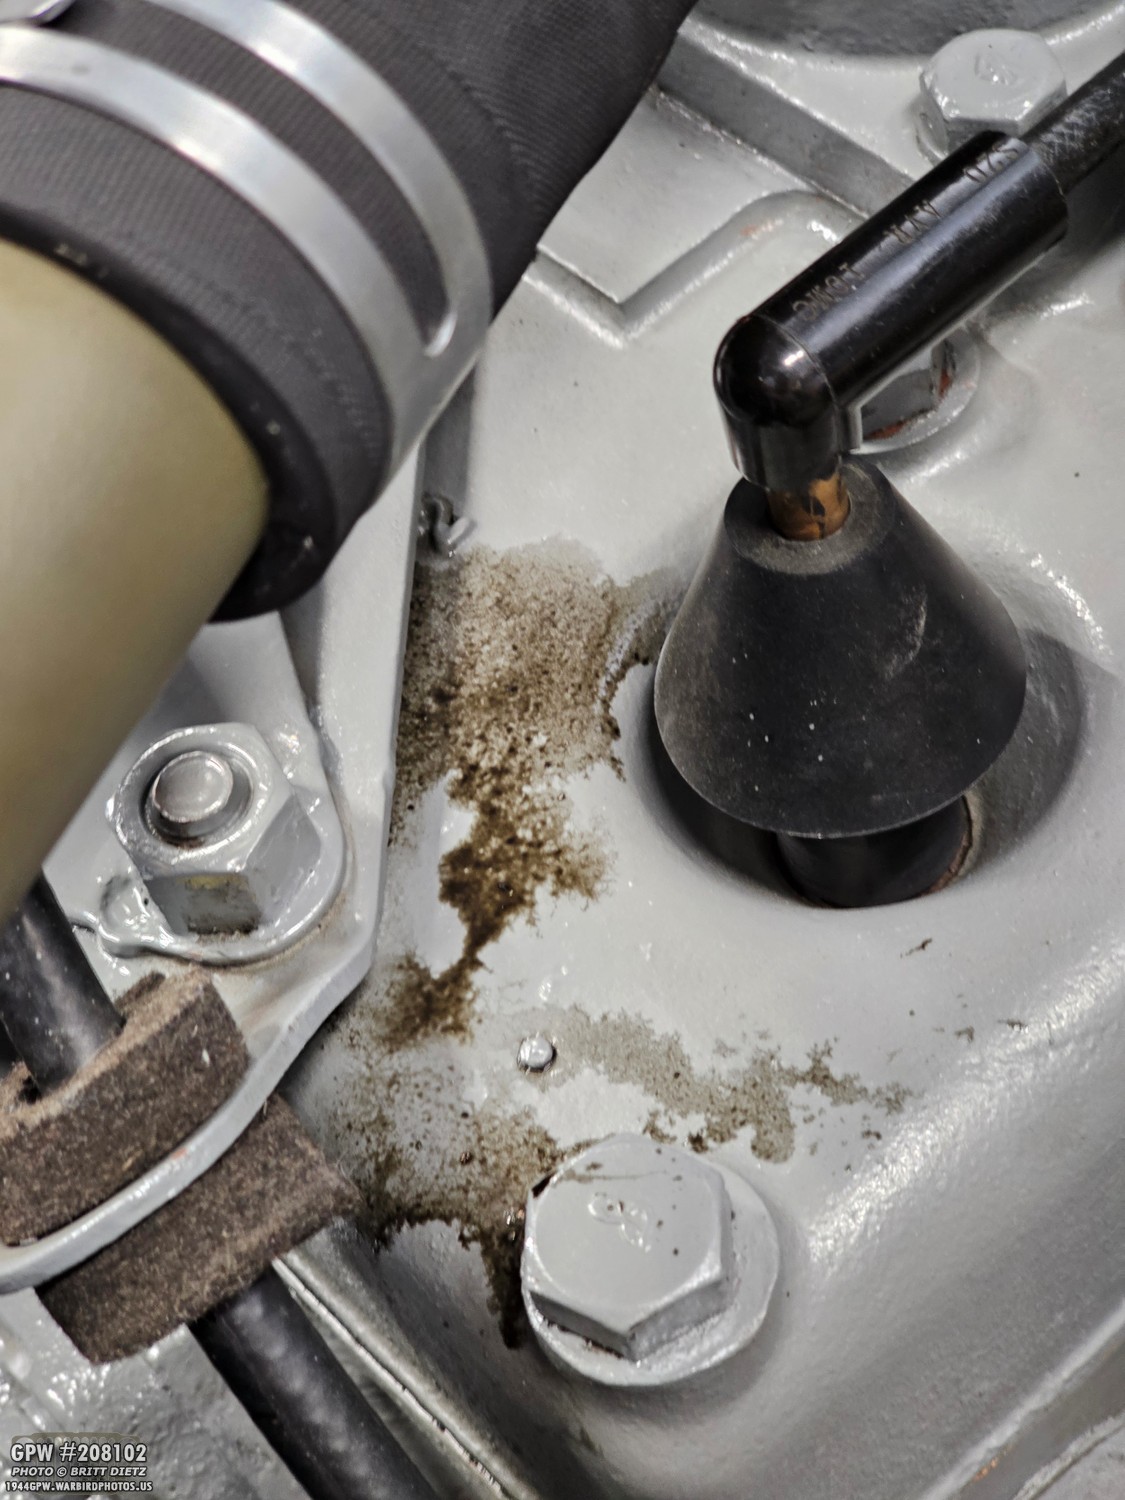
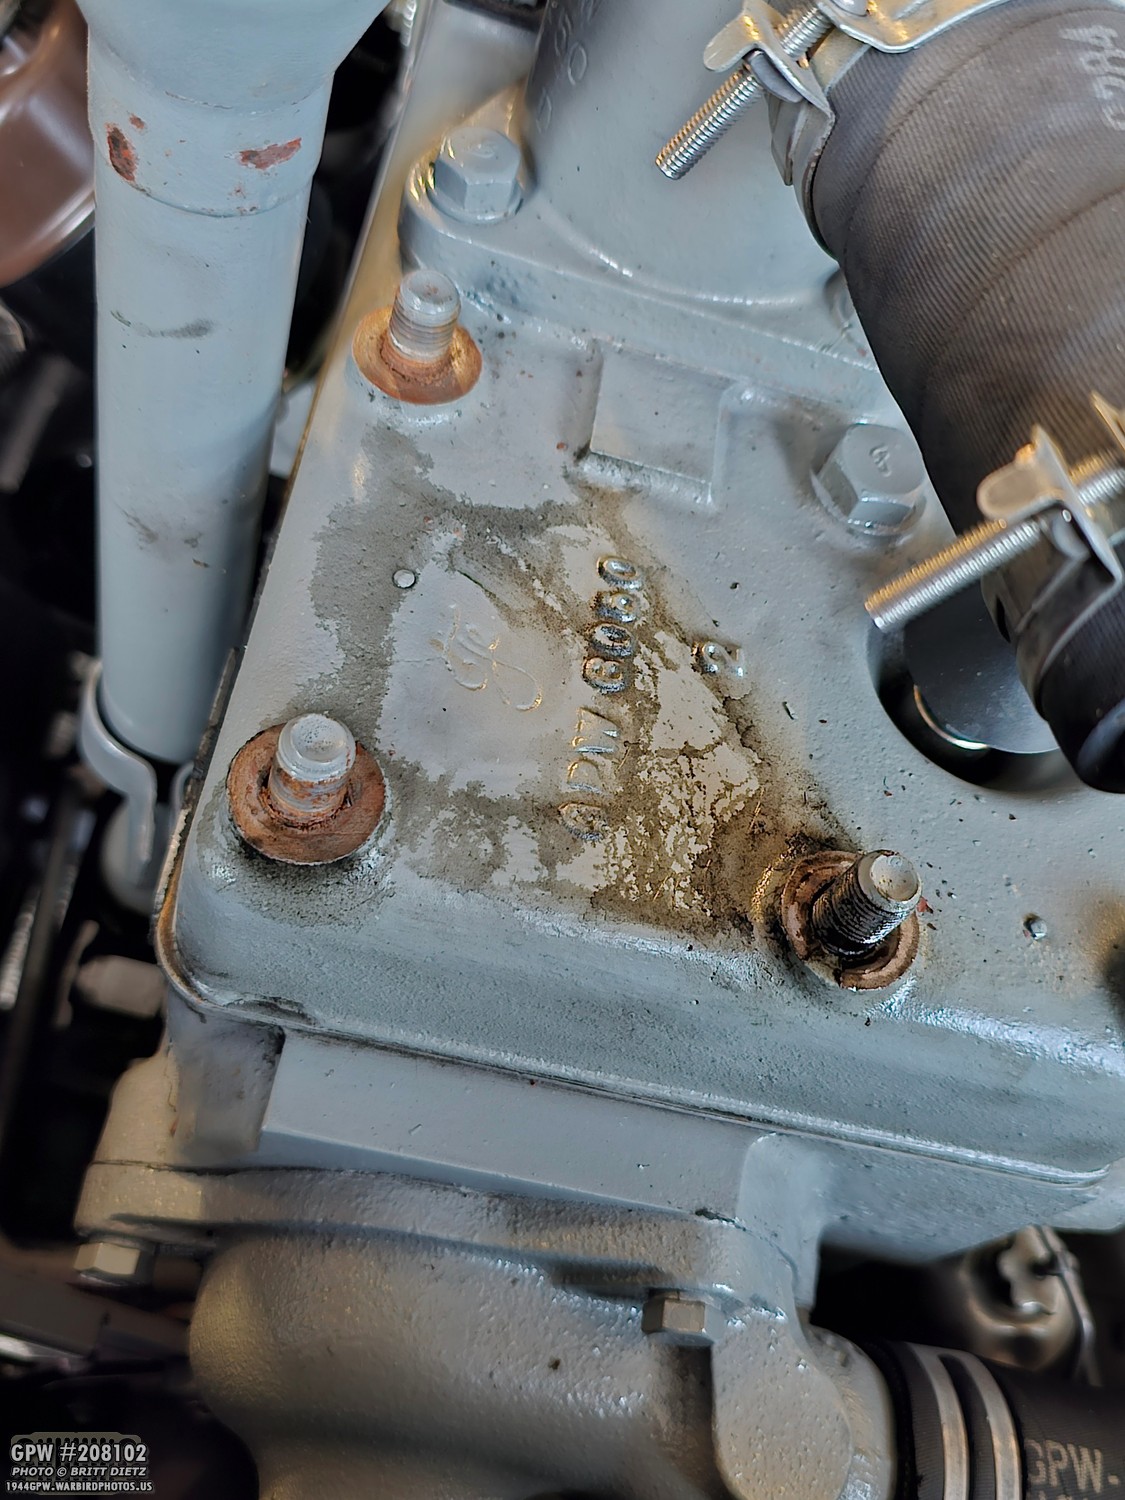
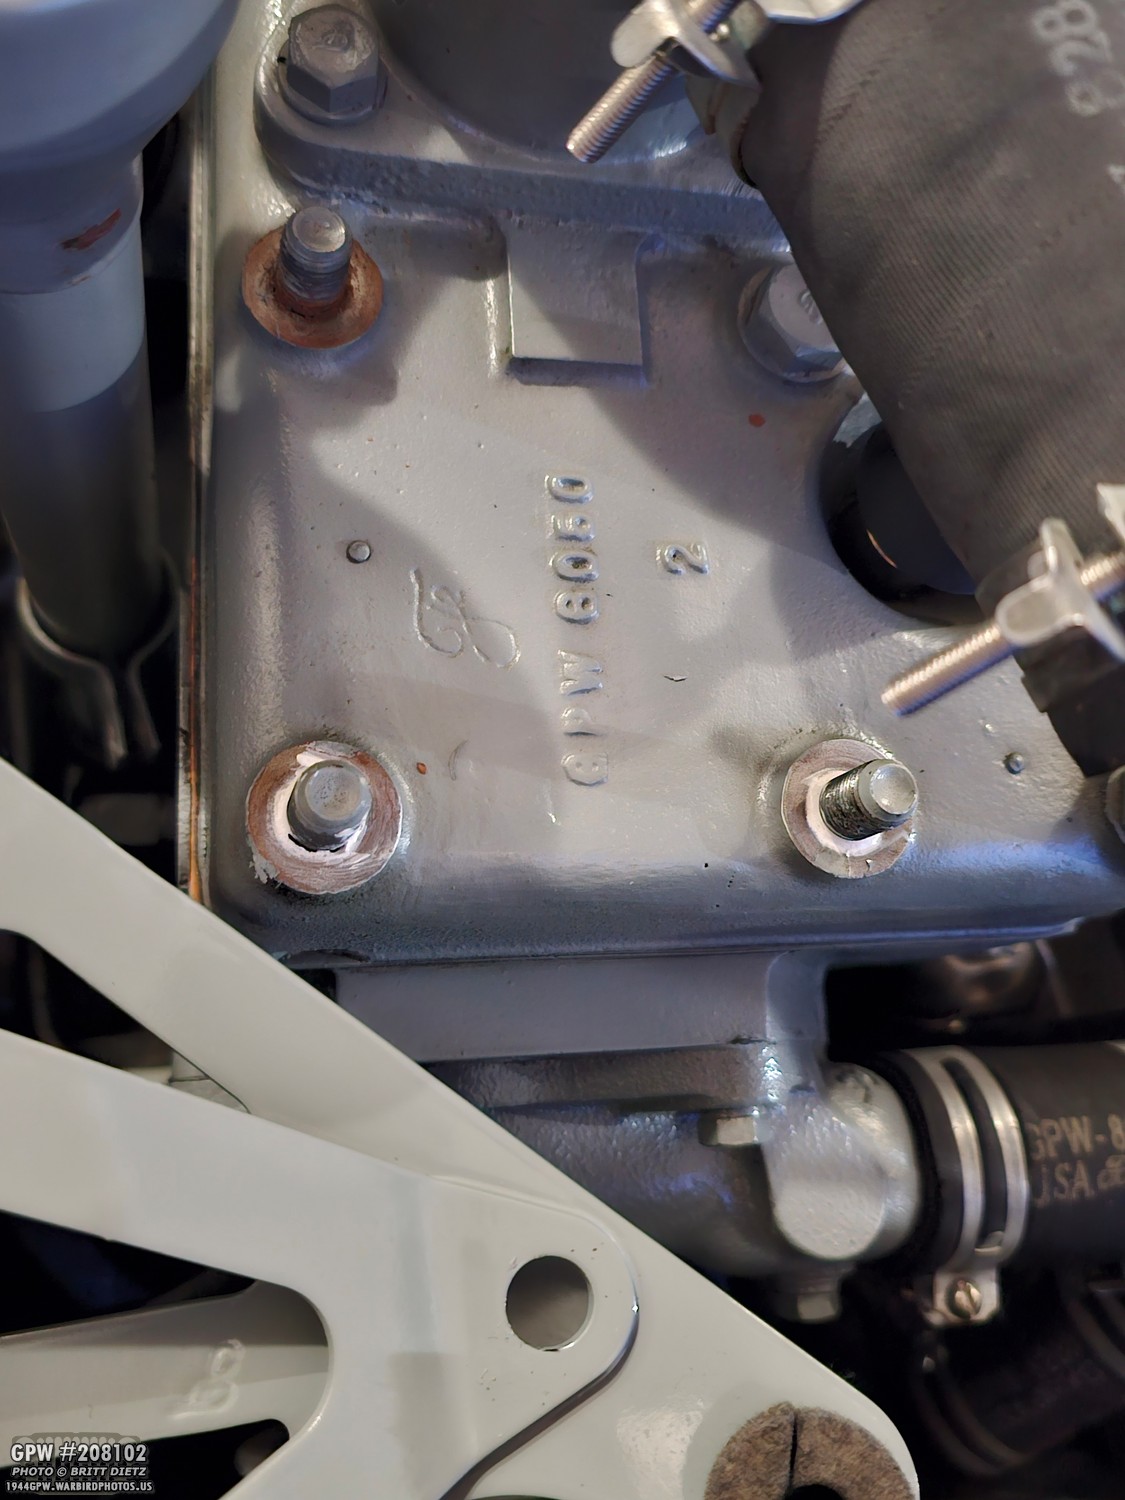
Inspecting the original bracket, I figured out why the bad leaking was occurring. If you look at the underside of the front bolt hole, you’ll see that there’s a circle spot weld indentation RIGHT where the bracket interfaces with the raised flange on the engine head. That means there’s no tight fit there, allowing oil to escape going up the stud. In fact, you can see by the oil pattern that is where the oil is coming out! Thankfully, the new repro bracket doesn’t copy that defect!
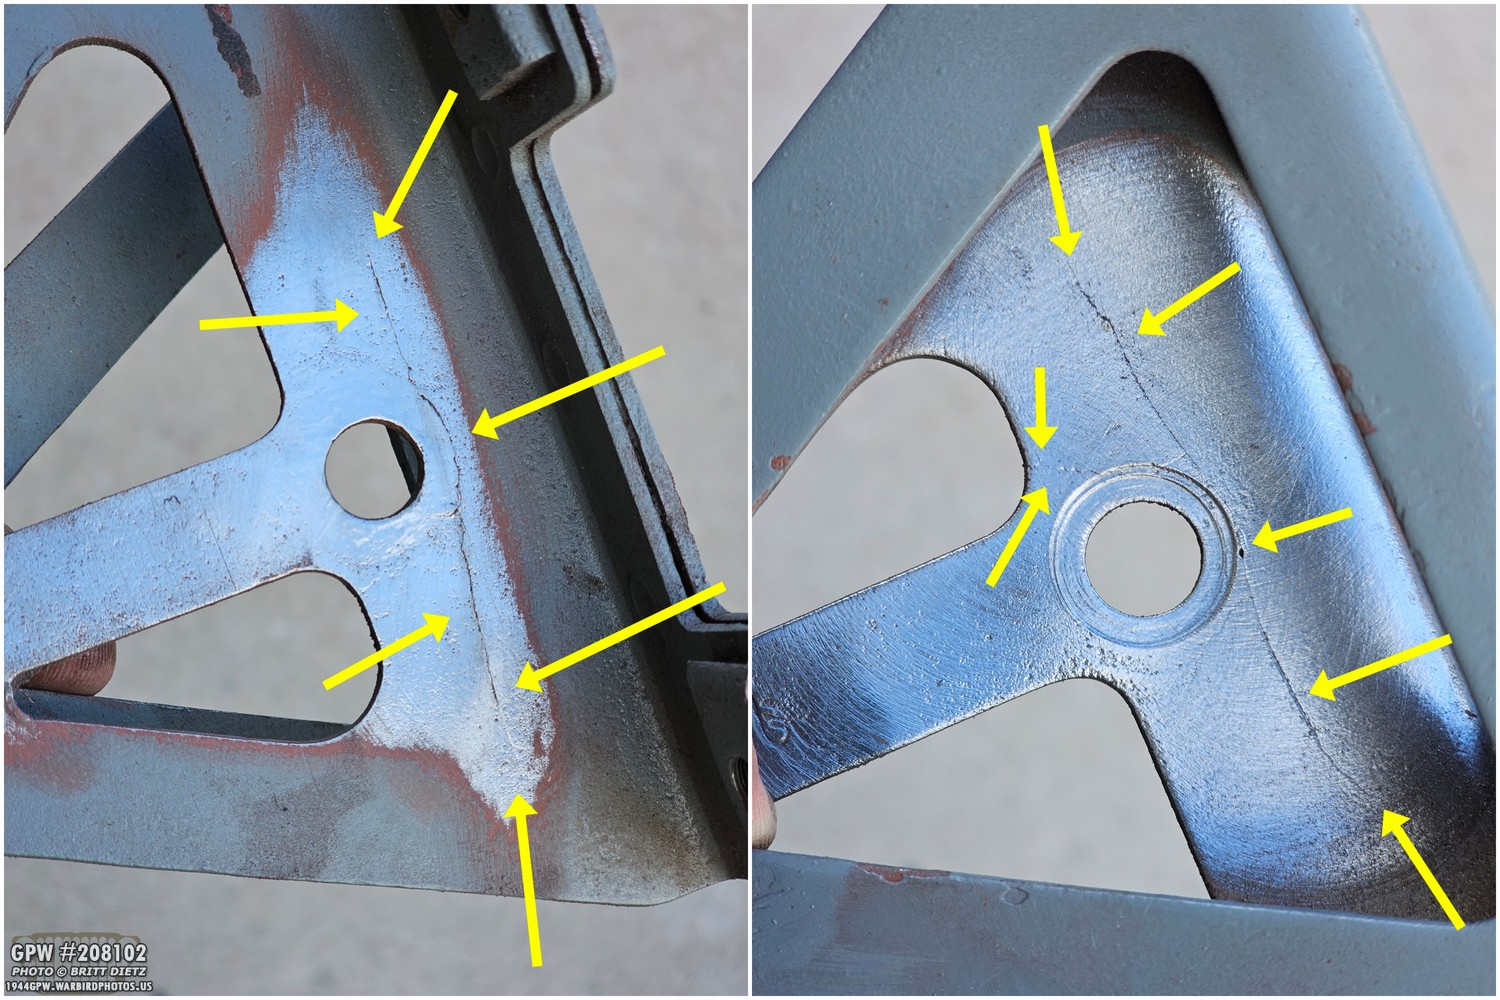
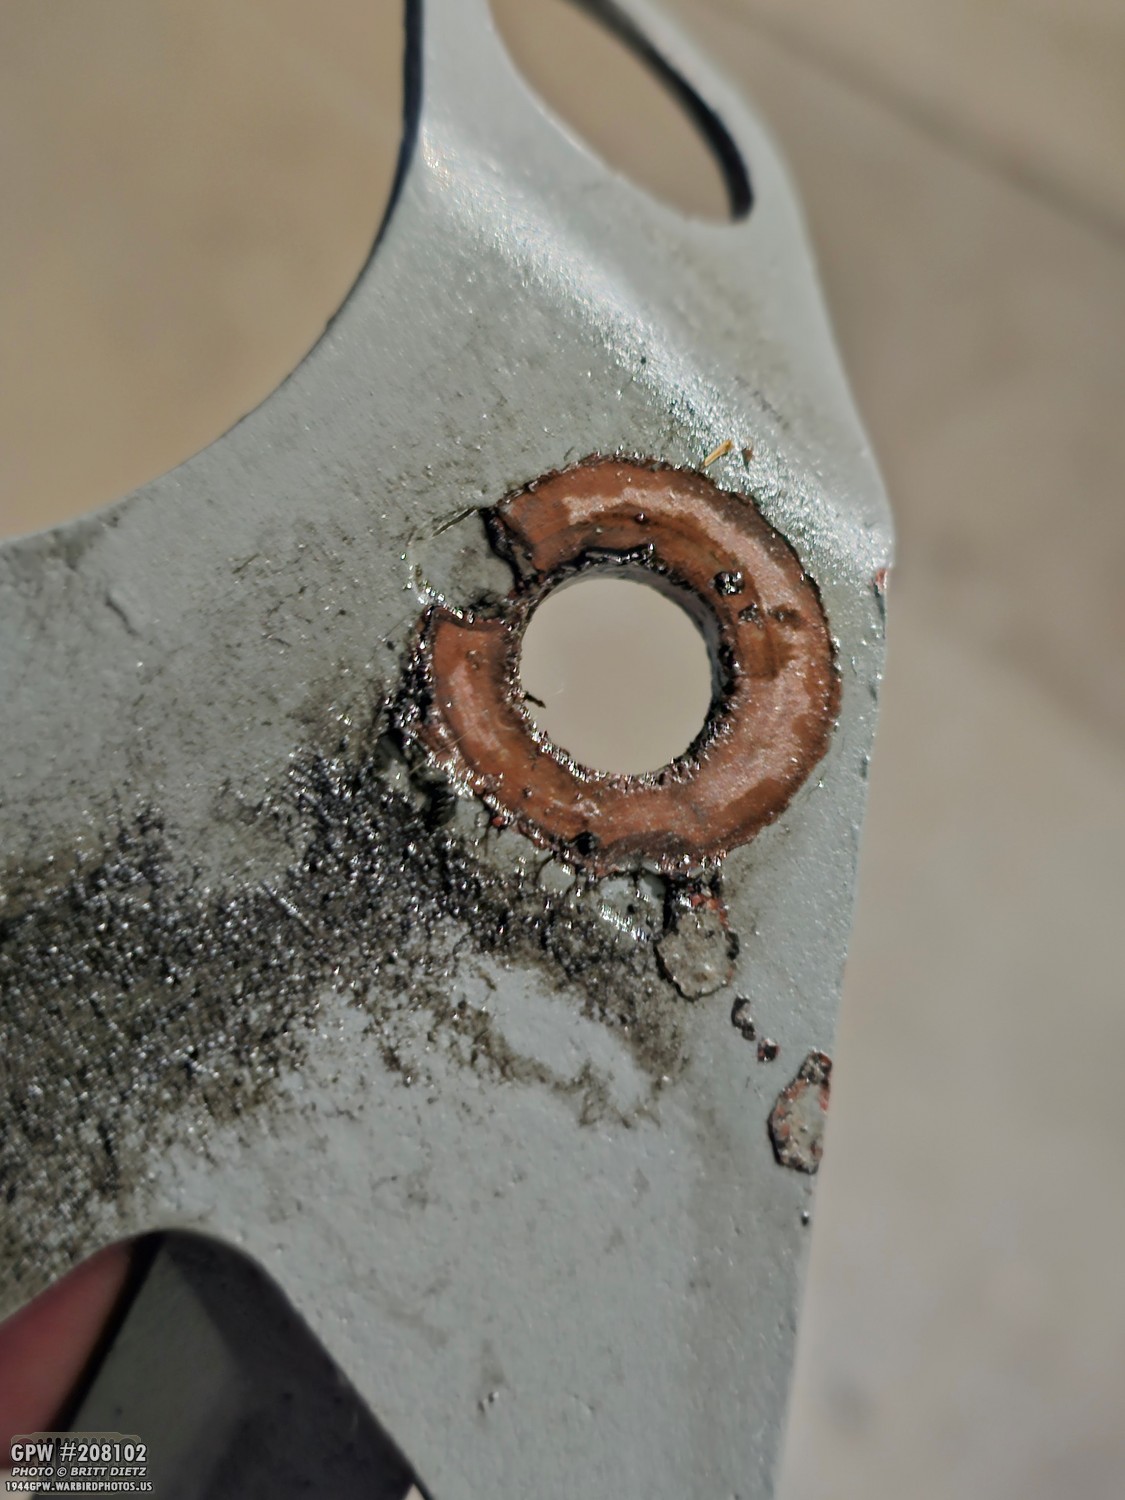
I did a quick cleaning of the original bracket so you can see just how bad the crack had gotten. Not only that, but I noticed a secondary, smaller crack was forming (see right photo). Making things worse was the oil seeping up and through the crack. I could have tried to repair it, but most people I’ve heard that have repaired it have found that they will end up cracking again over time. So I decided the reinforced repro was the better option in this case.
A quick cleaning of the engine head and it’s looking better. That VHT Ford Grey paint is just wonderful. Best spray paint I’ve ever used.
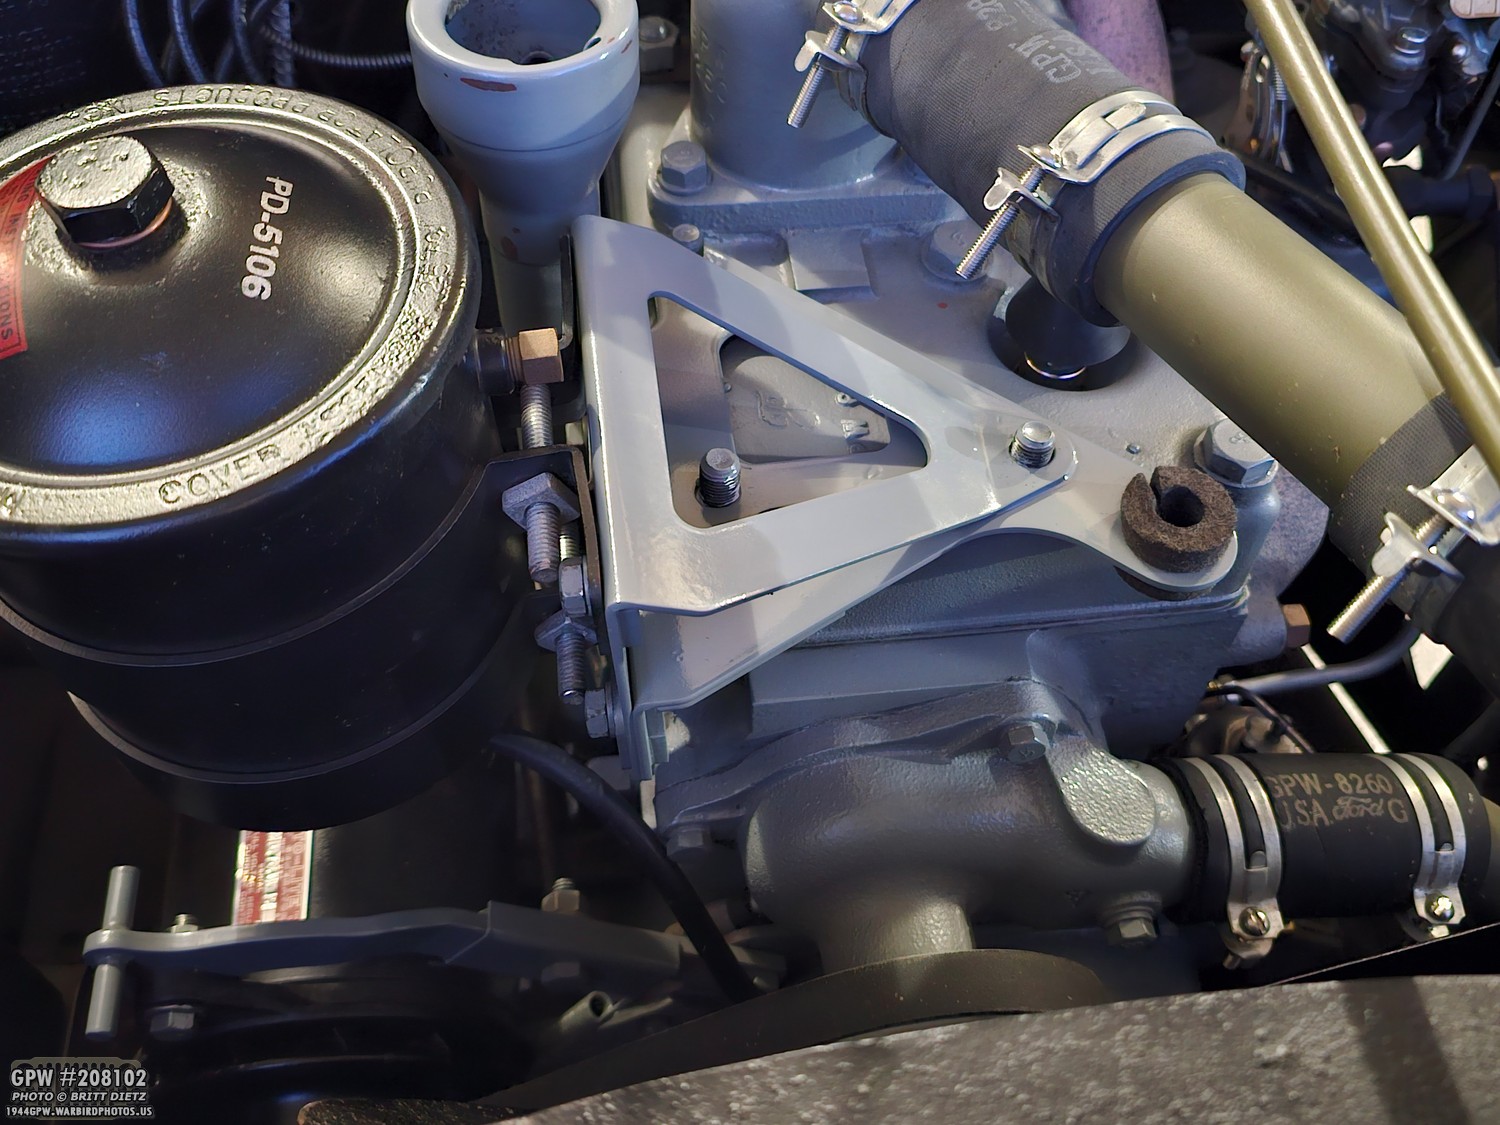
After reattaching the oil filter to the new bracket, I put it on as a test run to make sure that everything lined up correctly. It was a tight fit, but it went on well!
I wasn’t going to take any chances of any more leaks this time, so I used some thread sealer around the base of the two studs where it was leaking to help seal it up.
You can’t see it, but I also put some thread sealer underneath each hole on the bracket where it interfaces with the engine head flanges. I also added some thread sealer to the nut. So, it’s triple sealed! I then did a retorque sequence of the entire engine head (in the correct order you should torque them). Surprisingly, two of the other bolts on the engine head were able to be slightly tightened further.
Once torquing was done, I masked off the rest of the engine and hit the bracket/nuts with the VHT paint to touch up some areas.
One of the reasons I neglected to fix/replace the oil filter bracket is this darn stupid bolt right here. It is not only one of the bolts that holds the oil filter bracket to the engine head, but it also holds the clamp that holds down the dipstick tube. The clamp is thick, and doesn’t want to stay closed. The bolt is just long enough not to reach the threads in the engine head when the clamp is expanded like this, especially with the lock washer. It’s a game of trying to use one finger to compress the clamp while pushing hard with the other hand on the bolt while turning it to try and get it to start catching threads. It took me a good 15 minutes or more to finally get it, and my hands were sore!
Here is a shot as I was waiting for the paint to dry (note the dipstick tube clamp bolt still wasn’t in yet at this point, I was taking a break to let my hands relax a bit!)
I will have to go back and do some paint touch-up on the oil filter brackets and the bolt heads. Easy to do with a small brush.

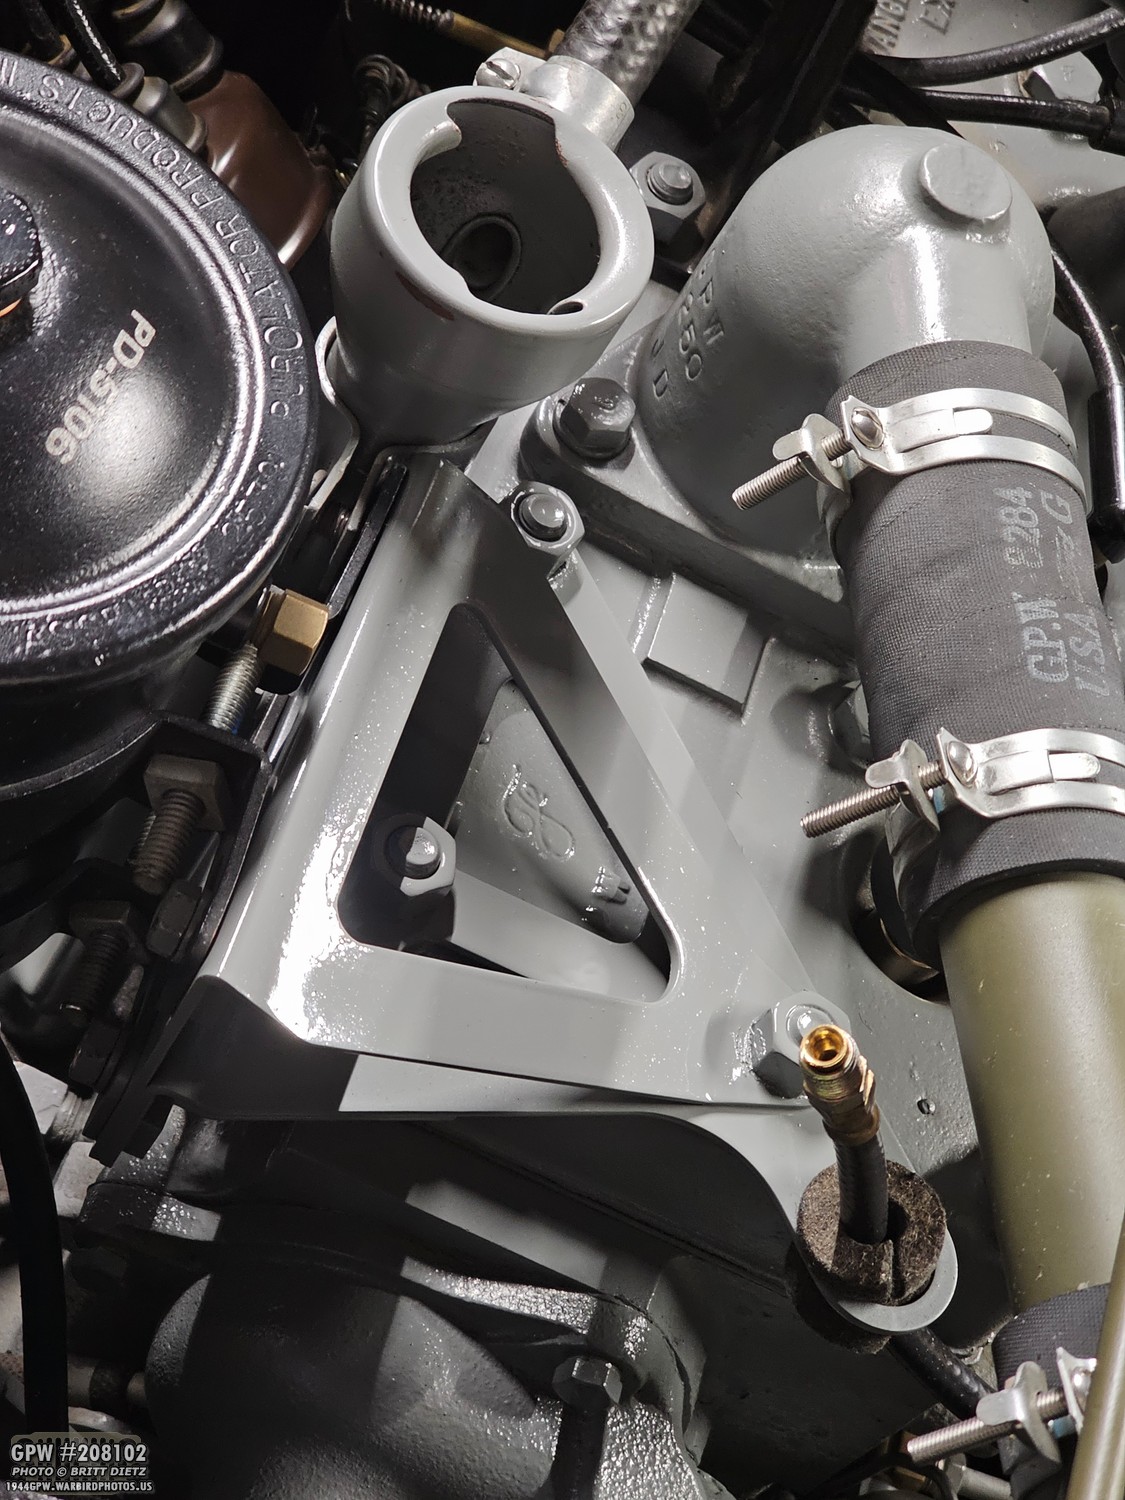
The VHT paint dries SUPER fast. Again, amazing paint. So, I was able to reconnect the oil line. Note, the dipstick tube clamp bolt is still not connected here. But it was great to admire the new bracket with the correct non-bent oil line end, and no cracks!

Here’s a look inside the bracket. You can faintly see the F stamp. Let’s hope there are no cracks that develop again!
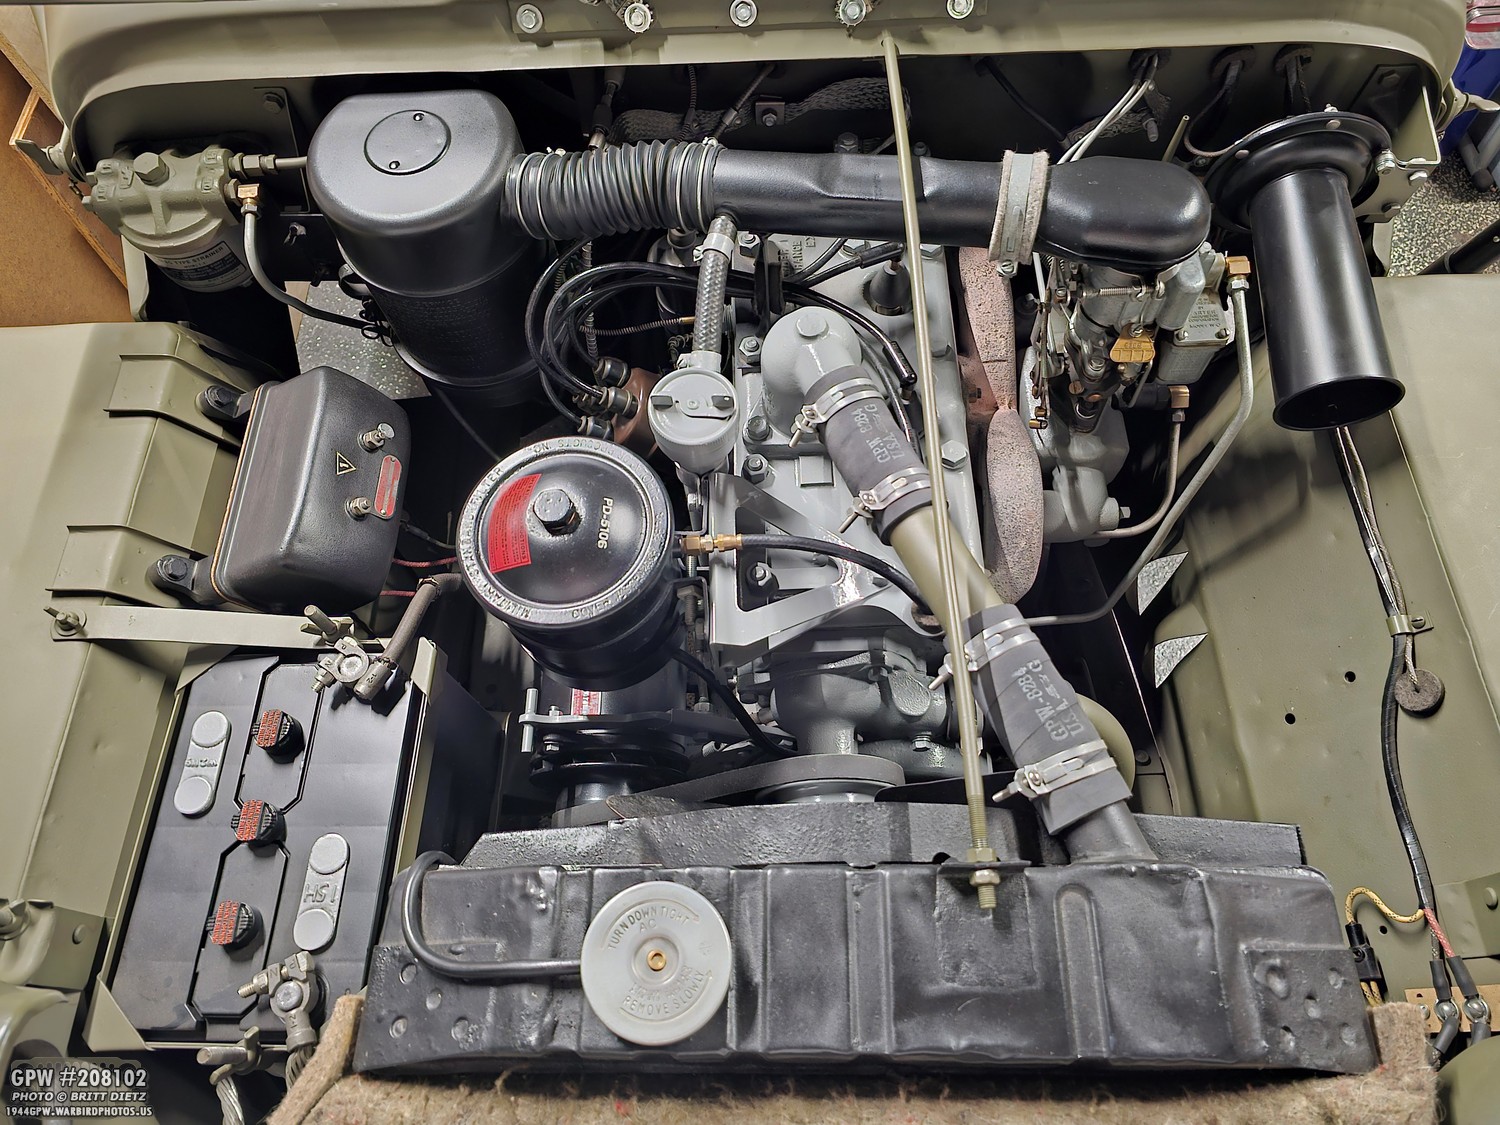
And here’s an overall look at the entire engine bay. FINALLY, that dipstick clamp bolt was fully screwed in and tightened! Another job well done. I hope this also fixed the oil leaks.
After taking the Jeep out for a drive for a few miles in the neighborhood, I opened the hood to check for any leaks. Not a drop of oil around any of the bracket nuts or holes! Time will tell, though, as if it does leak, it might not show right away. But I’m optimistic that I might have fixed this.

That does leave the question of what to do with the original bracket. I’ve thought about cutting out the F stamp and making it into another keychain. Thoughts?
Moving on to some last bits! I got this amazing replica of the original generator tags from Mike Wright, author of the incredible ‘GPW Restoration Standards’ book (a new updated volume to be released soon!). I attached it to my PowerMaster PowerGen alternator, which looks like a generator to give it a further realistic look.
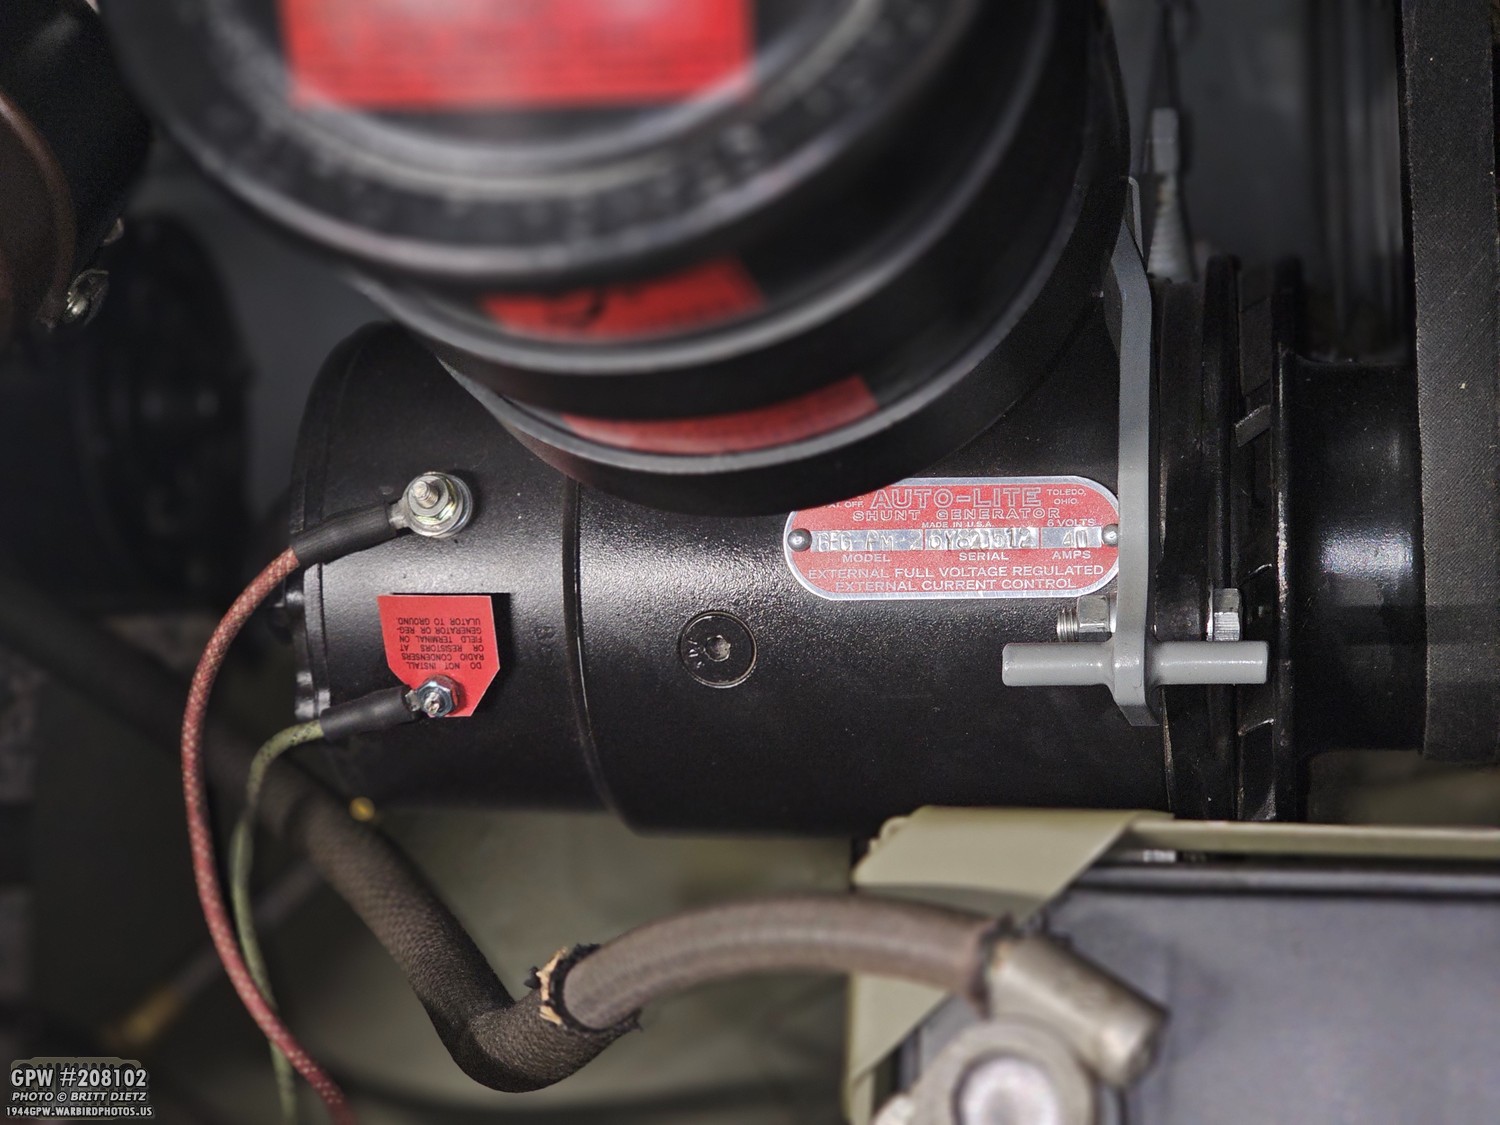
It really looks the part ever more now! Especially with the repro Auto-Lite data tag on it.
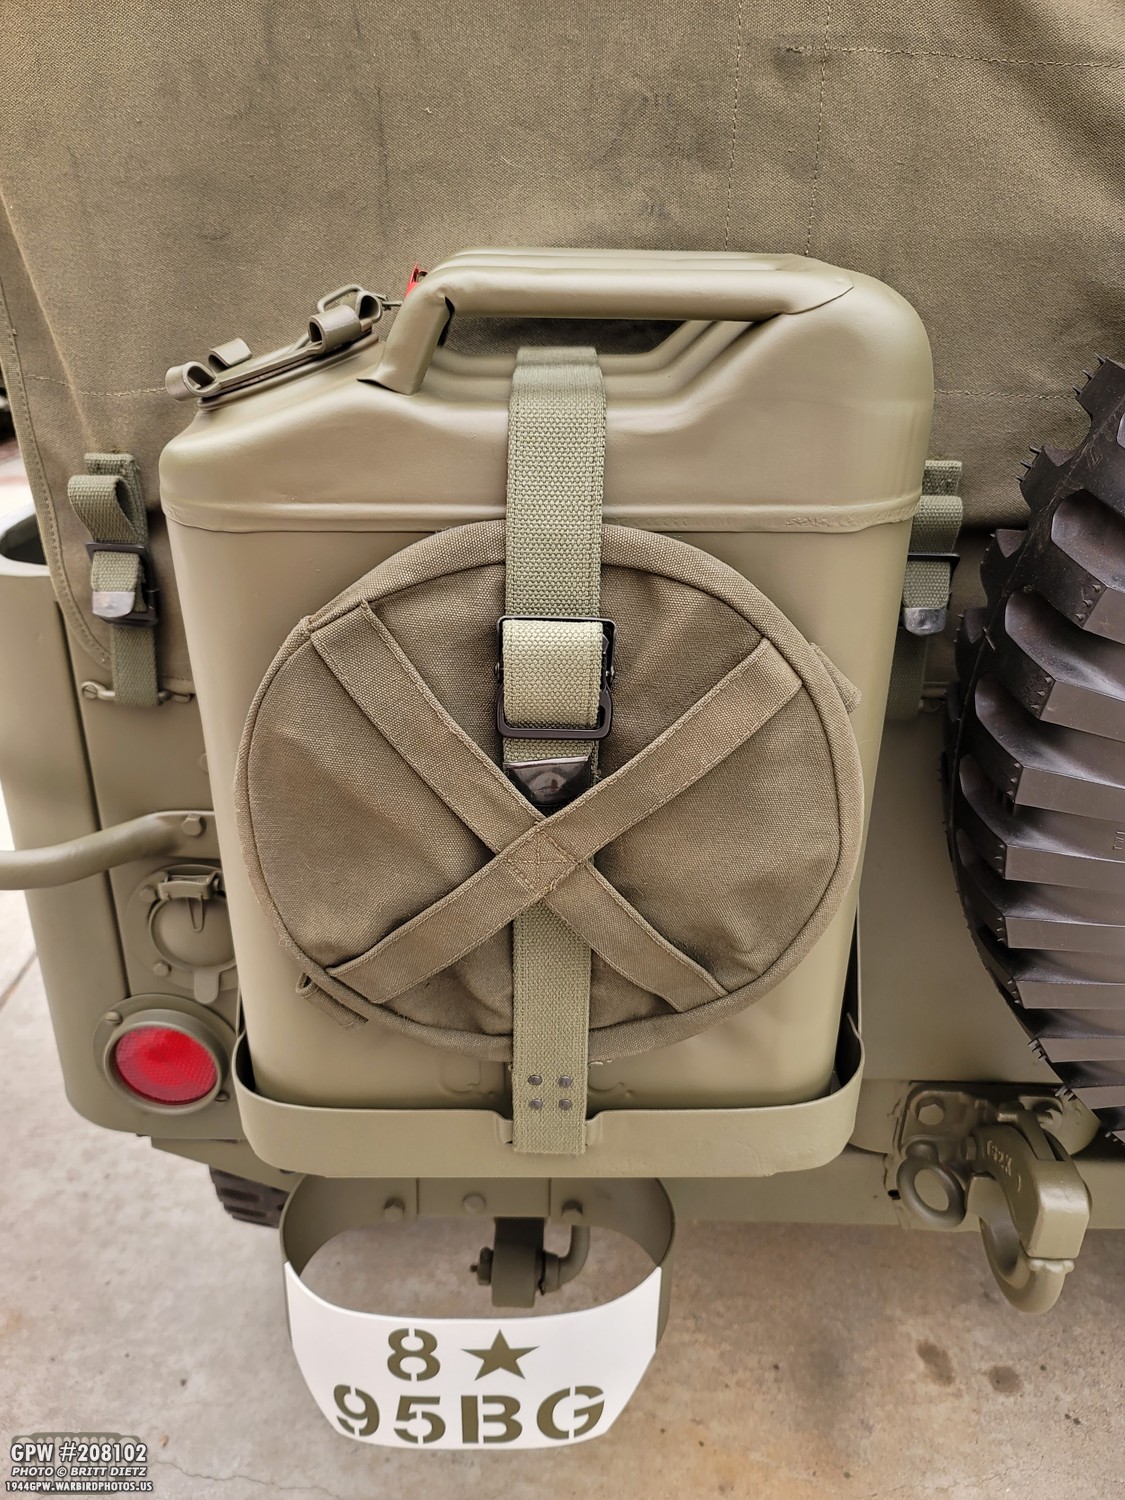
I’ve had this canvas water bucket on the back of my Jeep for years now. It never had any markings on it, and I had dyed it to be a bit more OD Green since it had faded over the years. I knew it was an original WW2 water bucket, but I’ve always said if I find a good deal on a 1944 one, I’d replace this one with the marked one.
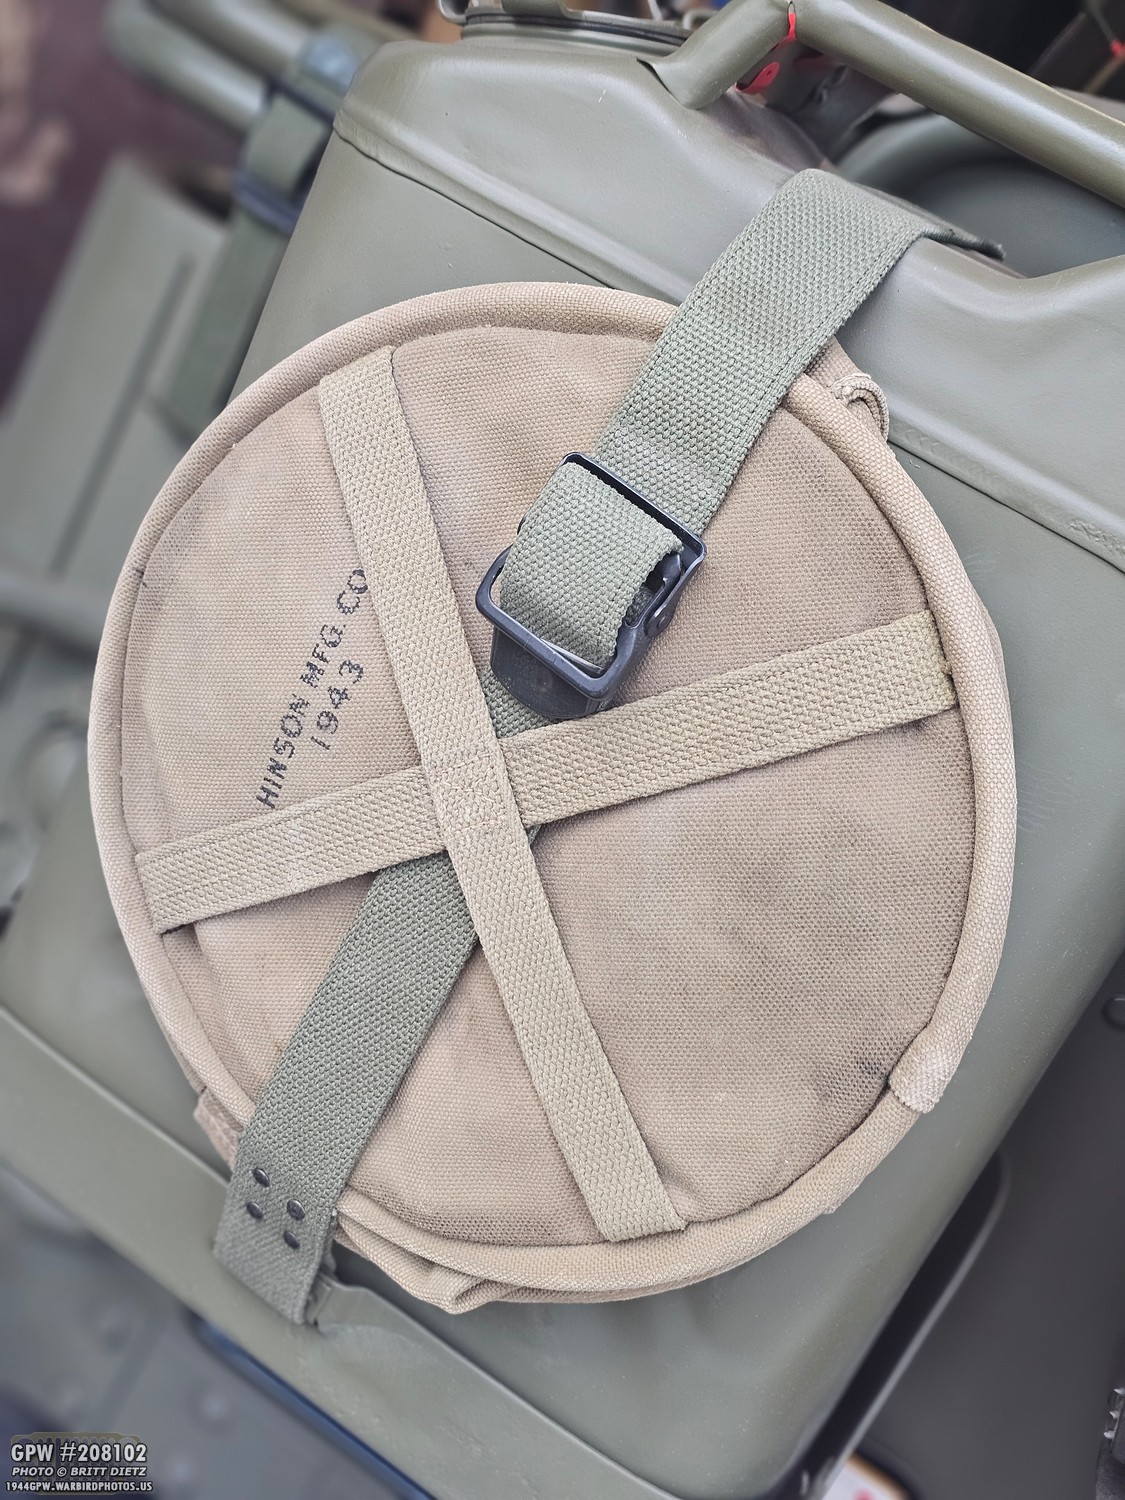
At a recent militaria show in Orange County, CA, I found this 1943-dated canvas water bucket that was in much, much better condition than the one I had. While it’s faded in color, the markings are pristine! And for only $25, it was a great deal and will now be on my Jeep until I can find a perfect 1944 dated one to replace it!
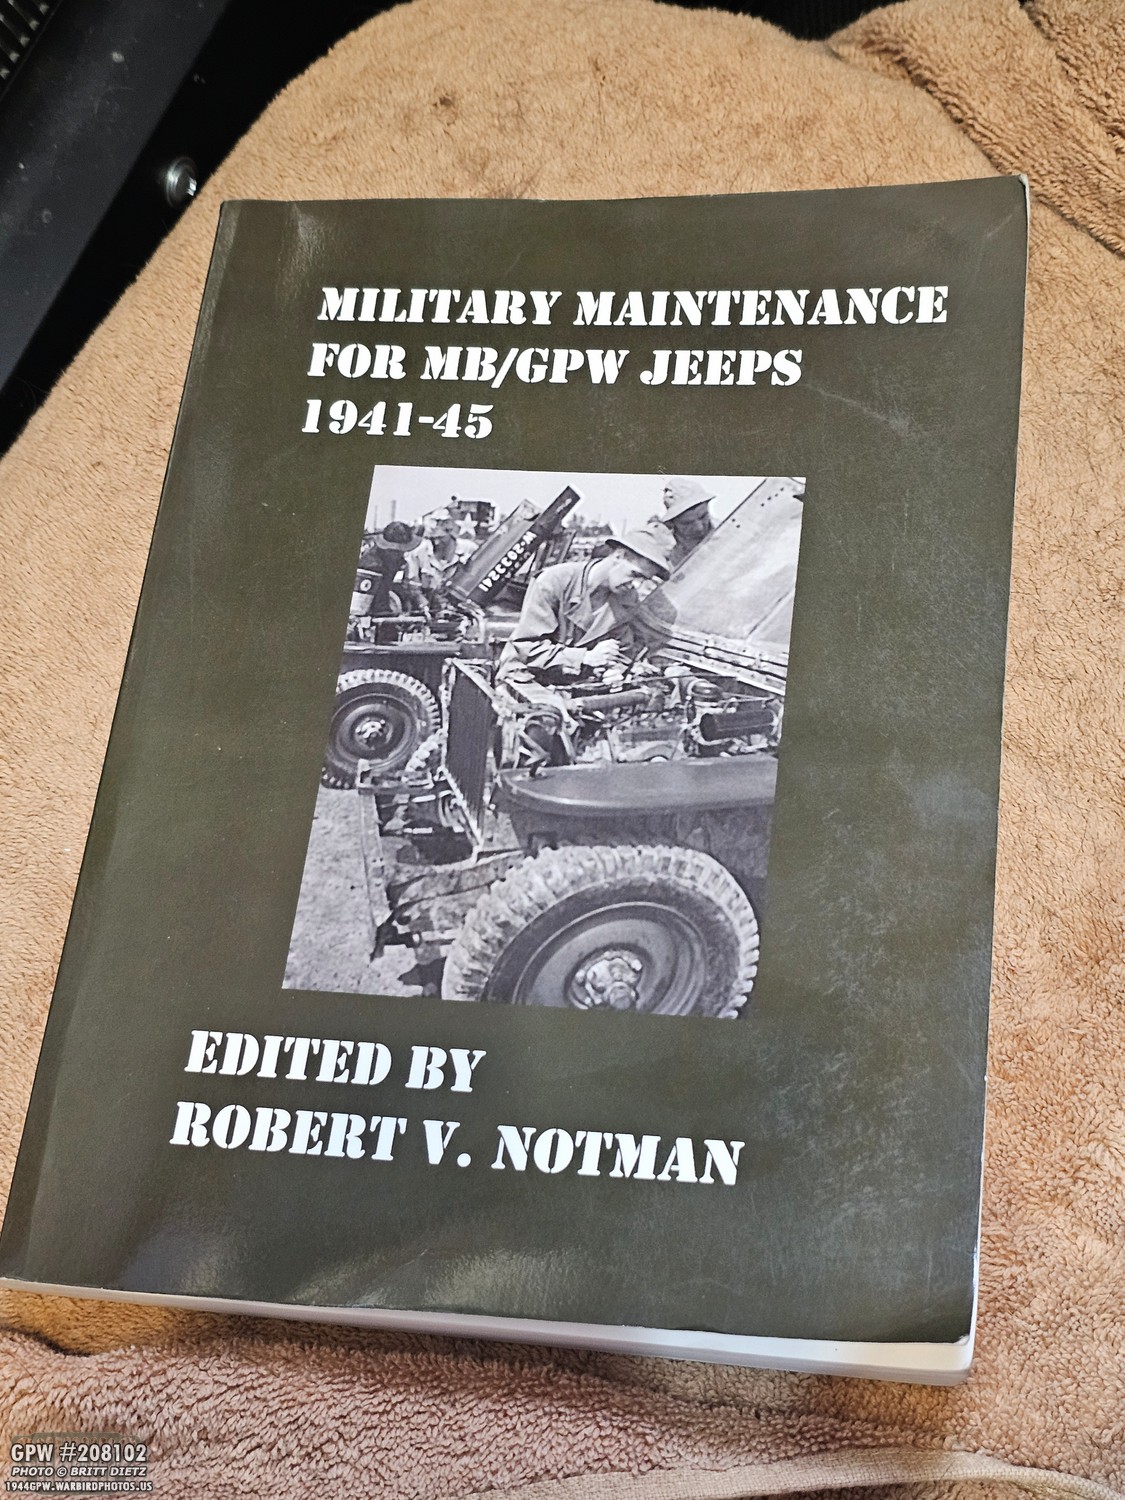
Since I always detail new Jeep books I purchase, I managed to snag this unique book on eBay the other day for a steal of a price. This ‘Military Maintenance for MB/GPW Jeeps 1941-45’ by Robert Notman is an insanely thick book with nearly 400 pages! It’s basically every single article, photo, diagram, story, service bulletin, etc., for anything to do with the wartime Jeep from the Army Motors magazine of World War 2. These magazines were made by the Army for the Army motorpools. Included in this book are also lots of Jeep things from various smaller technical manuals and field notes. I’ve barely scratched the surface of everything inside, but I’m sure I’ll find some really great things!
Getting close to wrapping up this update, and we’re moving on to some future things! Another thing that’s always bothered me on the Jeep is the noisy tappets on the engine. If they weren’t so loud, the engine would actually sound really smooth. Whether the valve tappets are worn or still not perfectly gapped, it’s been another one of those things on my begrudging to-do list.
I have adjusted the valves twice, but the sound persists. So, it makes me believe that the tappet adjusting screws have gotten rounded and need replacing. I ordered a set of NOS original tappet adjusting screws, and I found what appears to be an original valve spring expander tool on eBay. They arrive next week, and I’m very much considering spending the last weekend of April replacing the adjusting screws in an attempt to remove the tapping tappets, so I have a nice smooth engine for upcoming events. That’ll be another big update when it happens!
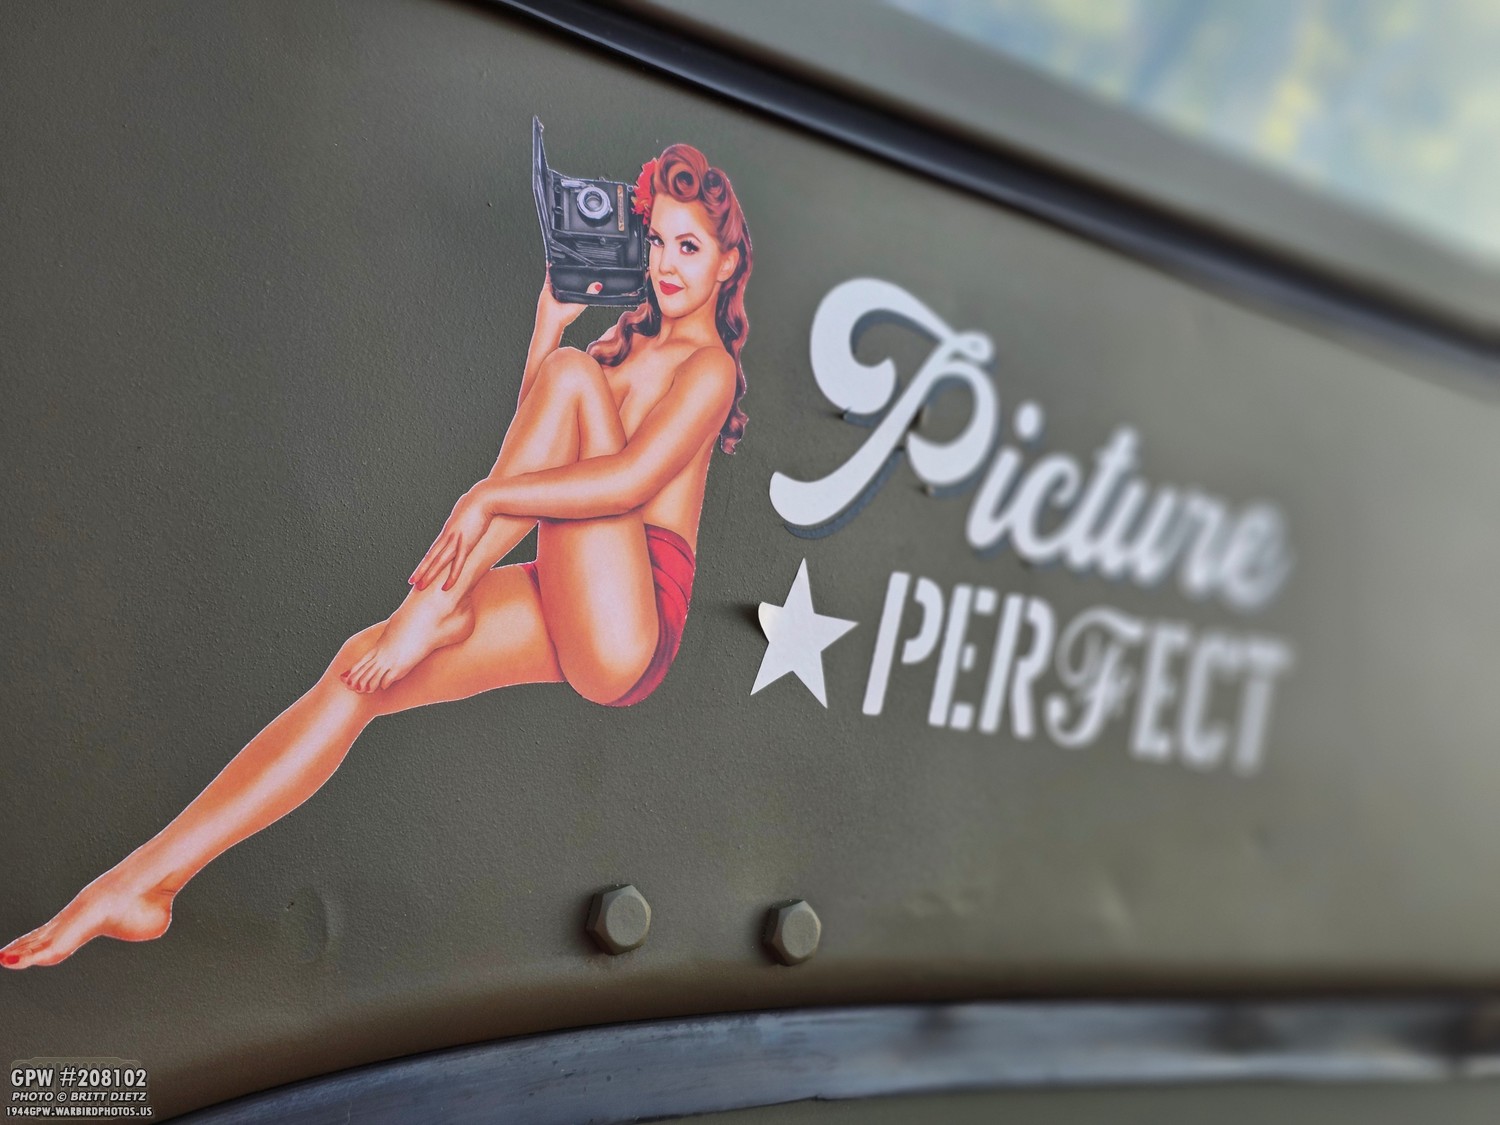
Another project I’ve been working on is brand new ‘windshield art’ for my Jeep. A new pinup gal, and a new font for the ‘Picture Perfect’ name. The vinyl I used is starting to peel up after nearly 6 years (not bad!), and I’ve wanted to change up the pinup gal. That’s the nice thing about doing vinyl for this: you can change it whenever you want! That’ll be another future update.
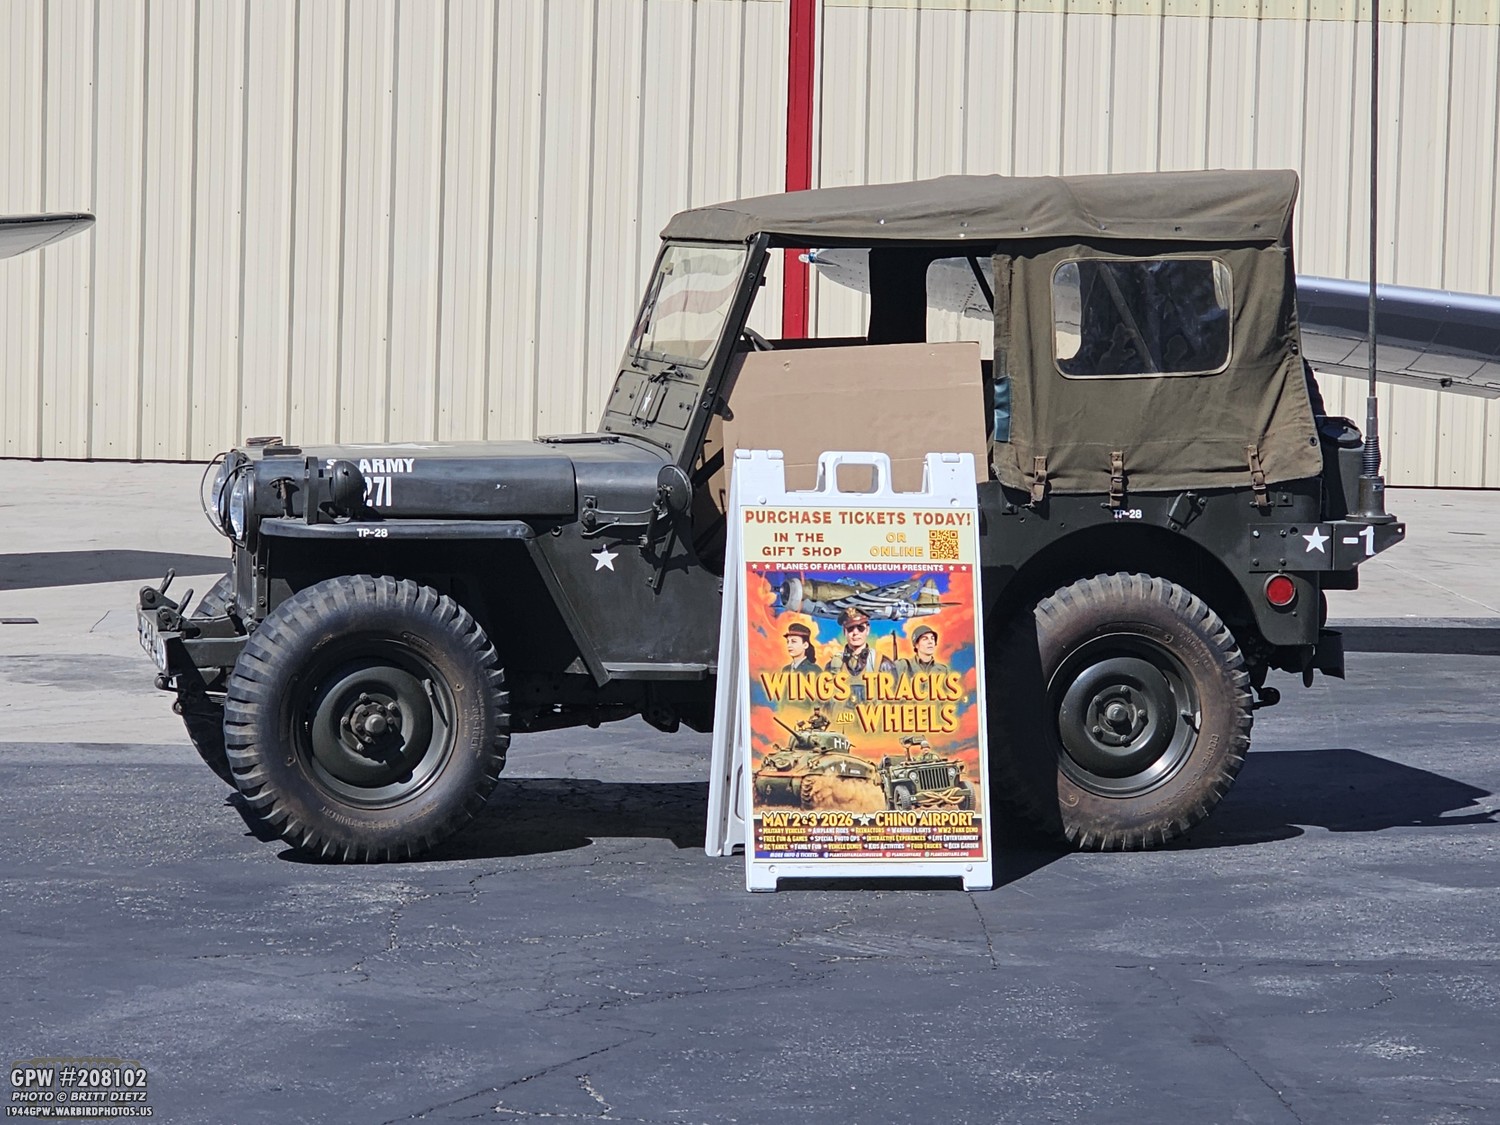
And finally, closing out the update with a promotion for the upcoming Wings, Tracks, and Wheels event at the Planes of Fame Air Museum on May 2-3, 2026! Just 1 week away! My Jeep will be there (this is not my Jeep, but the museum’s M38… which I got to drive the other day!) along with nearly 70 other military vehicles. If you live in Southern California, head on out to the Chino Airport for this largest gathering of reenactors and military vehicles (plus 14 warbirds flying!). We’ve expanded the ‘Jeeps through Time’ demo to feature 11 different Jeep-related vehicles from the Slat Grille to the modern Growler!
Till the next update…
Till the next update…